


DIY Project: Artful Scrap-Wood Bench
Salvage signs, block-printed wood and a secret compartment turn a handmade bench into an interactive work of art

About a month ago I was wandering through my inspiration folder and came across a photo of a wood floor that I've had saved for a few years now. It isn't too frequently that a photo speaks to me for such a length of time, but this one was different. It was a photo of a floor laid out into a quilt of mismatched wood, all of which appeared to be salvaged from various resources. From the moment I saw it, I wanted something similar.
The problem is that flooring isn't very high on my list of priorities right now, as there are a lot of other things that need attention. We have this odd recess in our dining area that has bugged me since we moved in, but I haven't had the spare cash to spend on a solution.
And suddenly it dawned on me. I had all these small pieces of wood scattered throughout my garage and studio that I had no idea what to do with, and I could use them to make a bench resembling the wood floor I was after.
And since the pieces were imperfect, my bench could be imperfect, because let's face it — I am not a woodworker. Low stress, low cost, high impact. Perfect.
When I came up with the idea to make this bench, I couldn't resist the urge to rummage through all the wood I have been collecting over the past few years. Everything from vintage signs and soda crates to personal art pieces that didn't make the cut soon formed a towering stack of multicolored wood on my living room floor.
Like most of the projects I do, my goal was to spend as little money as possible. I was thrilled to find a couple of 2-by-4s in the stash of wood in my basement. I used a circular saw to cut them to size and then screwed them together to make the frame.
I wasn't concerned about how the wood looked because eventually it would be covered anyway. So I laid my random pieces of plywood down underneath the frame and traced along the outer edge with a pencil, indicating where to cut. I found this easier than measuring since I was using multiple pieces of plywood. When everything was cut, I secured the wood with nails.
Once the frame was built, I started laying out the scraps of wood to get an idea of how much more I would need. I decided to form long, straight lines rather than randomly fitting pieces together, which seemed to work out pretty well.
Taking a break from the fun part, it was time to cut the legs. I used 4-by-4s that I cut with a circular saw to about 18 inches in length, then screwed them to the frame.
You can see that there is an opening without any plywood, which I later turned into a secret compartment. Nothing is complete without an added element of fun.
You can see that there is an opening without any plywood, which I later turned into a secret compartment. Nothing is complete without an added element of fun.
Here's a photo after I added the legs one late night in my basement. As you can see, I kept all the pieces lined up on the floor to make it easier to reassemble. Once it was time to start attaching the pieces to the frame, I used black finishing nails to keep everything in place.
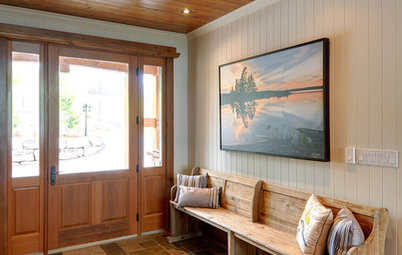
Here's a close-up of the top after things were secured. I was happy to use up a lot of old art pieces that I've had laying around, although I didn't have quite enough wood ready to go. So I got to pull out my paint and block-printing supplies during construction. The Suffolk Sheep sign came from an auction, and the Celo piece came from an old soda crate. The rest of the wood pieces in this view are my own creations.
Here's another view of the top. I used black and white spray paint along with a lettering stencil on a lot of the pieces to add visual interest and to help everything feel more cohesive.
I finished the edge of the frame with vintage yardsticks. Some of them I had on hand, and some were given to me by a friend. My favorite is this blue one.
Here is the compartment I made. I thought it made a good home for all the small toys I've collected over the years.
I also kept a few pieces of wood unattached so they can be lifted off the top. Underneath the pieces are funny comics and photos.
I also kept a few pieces of wood unattached so they can be lifted off the top. Underneath the pieces are funny comics and photos.
And it's finished! Here's the completed bench snuggled into its new home. I haven't decided what color I want to paint the legs yet, so for now I am just going to leave them as is. I'm guessing they'll probably end up being a vibrant shade of blue or yellow, but I'll most likely change my mind again before I buy the next round of paint.
Tell us: What projects have you been working on? Share your photos and ideas below!
More of Erin's DIYs:
Stacked-Stone Fire Pit
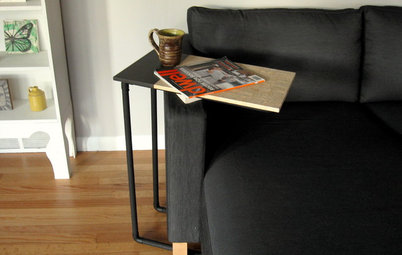
Side Table With Novel Twist
Block-Printed Coat Hook
Tell us: What projects have you been working on? Share your photos and ideas below!
More of Erin's DIYs:
Stacked-Stone Fire Pit
Side Table With Novel Twist
Block-Printed Coat Hook


This thing is megaheavy, like 64 pounds heavy, and hauling it across the basement, around four corners and up the stairs was a huge victory for me, but I was determined to have it nestled in its new space before my husband got home. So if you make something like this, plan to conquer a similar task.
The measurements are about 82 inches long, 22 inches deep and 19 inches high. I used materials I had on hand for the entire thing, with the exception of one 4-by-4 and one 2-by-4.