


How to Install a Toilet in an Hour
Putting a new commode in a bathroom or powder room yourself saves plumber fees, and it's less scary than you might expect

Many homeowners are intimidated by DIY plumbing projects. But if it’s time to replace your toilet, or you’re adding one to a new room, you won’t have anything to fear if you follow a few simple steps. Mike Hardy, a master plumber in Roswell, Georgia, was gracious enough to let me photograph him while he replaced a toilet recently, and he shared a few secrets that can make the job a snap.
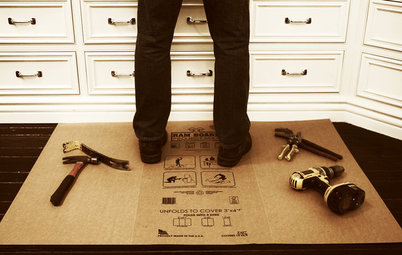
Materials
- Toilet with tank and seat
- Nut driver (optional, but it makes life easier)
- Phillips head screwdriver
- Flathead screwdriver
- Crescent wrench (or ratchet set)
- Channel lock pliers
- Wax ring with bolts included
- Bathroom/kitchen caulking
- Braided toilet connector (most toilets and cutoff valves require a 3/8- by 7/8-inch connector)
- Spare coins (cheaper than toilet shims)
1. Remove the old toilet, bolts and washers. A flathead screwdriver works well. You do not want to get the wax and any trapped mess on your skin. There may also be a bit of sewer gas that can escape if the P-trap is dried out. You can alleviate this by pushing a rag into the opening — just make sure you remember to remove it afterward!
2. Install the new wax ring and bolts. Buy a wax ring that comes with bolts, even though it costs a few more dollars more than one without. When you install the ring and bolts, make sure the bolts are set inside the channels and lined up to fit the bowl.
3. Lift up the bowl and push it onto the wax ring. Make sure the bolts are lined up to fit in the holes at the base of the toilet. Supply ample pressure to make the base sit on the tile. This will create a watertight connection. And yes, this picture has been cropped.
4. Install the nut and washer on each bolt. Mike Hardy chooses to leave off the plastic fastener that holds the decorative cover in place, because he has found that the toilet tends to loosen over time. He likes to have the washer directly contact the porcelain. Make sure you do not overtighten the bolts and crack the porcelain.
5. Install the plastic covers. Hardy uses a small dab of caulking to hold these in place in lieu of the plastic snap.
Tip: Here is some good info about installing or replacing a toilet that the plumbing handbook will not tell you: Most floors are slightly uneven, and this will cause the toilet to rock. For the price of a stick of gum you can level the base and avoid this fate.
6. Level the toilet. Using the flathead screwdriver, lift up the toilet slightly. Slide a coin or coins into the void to level the toilet. This will avoid a rocking toilet, which will lead to a loose toilet, which will eventually lead to a leaking toilet. You may also purchase toilet shims, but Hardy finds their sizes to be limited.
7. Install the toilet tank. You can also do this before you set the toilet, and it will be easier to tighten the bolts. The downside is that it makes the toilet heavier and slightly harder to set into the wax ring.
8. Install the bolts through the tank and tighten the nuts. Hardy is using a nut driver in this picture. Take care not to overtighten the nuts.
The rear nut on this one proved hard to tighten, so Hardy broke out his crescent wrench. You can avoid this by installing the tank before you set the toilet.
9. Install the braided hose connector. Connect one end to the cutoff valve in the wall and the other end to the tank. Most cutoff valves are 3/8 inch at the cutoff valve, and the tank connection is 7/8 inch. Roughly measure the length before buying the braided hose.
10. Install the toilet seat. Hand tighten the screw and bolt. If you can, buy the seat and toilet as a kit. Sometimes it can prove challenging to buy a seat that will match a specific bowl. We recommend using a plastic seat for sanitary reasons, and a self-closing one to avoid waking up your spouse at 3 a.m.
11. Slide the plastic trims over the screws.
Tip: Kohler has a really cool feature that very few people are aware of. When you want to clean the toilet bowl, remove the plastic covers shown in the previous photo, and the seat will slide away for easy cleaning.
Raise your hand if you have little kids and are excited by this.
Raise your hand if you have little kids and are excited by this.
12. Seal the joint between the toilet and the tile. This follows building codes and keeps gunk from collecting under the toilet.
13. Turn on the water at the cutoff valve. Hold your breath! Please watch the toilet and all connections to check for leaks. You can also monitor the length of time it takes the toilet to fill with water. Check to see if the toilet "runs," meaning it refills the tank even if it has not been flushed.
Hardy and his pièce de résistance.
An alternate view of the installed toilet if you don't want the plumber in it.


Skill level: Moderate
Time: 1 hour
Cost: Toilets range from $125 to $500 on average; materials for installation run about $15.