


Search results for "Hidden small appliances" in Home Design Ideas
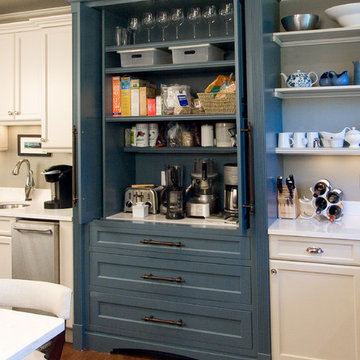
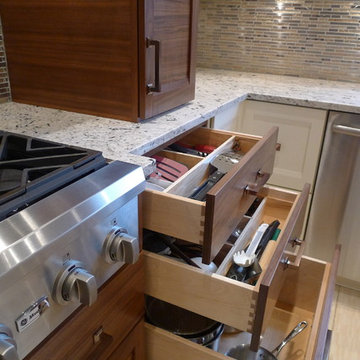
Cereal boxes, pasta, small appliances, all can be tucked away, but still easily accessible.
Photo by Bill Cartledge
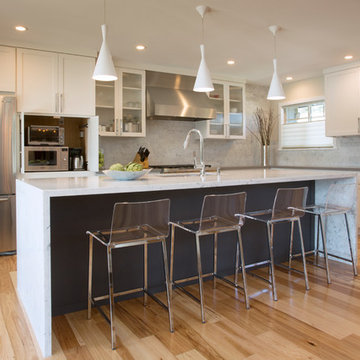
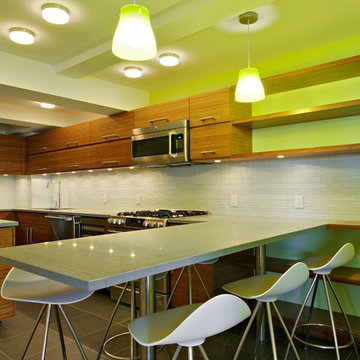
Example of a large classic u-shaped medium tone wood floor and brown floor open concept kitchen design in Philadelphia with an undermount sink, recessed-panel cabinets, white cabinets, solid surface countertops, multicolored backsplash, wood backsplash, stainless steel appliances, an island and white countertops
Example of a large classic u-shaped medium tone wood floor and brown floor open concept kitchen design in Philadelphia with an undermount sink, recessed-panel cabinets, white cabinets, solid surface countertops, multicolored backsplash, wood backsplash, stainless steel appliances, an island and white countertops

Find the right local pro for your project

Ready to start a family, the owners began this project with the hope of correcting problems from previous renovations, while looking to gain an open kitchen, upstairs bedrooms and a carport with storage.
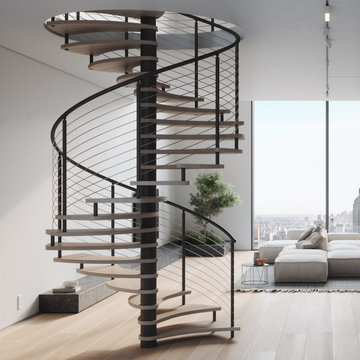
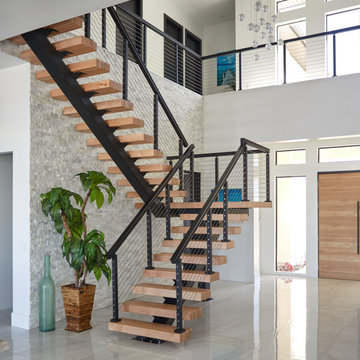
The recipe for fixing low ceilings and a dead-end kitchen, low ceilings was a two-story addition to the rear that features a double-height ceiling, great room, open staircase and a small mudroom at the back.
Interior finishes were selected to compliment the home’s original feel while exterior elements like cedar shingles, brackets and a tall window wall create an inviting facade for the family’s entrance and connects the interior with views to the backyard.
Photo credit: Joe Purvis
Example of a trendy kitchen design in New York with flat-panel cabinets, gray cabinets, beige backsplash, stone slab backsplash and stainless steel appliances

We designed this kitchen using Plain & Fancy custom cabinetry with natural walnut and white pain finishes. The extra large island includes the sink and marble countertops. The matching marble backsplash features hidden spice shelves behind a mobile layer of solid marble. The cabinet style and molding details were selected to feel true to a traditional home in Greenwich, CT. In the adjacent living room, the built-in white cabinetry showcases matching walnut backs to tie in with the kitchen. The pantry encompasses space for a bar and small desk area. The light blue laundry room has a magnetized hanger for hang-drying clothes and a folding station. Downstairs, the bar kitchen is designed in blue Ultracraft cabinetry and creates a space for drinks and entertaining by the pool table. This was a full-house project that touched on all aspects of the ways the homeowners live in the space.
Inspiration for a small timeless galley porcelain tile enclosed kitchen remodel in Portland with shaker cabinets, white cabinets, quartz countertops, white backsplash, ceramic backsplash, stainless steel appliances and no island
TOC design
When it comes to kitchens, we understand that they are the greatest investment in your home.
But what if you could have what you want without breaking the bank.
This kitchen is a great example of just that.
Here are a few tips
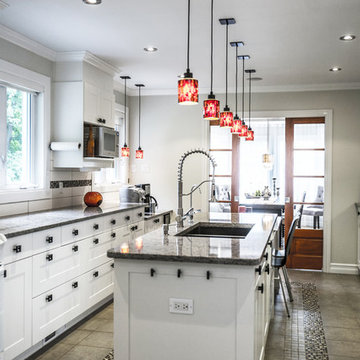
If the existing layout is good, just reface the cabinet doors, don’t forget the sides. I like to keep a kitchen white, I find that by painting walls and adding colorful accessories can make a kitchen appear bigger, and if you ever get tired of the wall color, it is a lot less expensive to paint.
If going with an all white kitchen I highly recommend to lacquer or polyurethane the cabinet doors, by professionals, don’t just get a gallon of paint and DIY it, it won’t last. Don’t go with pure white, Unless you like the clinical look. My favorite color for kitchens is CC-10 by Benjamin Moor.
If your existing cabinets don’t go to the ceiling, I highly recommend to add the same color panels above and finish it with a crown molding, this will bring height and richness to your kitchen.
Lighting is the Key ingredient, to making things POP. High light your back splash, add accent lighting or decorative fixtures, If possible change your existing Halogen light bulbs to LED. All that yellowish light you once had will be pure white, this enhances the true color of your element, just remember that when choosing your materials, you should look at under the same type of lighting.
Don’t forget the details, add light valance throughout , this will finish off the look of your cabinets, choose a really pretty door handle, this is like the perfect accessory to that little black dress, choose a simple back splash tile, you can never go wrong with a subway tile, just jazz it up with a mosaic, this will give you the ”bling”, Yes the mosaic tile is an expensive feature, but in this kitchen I only need 2 tiles for the full kitchen.
I know I said that the lighting is the most important element, but in today’s resale value, most people really want hard surface counters, it can be granite or quartz, depending on brand, style or make, prices can vary quite a bit, So I would highly recommend your choose this material first, and then the tiles and paint colors. This brings us to a must, feature that new counter with an under mount sink and please change the faucet and add a soap pump, they are so practical, I know an extra expense, but these are items you can buy on sale before the renos
In this kitchen I got lucky the flooring tile was neutral and would work with our new concept, I just tweak it by removing the existing border tile that was surrounding the kitchen island, and adding the same mosaic tile I used for the back splash, again this was more cost effective that changing the whole floor.
Appliances are the 2ed most important part of your kitchens, so this is when you must decide if it is worth the investment, In this kitchen we decided to stay with the existing appliances as they were only 3 years old, we did however remove the existing hood – fan and replaced it with a concealed fan. People are always asking “where is the fan?” yes it is true we lost storage in this area, as the doors conceal the hidden fan, but it was the perfect space to add a chalk board for notes or list. Just open the doors.
I also added a few custom elements to bring a contractors kitchen into a custom kitchen, without braking the bank, details like a shaker skirt behind the island instead of a flat panel, extra cabinet at the coffee station with posts instead of fillers, a new mini wine fridge, and moldings behind island instead of a toe kick. I also added an open niche box instead of a cabinet above the fridge with a mini recessed light to high light clients art .
Finally have fun with your accessories, just don’t overdo it, a few key pieces are all you need, get rid of the clutter on your counters.
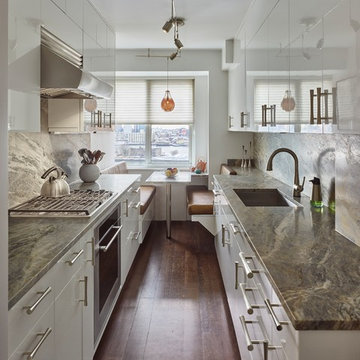
The existing 90 square foot galley kitchen was small and narrow, with limited storage and counterspace. By utilizing the hallway and master closet opposite, we expanded the kitchen across the hall, creating a 5’-6”x 2’-0”x 7’-0” niche for the Subzero refrigerator and under counter wine storage unit. The existing kitchen doorway was widened to unify the two spaces. Separating the tall elements from the original galley, the new design was able to provide uninterrupted counterspace and extra storage. Because of its proximity to the living area, the niche is also able to serve a dual role as an easily accessible bar with glass storage above when the client is entertaining.
Modern, high-gloss cabinetry was extended to the ceiling, replacing the existing traditional millwork and capitalizing on previously unused space. An existing breakfast nook with a view of the East River, which had been one of the client’s favorite features, was awkwardly placed and provided for tight and uncomfortable seating. We rebuilt the banquettes, pushing them back for easier access and incorporating hidden storage compartments into the seats.

New Construction-
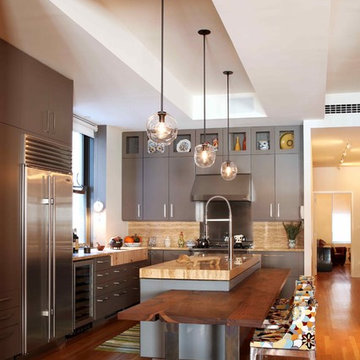
The big challenge of this kitchen was the lack of wall cabinet space due to the large number of windows, and the client’s desire to have furniture in the kitchen . The view over a private lake is worth the trade, but finding a place to put dishes and glasses became problematic. The house was designed by Architect, Jack Jenkins and he allowed for a walk in pantry around the corner that accommodates smaller countertop appliances, food and a second refrigerator. Back at the Kitchen, Dishes & glasses were placed in drawers that were customized to accommodate taller tumblers. Base cabinets included rollout drawers to maximize the storage. The bookcase acts as a mini-drop off for keys on the way out the door. A second oven was placed on the island, so the microwave could be placed higher than countertop level on one of the only walls in the kitchen. Wall space was exclusively dedicated to appliances. The furniture pcs in the kitchen was selected and designed into the plan with dish storage in mind, but feels spontaneous in this casual and warm space.
Homeowners have grown children, who are often home. Their extended family is very large family. Father’s Day they had a small gathering of 24 people, so the kitchen was the heart of activity. The house has a very restful feel and casually entertain often.Multiple work zones for multiple people. Plenty of space to lay out buffet style meals for large gatherings.Sconces at window, slat board walls, brick tile backsplash,
Bathroom Vanity, Mudroom, & Kitchen Space designed by Tara Hutchens CKB, CBD (Designer at Splash Kitchens & Baths) Finishes and Styling by Cathy Winslow (owner of Splash Kitchens & Baths) Photos by Tom Harper.
After six years of living in their Huntley IL home, Chris and Meghan were tired of their dark, dingy, outdated kitchen and it was finally time for a long-anticipated change. “The kitchen is the place where we live, it’s where we do everything,” Meghan said. “It was important that it be a space where we wanted to be.” Meghan loves cooking and enjoys including their girls in healthy meal prepping, this led them to want a brighter, more enjoyable kitchen with increased functionality and improved storage.
For Chris especially, the laundry room was an entirely dysfunctional eyesore. “We had a washer and a dryer, but it was all kind-of cobbled together!” Chris said. “There were always laundry piles everywhere, we weren’t really sure what we wanted to do in there, but it was time for us to make a change.” The mess of the space was stressful every time they walked in the door from the garage each day. Kids’ backpacks and shoes piled up haphazardly in the makeshift boot-bench closet left the family feeling disorganized and stressed. They needed space for folding clothes and locker cubbies to help keep the family organized.
Having known Christine and Todd in the Huntley community for years, Chris and Meghan were familiar with their work. “We already trusted them personally and having seen their projects for years we knew they did top notch work. After we reviewed the initial round of designs, we knew that hiring them was definitely the right choice,” Meghan and Chris said. Although Chris had done a lot of work in their home himself, the kitchen and laundry room renovation was such a large undertaking that he didn’t want to steal time away from his family to spend what would surely be many long weekends doing the job himself. “That would not have been a wise choice for us,” Chris laughed.
“Our designer, Michelle was very, very, easy to work with; anything we wanted to see or weren’t sure about, she went above and beyond to make this easy for us. She was easy to get hold of and always quick to respond,” the couple said. Michelle pulled ideas that mirrored the couple’s taste and style and was adept at directing the couple to limited choices that didn’t overwhelm them and kept the process moving. “I have a hard time making decisions. Michelle made the decision-making process so easy. I loved how she listened to what I liked and then presented three great options for me to choose from,” Meghan said.
The main objectives for the kitchen were better storage solutions, they wanted the space to reflect their lifestyle and taste, and they wanted it to last for years with low maintenance. One of the first steps in creating a more functional kitchen was relocating the refrigerator, creating an improved workflow for the busy family.
“We didn’t know that we could even move the refrigerator to a new location where it is now, that was something that we never would have thought of,” Chris said. “The new refrigerator location makes the kitchen feel so much bigger. We didn’t add any space, but our whole kitchen with the new design just seems like it’s so much larger than before!” Meghan said.
The perimeter mist colored cabinets helped warm and brighten the entire room, while the graphite colored cabinets on the island added contrast. Using this fresh, clean color palette satisfied the couple’s desire for a bright space that was the exact opposite of what they had before. Organization accessories were also added to the cabinets such as a spice drawer tray and roll outs to create hidden convenience.
“I absolutely love the hidden spices – it makes cooking so much more enjoyable!” Chris said. “And all the pull outs, and the double trash bin, who would think you could get so excited about organization!” the couple said in unison.
One thing they hated in their original kitchen was how dark the space felt. Added lighting on the ceiling with the new light fixtures combined with the lighter cabinetry colors throughout solved this problem. “Our new kitchen has this warm, almost cozy feeling that our old kitchen never had, it’s just a space that I love spending my time in now,” Meghan said. The light airy feeling was accentuated with the use of floating white shelves on either side of the decorative range hood. “We have so much cabinetry space, the new design is amazing we actually have more storage space than we will ever need,” Meghan said.
The island was extended to create more work surface and added space for stool seating. “The new island changes how we live. Now the kids can be in the kitchen with us, doing homework, eating breakfast, and the three of us have special dinners there when Chris is working late,” Meghan said.
The Carrara Marmi Quartz countertops were chosen because they are, not only beautiful, but are made from hard-working material that doesn’t require maintenance. The white subway tile backsplash that wraps to the ceiling behind the focal point cooktop range/hood compliments the crisp white countertops perfectly, while brushed brass hardware and light fixtures keep the design fresh and new.
The couple had a few fears at the beginning of the project, as most homeowners do. Their biggest fear was being out of their kitchen and laundry room for an extended time. The crew made it very easy for the family to work in a limited space keeping the washer and dryer hooked up the majority of the time, and also getting appliances working with minimal downtime.
“They above and beyond accommodated us to get us through the process,” Meghan said. “They did a great job making sure we were as comfortable as possible throughout the process,” Chris added.
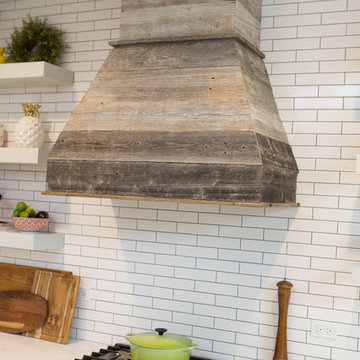
“Our project manager DJ did a great job. He was very good at updating us on schedule changes, getting guys in as quickly as possible. Everyone that stepped in the house was nice and did great work,” said Chris. They thought Advance’s carpenter was phenomenal and were impressed when he took a conceptual idea from a photograph and worked with designer Michelle to create a one of a kind range/hood that has become the topic of conversation with friends and family who visit the new kitchen. “He was in our house literally every day for several weeks. He was easy to work with and good at what he did,” Meghan and Chris said.
The focal point of the kitchen; a hand-crafted, custom-built ventilation hood was clad with handpicked reclaimed barnwood. Advance Design’s carpenter built the framework and the cladding to create a one-of-a-kind design element that the couple loves.
“I think it was especially fun for him to create something unique from scratch, showcasing his talent in this area,” Meghan said. “I love that my kitchen is not like everyone else’s. I got to pick out the wood on my hood and watch it being built and was able to choose what pieces of wood went where on it. It’s totally unique.”
Red Oak flooring was toothed-in throughout the kitchen and the rest of the first floor anywhere changes were made. Then the whole floor was refinished to tone down the orange undertones in the existing floor stain, ultimately changing the color complexion of the entire first floor. The result is a completely new feeling to the entire home.
Renovating the laundry room was extremely important to Meghan and Chris, but they had trouble visualizing what the possibilities were for the seemingly small space. Michelle produced beautiful 3D illustrations that helped them envision the space in a whole new way.
“I must have told Michelle 100 times that I am a visual person, seeing the designs in 3D made it so easy to make decisions and see what we could really do with our space,” Meghan said.
A dividing wall and doorway were removed between the existing laundry room and hallway formerly containing a coat closet, providing space to design specialized graphite colored cabinetry matching the kitchen island to house custom storage cubbies for each family member. Adding the tall utility cabinetry in the new laundry area helped solve the storage issue, tucking away cleaning supplies, household items, and even the cat got its own cubby.
“I love how everything is now hidden in its own space. I can’t tell you how much I hated coming home and seeing everything sitting around on counters,” Chris said.
Electrical outlets were planned for the inside of utility cabinets, so devices could charge in hidden locations. Stacking the washer and dryer allowed for wider countertop space to provide a folding area and a special space for clothes to hang. “The way I do laundry has been completely transformed! I can actually fold clothes and hang them now right out of the washer and dryer,” Meghan said.
“The end result in the kitchen and the laundry/mud room was an updated light and bright space, with a smarter work flow that better meets the needs of this family,” Michelle said.
“I would totally recommend Advance Design,” Meghan said. “Sometimes I sit and just look at my kitchen and laundry room and think ‘Wow, I can’t believe I get to live here!’ It’s an understatement to say we love our new space.”
Free ebook, Creating the Ideal Kitchen. DOWNLOAD NOW
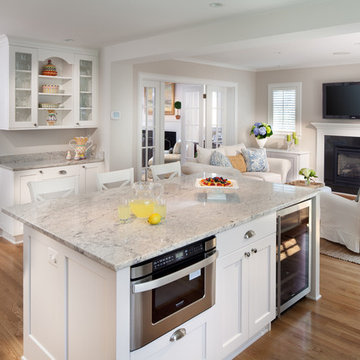
This project started out as a kitchen remodel but ended up as so much more. As the original plan started to take shape, some water damage provided the impetus to remodel a small upstairs hall bath. Once this bath was complete, the homeowners enjoyed the result so much that they decided to set aside the kitchen and complete a large master bath remodel. Once that was completed, we started planning for the kitchen!
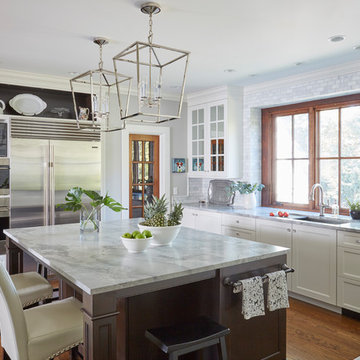
The original kitchen was just large enough to accommodate an island and a separate pantry but felt a little cramped, especially during the weekends when the couple likes to entertain. The primary goal was to maintain the functionality of the current space, but to add some breathing room as well as to provide a view to the homeowner’s side yard and substantial Hosta garden.
The solution was to bump out the space about 10 feet which provided ample room for large pro appliances, a large island for gathering and an upgraded pantry space. It was important to the homeowners to create a space that felt like it belonged in their historic 1866 home. Details such as matching new trim to the existing large custom profiles in the original home and re-purposing an existing door to be used for the new pantry, provided these touches. A large window at the main sink provides that view into the yard and a beautiful focal point for the room.
A mix of painted wood and stained cabinetry gives the new kitchen a sense of belonging in the older home, as do the Super White quartzite that has the look of marble, subway tile backsplash, polished nickel lanterns and glass and mirrored doors. The large pantry, filled with custom shelving built to the homeowner’s specifications, stainless steel appliances and the two Galley Workstations – sinks that do double duty as prep space – ensure that not only does the kitchen look great, but also functions in a personalized manner that works perfectly for the occupants.
Doing the bump out also allowed the opportunity for a small mudroom and powder room right off the kitchen as well as re-arranging some openings to allow for better traffic flow throughout the entire first floor. The result is a comfortable up-to-date home that feels both steeped in history yet allows for today’s style of living.
Designed by: Susan Klimala, CKD, CBD
Photography by: Michael Alan Kaskel
For more information on kitchen and bath design ideas go to: www.kitchenstudio-ge.com

Inspiration for a timeless kitchen remodel in Boston with stainless steel appliances, granite countertops, recessed-panel cabinets, white cabinets, white backsplash, subway tile backsplash and white countertops
Item 3 of 7
This kitchen was totally transformed from the existing floor plan. I used a mix of horizontal walnut grain with painted cabinets. A huge amount of storage in all the drawers as well in the doors of the cooker hood and a little bread storage pull out that is usually wasted space. My signature corner drawers this time just having 2 drawers as i wanted a 2 drawer look all around the perimeter.You will see i even made the sink doors "look" like 2 drawers. There is a designated cooking area which my client loves with all his knives/spices/utensils etc all around him. I reduced the depth of the cabinets on one side to still allow for my magic number pass through space, this area has pocket doors that hold appliances keeping them hidden but accessible. My clients are thrilled with the finished look.
Margot Hartford Photography
Kitchen - contemporary kitchen idea in San Francisco
Kitchen - contemporary kitchen idea in San Francisco
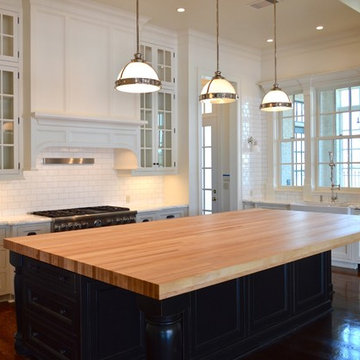
There are so many design elements to this kitchen, I almost don’t know where to start. Bright and airy with crisp clean white cabinets, the kitchen is open and welcoming. Still crisp but gently contrasting, the stainless steel appliance add depth amid the white. To keep this kitchen warm, natural oak covers the floors and a toasted wheat color washes the walls. And then there is the architectural elements. You know. That post and beam in the middle of the room. It’s the center of attention.When you walk into a room your eyes roam around, establishing the size and shape of the room as your feet take you forward. From the front door of this home straight ahead you encountered this wall. The dining area to the right gives you a glimpse of things to come. Where there is a dining room you will usually find a kitchen.
The architecture of years gone by consistently hides the kitchen, the heart of the home, behind walls. I sympathize with my Mom, and all the other Moms, who have had to spend so much time tucked into a tight kitchen, away from the family. This wall had to go, but it was structural. We needed its support but not its bulk.So we got rid of the bulk and only the bulk. Instead of a wall we have a post and beam, offering all of the structure we need. We could have installed a huge steel beam and reconfigure the joists to upset the beam, but why? The small beam and post add an incredible architectural element. It’s turning lemons into lemon, we simply made the most of what we had. It may be functional but it’s so fantastic. It looks like we created the effect just for the drama.
The original kitchen may have had a working triangle and some counter space, but it was fairly small, with each area only a step or two away. The dark cabinets made the space feel even smaller and the butcher block patterned laminate counter tops were very dated. The appliances were feeling their age as well, from a coil burner electric stove to a top freezer refrigerator. To keep this kitchen within its space, a half wall separated it from the dining area.
With the wall gone we borrowed some space from the living room and extended what was a U shaped kitchen into an L. At the living room window we start our new kitchen. We kept a small part of the wall to support the other end of our decorative beam. Sandwiched between a large pantry and our new French door refrigerator, the wall disappears. With our new open floor plan a sizable island was in order.
We split our cooking areas and installed a continuous grill gas cooktop into the island. A sleek island hood takes care of exhaust and adds an extra element to our architectural feature. Under the cooktop we added over-sized drawers for pots and pan storage. The frameless cabinets from New River Cabinetry are maple, painted white, with the Herndon door style. With the cooktop safely nestled into our island, we still had to add an oven.
We used the space where the old range sat for a large single oven of stainless steel and glass. If it worked for one, why not two? We created a home for a microwave in the wall cabinets. It’s perfect for heating leftovers so close to the refrigerator.An important consideration for hot spots in your kitchen is landing zones. Each of our cooking areas have generous landing zones, one on each side of the cooktop and an entire counter area above or below the ovens, depending on which one you’re using.We wanted to give the sink area more room so the half wall had to come out. We moved the trash and recycle cans into a cabinet, removed the heavy soffits and kept the sink under the window.With that little bit of extra space we were able to add a larger cabinet above the dishwasher and slide it all down. This used to be where the carpeting met the vinyl floor, but all of it is gone. Long oak planks eliminate that final divide between the kitchen and the dining area, while adding visual length to the area. White wall cabinets on each side of the window reflect the sunlight for a brighter view.
With all of the darker cabinetry the backsplash walls had been painted white. Even still, there was a darkness in the corners and it wasn’t very exciting. We wanted to add visual interest and reflect the new under-cabinet lighting, eliminating the shadows in this corner.With 1″x 2″ Arabescato Honed marble mosaics and those under-cabinet lights, we achieved the perfect balance. The marble has subtle swirls in gray and beige on a clean white background, but with the honed finish the light is softly reflected instead of glaring. For granite, we chose the soft gray tones of Luna Pearl. The speckles of gray and beige are a gentle contrast to the white cabinets and emulate the color of the stainless steel.Between the carpet, red half wall, dark railing and dated light fixture, the dining area felt tired. Since the kitchen lacked sufficient storage, a large utility cabinet crowded the table space without adding any decorate elements.Although it didn’t get any bigger, our dining area feels fresher and more open too. With the oak flooring joining the area to the rest of our space and the toasted wheat on the walls, the white table and chairs compliment the cabinetry while contrasting the warmer colors. We replaced the chandelier with recessed lighting and changed that railing too.With our new open floor plan, we ended up with a fairly open area in between our foyer closet and the living room window. Not one to miss an opportunity, we filled the space with a multi-functional work space.
With the sunlight streaming in this bright corner works for anything this family needs.
Photo Credit to RJK Construction, Inc.
Showing Results for "Hidden Small Appliances"
Factory Builder Stores
Eat-in kitchen - large transitional u-shaped medium tone wood floor eat-in kitchen idea in Houston with flat-panel cabinets, white cabinets, wood countertops, white backsplash, ceramic backsplash, stainless steel appliances and a farmhouse sink
Eat-in kitchen - large transitional u-shaped medium tone wood floor eat-in kitchen idea in Houston with flat-panel cabinets, white cabinets, wood countertops, white backsplash, ceramic backsplash, stainless steel appliances and a farmhouse sink
The small kitchen in this pre-war apartment was combined with an adjacent dining nook to create a generously sized eat-in kitchen. The strongly horizontal design of the custom cabinetry enhances the breadth of the newly enlarged space and complements the geometries of the irregularly spaced concrete beams above.
Project team: Richard Goodstein, Heather Kennedy
Contractor: Perfect Renovation, Brooklyn, NY
Millwork: Premium Millwork, Brooklyn, NY
Photography: Tom Sibley
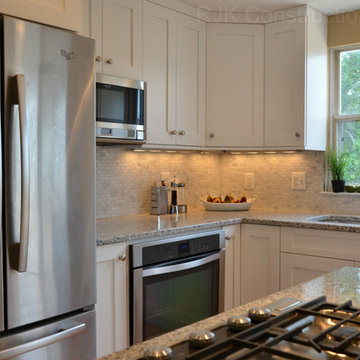
This Transitional Farmhouse Kitchen was completely remodeled and the home is nestled on the border of Pasadena and South Pasadena. Our goal was to keep the original charm of our client’s home while updating the kitchen in a way that was fresh and current.
Our design inspiration began with a deep green soapstone counter top paired with creamy white cabinetry. Carrera marble subway tile for the backsplash is a luxurious splurge and adds classic elegance to the space. The stainless steel appliances and sink create a more transitional feel, while the shaker style cabinetry doors and schoolhouse light fixture are in keeping with the original style of the home.
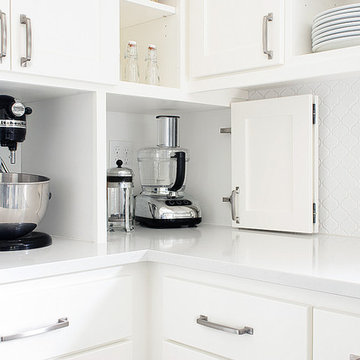
Tile flooring resembling concrete is clean and simple and seeded glass in the upper cabinet doors help make the space feel open and light. This kitchen has a hidden microwave and custom range hood design, as well as a new pantry area, for added storage. The pantry area features an appliance garage and deep-set counter top for multi-purpose use. These features add value to this small space.
The finishing touches are polished nickel cabinet hardware, which add a vintage look and the cafe curtains are the handiwork of the homeowner. We truly enjoyed the collaborative effort in this kitchen.
Photography by Erika Beirman
80