
Search results for "Releases patches" in Home Design Ideas


 Zelaya Properties LLC
We used: Custom cherry cabinetry in Arts & Crafts Shaker style by Kabinart in Boulder and Espresso stains. Liberty Hardware Venetian bronze 1-1/2" cabinet knobs. KitchenAid Architect II Series 22 CF counter-depth French door refrigerator. KitchenAid Architect Series II 27" convection single wall oven. KitchenAid 36" 6-burner dual fuel freestanding commercial-style range. KitchenAid Architect II Series 24" dishwasher. Sharp Insight Pro Series 24" built-in microwave drawer (Model #KB6524PS). Crystorama Solaris 12" wide pendant lights in English bronze. Granite countertops in Brown Fantasy. 3"x6" polished marble backsplash.
Paint colors:
Walls: Glidden Silver Cloud 30YY 63/024
Ceilings/Trims/Doors: Glidden Swan White GLC23
Robert B. Narod Photography

 McCullough's Flooring
Gorgeous master bath finished with Dal-Tile's Fabrique porcelain tile in the color Noir Linen polished. Tile size is 12"x24" installed in a brick joint pattern. The floor boasts underfloor heating on a timed thermostat.
Find the right local pro for your project

 Southern Perfection Painting Inc.
Choose Low-VOC or Zero-VOC Paints
Winter often means more time spent indoors, so you want to ensure that the air quality is as good as possible. Opt for low-VOC or zero-VOC paints, which produce fewer fumes and are safer for indoor use. These paints dry quickly and don’t release strong odors, keeping your home smelling fresh.
Ensure Proper Ventilation
Even with low-VOC paints, it's essential to keep the air moving while you paint. Open windows slightly (if it’s not too cold) and use fans to circulate the air. This helps with both drying times and reducing paint fumes, making your home more comfortable while the paint is curing.
Prep Your Walls for Success
Before you start painting, take the time to prep your walls properly. Clean the surfaces, patch up any cracks or holes, and sand them smooth. Prepping the walls ensures a flawless finish and will help your paint last longer, making your investment go further.
Use the Right Paint for the Job
Pick the right type of paint for each room. Satin and semi-gloss finishes are great for kitchens and bathrooms, as they are easier to clean. For living rooms and bedrooms, consider matte or eggshell finishes for a soft, warm look. If you have kids or pets, opt for paints that are more durable and washable.
Layer Up for Comfort While You Paint
Winter temperatures can be chilly, but that shouldn’t stop you from tackling your painting project. Layer up with comfortable clothing to stay warm while you work. A well-insulated room will also help the paint dry faster, so keep your home at a comfortable temperature for both you and your paint!
Consider Hiring a Professional Painter
If you're feeling overwhelmed or simply want the best results, consider hiring a professional painting service. Experienced contractors can ensure a high-quality, long-lasting finish, saving you time and effort. Plus, they know all the tricks to get the job done quickly and efficiently—just in time for your winter gatherings!
 Tile Doctor Ltd
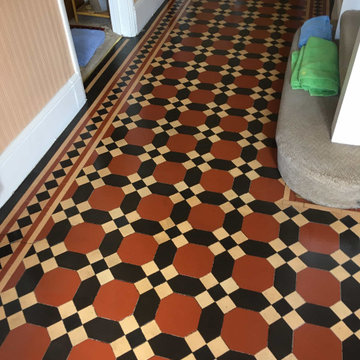
This Victorian floor in Twickenham, Middlesex was in good physical condition for its age but needed a good deep clean. Our customer had informed us that they had never cleaned or sealed the floor in the sixteen years that they had lived there so it was well overdue.
I went over to survey the floor and completed a test clean on a small section of tiling to see which products/techniques would work best. I like to do this as it demonstrates to the client what can be done, and it allows me to come up with an accurate price for doing the work.
As you can see from the pictures, there was quite a difference in the test patch compared to the rest of the floor. Years of foot traffic from the street had taken its’ toll and the floor was very dirty. Luckily, the floor was in very good condition and had not worn too badly.
Once they had seen the test patch, they were confident that it would be worth go ahead with my quote. It would ensure that the period feature was retained for many years to come. The colours on the floor were quite faded so it would be nice to get it restored.
I started the cleaning process by first taping up the surrounding skirting boards and doors to ensure they were protected from potential splashing. Cleaning involved spraying the Victorian tiles with a strong dilution of Tile Doctor Pro-Clean which is a dedicated Tile and Grout cleaning product. This was left to soak in for about ten minutes and then scrubbed in using a black pad fitted to a heavy-duty rotary scrubber.
This gives the floor a good mechanical scrub and works wonders releasing the ground-in dirt and soil from the tiles. The strong dilution of Pro-Clean will also remove any remaining sealers from the tile, however after sixteen years I doubted there would much trace of sealer left. Once done the floor was rinsed with water and all the soils removed with a wet vacuum.
Following the initial clean the colours were already much stronger. Next step however was to improve on that by giving the floor an acid rinse using Tile Doctor Grout Clean-Up. This removes mineral deposits and generally brightens up the appearance of the tile. After another round of scrubbing the floor was rinsed with our high-pressure washer and then vacuumed, extracting all of the dirty water and dirt away in one go. The floor was looking a lot better and was left to dry overnight.
After allowing the floor to dry overnight, we returned the next day to seal the floor. First, checking the floor was dry using the damp meter. Floors of this age can take a little longer to dry as there is no damp-proof membrane so it’s always worth checking as applying a sealer to damp tiles is not a good idea.
Once I was satisfied it was dry eight coats of Tile Doctor Seal and Go sheen finish sealer were applied. This takes a while to do as each coat needs to dry before applying the next. The sealer will protect the Victorian tiles for dirt and stains, it also enhanced the colours in the tile and will make it easier to keep the floor clean going forward.
My client was very pleased with the floor and mentioned that they should have called me in sooner! For aftercare cleaning I recommended Tile Doctor Neutral Clean which is an effective cleaner with a neutral pH, its designed for cleaning tiles without degrading the sealer.
Jonathan Oldham
South Middlesex Tile Doctor


 Tile Doctor Ltd
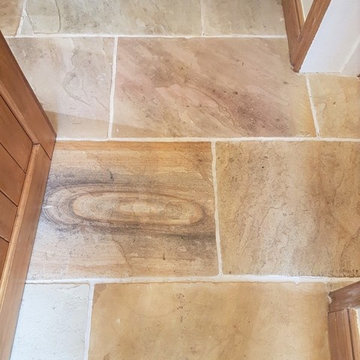
The pictures below are of a multi coloured sandstone floor installed at a property in East Keswick which is a village approximately halfway between Harrogate and Leeds. (Not to be confused with the more famous Keswick in the Lake District)
The stone floor had not been cleaned professionally for ten years and although the grout looked clean It was clear that any sealer that was once present had long since worn off leaving the stone unprotected. The result was dirt had become deeply ingrained in the Sandstone leading causing the stone to darken and hide its true beauty and rich colouring. The client had tried lots of different products to clean the floor but had not had any luck.
I visited the property and carried out a few successful patch tests resulting in the floor becoming much cleaner. They were happy to go ahead with my quote and we arranged a time to return and complete the work.
I prepared the area before starting, taping up the skirting boards and doors to protect them from the splashing that can happen during the intensive cleaning process.
To get the sandstone clean I applied a medium dilution of Tile Doctor Pro-Clean to the floor and allowed it to soak in for ten minutes. The solution was then worked into the Sandstone using a rotary floor machine fitted with a black scrubbing pad. More Pro-Clean was applied with a hand-held scrubbing brush to get deep into the grout lines and to reach into the corners.
Once done the floor was rinsed with water and the soil extracted with a wet vacuum. The floor was inspected, and the process repeated until I was satisfied that the stone and grout had released all the trapped dirt. After a final rinse, the wet vacuum was used to get as much moisture out of the stone as possible and then the floor left to dry out fully overnight.
Returning the following morning, I first checked that the floor was dry using a damp meter. The sealer won’t cure if there is any moisture in the stone and I’ve been known to reschedule sealing a floor if the readings are too high. On this occasion I was satisfied that the floor was within acceptable levels, so I was ready to seal the floor.
I used three coats of Tile Doctor Colour Grow to seal the floor, this is an impregnating sealer which intensifies natural colours whilst providing durable protection against stains, an essential feature in an area such as a hallway which is subject to constant foot traffic.
As you can see from the photos the transformation was quite impressive, the floor became much lighter and almost unrecognisable, the natural colours of the stone were now visible, and the floor looked beautiful. The client was very happy with the end result and has said they would not hesitate to recommend me to others.
Nigel Stoker
North West Yorkshire Tile Doctor



 Chango
Interior Design, Custom Furniture Design, & Art Curation by Chango & Co.
Photography by Raquel Langworthy
See the project in Architectural Digest
Example of a huge transitional boy dark wood floor home design design in New York with blue walls
Example of a huge transitional boy dark wood floor home design design in New York with blue walls

 MEC
PEACOCK FANTASY - Custom Designed Peacock Wall Mural in brilliant colors. Notice how it has just the right amount of color | Have a custom mosaic idea? We can help, with our brilliant Italian-trained mosaicists and easy-to-install tiled masterpieces. Worldwide shipping available on the complete range of quality handcrafted marble & glass mosaic products. For inquires and more info, contact us: http://mecartworks.com


 MSI
Exquisite and unique, Calacatta Classique Quartz stuns with its clean whites and striking through-body veining. This showstopper countertop offers the look of luxurious marble in durable and maintenance-free quartz.
 Geddes Ulinskas Architects
Blake Marvin Photography
Example of a trendy home design design in San Francisco
Example of a trendy home design design in San Francisco


 Regenesis Ecological Design
This interlocking concrete permeable paver driveway is set in an ashlar pattern to create a decorative but versatile look. This driveway allows stormwater to infiltrate into the ground - instead of running off the landscape into streams and rivers where is can cause flooding and pollution.
 Tile Doctor Ltd
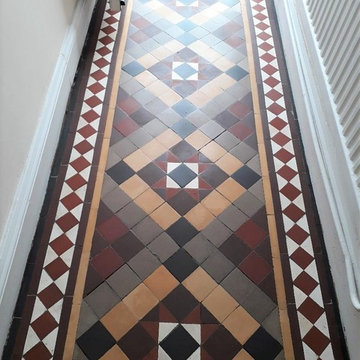
As is often the case in years past and for whatever reason many homeowners covered their decorative Victorian hallway tiles in a variety of products from carpet to laminate flooring. These days the trend has reversed and quite rightly many homeowners now realise the value a tiled floor can bring to a property and look to us to have it restored.
Our client had purchased a property in Norfolk seaport of Kings Lynn and, on lifting the dirty old carpet and decaying underlay in the hallway, discovered a beautiful tiled entrance hall. It was obvious that a previous owner had decided to lay carpet over the tiles as an easy way of hiding the result of careless renovation and decorating which had resulted in a thick coating of plaster, paint, carpet tape glue and various other contaminants which had become firmly stuck to the surface. There were also two small rectangular black and brown tiles missing behind the front door which had been damaged during the removal of some old lead pipes.
This was clearly a job which would need somewhat more than a scrubbing brush and a bottle of Flash!
Our first job was to remove as much of the solid contaminants as possible by hand with floor scrapers and a steamer which softened the more stubborn lumps. We then applied Tile Doctor Remove & Go which is a powerful alkaline stripper to the whole area, left it to dwell on the surface for twenty minutes and then scrubbed it in using a rotary machine fitted with a black scrubbing pad. The resulting slurry was then power rinsed and extracted away using our Ninja machine which is a high-power industrial vacuum. Any remaining patches where the carpet tape had been stuck down were spot treated using Tile Doctor Nanotech HBU which made short work of the hardened glue.
The result was a clean floor, but the surface still felt slightly rough and pitted, a problem which we resolved using the rotary machine fitted with a 200-grit diamond burnishing pad followed by a 400-grit pad with a little 400 grit honing powder which left the surface smooth, silky and ready for the application of a sealer.
Finally, we acid washed the whole area using Tile Doctor Acid Gel, a slow release product which would neutralise any remaining chemicals, improve new sealer adhesion and inhibit the future production of any efflorescence salts. We had used a fair amount of water during the cleaning process, so we left the floor to dry off thoroughly overnight with assistance from our commercial dehumidifier.
On our return the following day, we discussed the sealer options with the client and recommended using microporous Tile Doctor Colour Grow which is an impregnating sealer that seeps into the pores of the stone protecting it from within. It will provide an excellent fluid resistant seal whilst enhancing the natural colours in the stone, additionally it’s fully breathable thereby enabling any moisture trapped under the floor to rise through the floor and evaporate. This is important on old floors like this where no damp-proof membrane was installed. The sealer was applied with a paint pad in tow coats and allowed to dry for an hour before buffing the floor with a hog’s hair pad to give a rich natural-look sheen finish.
The Victorian tiles responded well to the treatments which were completed in two consecutive days. My client was extremely pleased with the results and left the following comment:
“My floor was in poor condition after being buried under carpet as well as many, many years of paint and muck. I enjoyed the time they spent at my home and wouldn’t hesitate to use (or recommend) the Tile Doctor service in the future.”
Nick White
Norfolk Tile Doctor

 Betty Wasserman Art & Interiors
Modern luxury meets warm farmhouse in this Southampton home! Scandinavian inspired furnishings and light fixtures create a clean and tailored look, while the natural materials found in accent walls, casegoods, the staircase, and home decor hone in on a homey feel. An open-concept interior that proves less can be more is how we’d explain this interior. By accentuating the “negative space,” we’ve allowed the carefully chosen furnishings and artwork to steal the show, while the crisp whites and abundance of natural light create a rejuvenated and refreshed interior.
This sprawling 5,000 square foot home includes a salon, ballet room, two media rooms, a conference room, multifunctional study, and, lastly, a guest house (which is a mini version of the main house).



 Cypress Design Co.
Inspiration for a mid-sized 1960s master white tile and subway tile porcelain tile and white floor corner shower remodel in Providence with a two-piece toilet, gray walls, a pedestal sink and a hinged shower door
 Caela McKeever
Photo: Caela McKeever © 2017 Houzz
Inspiration for an eclectic home design remodel in Seattle
Inspiration for an eclectic home design remodel in Seattle
1