How to Use and Customize the Selections Tracker

The Houzz Pro Selections Tracker, previously called Project Tracker, is a central place where you can find all financial and procurement information, as well as see the status for all products and services in your project, including which documents they’re connected to, such as invoices or purchase orders. The Selections Tracker is a fully customizable worksheet, where you can create your own columns and choose what details you want to view, then export to share with team members, vendors, subcontractors or clients. Watch the video tutorial or check out the step-by-step instructions below to learn about all the tracker has to offer.
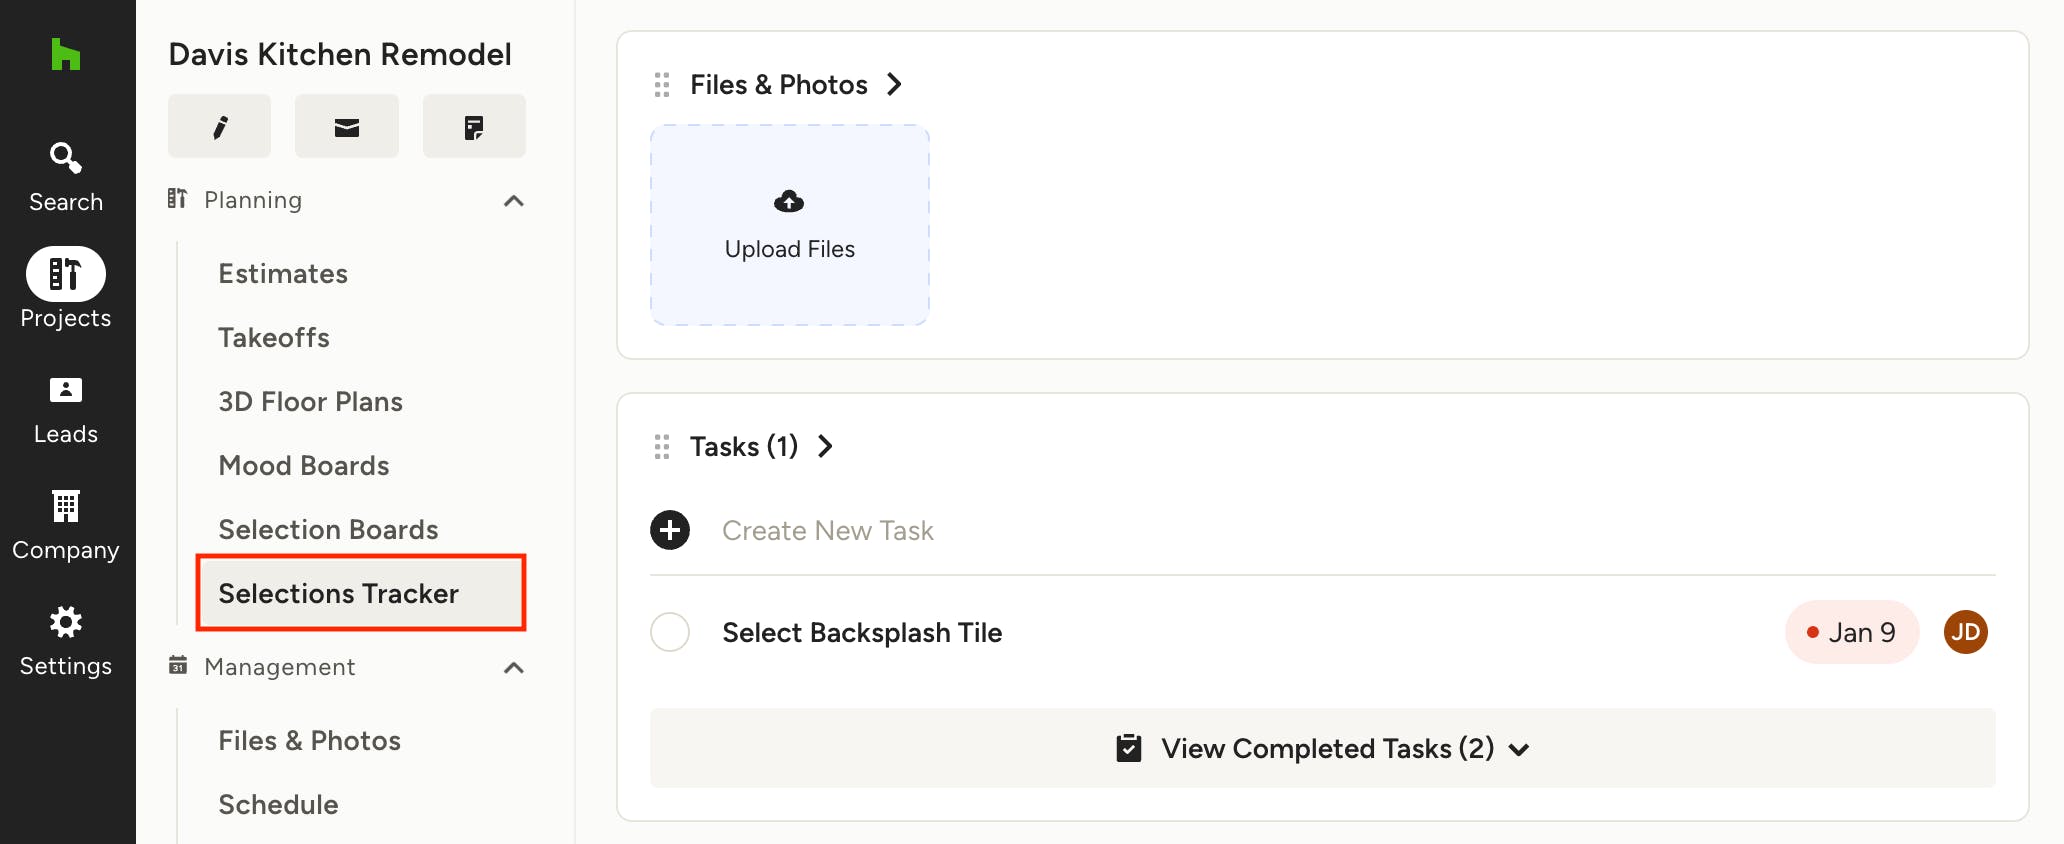
Accessing the Selections Tracker
To access a project's Selections Tracker, navigate to the project overview page and click on Selections Tracker under the Planning section in the left menu.

You can also quickly access the tracker from the selection boards page by clicking on the Tracker tab at the top.
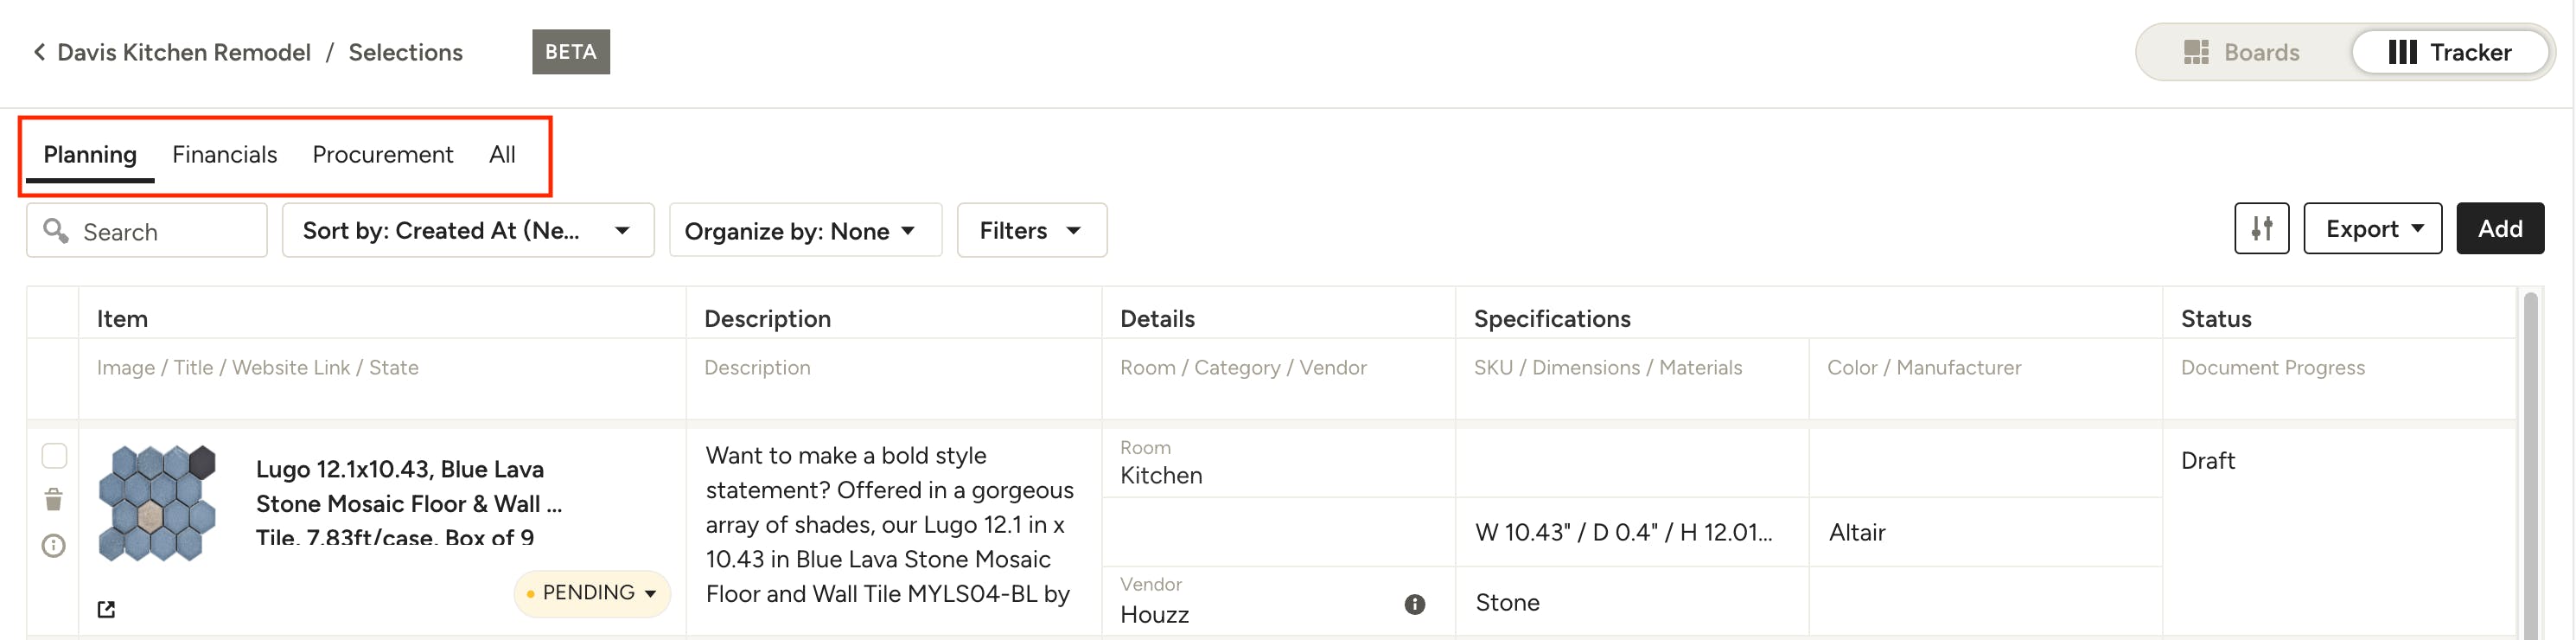
Switch Views
Your Tracker has 4 views you can easily switch between to quickly find the exact information you're looking for, depending on which stage your project is in: Planning, Financials, Procurement and All.
To switch your view, simply click on the one you want at the top of the Tracker. The columns will automatically update to reflect information relevant to each view type. Next time you open the Tracker, you'll see your most recently used view.
To further personalize each view, you can customize the columns per view to show/hide certain details and adjust the order of the fields as well. Learn how in the following section.

Customize Columns and Views
To customize each view of your selections tracker, you have the option to toggle on/off desired information and adjust the order in which it's shown. To do so, click on the Customize Views icon towards the top right.

The Customize Views modal will appear, set to the view you are currently on. To customize a different view, click the back arrow next to the view name and select a new view.
To show or hide information, use the toggles on the right. To quickly show or hide an entire family of information, use the toggle next to the main column name (Details, Specifications, Status etc.).

Create New Column/Field
To create a new field within the Additional Information column, click + Add New Field at the top of the toggles.

Type in the desired field name, select the field type from the dropdown and click Save when you're done. The new field will be added to the bottom of the list under Additional Information.
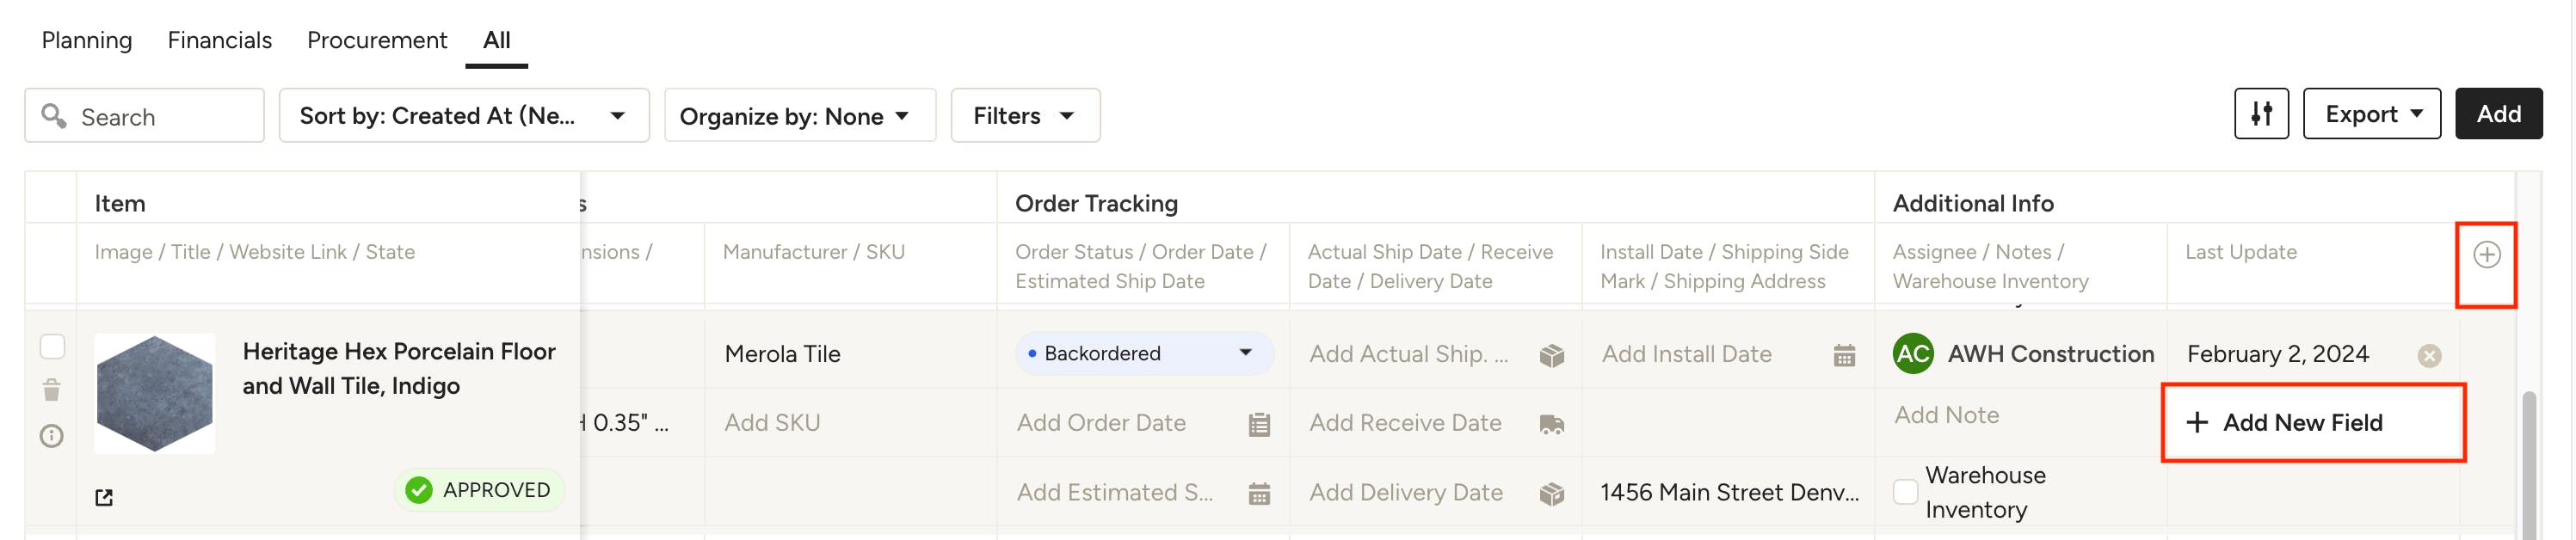
You can also quickly add a new field by clicking the + icon, or + Add New Field in an empty field, within in the Additional Information column.
Change Column Order
To change the order of the columns in the tracker, simply open the Customize Views modal, click the 6 dots to the left of each and drag to your desired order. You will see them update in the Tracker after you click Save.

Modifying Line Height
The Tracker's default line spacing is set to Stacked, which displays three fields in a single column stacked vertically, optimizing visibility of product or service details while minimizing horizontal scrolling. For a broader view, you can adjust the line spacing to Flat, which presents all fields side by side.
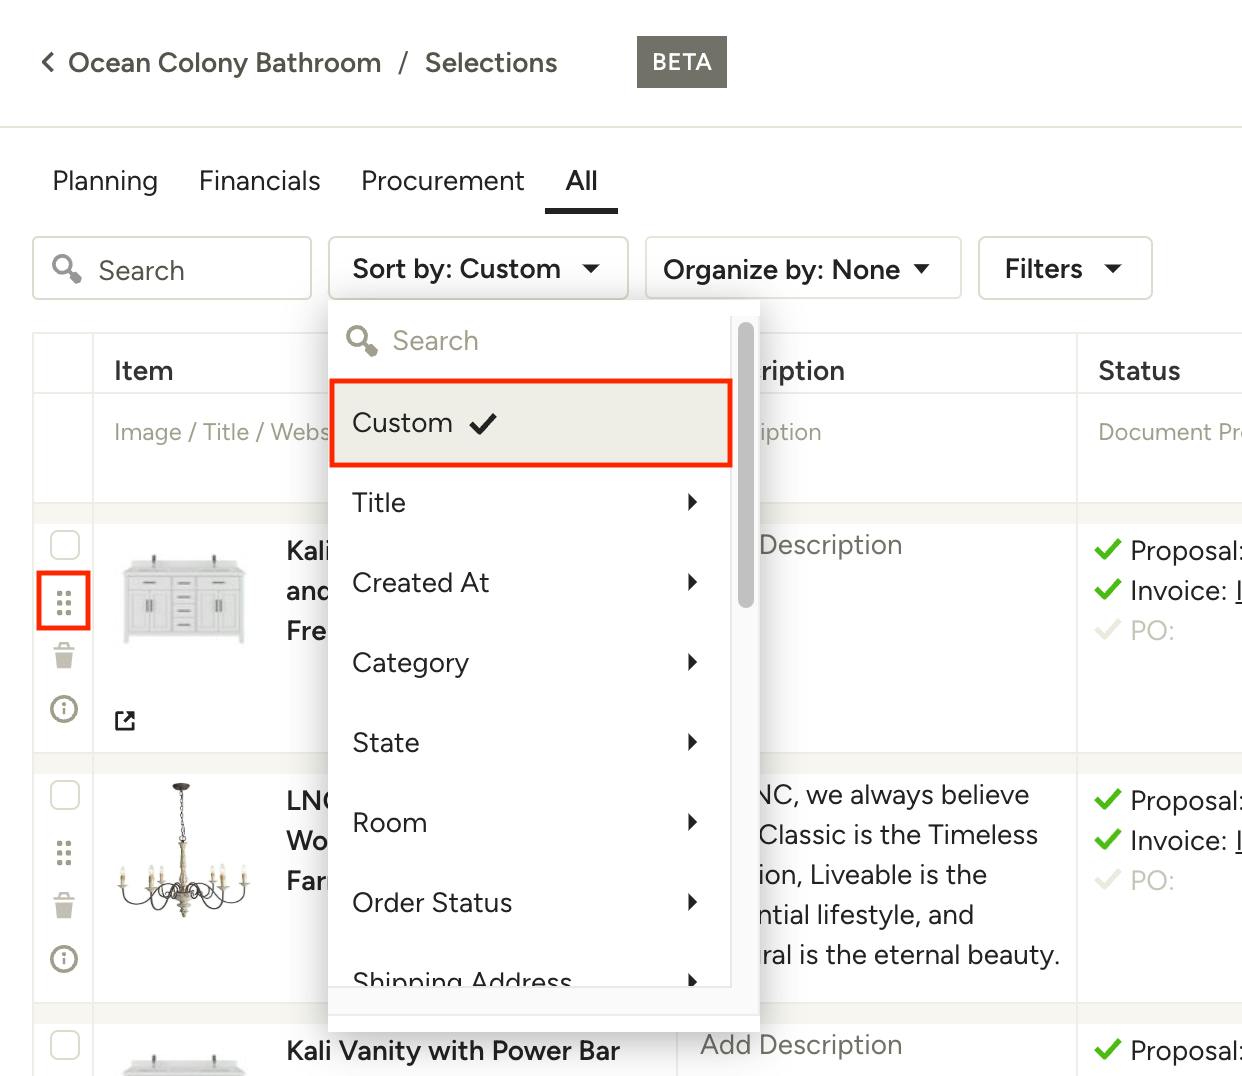
Rearrange Items Vertically
You have the option to custom sort your items in the Tracker by vertically rearranging them into the exact positions you want. To do so, you must select Custom from the Sort By dropdown at the top of the Tracker. Once in Custom sort you can use the 6 dots to the left of each item to vertically drag them into your desired order. This custom order will remain in the position you set it, so you can always return to Custom sort to see your personalized view.
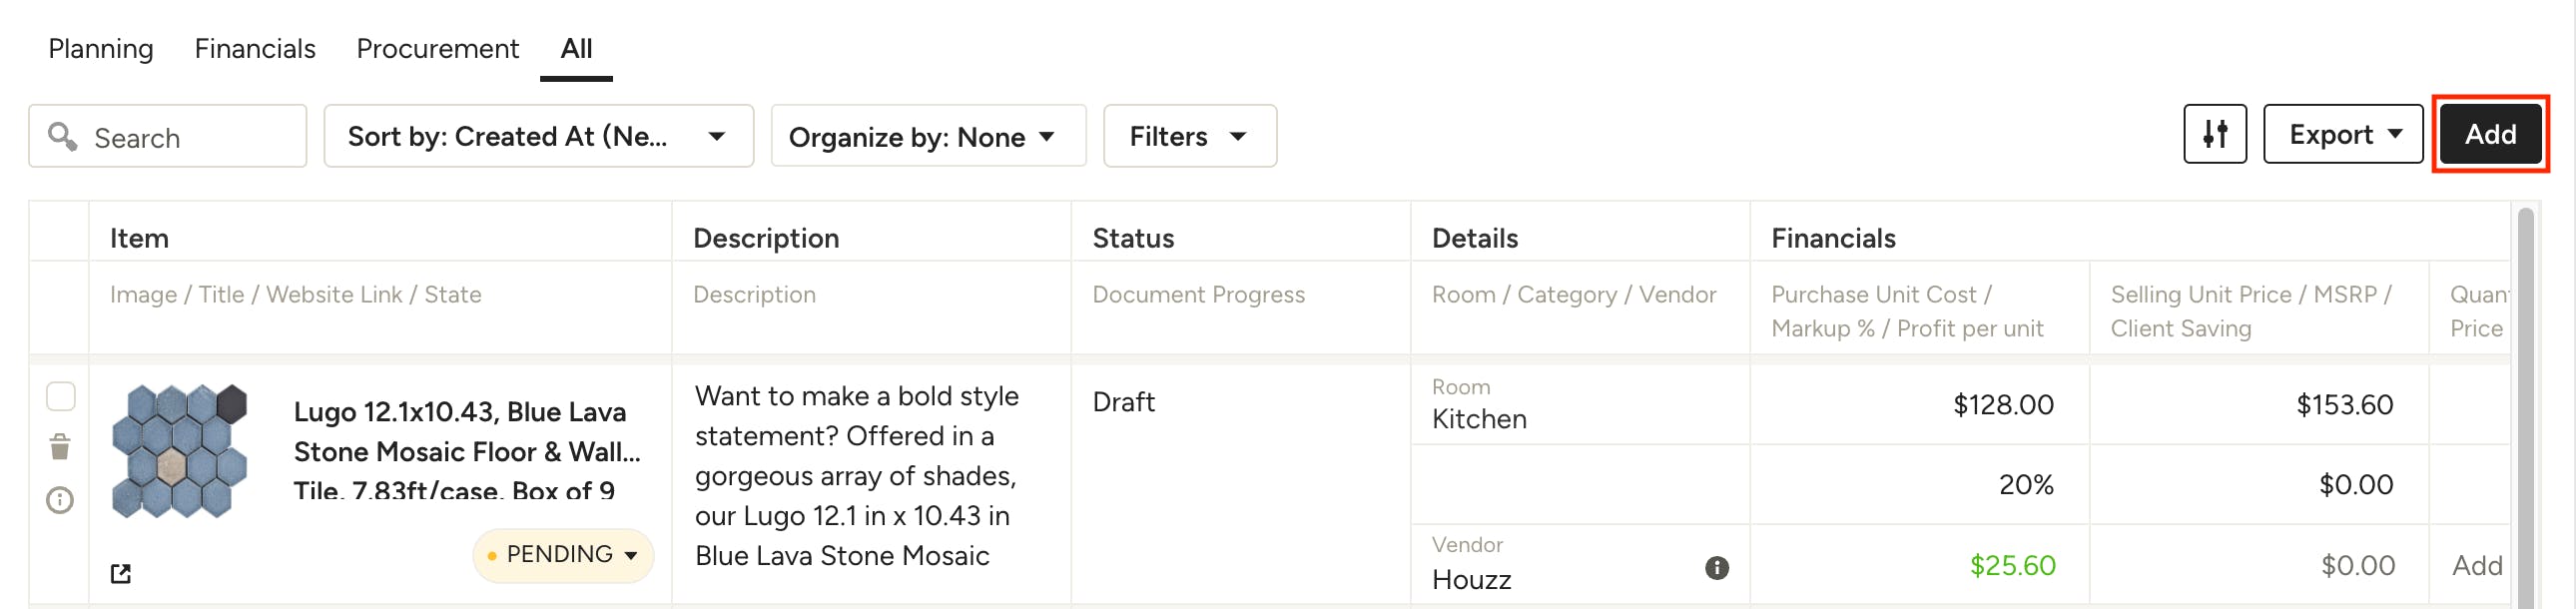
Adding Items to the Tracker
Within a project's tracker you will automatically see all items that have been added to a document for that project, like an estimate, proposal or invoice, as well as items that have been added to a mood board. To add items to your selections tracker that aren't associated with a document or mood board, simply click the Add button in the top right. This will open up your Library where you can find all of your products and services. Click Add a Product to manually add a new item, or use the filter and search options to quickly find a product by name, vendor or category. You can convert these draft items to documents when you're ready.

Editing Items in the Tracker
To edit product details, you have two options.
Edit In-line
- Edit the details directly in-line on the tracker where available. Simply click on the field you wish to edit and type or select the updated option. If it's a text field, hit Enter or click the checkmark to save the edit.
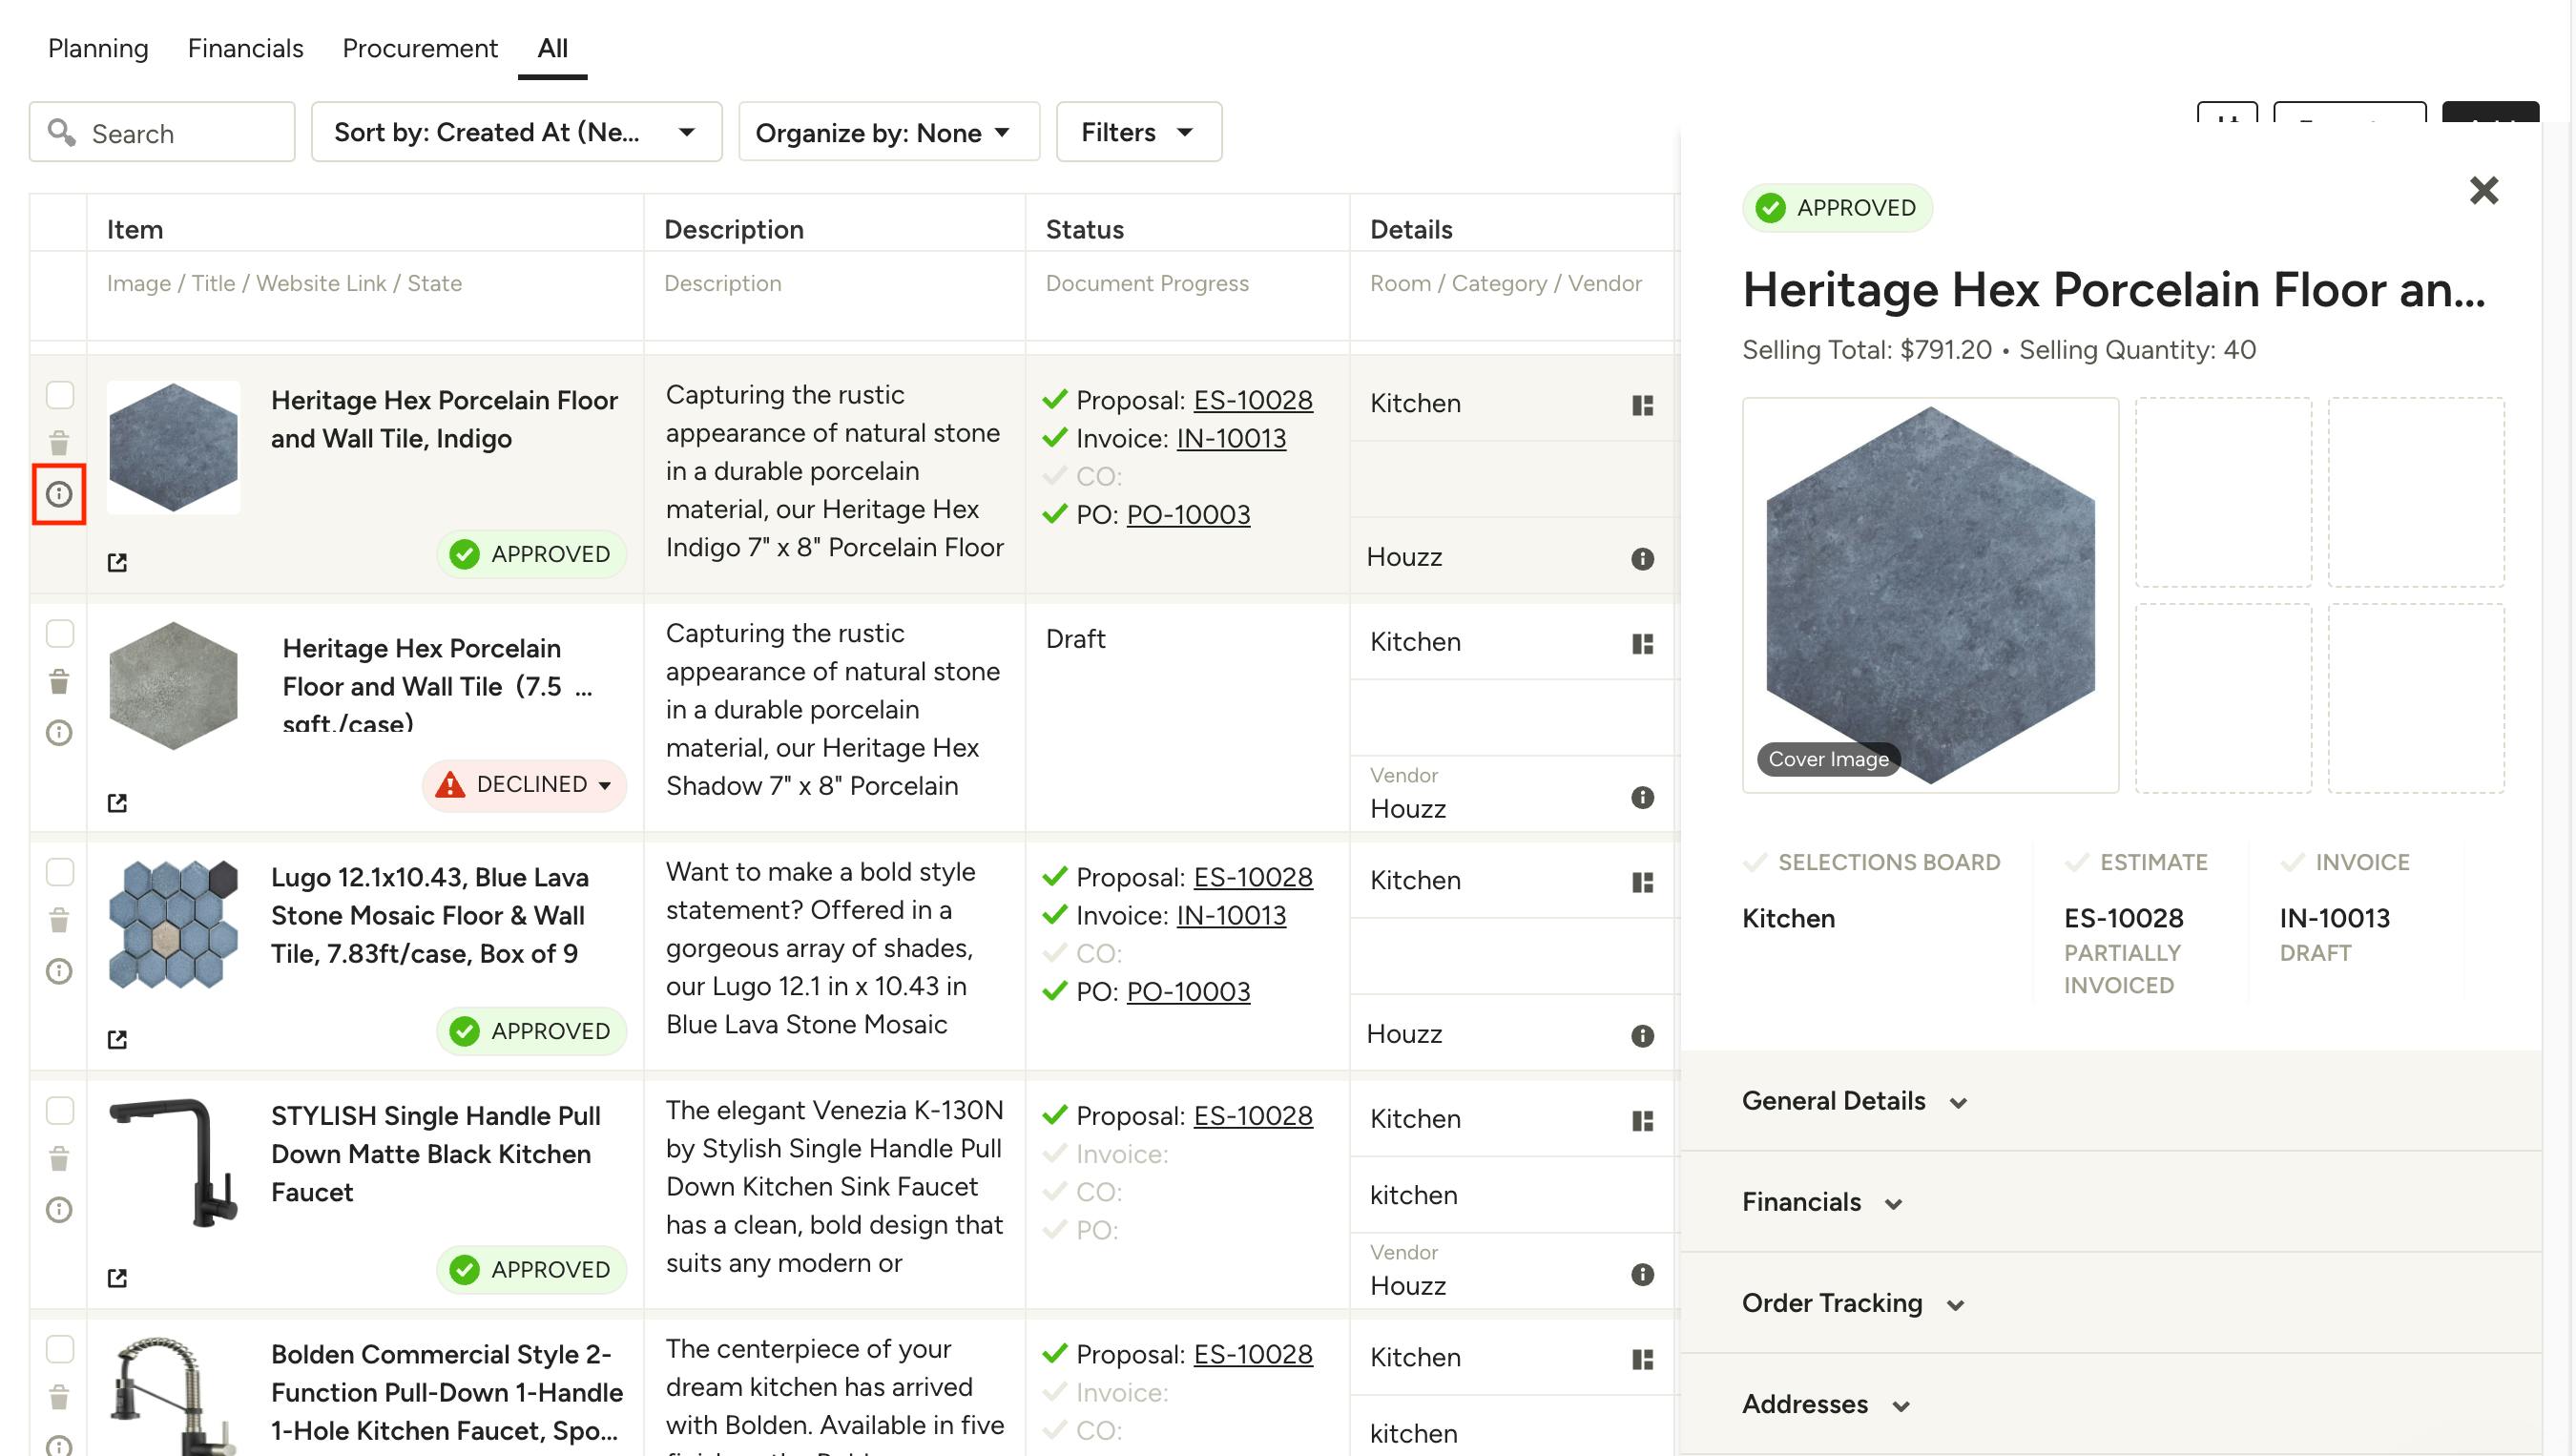
Edit in 360 view
- Click on the 'i' icon to the far left of an item to open the 360 view. Here you'll see all the specifics about the item, including any boards or documents the item is attached to.
- Open each tab to edit any details about the product, from financials to order tracking to addresses and more.
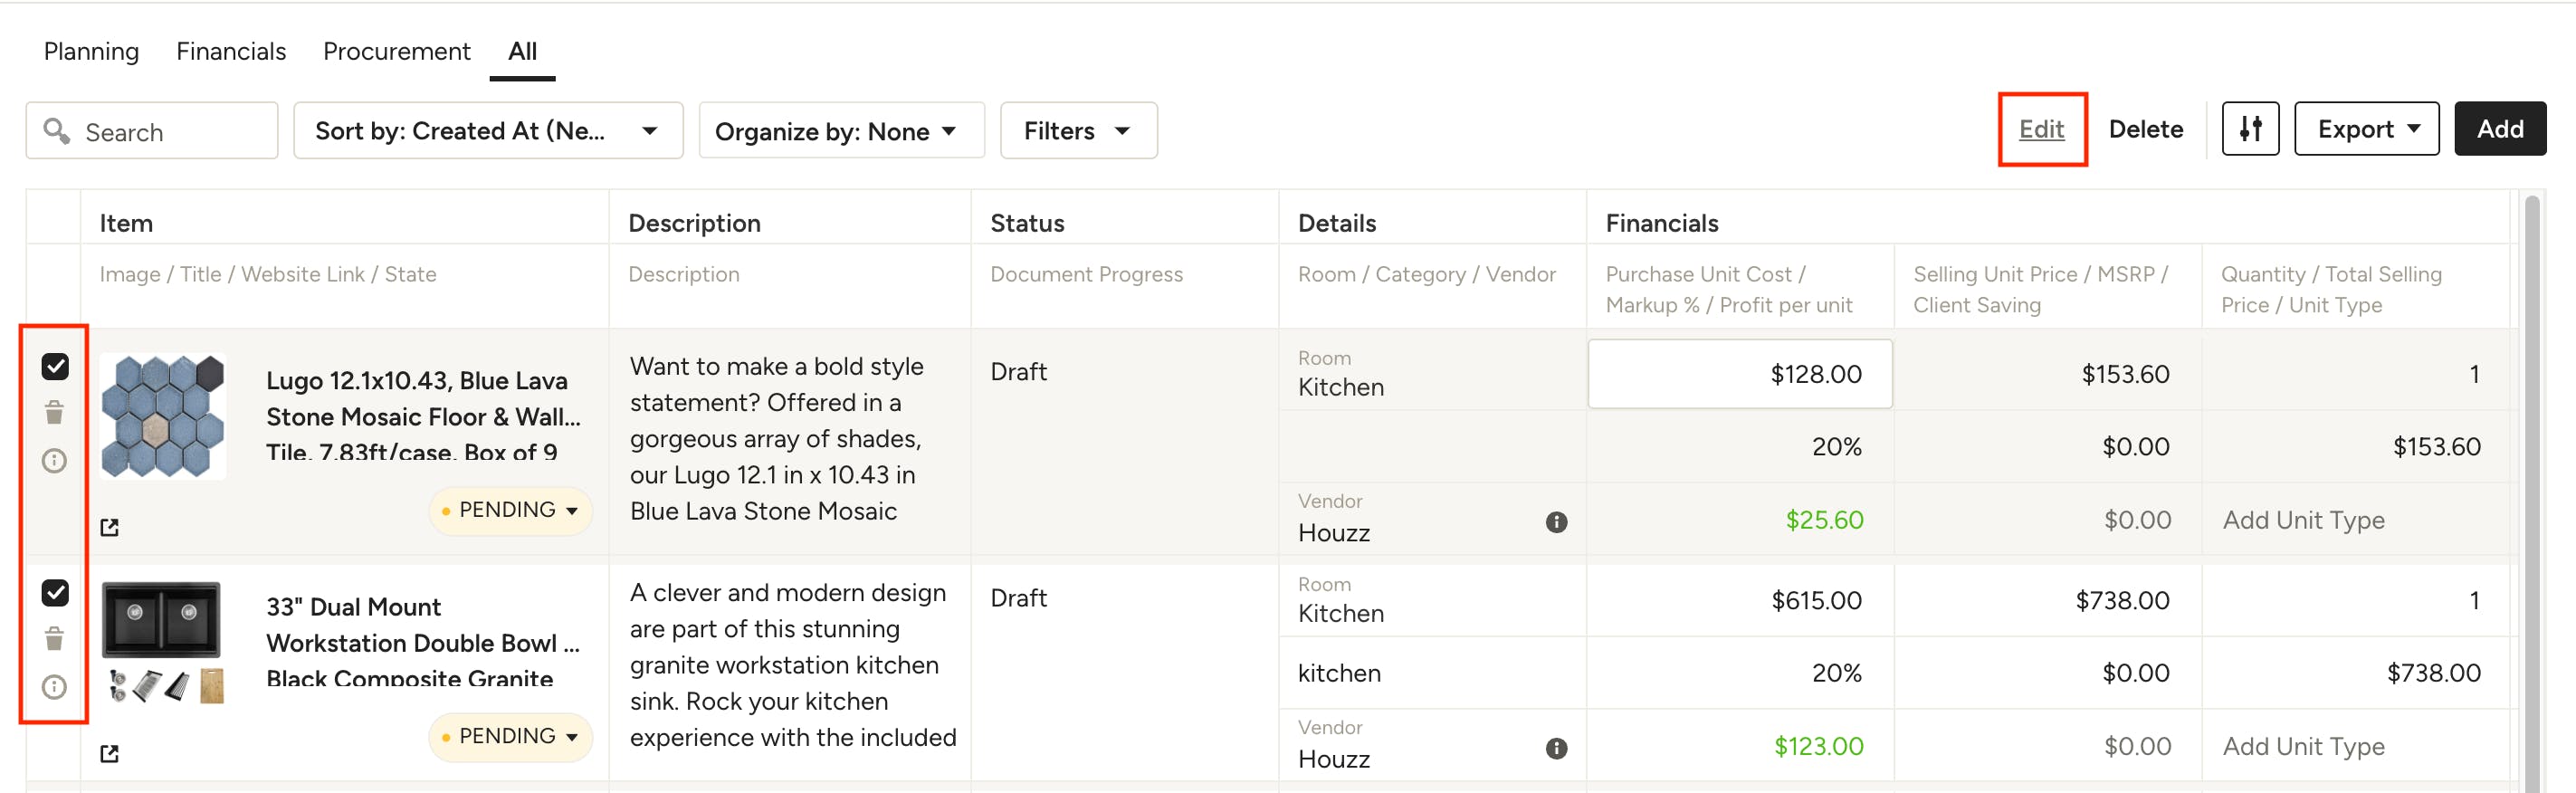
Edit Multiple Items at Once
You can edit certain details on multiple items at the same time, such as order status, scheduling dates, assignee and notes. This is particularly handy for items that share the same vendor or are on the same purchase order.
To do so, select the items you wish to edit by clicking the checkbox to the left of each one, then click Edit at the top of the page.
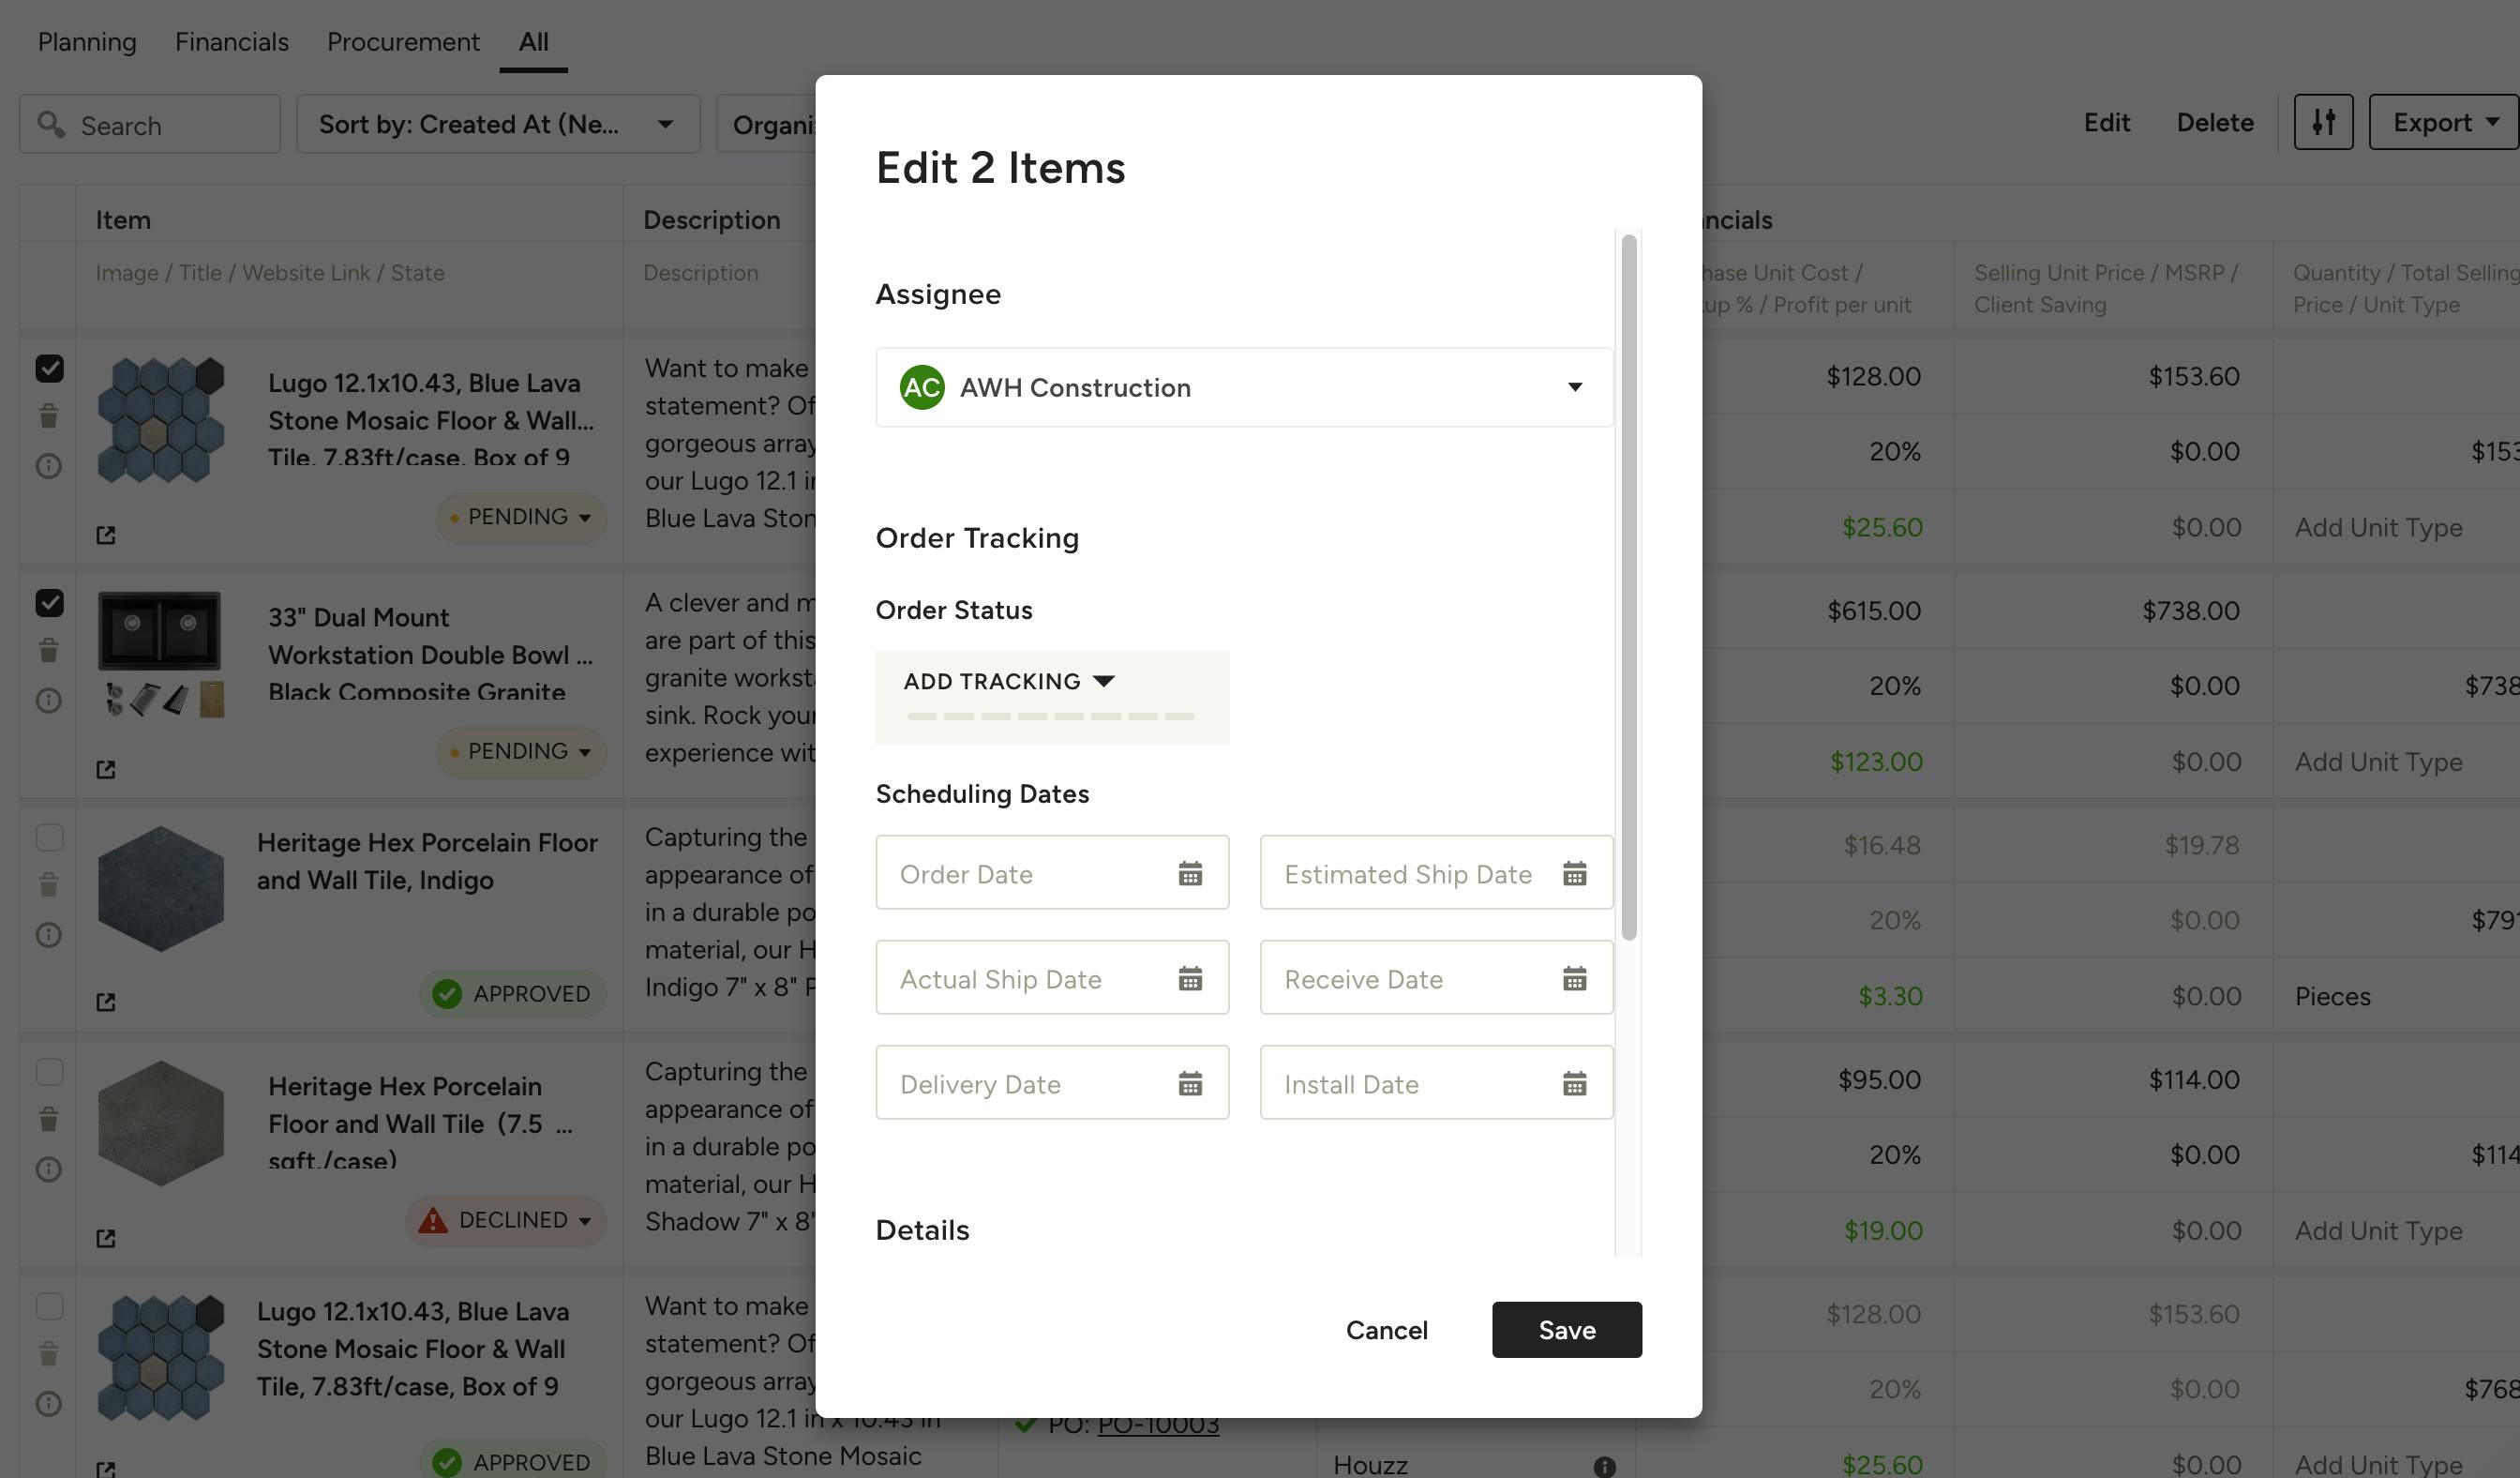
In the modal that pops up, update any relevant details, then click Save to apply the changes.
Note that when you update order statuses on an item in the Tracker, these changes will be reflected in the Purchase Order associated with this item, and vice versa.
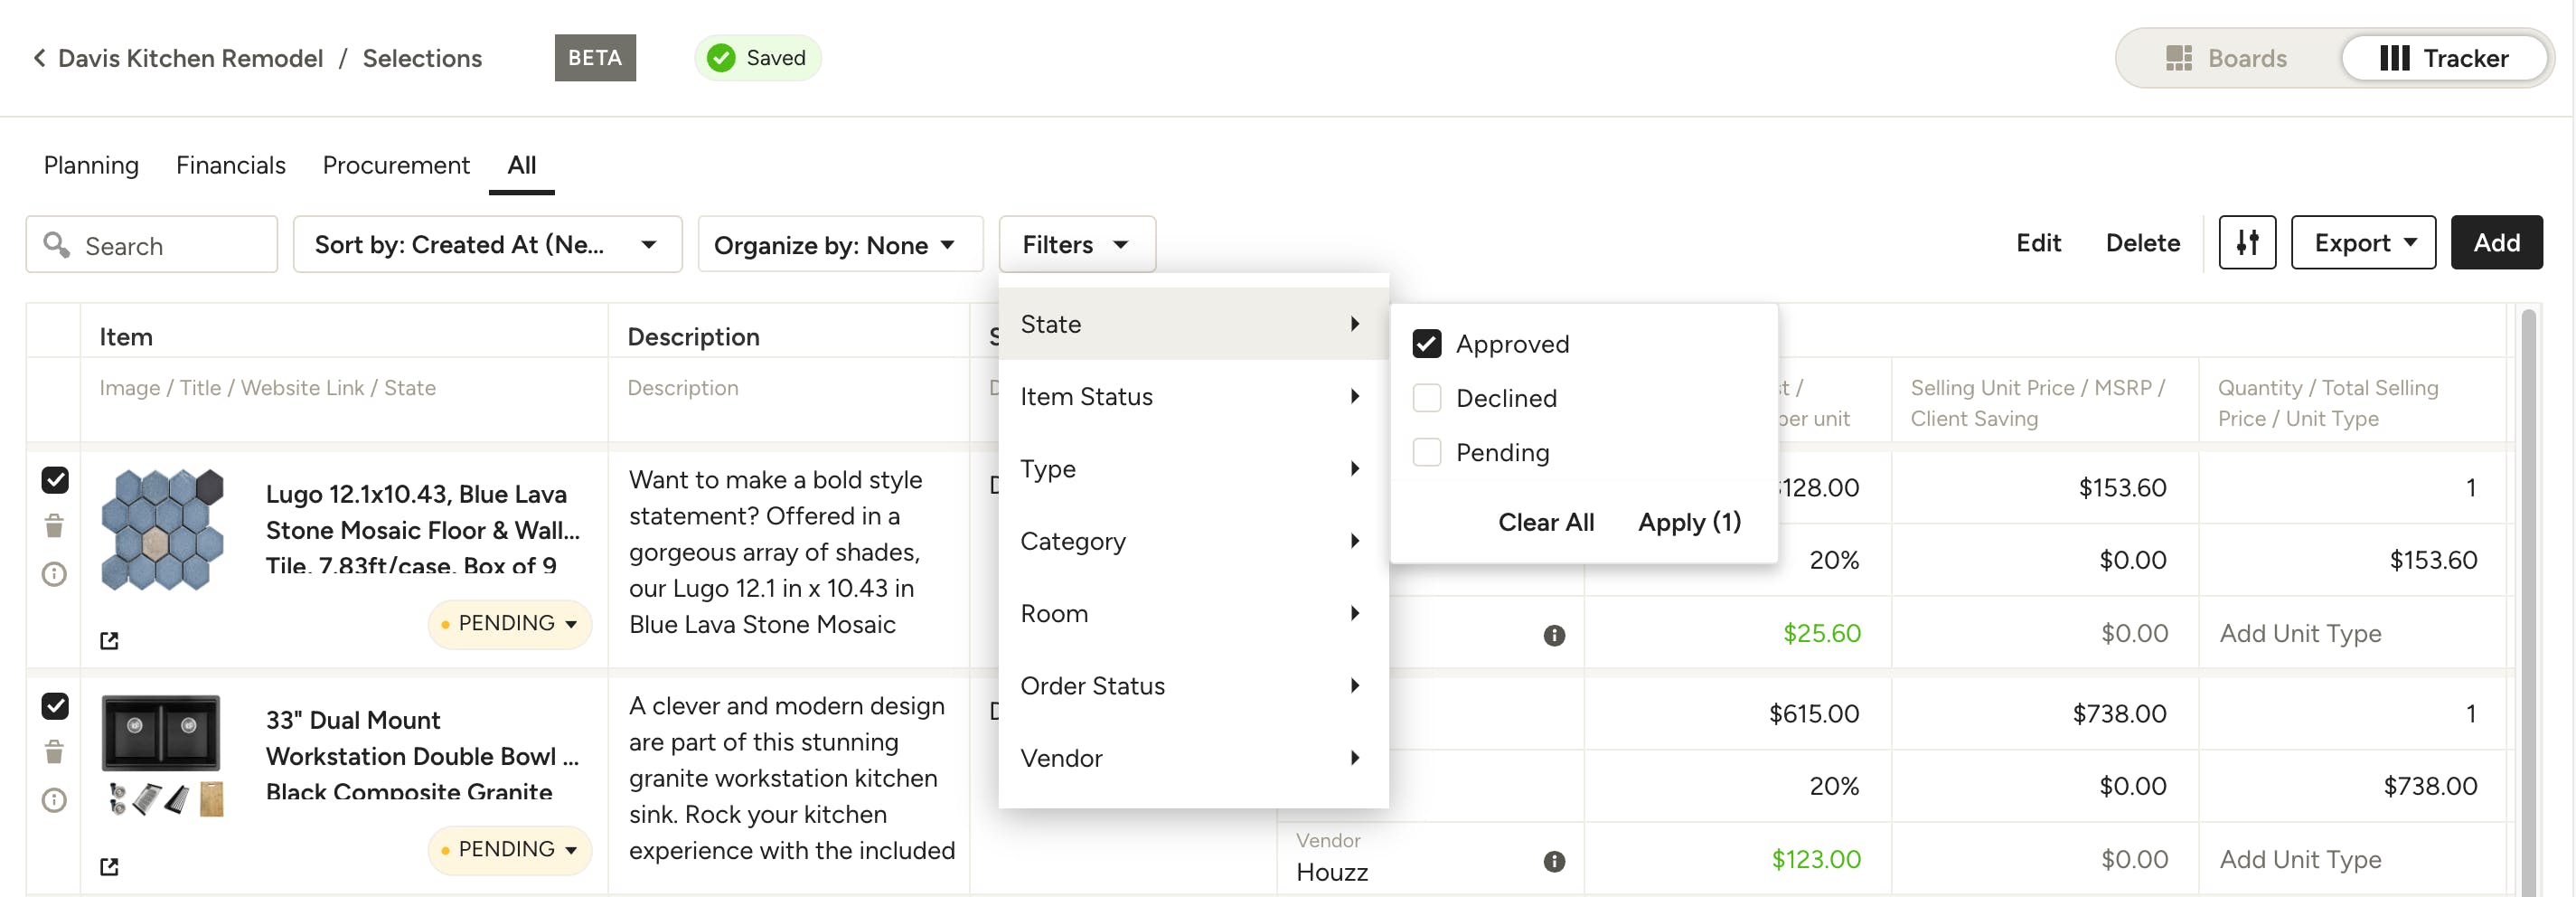
Filter and Search
Use the search function to quickly find entries in your tracker or customize the view by sorting, organizing and/or filtering by various options.
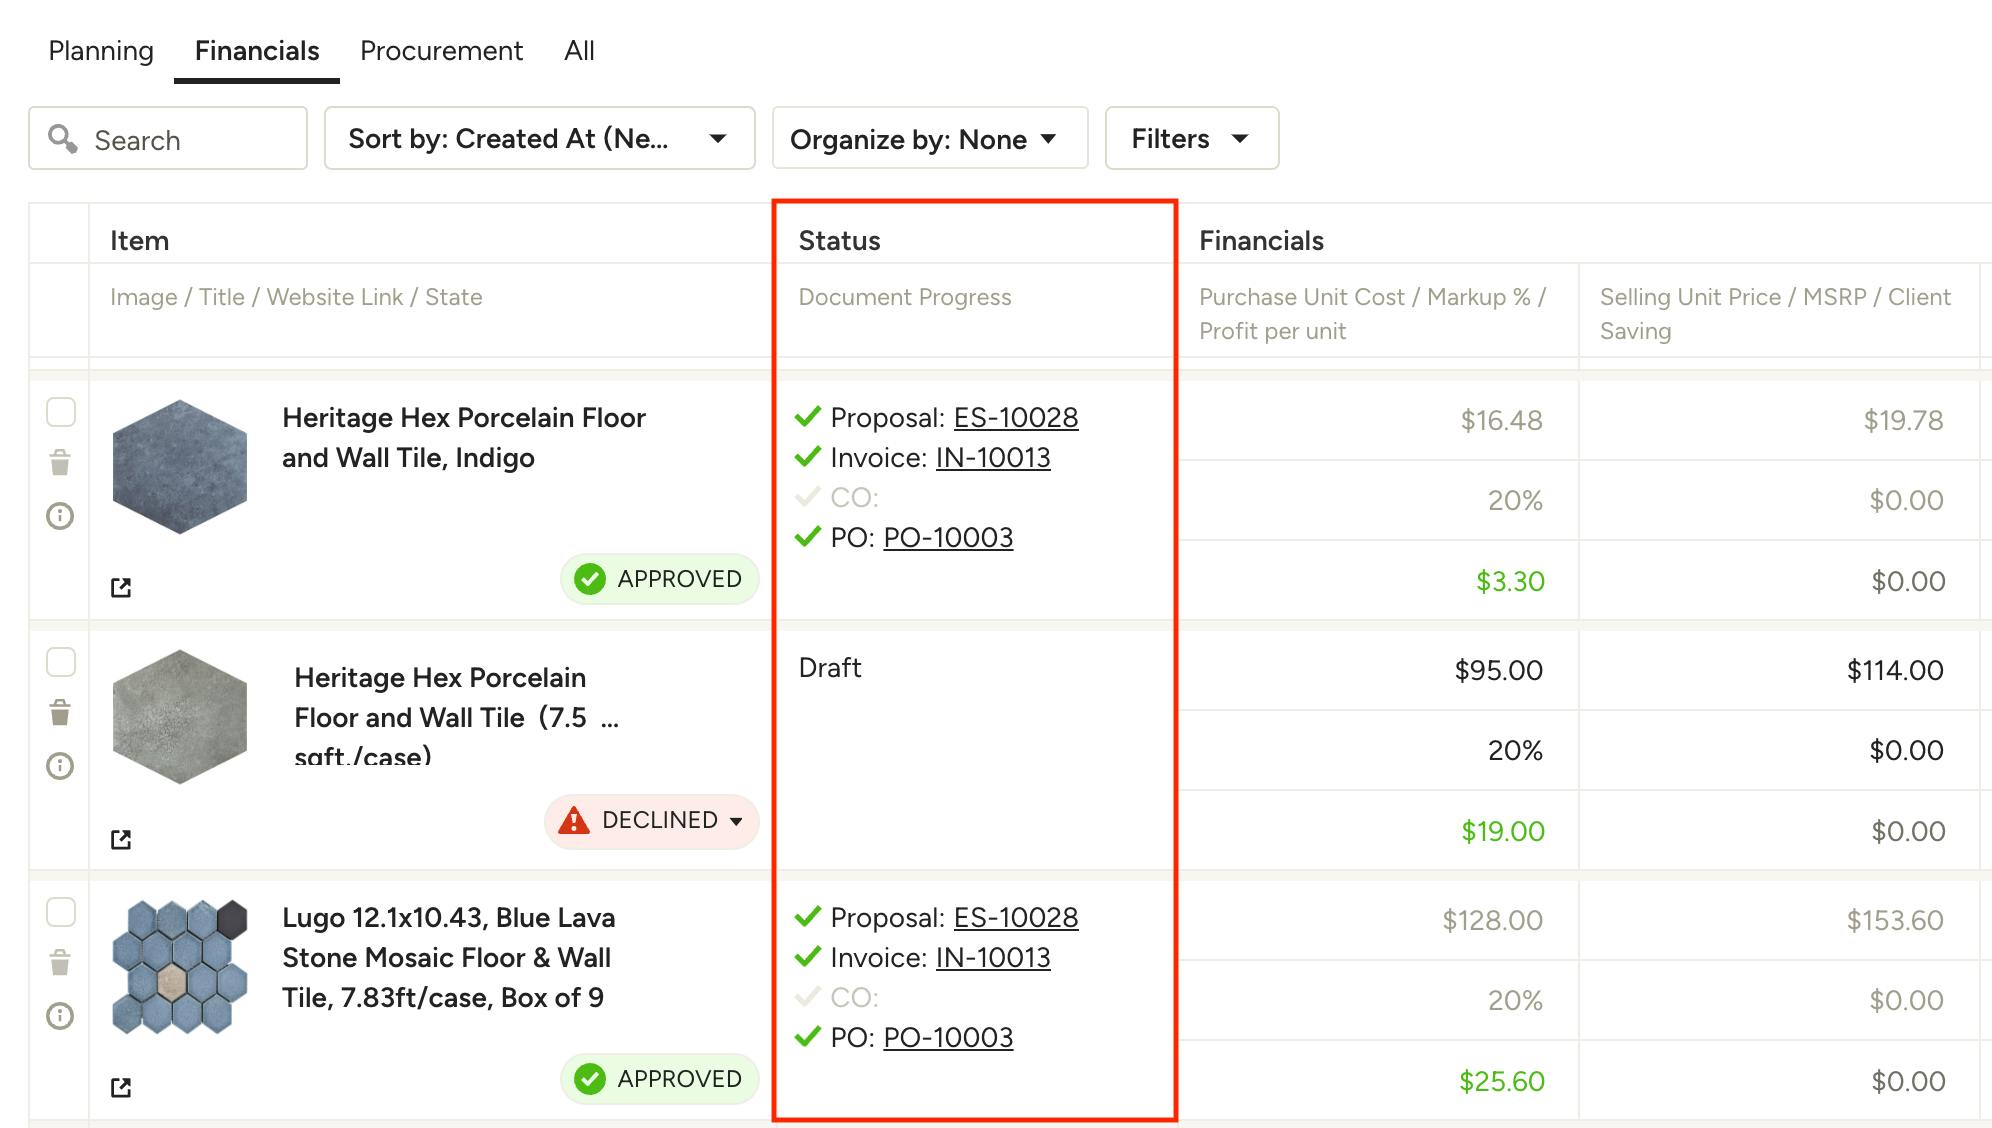
View Connected Documents
To help keep track of where each item appears across your project, use the Status column. Here you will see any documents that the item is currently used on and be able to quickly access them by clicking on the document name.
Make sure you have the Document Progress field toggled on to be able to see connected documents.
Convert Items to Document
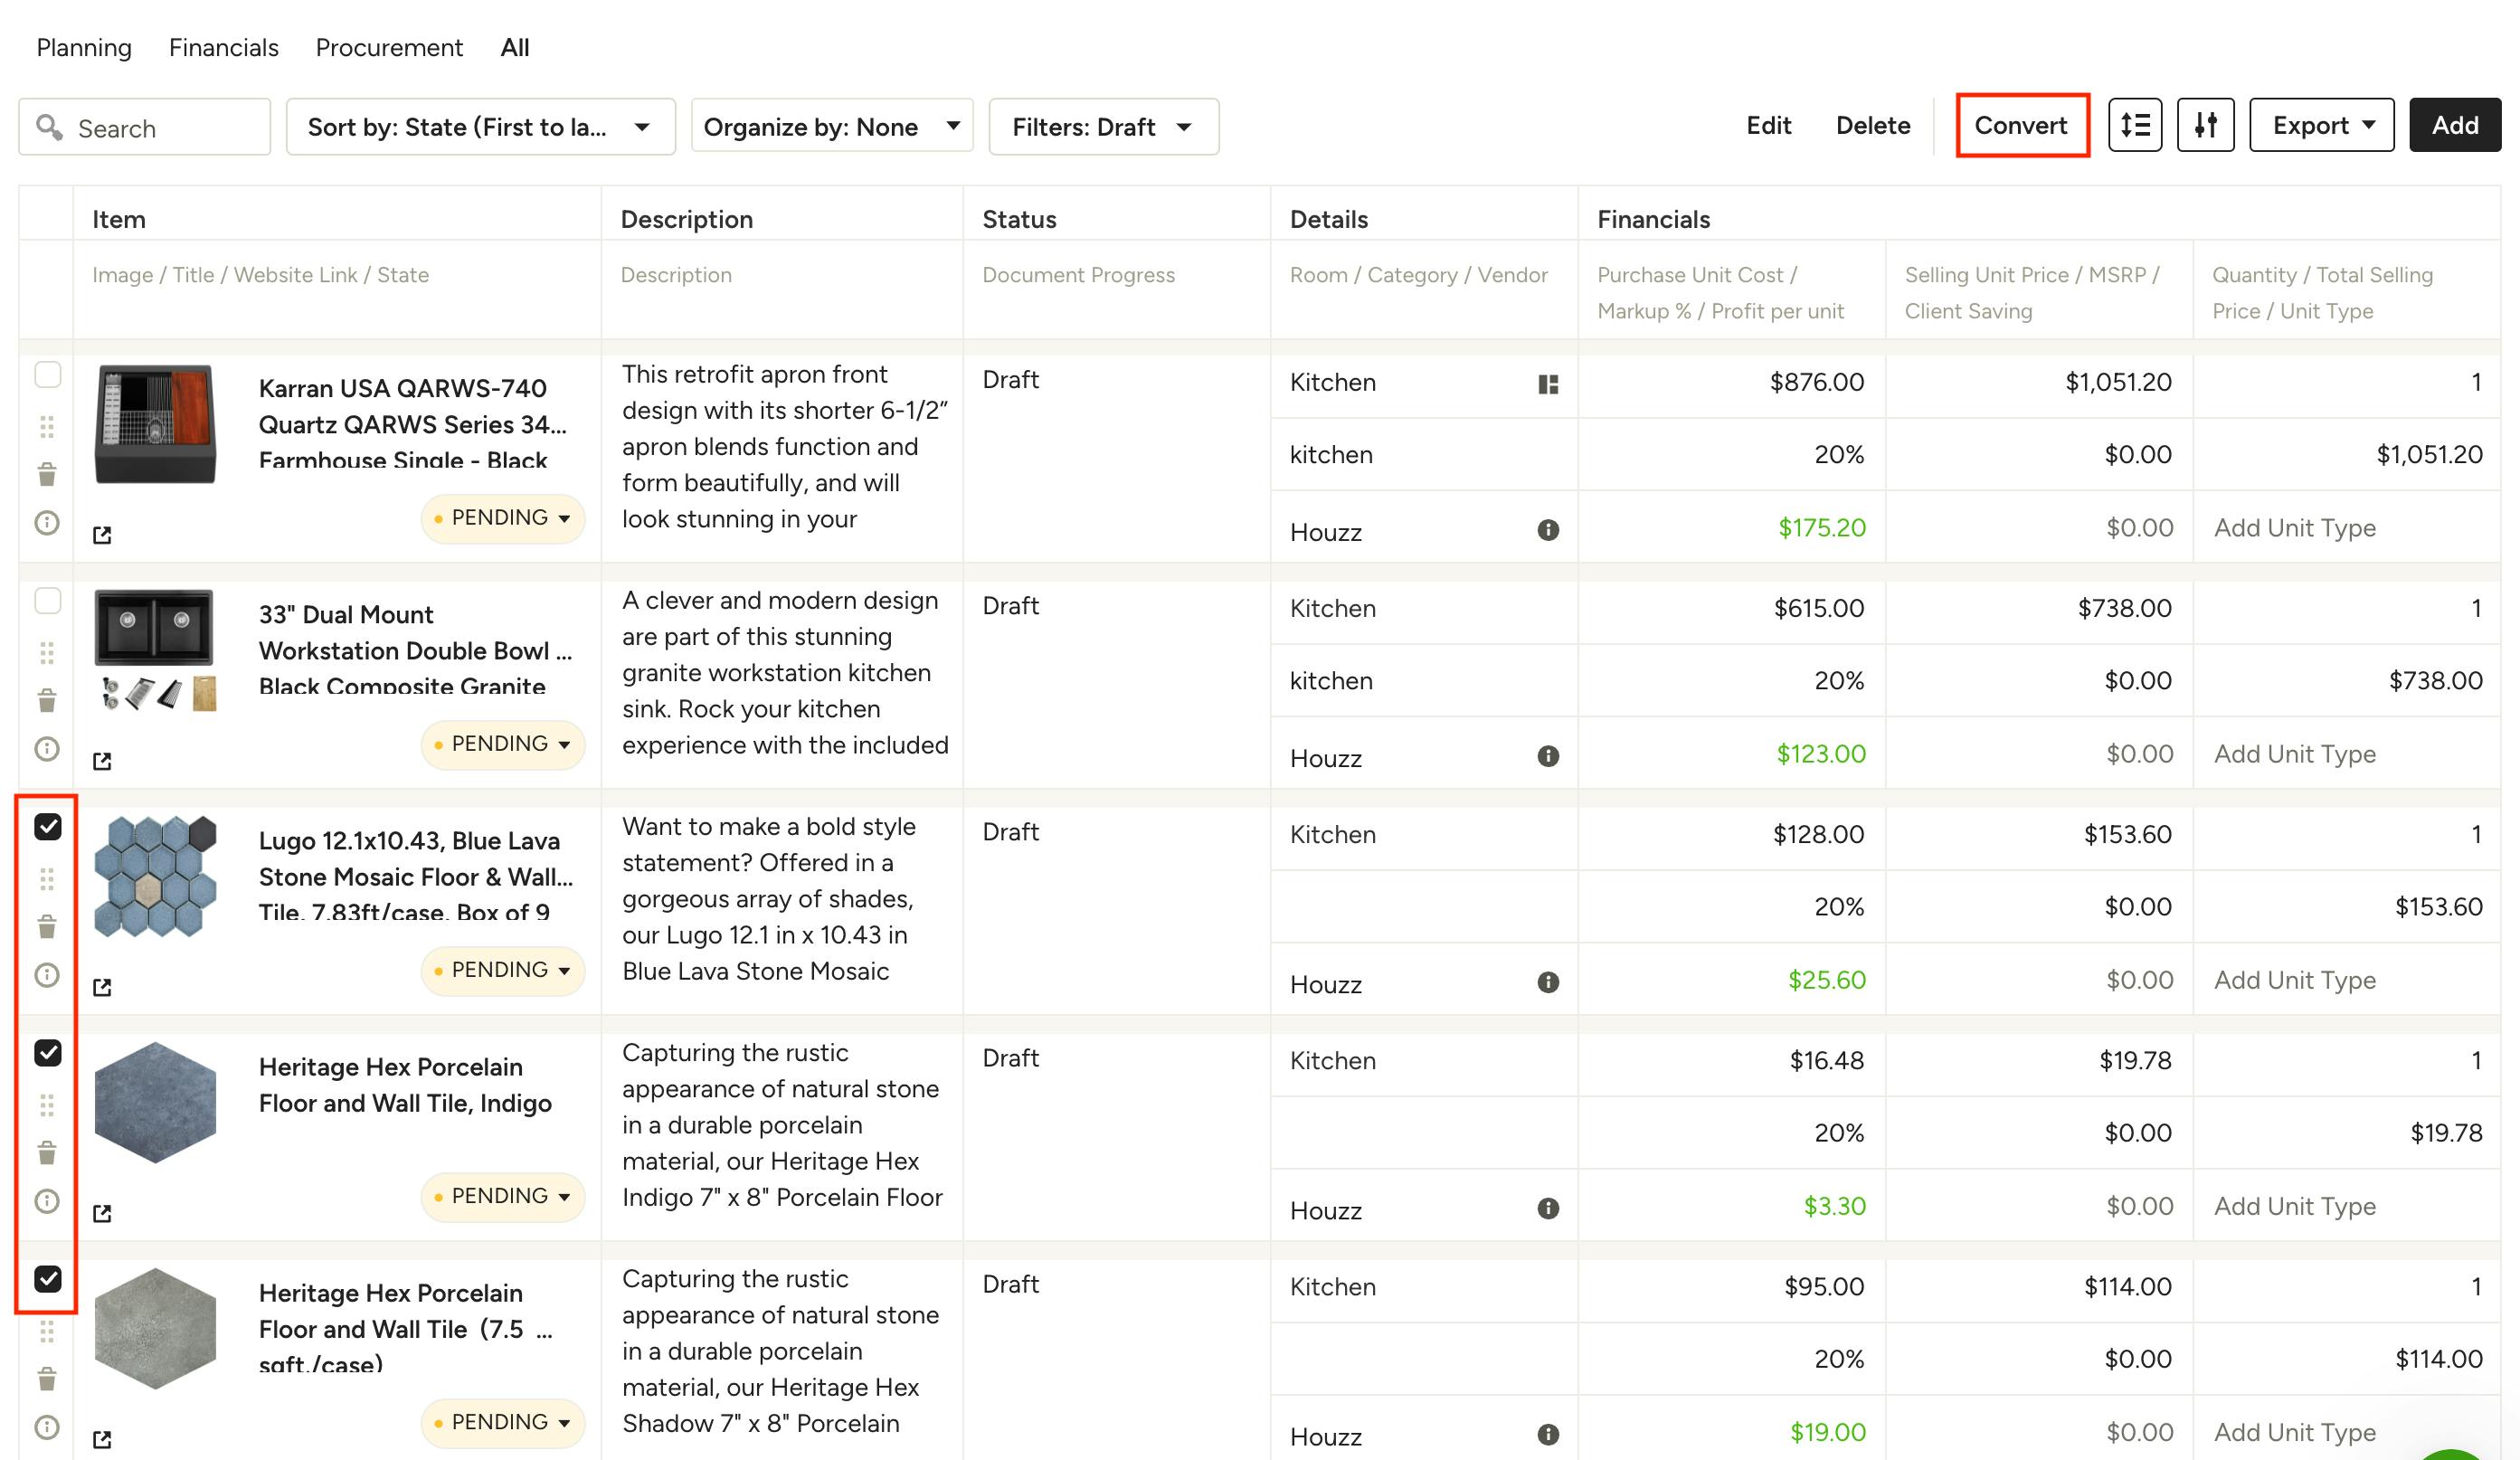
You can convert draft items (those not associated with any documents) to estimates, proposals and invoices directly from the selections tracker. Here's how:
Select the item(s) you want to convert to a single document by using the checkbox to the far left of each one, then click Convert in the top right of the tracker.
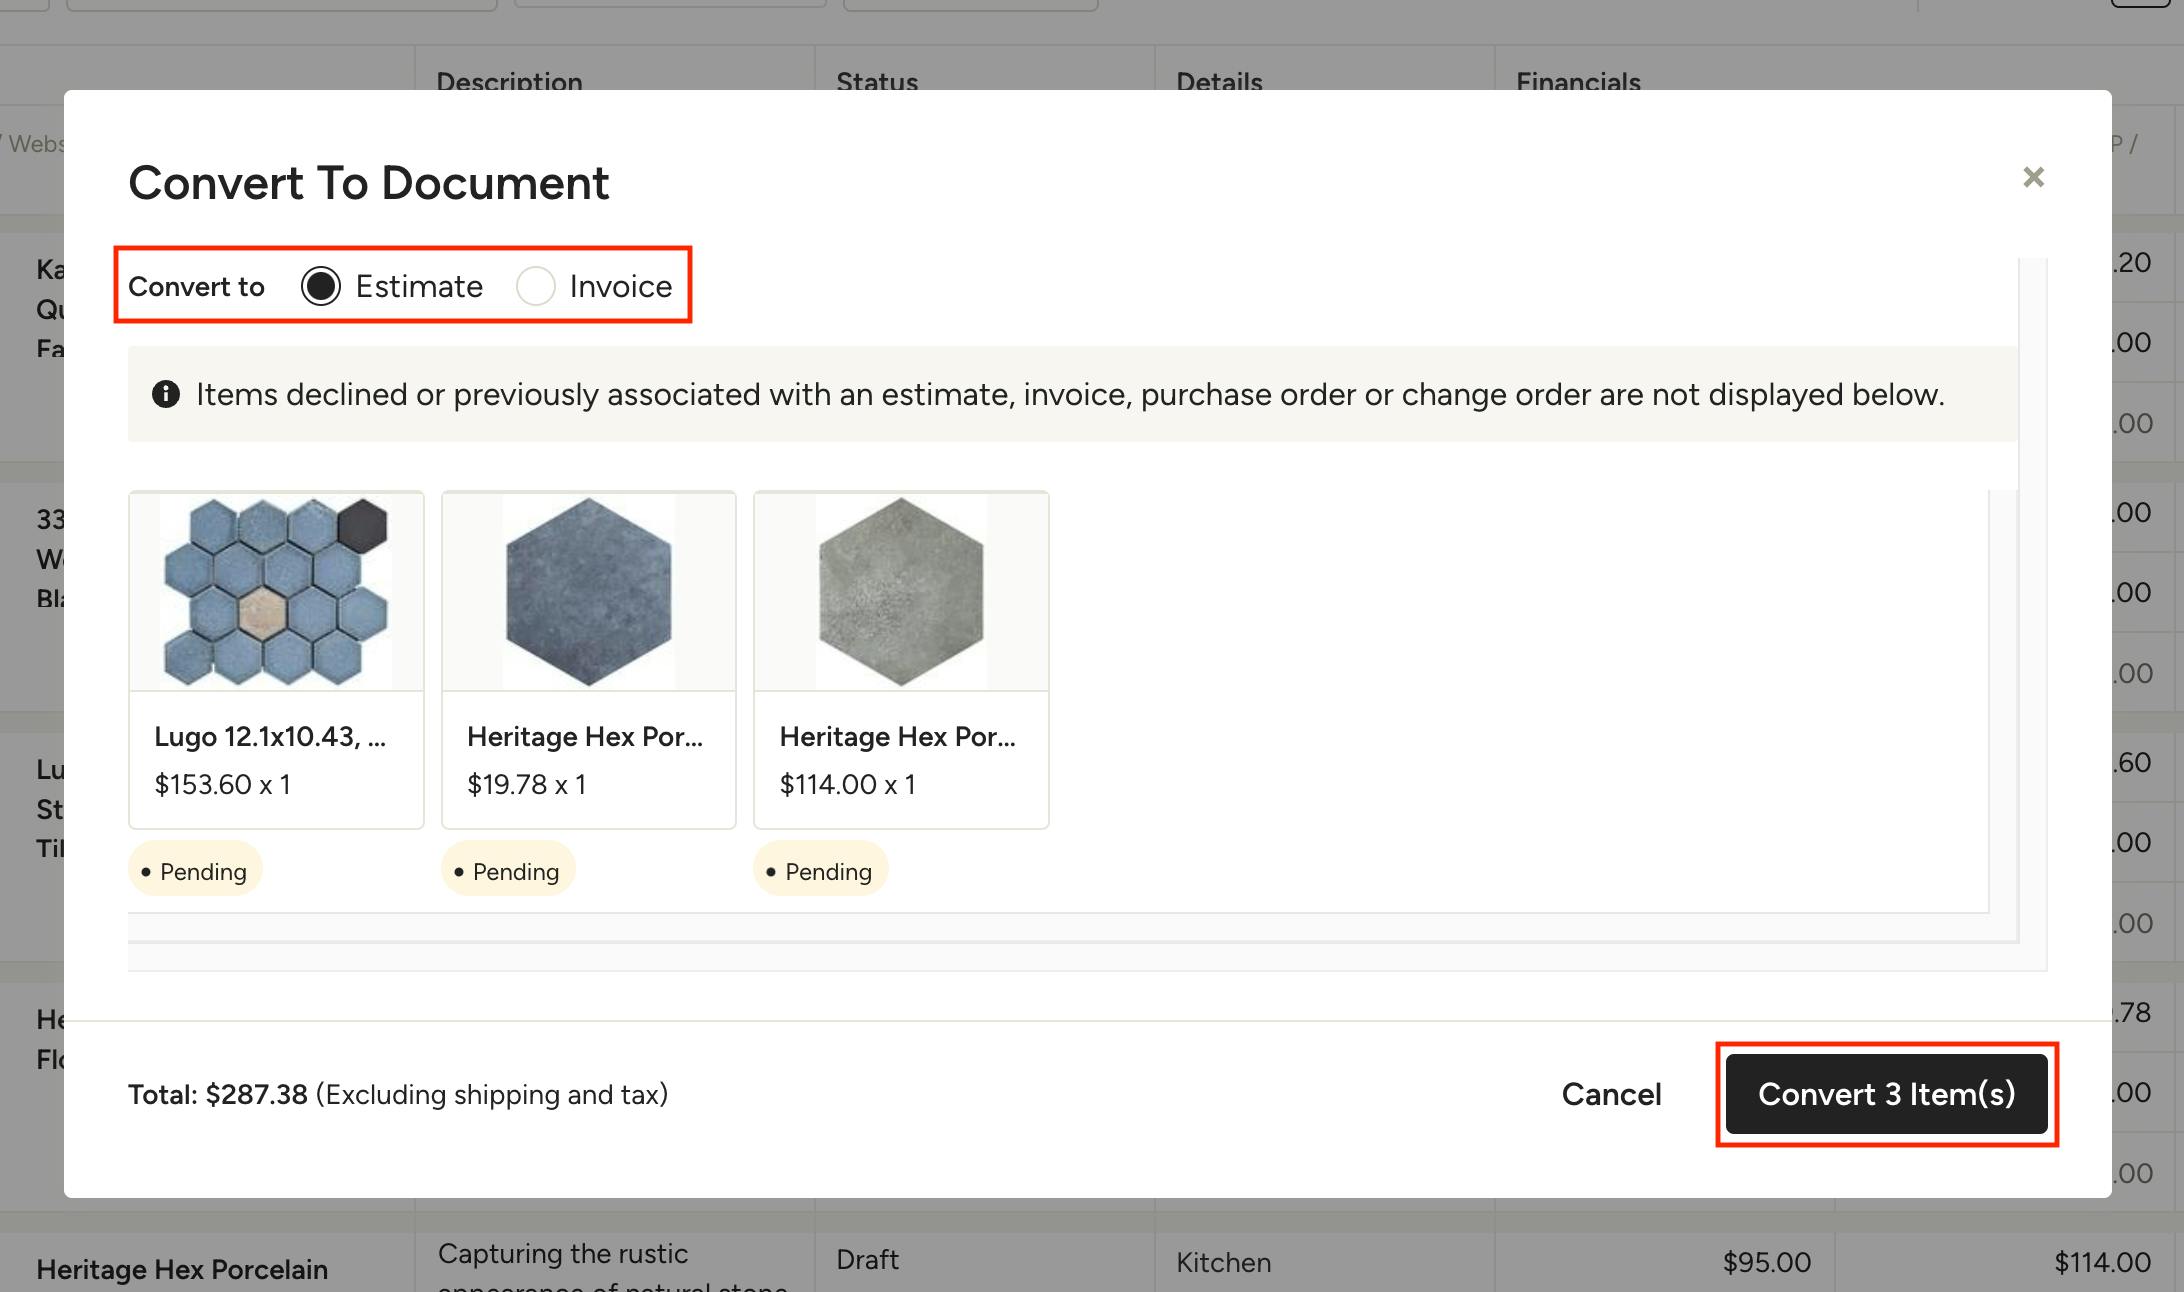
In the modal that appears, choose the type of document you want to convert the items to (estimate/proposal or invoice). Double check that you selected the correct items, then click Convert Item(s) in the bottom right. You will be taken directly to the new document you've just created.
Note: To convert items already associated with a document, you will need to do so directly from the document they are attached to. You can find these documents in the Status column of the tracker and click to open the one(s) you wish you view or edit.
Export the Tracker as Excel, FFE PDF or Tear Sheet
The Selections Tracker is an essential tool for professionals when it comes to keeping track of details, but it's also a very valuable resource that can be shared with all stakeholders, including subcontractors, vendors and clients.
While most of your work processes should remain in Houzz Pro in order to ensure things stay organized and up-to-date, there may be cases where you want to export the Selections Tracker to share. You can download it as an Excel sheet, FFE, or tear sheet. Here's how:
Download as Excel
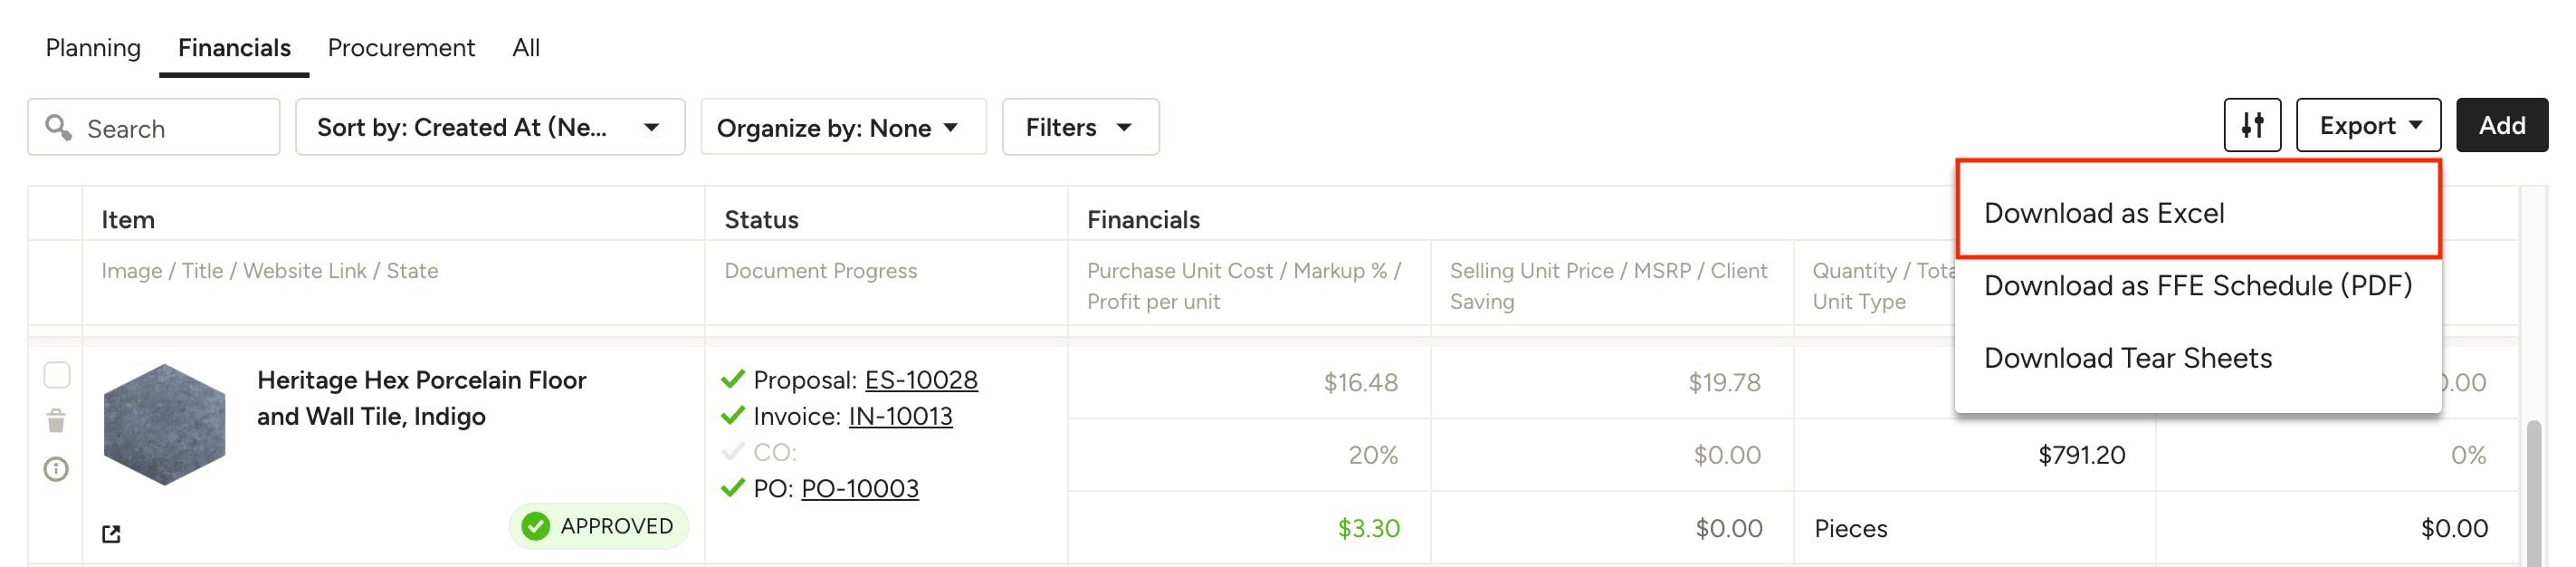
1. Click the Export button at the top right of the page.
2. Select Download as Excel.
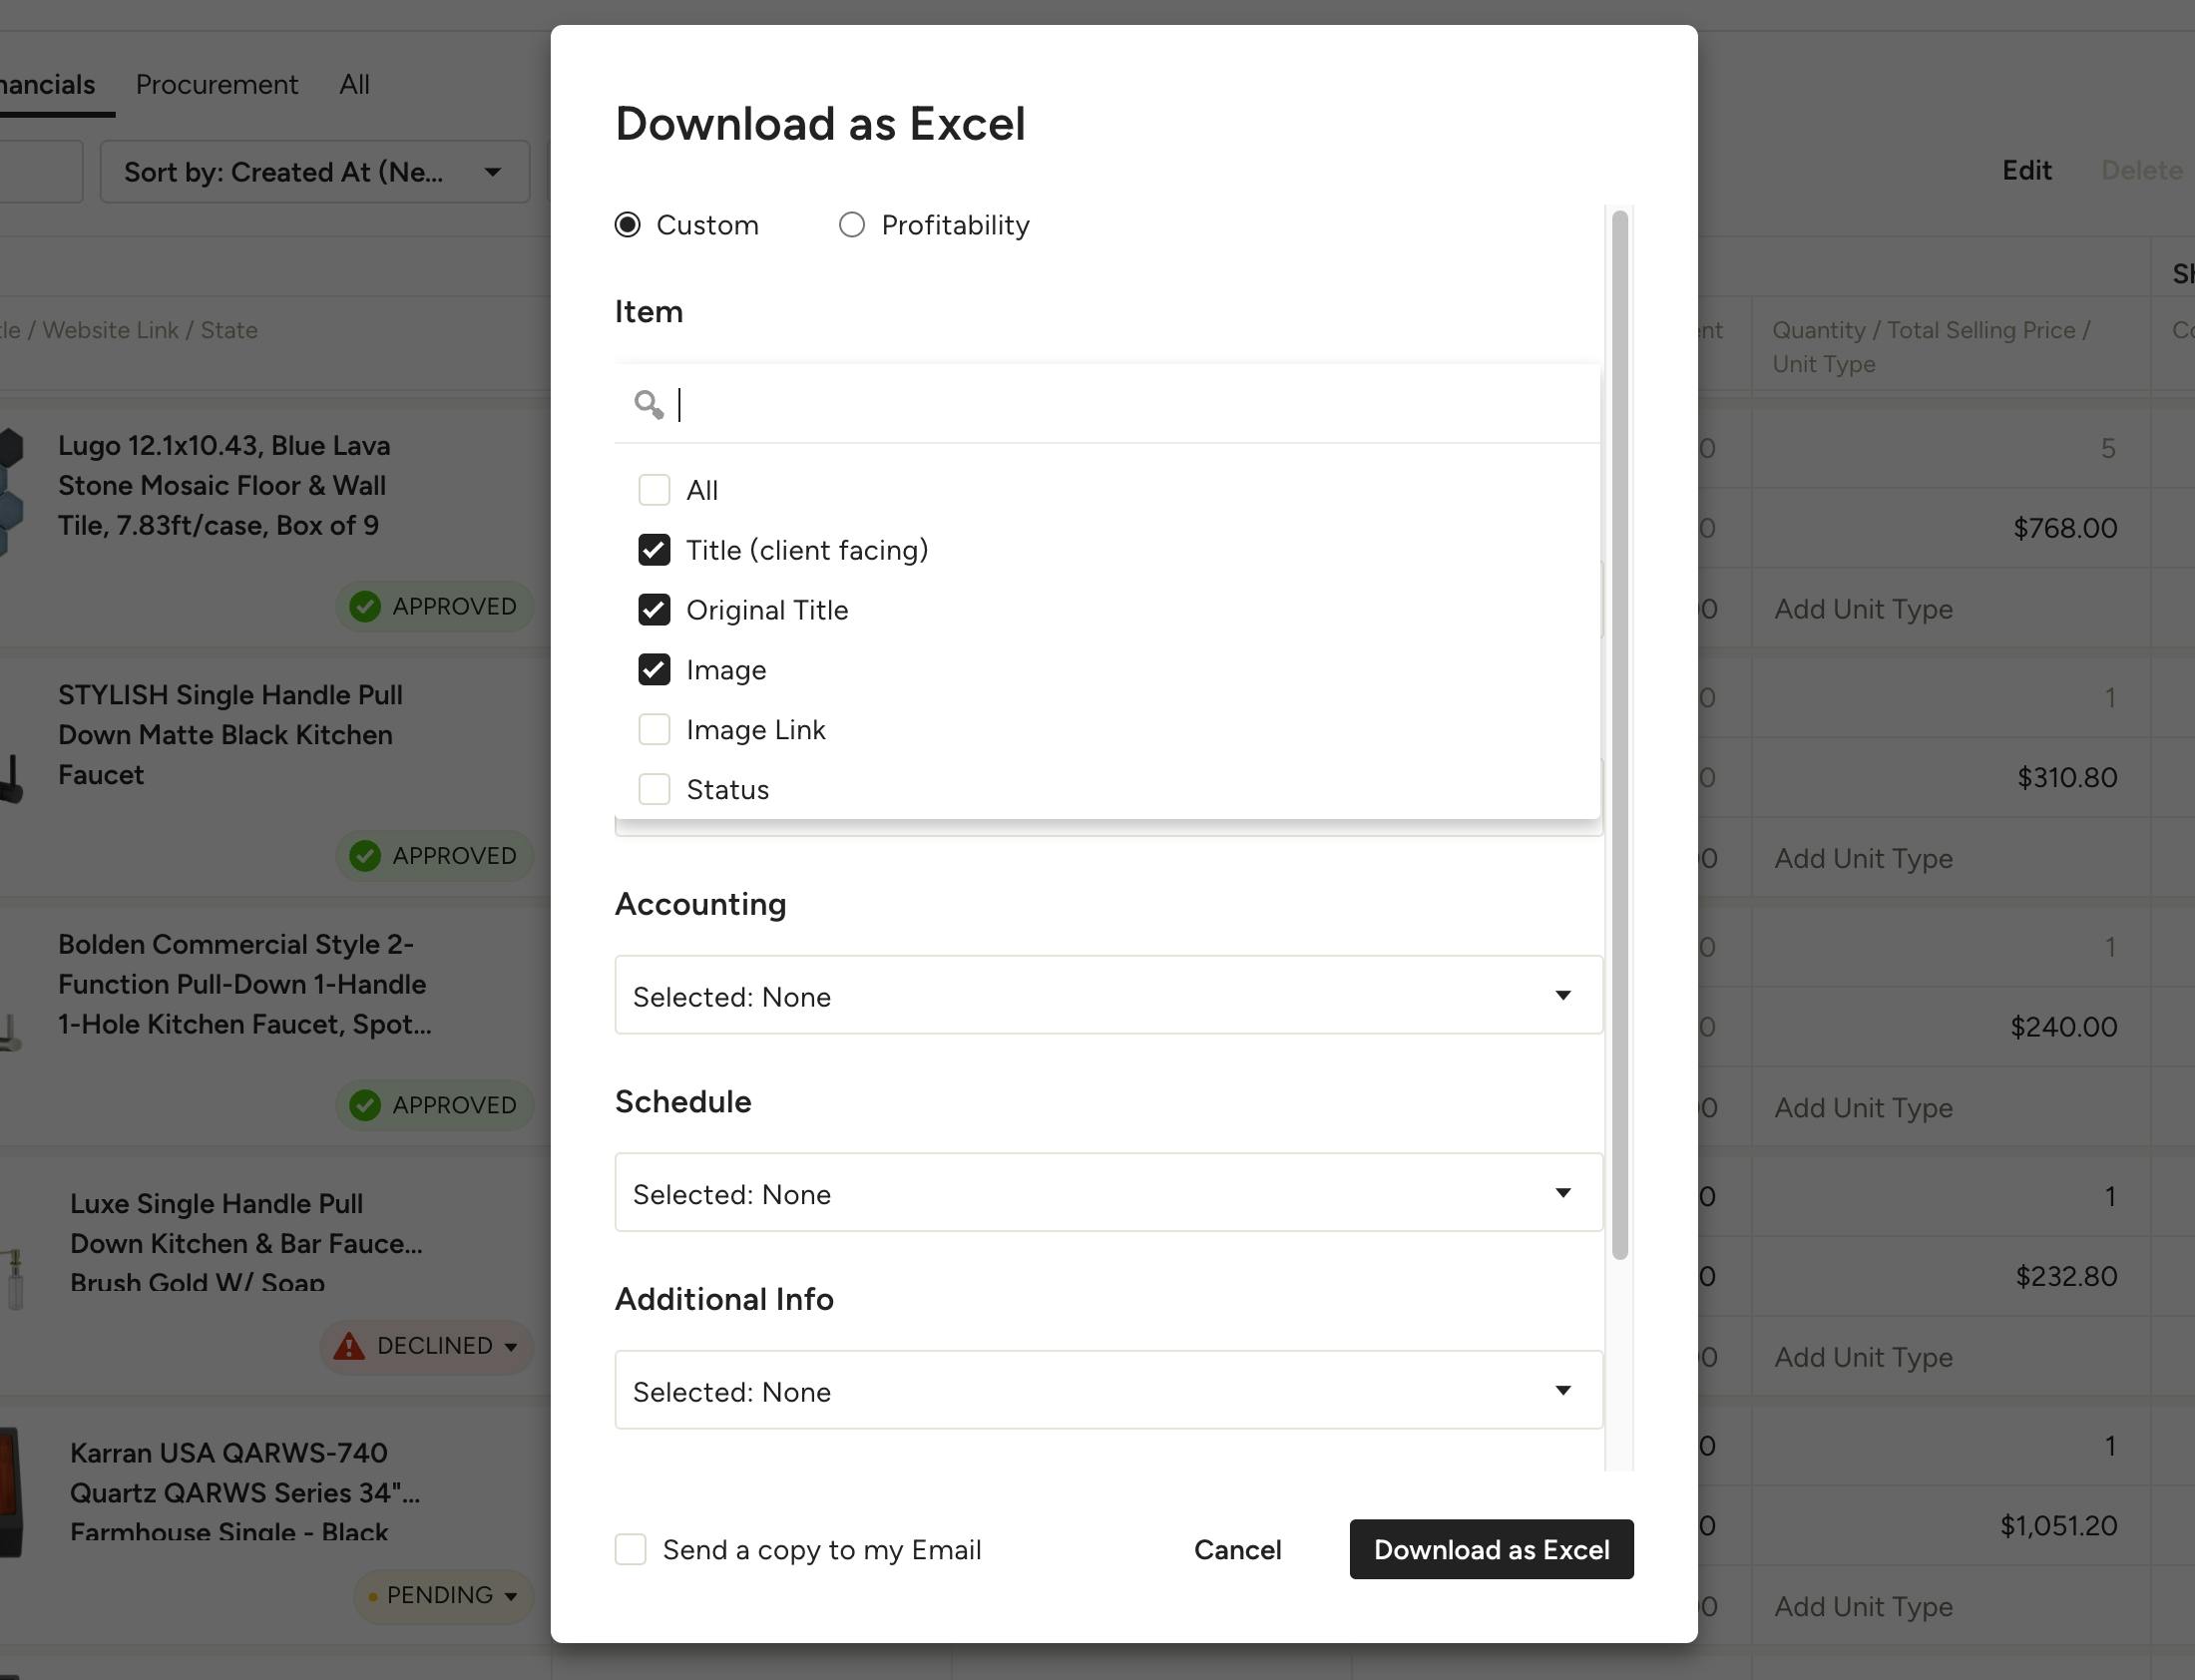
3. When the pop-up window appears, you can choose which columns you'd like to include/exclude in the Excel. This is handy if you need the document for your receiver, because you can filter out all the irrelevant columns, such as markup, selling price, etc.
In your Excel and FFE reports, you can export it with the original product name or with a client facing name. When you export an Excel, you can also export images in your Excel report, instead of only the image URL, and the columns will be in the same order and match what was included in the tracker.
4. Click the Download as Excel button to continue.
5. Open the file in Excel to review before sending it to your receiver.
Download as FF&E
Exporting your Selections Tracker as a "Furniture, Fixture and Equipment" PDF file (abbreviated as FF&E or FFE) is an easy way to share project information that will keep everyone in the loop. Here's how:
1. Select which items you want to include in the FFE by checking the box to the left of each one.
Pro Tip: Use the filters at the top of the tracker to narrow down items by status, room, vendor, etc. Your customizations will be saved for next time.
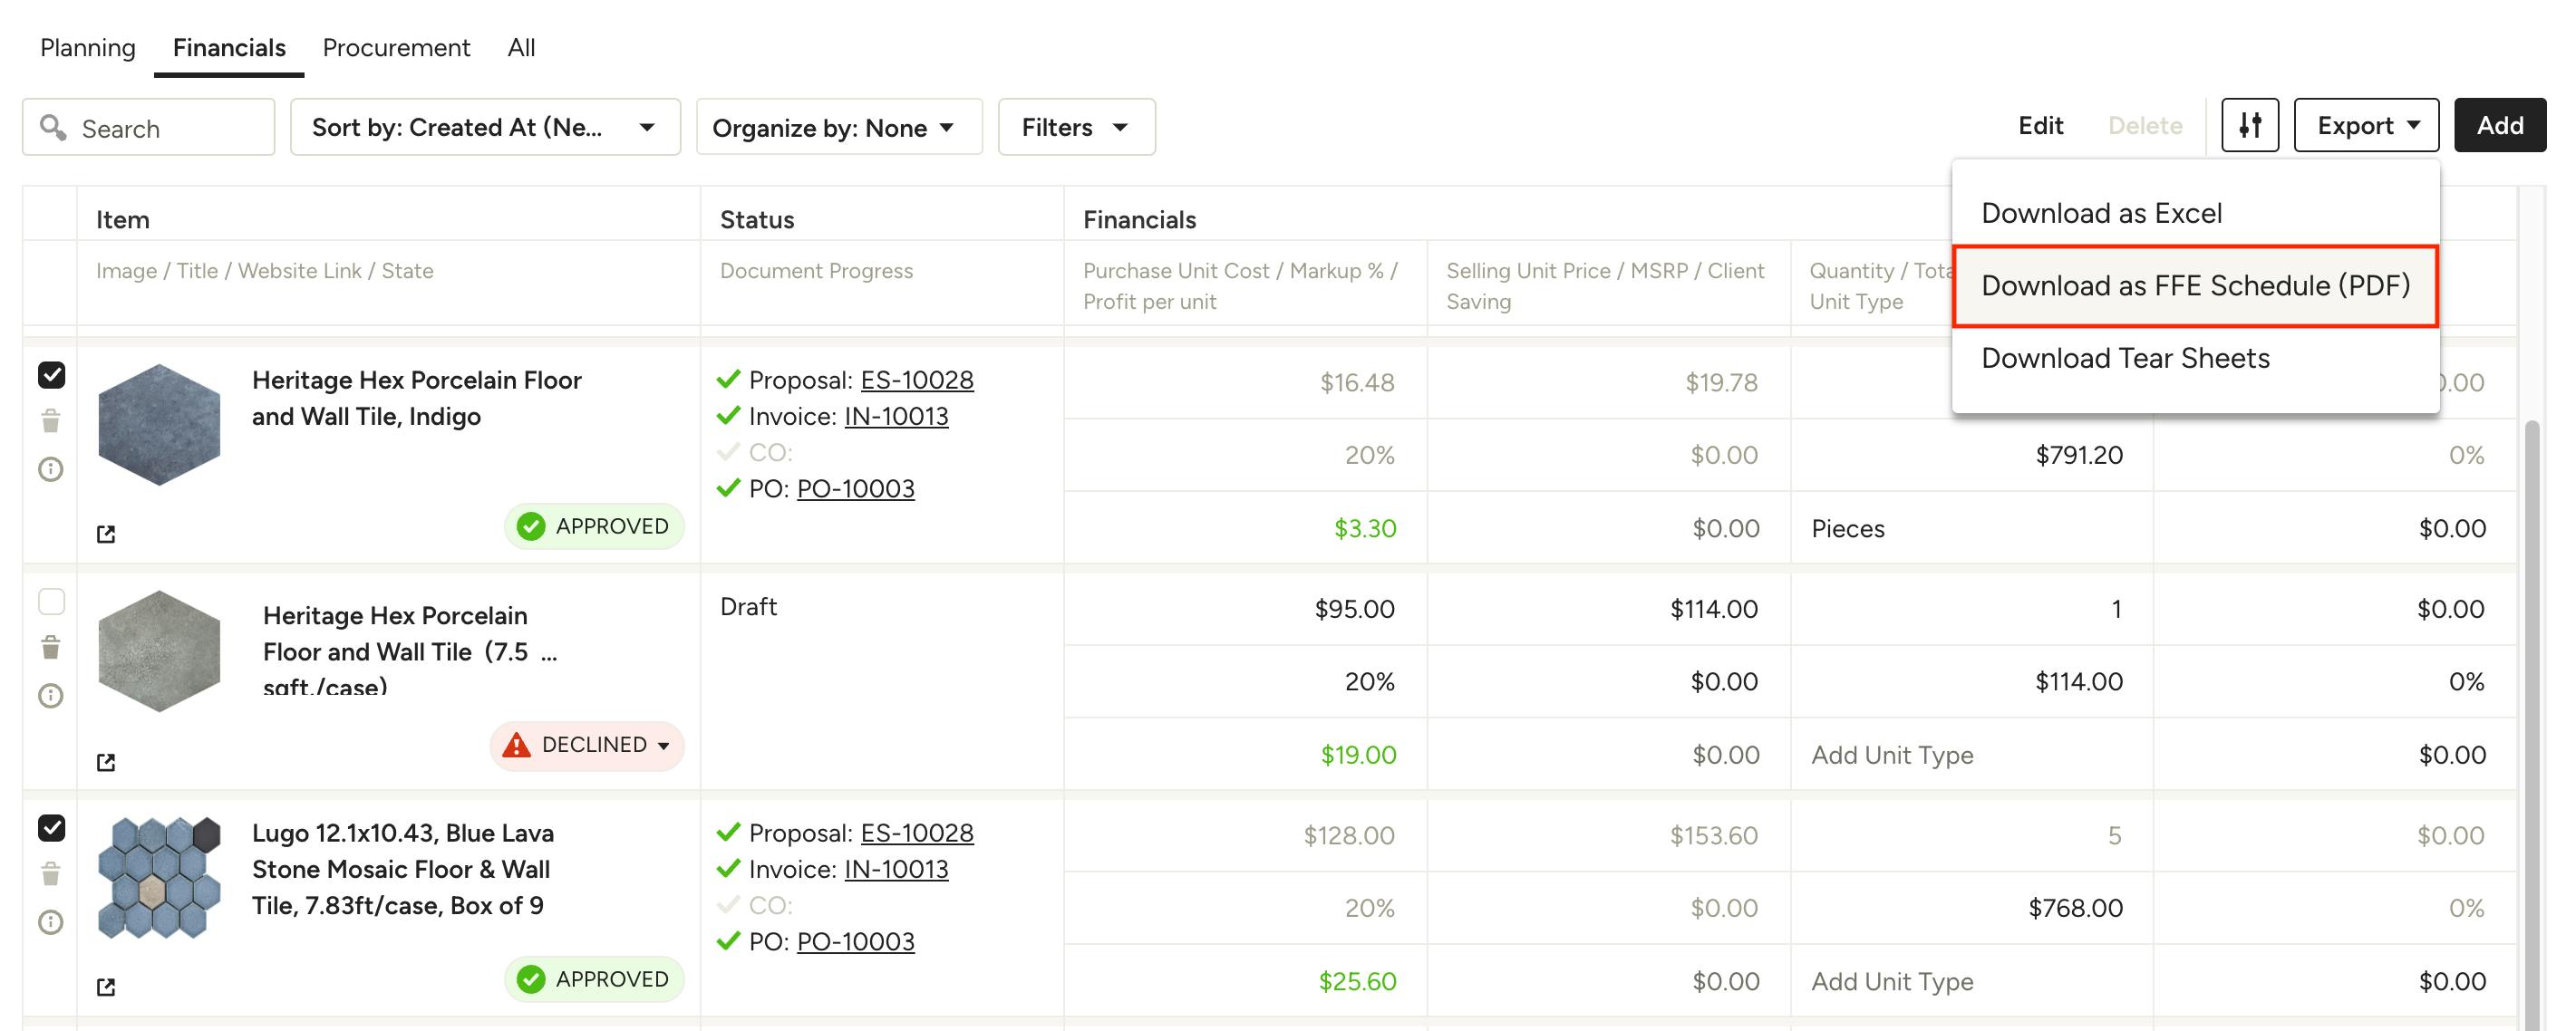
2. Click the Export button at the top right of the page.
3. Select Download as FFE Schedule (PDF).
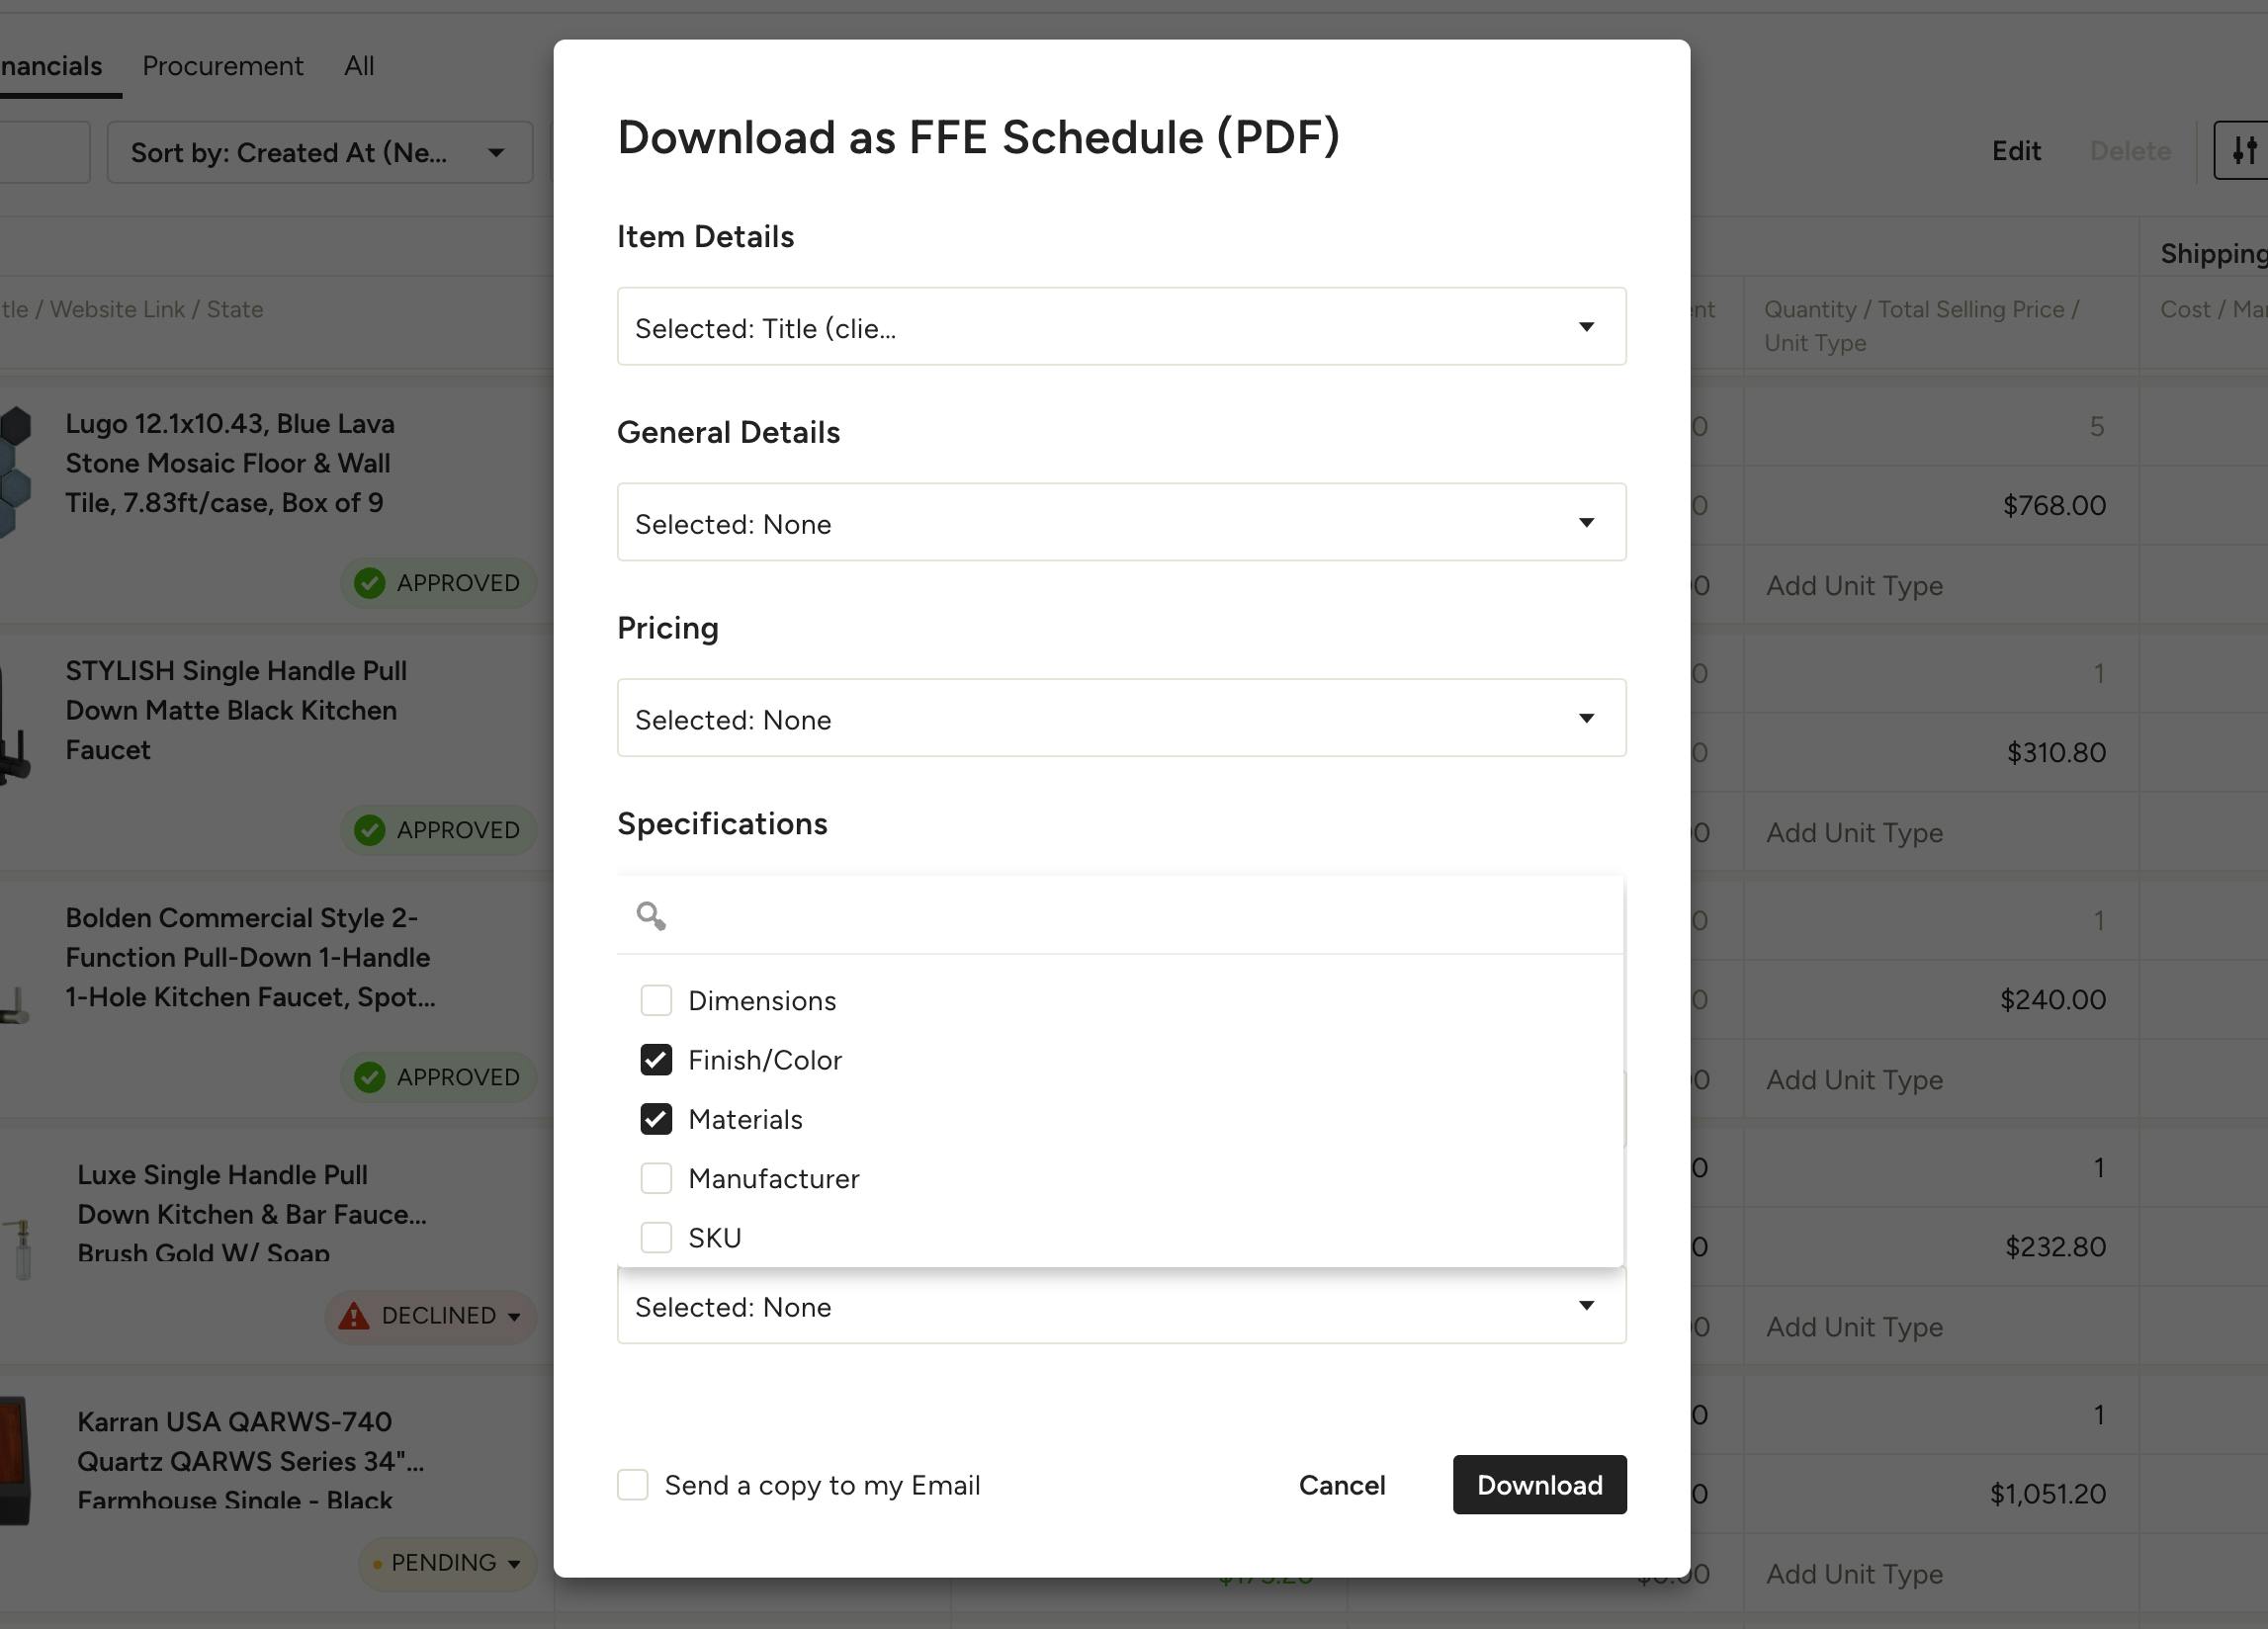
4. When the pop-up window appears, choose which columns you'd like to include/exclude in the FFE export.
This is handy for customizing the document depending on the receiver — vendors might need specifics like SKUs and original titles, whereas clients might need information like color, dimensions or order status. You can filter out any irrelevant columns, such as markup, selling price, etc., if sharing your FFE outside your team.
5. Click the Download button to continue.
6. Open the PDF to review before sending it to your receiver.
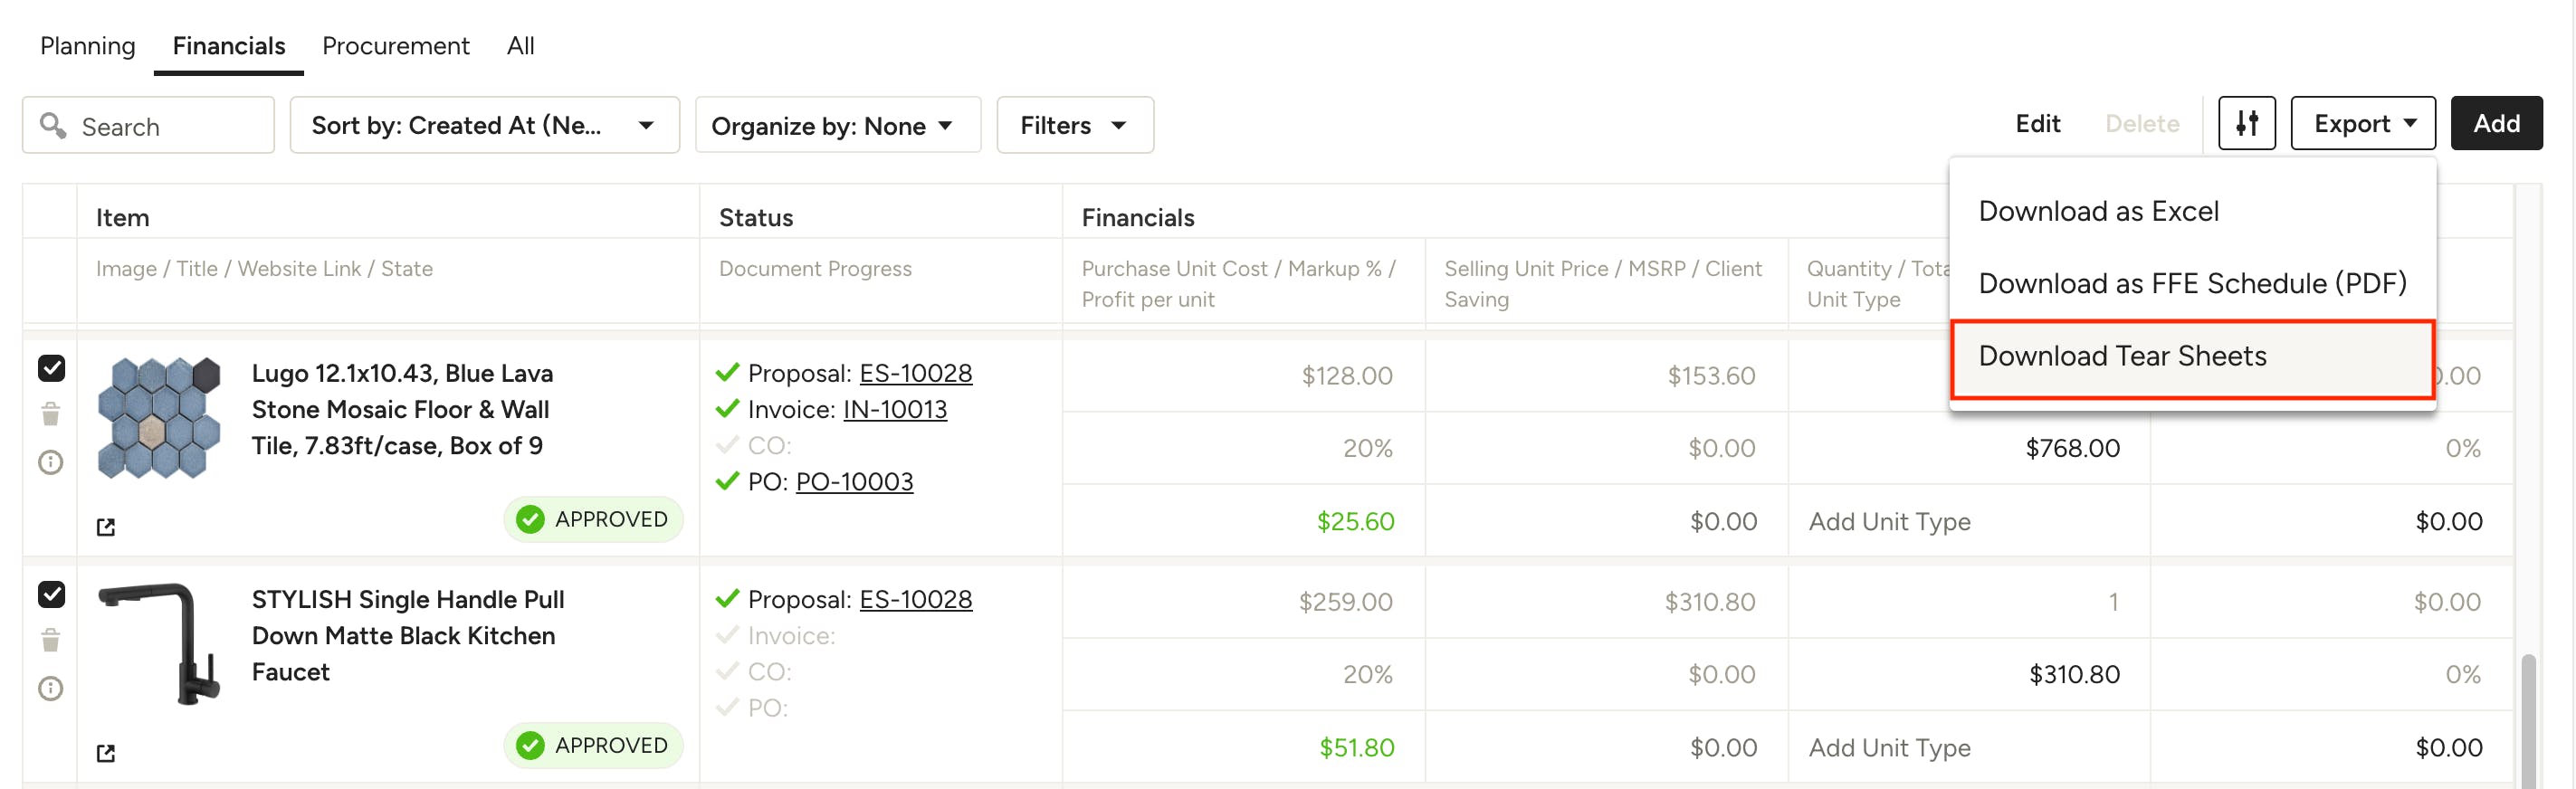
Download as Tear Sheet
1. Select which items you want to include in the tear sheet by checking the box to the left of each one.
Pro Tip: Use the filters at the top of the tracker to narrow down items by status, room, vendor, etc. Your customizations will be saved for next time.
2. Click the Export button at the top right of the page.
3. Select Download Tear Sheets.

4. When the pop-up window appears, choose a custom title and decide if you want prices, product links and/or a document footer with your company information displayed in the tear sheet. If you would like a copy sent directly to your email, make sure this option is selected.
5. Click the Download button to continue.
6. Open the PDF to review before sending it to your receiver.