
Search results for "Comprehensive overview" in Home Design Ideas

 Free Lancing
Effective residential construction project management is crucial in today’s fast-moving building industry. It means overseeing every step of building a home, from planning to finishing, to ensure projects are completed time, within budget, and with high quality. Unlike commercial projects, residential projects require special attention to meet homeowners' unique needs and wishes, requiring a customized approach from the beginning to the end.
In 2025, the construction sector will use advanced technologies like AI and integrated project delivery (IPD) to streamline processes and improve stakeholder collaboration. However, project managers face significant challenges, including managing risks, maintaining quality control, and ensuring effective communication among team members.
A WIP Report (Work-in-Progress Report) is a key tool that helps track a project's budget, progress, and resource use. It provides clear insights, making managing costs easier, avoiding delays, and making informed decisions.
By adopting best practices and using modern construction management tools, project managers can overcome these challenges and deliver successful residential construction projects that meet client expectations and contribute to a sustainable future.
This article provides a brief overview of residential construction project management, highlights its importance, and touches on the challenges faced by project managers while incorporating the latest trends and technologies in the field.
Types of Residential Construction Management
Here are the different types of Residential Construction Management:
Single-Family Homes: These are standalone houses built for individual families. Managing these projects involves overseeing construction from planning to completion, ensuring that the home meets the owner's preferences and budget.
Multi-Family Housing: This includes apartments, condominiums, and townhouses. Projects of this type require managing multiple units, often with shared facilities, and ensuring compliance with local building codes.
Custom Home Building: This involves constructing homes tailored to specific client needs. Close collaboration with architects and designers is required to ensure the house reflects the owner's personality and preferences.
Home Renovation and Remodeling: These projects focus on updating or expanding existing homes. They often involve working with subcontractors for specialized tasks like electrical or plumbing work.
Components of Residential Construction Project Management
Managing a residential construction project requires carefully coordinating people, materials, and timelines. A well-structured approach ensures efficiency, cost control, and high-quality results.
Roles and Responsibilities
A project manager plays a vital role in residential construction. They oversee every step from planning to completion and ensure the project stays on schedule, within budget, and meets quality standards.
Project Manager’s Role in Home Construction
The project manager is responsible for organizing tasks, managing resources, and solving problems that arise during construction. They coordinate between different teams, track progress, and ensure safety regulations are followed.
Collaboration with Contractors, Architects, and Stakeholders
Successful residential construction requires teamwork. Project managers work closely with architects to bring designs to new heights, coordinate with contractors to manage labor and materials, and keep stakeholders (such as homeowners and investors) informed about project updates.
Client Communication and Expectations Management
Clear communication with clients is essential. The project manager keeps homeowners updated on timelines, changes, and challenges. Setting realistic expectations and providing regular updates, they help avoid misunderstandings and keep the project running smoothly.
Project Scope & Planning
Practical project planning sets the foundation for a successful residential construction project. It ensures clear goals, minimizes risks, and keeps the project on track.
Defining Project Objectives and Deliverables:
Clearly outlining what needs to be done and what the final result should look like is essential. This involves setting specific, measurable goals that align with the homeowner's vision and budget.
Managing Homeowner Expectations and Scope Creep:
Homeowners often have changing needs or ideas. Effective project managers must manage these expectations to prevent "scope creep," which can delay projects and increase costs. This involves open communication and setting clear boundaries.
Ensuring Compliance with Zoning Laws and Permits:
Before construction begins, it's crucial to ensure that all necessary permits are obtained and that the project complies with local zoning laws. This step avoids costly fines and delays, ensuring the project moves forward smoothly.
Budgeting & Cost Control
Proper budgeting is essential for keeping residential construction projects financially viable. Effective cost management prevents overspending and ensures profitability.
Accurate Cost Estimation for Residential Projects
A precise cost estimate considers labor, materials, permits, and unexpected expenses. Using historical data and Sage 300 CRE for financial management improves accuracy and helps set realistic budgets.
Budget Allocation and Tracking
Allocating funds efficiently ensures that each phase of the project receives the necessary resources. Tracking expenses through Construction & Financial Dashboards allows for real-time monitoring and early detection of budget deviations.
Preventing Budget Overruns
Uncontrolled costs can derail a project. Regular financial reviews, automated alerts for overspending, and contingency planning help keep expenses in check and prevent financial strain.
Scheduling & Timeline Management
Timely project completion is crucial in residential construction. Effective scheduling minimizes delays and ensures a smooth workflow.
Creating Detailed Project Schedules
A structured schedule outlines all tasks, deadlines, and dependencies. Breaking down the project into phases, planning, execution, and finishing, helps maintain order and clarity.
Preventing Delays & Meeting Deadlines
Delays can result from labor shortages, weather conditions, or supply chain issues. To avoid problems, it’s good to check for risks ahead of time, add extra time to schedules, and keep everyone on the same page.
Using Gantt Charts and Critical Path Methods
CPM for Construction helps identify critical activities that directly impact project completion, while Gantt charts provide a visual timeline of tasks. Both tools optimize scheduling and improve efficiency.
Residential Construction Project Management Phases
Managing a residential construction project effectively requires a structured approach through various phases. Each phase plays a critical role in ensuring the project's success, from initial planning to completion.
Pre-Construction Phase
The pre-construction phase sets the foundation for a smooth and efficient building process. Proper planning at this stage helps prevent costly changes and delays later.
Site Analysis & Approvals: A thorough site analysis assesses soil conditions, topography, and environmental factors. Feasibility studies evaluate project viability, including costs and regulatory compliance. Obtaining zoning approvals, permits, and other legal clearances is crucial before breaking ground.
Selecting Materials and Procurement Strategies: Choosing the right materials impacts durability, sustainability, and cost efficiency. A well-planned procurement strategy, including bulk purchasing and reliable supplier partnerships, ensures timely delivery and cost savings. Using Sage 300 CRE for procurement management helps streamline material sourcing and financial planning.
Construction Phase
The construction phase transforms plans into reality. Effective coordination and strict quality control ensure a successful build.
Resource Allocation and Workflow Coordination: Efficiently managing labor, equipment, and materials is key to maintaining progress. Using CPM for Construction, project managers can allocate resources strategically, prevent bottlenecks, and optimize workflows for timely completion.
Quality Control and Ensuring Compliance with Safety Regulations: Strict adherence to building codes and safety standards is non-negotiable. Regular inspections, worker training, and real-time quality monitoring ensure a structurally sound and legally compliant project. Proactive safety measures prevent accidents and project disruptions.
Project Closeout & Handover
The final phase of residential construction project management is crucial for ensuring a smooth transition from construction to occupancy. Proper closeout procedures guarantee quality, client satisfaction, and long-term project success.
Final Inspections and Quality Assurance: Before finishing the project, a final inspection checks that everything meets safety rules and quality standards. Any problems need to be fixed quickly. Using Procore helps make inspections and tracking issues easier, ensuring a high-quality final product.
Client Walkthrough and Support: A final check helps homeowners see the finished work, ask questions, and make sure it meets their expectations. This is also a chance to explain important home features and maintenance tips. Good communication here builds trust and strengthens relationships.
Warranty Management and Feedback: Efficient warranty management ensures clients get quick help for any issues after construction. A clear process for tracking requests and keeping in touch with homeowners boosts satisfaction. Collecting feedback helps improve future projects. Using S-Curve Forecasting tracks performance trends and refines management strategies.
Software for Residential Construction Project Management
The integration of technology in residential construction project management has revolutionized the way projects are planned, executed, and monitored. Digital tools streamline operations, reduce costs, and improve communication, making them essential for modern construction firms.
Importance of Digital Tools
Investing in digital tools is crucial for construction firms as it transforms the industry by enhancing efficiency, accuracy, and collaboration across the entire project lifecycle. They also improve project management by streamlining processes, automating tasks, and facilitating real-time stakeholder communication.
Top Construction Management Software for Residential Projects
Several software solutions are available for managing residential construction projects:
Procore: Known for its comprehensive project management features, including document management and collaboration tools.
Sage 300 CRE: Offers robust accounting and financial management capabilities, ideal for large-scale construction projects.
Buildertrend: Specializes in residential construction, providing tools for project scheduling, budgeting, and client communication.
CoConstruct: Focuses on custom home building and remodeling, offering features for estimating, scheduling, and project management.
WIP Reports: Useful for tracking work-in-progress and managing project finances effectively.
Features Comparison and Best Use Cases:
Procore: Best for large projects requiring extensive collaboration and document management.
Sage 300 CRE: Ideal for firms needing robust financial management.
Buildertrend: Suitable for residential builders focusing on client communication and project scheduling.
CoConstruct: Perfect for custom home builders who need detailed estimating and scheduling tools.
WIP Reports: Useful for firms needing to track project finances closely.
How Software Improves Project Efficiency
Construction management software significantly enhances project efficiency in several ways:
Automating Accounting and Job Costing: Software like Sage 300 CRE automates financial tasks, reducing manual errors and improving budget tracking.
Streamlining Document Management and Communication: Tools like Procore centralize documents and facilitate real-time communication among team members, reducing misunderstandings and delays.
Mobile-Friendly Solutions for Real-Time Tracking: Mobile apps from platforms like Buildertrend allow for on-site access to project data, enabling real-time tracking and decision-making.
These digital tools and software solutions are essential for modern residential construction project management, offering benefits such as improved efficiency, enhanced collaboration, and better financial control.
Challenges in Residential Construction Project Management
Residential construction projects face a variety of challenges that can impact their success. Here are some of the key issues project managers encounter:
Managing Subcontractors and Labor Shortages
One of the biggest challenges in residential construction is managing subcontractors and dealing with labor shortages. Subcontractors often have their own schedules and priorities, which can lead to delays if not coordinated properly. Additionally, labor shortages can slow down projects and increase costs due to the need for overtime or hiring temporary workers.
Budget Overruns and Unexpected Costs
Budget overruns are common in residential construction due to factors like material price fluctuations, unexpected site conditions, or changes in project scope. Effective budget management involves regularly monitoring expenses and having contingency plans for unexpected costs.
Changing Construction and Eco Rules
Construction and Eco Rules are always changing, so project managers need to keep up with the latest regulations. This involves following guidelines for saving energy, protecting the environment, and ensuring safety. Ignoring these rules can lead to fines, delays, or even stopping the project.
Best Practices
To ensure your residential construction projects run smoothly and successfully, follow these essential best practices:
Setting Clear Project Goals and Milestones
Clearly defining what you want to achieve is the first step to success. Set specific, measurable, achievable, relevant, and time-bound (SMART) goals. This helps everyone involved understand what needs to be done and by when. For example, instead of saying "build a house," say "build a house with three bedrooms and two bathrooms within the next nine months."
Stakeholder Collaboration
Good communication is key to keeping everyone on the same page. Regular meetings with contractors, suppliers, and homeowners help prevent misunderstandings and ensure that everyone knows what's happening and what's next. This open dialogue also helps resolve issues quickly, preventing small problems from becoming big delays.
Using Data-Driven Insights for Decision-Making
Making decisions based on facts rather than guesses is crucial. Use data and analytics to understand project progress, identify potential issues early, and make informed decisions. For instance, if data shows that a particular material is consistently causing delays, you can plan ahead to avoid those delays in the future.
Proactive Risk Management Strategies
Things don't always go as planned, so being prepared is essential. Identify potential risks early and have a plan to manage them. This might include having backup suppliers, planning for weather conditions, or setting aside extra funds for unexpected expenses. Being proactive can prevent small issues from turning into major problems.
Conclusion
Effective residential construction project management requires careful planning, clear communication, and the right digital tools. From single-family homes to multi-family housing and custom projects, managing timelines, budgets, and quality is essential for success.
By following best practices, using project management software, and staying ahead of industry trends, project managers can ensure smooth execution and client satisfaction despite challenges like labor shortages, budget overruns, and regulatory compliance; modern technology and strategic planning help mitigate risks.
Construction firms can improve efficiency, enhance collaboration, and maintain financial control by adopting advanced tools like Procore, Sage 300 CRE, and Buildertrend. A well-managed project delivers a quality home and builds trust and long-term success in the industry.
FAQs
What is residential construction project management?
It involves overseeing all aspects of building residential properties, from initial planning and design to construction and completion, ensuring projects are completed on time, within budget, and to the desired quality standards.
How can I prevent budget overruns in my construction project?
Accurate cost estimation, continuous budget tracking, and having contingency plans for unexpected expenses are key strategies to prevent budget overruns.
What are the main stages of a residential construction project?
The primary stages include design, pre-construction, procurement, and construction.
How does construction management software improve project efficiency?
It streamlines processes like scheduling, budgeting, and communication, providing real-time data access and collaboration among stakeholders, which enhances overall project efficiency.
How can I ensure my project complies with local building codes and regulations?
Engage professionals familiar with local laws, obtain all necessary permits before starting, and conduct regular inspections to ensure adherence to building codes and regulations.
 M3Decks & Outdoor Living
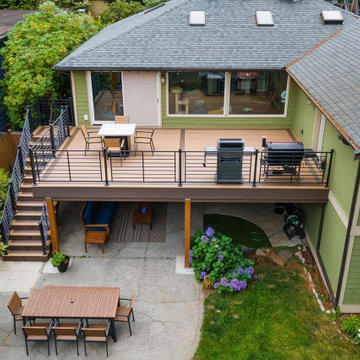
North Seattle Complete Design-Build Deck with Underdeck DrySpace Project
Project Overview
In North Seattle, M3Decks & Outdoor Living completed a comprehensive design-build project, transforming a residential backyard into a multi-functional outdoor living space. The project featured a modern elevated deck with an innovative underdeck DrySpace system, seamlessly blending practicality with aesthetic appeal to suit the Pacific Northwest climate.
Scope of Work
Design Phase: Created a custom design for an elevated deck, prioritizing open space for entertaining and a sheltered underdeck area. The design incorporated sleek railings and a natural aesthetic to complement the surrounding greenery.
Construction: Built the elevated deck using TimberTech composite decking and Fortress Steel Framing for durability. Installed a TimberTech DrySpace system beneath the deck to create a dry, usable space for additional outdoor living or storage.
Staircase and Lighting: Constructed a sturdy staircase with inset lighting on each step, ensuring safety and adding a warm ambiance for evening use. The staircase featured modern black railings to match the deck’s design.
Landscaping Integration: Worked with the existing landscape, preserving mature trees and adding native plants like hydrangeas to enhance the natural setting and create a cohesive outdoor environment.
Key Features
Elevated Deck: Spacious TimberTech composite deck with sleek black railings, designed for entertaining and enjoying the scenic views of North Seattle’s greenery.
Underdeck DrySpace: TimberTech DrySpace system installed to provide a weatherproof area beneath the deck, perfect for additional seating, storage, or future outdoor amenities.
Inset Lighting: Energy-efficient lighting integrated into the staircase and deck perimeter, enhancing safety and creating an inviting atmosphere for nighttime use.
Biophilic Design: Incorporated native plants and preserved existing trees to create a seamless connection with the natural surroundings, enhancing the outdoor experience.
Outcome
The North Seattle design-build project delivered a stunning and functional outdoor space that elevated the homeowners’ lifestyle. The elevated deck provides a perfect spot for entertaining, while the DrySpace system ensures the underdeck area remains dry and usable year-round, even in Seattle’s rainy climate. The modern design, combined with practical features like inset lighting and durable materials, resulted in a low-maintenance, high-value addition to the property that the homeowners can enjoy for years to come.
Location
North Seattle, WA
Project Type
Residential Design-Build with Underdeck System
 M3Decks & Outdoor Living
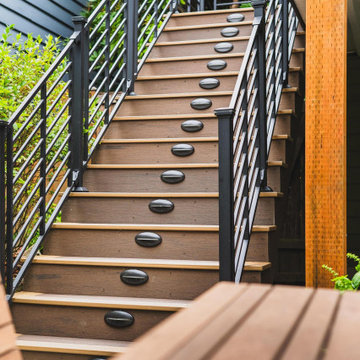
North Seattle Complete Design-Build Deck with Underdeck DrySpace Project
Project Overview
In North Seattle, M3Decks & Outdoor Living completed a comprehensive design-build project, transforming a residential backyard into a multi-functional outdoor living space. The project featured a modern elevated deck with an innovative underdeck DrySpace system, seamlessly blending practicality with aesthetic appeal to suit the Pacific Northwest climate.
Scope of Work
Design Phase: Created a custom design for an elevated deck, prioritizing open space for entertaining and a sheltered underdeck area. The design incorporated sleek railings and a natural aesthetic to complement the surrounding greenery.
Construction: Built the elevated deck using TimberTech composite decking and Fortress Steel Framing for durability. Installed a TimberTech DrySpace system beneath the deck to create a dry, usable space for additional outdoor living or storage.
Staircase and Lighting: Constructed a sturdy staircase with inset lighting on each step, ensuring safety and adding a warm ambiance for evening use. The staircase featured modern black railings to match the deck’s design.
Landscaping Integration: Worked with the existing landscape, preserving mature trees and adding native plants like hydrangeas to enhance the natural setting and create a cohesive outdoor environment.
Key Features
Elevated Deck: Spacious TimberTech composite deck with sleek black railings, designed for entertaining and enjoying the scenic views of North Seattle’s greenery.
Underdeck DrySpace: TimberTech DrySpace system installed to provide a weatherproof area beneath the deck, perfect for additional seating, storage, or future outdoor amenities.
Inset Lighting: Energy-efficient lighting integrated into the staircase and deck perimeter, enhancing safety and creating an inviting atmosphere for nighttime use.
Biophilic Design: Incorporated native plants and preserved existing trees to create a seamless connection with the natural surroundings, enhancing the outdoor experience.
Outcome
The North Seattle design-build project delivered a stunning and functional outdoor space that elevated the homeowners’ lifestyle. The elevated deck provides a perfect spot for entertaining, while the DrySpace system ensures the underdeck area remains dry and usable year-round, even in Seattle’s rainy climate. The modern design, combined with practical features like inset lighting and durable materials, resulted in a low-maintenance, high-value addition to the property that the homeowners can enjoy for years to come.
Location
North Seattle, WA
Project Type
Residential Design-Build with Underdeck System
Find the right local pro for your project
 Az Custom Landscapes LLC
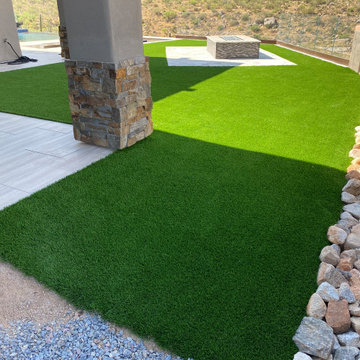
This comprehensive aerial overview showcases a luxury, multi-tiered contemporary backyard landscape expertly engineered for a hillside property in Oro Valley, Arizona. Designed by Az Custom Landscapes LLC, the resort-style retreat utilizes a structured, geometric layout to convert a steep slope into distinct functional living zones.The upper terrace features a vibrant, precision-cut premium artificial turf lawn that frames a custom, rectangular stacked-stone fire pit centered on a contrasting light porcelain paver pad. A seamless glass pool fence preserves the panoramic desert views while separating the upper lawn from the lower tiers.Integrated concrete masonry steps lead down to a sunken, luxury outdoor kitchen pavilion finished with premium large-format porcelain pavers ($24\times48$ inches), stainless steel appliances, a built-in grill, and an outdoor sink. The hardscape transitions fluidly into a modern swimming pool area, showcasing clean lines, minimal grout joints, and a low-maintenance, drought-tolerant desert aesthetic tailored for the Southwest climate.
 BMR BelMax Remodeling
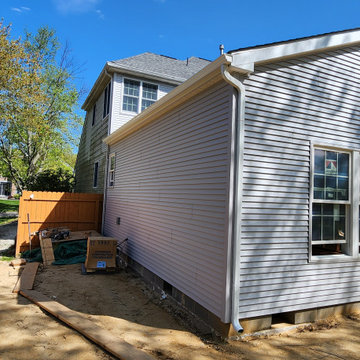
Project Spotlight: Stunning 700 Sq. Ft. Home Addition by BMR Belmax Remodeling
At BMR Belmax Remodeling, we recently completed an extensive 700 sq. ft. home addition project that redefined both style and functionality for our clients. This comprehensive project not only expanded the home but also upgraded its overall design and livability. From structural work to interior finishes, we handled every detail with precision and care.
Project Overview
Structural Upgrades and Expansion:
The project began with the removal of an old deck to make way for a new addition seamlessly integrated into the existing structure.
To achieve an open-concept design, we removed a section of the kitchen wall and installed a robust metal beam supported by two metal columns. This structural element ensured the second floor and roof were securely supported.
New Spaces Added:
Kitchen Remodeling:
Installed custom kitchen cabinets with stunning white quartz countertops for a clean, modern look.
Integrated a large peninsula, creating additional workspace and seating.
Added recessed lighting for a bright and functional cooking area, along with new high-end appliances.
Bathroom Addition:
Designed and built a new bathroom featuring a walk-in shower with glass doors, a double vanity, and elegant recessed lighting.
Installed new mirrors, a toilet, and high-quality fixtures to create a luxurious space.
Dining Room and Bedroom:
Built a spacious new dining room directly connected to the kitchen, ideal for entertaining and family gatherings.
Added a cozy new bedroom with modern lighting and finishes for a warm, inviting atmosphere.
Laundry Room Remodel:
Upgraded the laundry room to maximize efficiency with new plumbing, electrical systems, and updated finishes.
Exterior Upgrade:
Built a brand-new deck adjacent to the new addition, offering an outdoor space perfect for relaxation and entertaining.
Electrical, Plumbing, and Mechanical Work:
Completed all necessary upgrades to ensure the new addition was seamlessly connected to the home’s existing systems, including electrical, plumbing, and HVAC.
Key Features and Design Highlights
Open-concept design achieved through structural engineering with a metal beam and column system.
High-end kitchen finishes, including quartz countertops, recessed lighting, and a large peninsula.
Luxurious bathroom design with modern amenities like a walk-in shower and double vanity.
A new deck addition that enhances outdoor living space.
Stylish and functional spaces tailored to the homeowners’ needs.
The Result
The 700 sq. ft. addition has transformed this home into a spacious, modern, and functional retreat. The open-concept kitchen and dining area create a welcoming space for gatherings, while the upgraded bedroom and bathroom offer comfort and style. The new deck perfectly complements the addition, providing a seamless transition between indoor and outdoor living.
Ready to expand and enhance your home? Contact BMR Belmax Remodeling today to turn your vision into reality!
 BMR BelMax Remodeling
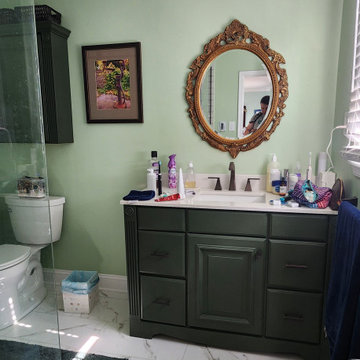
Master Bathroom Remodel by BMR Belmax Remodeling: Project Overview
Initial Condition
Size and Layout: The master bathroom was small, featuring a plastic shower enclosure.
Client’s Request: The client wanted to enlarge the bathroom to create a more spacious and luxurious environment.
Renovation Details
Expansion:
Wall Movement: The wall between the hallway and the master bathroom was moved 2 feet to increase the bathroom’s size.
Plumbing Upgrades:
New Water Pipes: Installed for the new shower, vanity, and toilet.
Drainage: A new shower drain and toilet drain were installed to accommodate the updated layout.
Electrical Enhancements:
Recessed Lighting: Installed 4 new recessed lights to improve illumination.
Heated Floor: Added a new heated floor for enhanced comfort.
Fixtures and Finishes:
Vanity: Installed a beautiful, modern vanity to improve storage and aesthetics.
Medicine Cabinet: Included a new medicine cabinet to provide additional storage and convenience.
Exhaust Fan and HVAC Outlet: Added to improve ventilation and climate control.
Tiles: Small format tiles were installed in the shower area, and 12×24 tiles were laid on the floor to create a cohesive and stylish look.
Conclusion This comprehensive remodel transformed a small, outdated master bathroom into a spacious, modern, and functional retreat, perfectly tailored to the client’s needs and preferences.

 Cowbell Designs
Project Overview: This comprehensive renovation breathes new life into an existing home, meticulously preserving its foundational essence while introducing modern enhancements. The transformation includes the addition of a second story, thoughtfully designed with a dog shed roof that harmoniously aligns with the original roof’s architectural intent.
Exterior Expansion: The rear of the home has been skillfully extended to accommodate a basement access point, housing mechanical and electrical equipment. Above, a mudroom offers practicality and convenience. The newly constructed back porch serves as a serene retreat, boasting panoramic views of the property’s expansive depth.
Front Porch Extension: In keeping with the home’s original A-frame entryway, the front porch has been tastefully elongated, further accentuating the residence’s welcoming facade.
Energy Efficiency: This residential renovation proudly exceeds recommended energy efficiency standards by over 10%. This achievement is attributed to the strategic placement of high R-value insulation, tailored to each product’s function within the overall building envelope. Additionally, the incorporation of energy-efficient glazing with low Solar Heat Gain Coefficient (SGHC) values significantly contributes to the home’s sustainable design.
Aesthetic Vision: The client’s aesthetic preference shines through in the envisioned color scheme, featuring dark black and gray tones complemented by rich, dark wood accents. This bold palette underscores the home’s sophisticated and contemporary character.
Client Satisfaction: From the outset, the client has expressed immense satisfaction with the design, which not only meets but exceeds their expectations in both form and function.
 BMR BelMax Remodeling
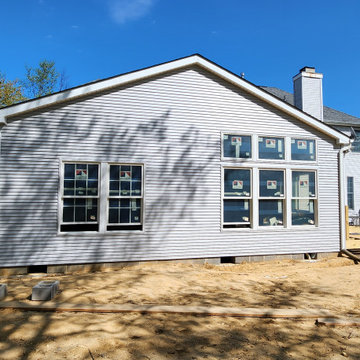
Project Spotlight: Stunning 700 Sq. Ft. Home Addition by BMR Belmax Remodeling
At BMR Belmax Remodeling, we recently completed an extensive 700 sq. ft. home addition project that redefined both style and functionality for our clients. This comprehensive project not only expanded the home but also upgraded its overall design and livability. From structural work to interior finishes, we handled every detail with precision and care.
Project Overview
Structural Upgrades and Expansion:
The project began with the removal of an old deck to make way for a new addition seamlessly integrated into the existing structure.
To achieve an open-concept design, we removed a section of the kitchen wall and installed a robust metal beam supported by two metal columns. This structural element ensured the second floor and roof were securely supported.
New Spaces Added:
Kitchen Remodeling:
Installed custom kitchen cabinets with stunning white quartz countertops for a clean, modern look.
Integrated a large peninsula, creating additional workspace and seating.
Added recessed lighting for a bright and functional cooking area, along with new high-end appliances.
Bathroom Addition:
Designed and built a new bathroom featuring a walk-in shower with glass doors, a double vanity, and elegant recessed lighting.
Installed new mirrors, a toilet, and high-quality fixtures to create a luxurious space.
Dining Room and Bedroom:
Built a spacious new dining room directly connected to the kitchen, ideal for entertaining and family gatherings.
Added a cozy new bedroom with modern lighting and finishes for a warm, inviting atmosphere.
Laundry Room Remodel:
Upgraded the laundry room to maximize efficiency with new plumbing, electrical systems, and updated finishes.
Exterior Upgrade:
Built a brand-new deck adjacent to the new addition, offering an outdoor space perfect for relaxation and entertaining.
Electrical, Plumbing, and Mechanical Work:
Completed all necessary upgrades to ensure the new addition was seamlessly connected to the home’s existing systems, including electrical, plumbing, and HVAC.
Key Features and Design Highlights
Open-concept design achieved through structural engineering with a metal beam and column system.
High-end kitchen finishes, including quartz countertops, recessed lighting, and a large peninsula.
Luxurious bathroom design with modern amenities like a walk-in shower and double vanity.
A new deck addition that enhances outdoor living space.
Stylish and functional spaces tailored to the homeowners’ needs.
The Result
The 700 sq. ft. addition has transformed this home into a spacious, modern, and functional retreat. The open-concept kitchen and dining area create a welcoming space for gatherings, while the upgraded bedroom and bathroom offer comfort and style. The new deck perfectly complements the addition, providing a seamless transition between indoor and outdoor living.
Ready to expand and enhance your home? Contact BMR Belmax Remodeling today to turn your vision into reality!
 M3Decks & Outdoor Living
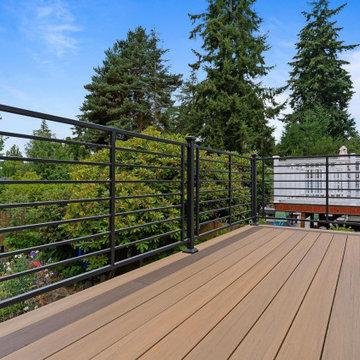
North Seattle Complete Design-Build Deck with Underdeck DrySpace Project
Project Overview
In North Seattle, M3Decks & Outdoor Living completed a comprehensive design-build project, transforming a residential backyard into a multi-functional outdoor living space. The project featured a modern elevated deck with an innovative underdeck DrySpace system, seamlessly blending practicality with aesthetic appeal to suit the Pacific Northwest climate.
Scope of Work
Design Phase: Created a custom design for an elevated deck, prioritizing open space for entertaining and a sheltered underdeck area. The design incorporated sleek railings and a natural aesthetic to complement the surrounding greenery.
Construction: Built the elevated deck using TimberTech composite decking and Fortress Steel Framing for durability. Installed a TimberTech DrySpace system beneath the deck to create a dry, usable space for additional outdoor living or storage.
Staircase and Lighting: Constructed a sturdy staircase with inset lighting on each step, ensuring safety and adding a warm ambiance for evening use. The staircase featured modern black railings to match the deck’s design.
Landscaping Integration: Worked with the existing landscape, preserving mature trees and adding native plants like hydrangeas to enhance the natural setting and create a cohesive outdoor environment.
Key Features
Elevated Deck: Spacious TimberTech composite deck with sleek black railings, designed for entertaining and enjoying the scenic views of North Seattle’s greenery.
Underdeck DrySpace: TimberTech DrySpace system installed to provide a weatherproof area beneath the deck, perfect for additional seating, storage, or future outdoor amenities.
Inset Lighting: Energy-efficient lighting integrated into the staircase and deck perimeter, enhancing safety and creating an inviting atmosphere for nighttime use.
Biophilic Design: Incorporated native plants and preserved existing trees to create a seamless connection with the natural surroundings, enhancing the outdoor experience.
Outcome
The North Seattle design-build project delivered a stunning and functional outdoor space that elevated the homeowners’ lifestyle. The elevated deck provides a perfect spot for entertaining, while the DrySpace system ensures the underdeck area remains dry and usable year-round, even in Seattle’s rainy climate. The modern design, combined with practical features like inset lighting and durable materials, resulted in a low-maintenance, high-value addition to the property that the homeowners can enjoy for years to come.
Location
North Seattle, WA
Project Type
Residential Design-Build with Underdeck System
 M3Decks & Outdoor Living
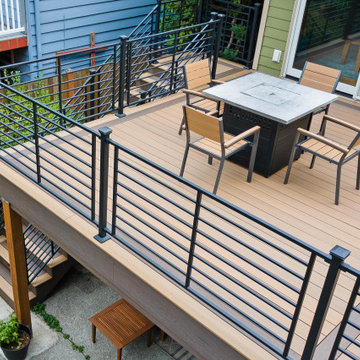
North Seattle Complete Design-Build Deck with Underdeck DrySpace Project
Project Overview
In North Seattle, M3Decks & Outdoor Living completed a comprehensive design-build project, transforming a residential backyard into a multi-functional outdoor living space. The project featured a modern elevated deck with an innovative underdeck DrySpace system, seamlessly blending practicality with aesthetic appeal to suit the Pacific Northwest climate.
Scope of Work
Design Phase: Created a custom design for an elevated deck, prioritizing open space for entertaining and a sheltered underdeck area. The design incorporated sleek railings and a natural aesthetic to complement the surrounding greenery.
Construction: Built the elevated deck using TimberTech composite decking and Fortress Steel Framing for durability. Installed a TimberTech DrySpace system beneath the deck to create a dry, usable space for additional outdoor living or storage.
Staircase and Lighting: Constructed a sturdy staircase with inset lighting on each step, ensuring safety and adding a warm ambiance for evening use. The staircase featured modern black railings to match the deck’s design.
Landscaping Integration: Worked with the existing landscape, preserving mature trees and adding native plants like hydrangeas to enhance the natural setting and create a cohesive outdoor environment.
Key Features
Elevated Deck: Spacious TimberTech composite deck with sleek black railings, designed for entertaining and enjoying the scenic views of North Seattle’s greenery.
Underdeck DrySpace: TimberTech DrySpace system installed to provide a weatherproof area beneath the deck, perfect for additional seating, storage, or future outdoor amenities.
Inset Lighting: Energy-efficient lighting integrated into the staircase and deck perimeter, enhancing safety and creating an inviting atmosphere for nighttime use.
Biophilic Design: Incorporated native plants and preserved existing trees to create a seamless connection with the natural surroundings, enhancing the outdoor experience.
Outcome
The North Seattle design-build project delivered a stunning and functional outdoor space that elevated the homeowners’ lifestyle. The elevated deck provides a perfect spot for entertaining, while the DrySpace system ensures the underdeck area remains dry and usable year-round, even in Seattle’s rainy climate. The modern design, combined with practical features like inset lighting and durable materials, resulted in a low-maintenance, high-value addition to the property that the homeowners can enjoy for years to come.
Location
North Seattle, WA
Project Type
Residential Design-Build with Underdeck System
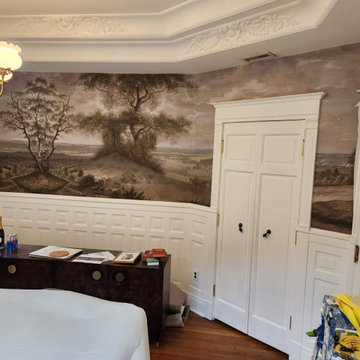
 Windy City Painters
Professional wallpaper installation Old Town requires expertise that honors the neighborhood's historic character while delivering modern durability and beauty.
Project Overview and Architecture
This Old Town wallpaper installation showcased our ability to work with the area's distinctive architecture, from classic greystones to renovated vintage condos that define this prestigious neighborhood.
Materials and Products
We selected premium wallpaper materials specifically designed for Chicago's climate conditions, using high-quality adhesives and primers that ensure long-lasting adhesion on various surface types.
Installation Process
Step 1: Surface preparation including cleaning, smoothing, and addressing imperfections common in older buildings
Step 2: Professional repairs to walls ensuring perfect foundation for wallpaper application
Step 3: Quality primer application designed specifically for wallpaper adhesion and longevity
Step 4: Expert wallpaper installation with precise pattern matching and seamless application techniques
Chicago-Specific Challenges
Old Town homes present unique challenges including weather exposure, aging building materials, potential lead paint considerations, and vintage surfaces requiring specialized preparation techniques.
Results Achieved
Windy City Painters delivered flawless wallpaper installation that enhanced the room's aesthetic while respecting the architectural integrity of this historic Old Town property.
Professional Tips
Homeowners should always hire experienced professionals for wallpaper installation, especially in historic properties where surface preparation and material selection significantly impact long-term success and beauty.
See more work and request free estimate at windypainters.com.
FAQs
Q: Why hire professionals for wallpaper installation Old Town homes? / A: Expert installation prevents costly mistakes, ensures proper adhesion, and preserves historic property values through quality craftsmanship.
Q: What wallpaper materials work best in Chicago climate? / A: High-quality papers with proper backing designed for humidity fluctuations and temperature changes typical in Chicago homes.
Q: How do you prepare Old Town walls for wallpaper? / A: Thorough cleaning, surface smoothing, repairs, and specialized primers ensure optimal wallpaper installation adhesion and longevity.
Q: Can wallpaper be installed over existing paint? / A: Sometimes, but professional assessment determines if surface preparation or primer application is needed for successful wallpaper installation.
Q: How long does professional wallpaper installation take? / A: Most rooms completed within one day, depending on size, pattern complexity, and surface preparation requirements.
Q: What about removing old wallpaper first? / A: We safely remove existing wallpaper using proper techniques that protect walls and prepare surfaces for new installation.
Q: Do you offer design consultation for wallpaper selection? / A: Yes, we help choose patterns and materials that complement Old Town architectural character and personal style preferences.
Q: How do you handle pattern matching across walls? / A: Precise measurements and expert techniques ensure seamless wallpaper installation with perfect pattern alignment throughout rooms.
Q: What's your wallpaper installation warranty coverage? / A: Comprehensive warranties cover both materials and workmanship, giving you confidence in your wallpaper installation investment.
Q: Can you work around furniture and schedules? / A: Absolutely! We coordinate timing and setup to minimize disruption during your professional wallpaper installation project.
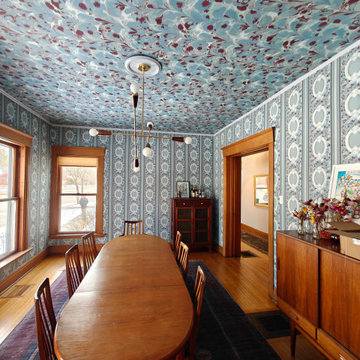 Windy City Painters
Professional wallpaper installation Chicago dining room showcases expert craftsmanship in this stunning transformation that perfectly complements the home's architectural character.
## Project Overview
This comprehensive wallpaper installation project involved both walls and ceiling application in a formal dining room within a vintage Chicago greystone. The intricate pattern required precise alignment and professional techniques to achieve seamless results that honor the home's historic charm while adding contemporary elegance.
## Materials and Products
We utilized premium wallpaper adhesive specifically formulated for Chicago's climate variations, along with professional-grade smoothing tools and precision cutting equipment. High-quality primer ensured optimal surface preparation for lasting adhesion across both vertical and horizontal applications.
## Installation Process
First, comprehensive surface preparation included removing existing materials and repairing any imperfections. Second, application of specialized primer designed for wallpaper adhesion. Third, precise measurement and cutting with careful attention to pattern alignment. Finally, professional installation with meticulous corner work and ceiling transitions.
## Chicago-Specific Challenges
Chicago homes present unique wallpaper installation challenges including settling foundations that affect wall surfaces, humidity fluctuations impacting adhesive performance, and older plaster surfaces requiring specialized preparation techniques. Additionally, vintage buildings often have irregular walls demanding expert adjustment skills.
## Results and Quality
The completed wallpaper installation creates a sophisticated dining environment that seamlessly integrates with the home's architectural character. Perfect pattern matching across walls and ceiling demonstrates the precision possible with professional installation techniques.
## Professional Tips
Before starting wallpaper installation, always test adhesion in inconspicuous areas first. Maintain consistent room temperature throughout the process. Choose quality materials designed for Chicago's climate. Plan pattern layout carefully to minimize waste and ensure optimal visual flow.
See more work and request free estimate at windypainters.com - Windy City Painters delivers exceptional results.
Q: How long does wallpaper installation take?
A: Professional wallpaper installation typically requires 1-2 days depending on room size, pattern complexity, and surface preparation needs.
Q: Can you install wallpaper on textured walls?
A: Yes, textured wall wallpaper installation requires proper surface preparation and specialized techniques for optimal adhesion results.
Q: Do you remove old wallpaper first?
A: Complete old wallpaper removal is essential before new wallpaper installation to ensure proper adhesion and smooth finish.
Q: What about ceiling wallpaper installation?
A: Ceiling wallpaper installation requires specialized equipment and techniques - Windy City Painters handles this expertly and safely.
Q: How do you ensure pattern matching?
A: Professional wallpaper installation includes precise measuring, cutting, and alignment techniques for seamless pattern matching throughout the space.
Q: Can wallpaper installation work in humid areas?
A: Proper wallpaper installation with quality adhesives designed for humidity variations ensures lasting results in Chicago's climate.
Q: What surfaces accept wallpaper installation?
A: Most properly prepared surfaces including drywall, plaster, and previously painted walls can accept professional wallpaper installation successfully.
Q: Do you handle corner installations?
A: Corner wallpaper installation requires specialized techniques for inside and outside corners - we ensure perfect alignment.
Q: What's included in the service?
A: Complete wallpaper installation service includes surface preparation, removal if needed, professional application, cleanup, and quality guarantee.
Q: How do you prepare surfaces?
A: Surface preparation for wallpaper installation includes cleaning, repairing imperfections, priming, and ensuring optimal conditions for adhesion.
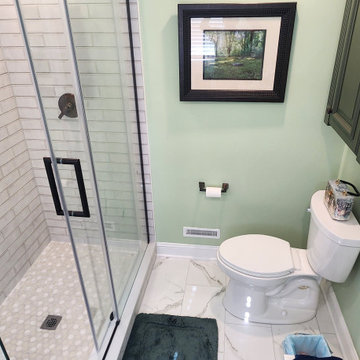 BMR BelMax Remodeling
Master Bathroom Remodel by BMR Belmax Remodeling: Project Overview
Initial Condition
Size and Layout: The master bathroom was small, featuring a plastic shower enclosure.
Client’s Request: The client wanted to enlarge the bathroom to create a more spacious and luxurious environment.
Renovation Details
Expansion:
Wall Movement: The wall between the hallway and the master bathroom was moved 2 feet to increase the bathroom’s size.
Plumbing Upgrades:
New Water Pipes: Installed for the new shower, vanity, and toilet.
Drainage: A new shower drain and toilet drain were installed to accommodate the updated layout.
Electrical Enhancements:
Recessed Lighting: Installed 4 new recessed lights to improve illumination.
Heated Floor: Added a new heated floor for enhanced comfort.
Fixtures and Finishes:
Vanity: Installed a beautiful, modern vanity to improve storage and aesthetics.
Medicine Cabinet: Included a new medicine cabinet to provide additional storage and convenience.
Exhaust Fan and HVAC Outlet: Added to improve ventilation and climate control.
Tiles: Small format tiles were installed in the shower area, and 12×24 tiles were laid on the floor to create a cohesive and stylish look.
Conclusion This comprehensive remodel transformed a small, outdated master bathroom into a spacious, modern, and functional retreat, perfectly tailored to the client’s needs and preferences.
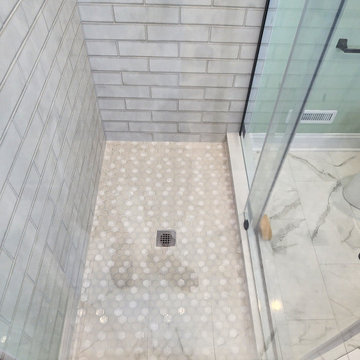 BMR BelMax Remodeling
Master Bathroom Remodel by BMR Belmax Remodeling: Project Overview
Initial Condition
Size and Layout: The master bathroom was small, featuring a plastic shower enclosure.
Client’s Request: The client wanted to enlarge the bathroom to create a more spacious and luxurious environment.
Renovation Details
Expansion:
Wall Movement: The wall between the hallway and the master bathroom was moved 2 feet to increase the bathroom’s size.
Plumbing Upgrades:
New Water Pipes: Installed for the new shower, vanity, and toilet.
Drainage: A new shower drain and toilet drain were installed to accommodate the updated layout.
Electrical Enhancements:
Recessed Lighting: Installed 4 new recessed lights to improve illumination.
Heated Floor: Added a new heated floor for enhanced comfort.
Fixtures and Finishes:
Vanity: Installed a beautiful, modern vanity to improve storage and aesthetics.
Medicine Cabinet: Included a new medicine cabinet to provide additional storage and convenience.
Exhaust Fan and HVAC Outlet: Added to improve ventilation and climate control.
Tiles: Small format tiles were installed in the shower area, and 12×24 tiles were laid on the floor to create a cohesive and stylish look.
Conclusion This comprehensive remodel transformed a small, outdated master bathroom into a spacious, modern, and functional retreat, perfectly tailored to the client’s needs and preferences.
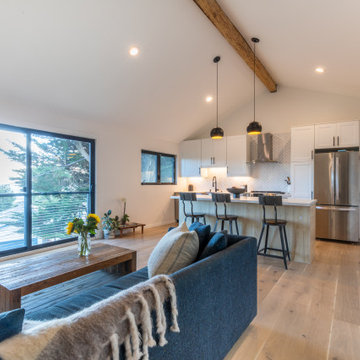
 GBU Construction Development
Modern Open Concept Kitchen & Living Space
Project Overview:
Complete transformation of a hillside home's main level into a stunning open concept living space that maximizes natural light and captures panoramic views. This comprehensive remodel eliminated interior walls to create a seamless flow between kitchen, dining, and living areas while incorporating high-end finishes and modern design elements.
Key Features:
Open Floor Plan: Removed partition walls to create an expansive 450+ sq ft great room
Gourmet Kitchen: Custom white cabinetry with quartz waterfall countertops and stainless steel appliances
Architectural Details: Exposed wood beam ceiling adds warmth and visual interest
Natural Light: Large picture windows and sliding doors flood the space with light
Indoor-Outdoor Living: Direct access to outdoor deck through oversized sliding glass doors
Designer Lighting: Statement pendant lights and recessed LED lighting throughout
Premium Finishes: Wide-plank hardwood flooring, herringbone tile backsplash, and custom millwork
Design Elements:
Contemporary color palette of whites, grays, and natural wood tones
Kitchen island with bar seating for casual dining and entertaining
Built-in storage solutions maximize functionality
Seamless integration of living and cooking spaces perfect for modern lifestyle
Location: San Francisco Bay Area
Project Type: Whole House Remodel - Main Living
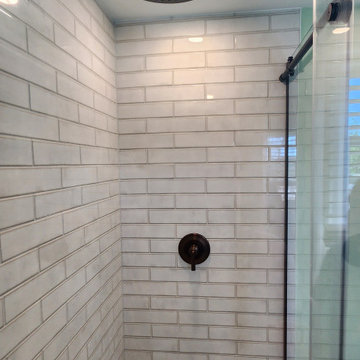 BMR BelMax Remodeling
Master Bathroom Remodel by BMR Belmax Remodeling: Project Overview
Initial Condition
Size and Layout: The master bathroom was small, featuring a plastic shower enclosure.
Client’s Request: The client wanted to enlarge the bathroom to create a more spacious and luxurious environment.
Renovation Details
Expansion:
Wall Movement: The wall between the hallway and the master bathroom was moved 2 feet to increase the bathroom’s size.
Plumbing Upgrades:
New Water Pipes: Installed for the new shower, vanity, and toilet.
Drainage: A new shower drain and toilet drain were installed to accommodate the updated layout.
Electrical Enhancements:
Recessed Lighting: Installed 4 new recessed lights to improve illumination.
Heated Floor: Added a new heated floor for enhanced comfort.
Fixtures and Finishes:
Vanity: Installed a beautiful, modern vanity to improve storage and aesthetics.
Medicine Cabinet: Included a new medicine cabinet to provide additional storage and convenience.
Exhaust Fan and HVAC Outlet: Added to improve ventilation and climate control.
Tiles: Small format tiles were installed in the shower area, and 12×24 tiles were laid on the floor to create a cohesive and stylish look.
Conclusion This comprehensive remodel transformed a small, outdated master bathroom into a spacious, modern, and functional retreat, perfectly tailored to the client’s needs and preferences.
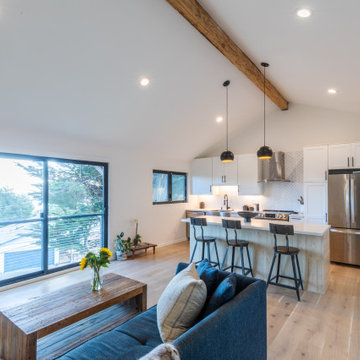 GBU Construction Development
Modern Open Concept Kitchen & Living Space
Project Overview:
Complete transformation of a hillside home's main level into a stunning open concept living space that maximizes natural light and captures panoramic views. This comprehensive remodel eliminated interior walls to create a seamless flow between kitchen, dining, and living areas while incorporating high-end finishes and modern design elements.
Key Features:
Open Floor Plan: Removed partition walls to create an expansive 450+ sq ft great room
Gourmet Kitchen: Custom white cabinetry with quartz waterfall countertops and stainless steel appliances
Architectural Details: Exposed wood beam ceiling adds warmth and visual interest
Natural Light: Large picture windows and sliding doors flood the space with light
Indoor-Outdoor Living: Direct access to outdoor deck through oversized sliding glass doors
Designer Lighting: Statement pendant lights and recessed LED lighting throughout
Premium Finishes: Wide-plank hardwood flooring, herringbone tile backsplash, and custom millwork
Design Elements:
Contemporary color palette of whites, grays, and natural wood tones
Kitchen island with bar seating for casual dining and entertaining
Built-in storage solutions maximize functionality
Seamless integration of living and cooking spaces perfect for modern lifestyle
Location: San Francisco Bay Area
Project Type: Whole House Remodel - Main Living
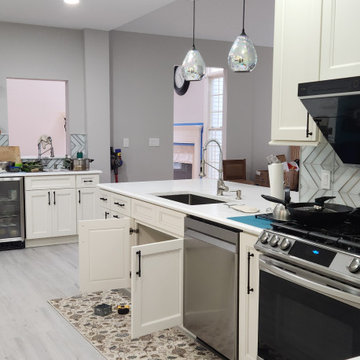 BMR BelMax Remodeling
Project Spotlight: Stunning 700 Sq. Ft. Home Addition by BMR Belmax Remodeling
At BMR Belmax Remodeling, we recently completed an extensive 700 sq. ft. home addition project that redefined both style and functionality for our clients. This comprehensive project not only expanded the home but also upgraded its overall design and livability. From structural work to interior finishes, we handled every detail with precision and care.
Project Overview
Structural Upgrades and Expansion:
The project began with the removal of an old deck to make way for a new addition seamlessly integrated into the existing structure.
To achieve an open-concept design, we removed a section of the kitchen wall and installed a robust metal beam supported by two metal columns. This structural element ensured the second floor and roof were securely supported.
New Spaces Added:
Kitchen Remodeling:
Installed custom kitchen cabinets with stunning white quartz countertops for a clean, modern look.
Integrated a large peninsula, creating additional workspace and seating.
Added recessed lighting for a bright and functional cooking area, along with new high-end appliances.
Bathroom Addition:
Designed and built a new bathroom featuring a walk-in shower with glass doors, a double vanity, and elegant recessed lighting.
Installed new mirrors, a toilet, and high-quality fixtures to create a luxurious space.
Dining Room and Bedroom:
Built a spacious new dining room directly connected to the kitchen, ideal for entertaining and family gatherings.
Added a cozy new bedroom with modern lighting and finishes for a warm, inviting atmosphere.
Laundry Room Remodel:
Upgraded the laundry room to maximize efficiency with new plumbing, electrical systems, and updated finishes.
Exterior Upgrade:
Built a brand-new deck adjacent to the new addition, offering an outdoor space perfect for relaxation and entertaining.
Electrical, Plumbing, and Mechanical Work:
Completed all necessary upgrades to ensure the new addition was seamlessly connected to the home’s existing systems, including electrical, plumbing, and HVAC.
Key Features and Design Highlights
Open-concept design achieved through structural engineering with a metal beam and column system.
High-end kitchen finishes, including quartz countertops, recessed lighting, and a large peninsula.
Luxurious bathroom design with modern amenities like a walk-in shower and double vanity.
A new deck addition that enhances outdoor living space.
Stylish and functional spaces tailored to the homeowners’ needs.
The Result
The 700 sq. ft. addition has transformed this home into a spacious, modern, and functional retreat. The open-concept kitchen and dining area create a welcoming space for gatherings, while the upgraded bedroom and bathroom offer comfort and style. The new deck perfectly complements the addition, providing a seamless transition between indoor and outdoor living.
Ready to expand and enhance your home? Contact BMR Belmax Remodeling today to turn your vision into reality!
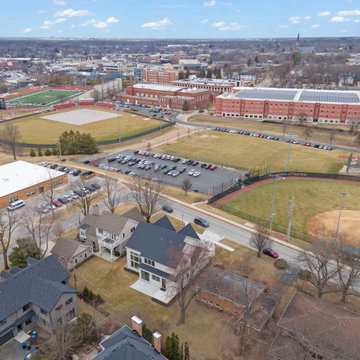
 DJK Custom Homes
This aerial view provides a comprehensive look at the home’s surrounding neighborhood, highlighting its placement within a vibrant and well-connected community.
 BMR BelMax Remodeling
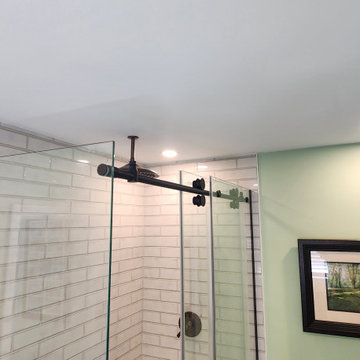
Master Bathroom Remodel by BMR Belmax Remodeling: Project Overview
Initial Condition
Size and Layout: The master bathroom was small, featuring a plastic shower enclosure.
Client’s Request: The client wanted to enlarge the bathroom to create a more spacious and luxurious environment.
Renovation Details
Expansion:
Wall Movement: The wall between the hallway and the master bathroom was moved 2 feet to increase the bathroom’s size.
Plumbing Upgrades:
New Water Pipes: Installed for the new shower, vanity, and toilet.
Drainage: A new shower drain and toilet drain were installed to accommodate the updated layout.
Electrical Enhancements:
Recessed Lighting: Installed 4 new recessed lights to improve illumination.
Heated Floor: Added a new heated floor for enhanced comfort.
Fixtures and Finishes:
Vanity: Installed a beautiful, modern vanity to improve storage and aesthetics.
Medicine Cabinet: Included a new medicine cabinet to provide additional storage and convenience.
Exhaust Fan and HVAC Outlet: Added to improve ventilation and climate control.
Tiles: Small format tiles were installed in the shower area, and 12×24 tiles were laid on the floor to create a cohesive and stylish look.
Conclusion This comprehensive remodel transformed a small, outdated master bathroom into a spacious, modern, and functional retreat, perfectly tailored to the client’s needs and preferences.
1