
Search results for "Postcode" in Home Design Ideas

 Luster Custom Homes & Remodeling
Baxter Imaging
Example of a transitional wooden medium tone wood floor staircase design in Phoenix with white walls and wooden risers
Example of a transitional wooden medium tone wood floor staircase design in Phoenix with white walls and wooden risers

 AquaTerra Outdoors
This large sprawling yard is highlighted by the house with a dry creek bed flowing under a see through corridor in the house.
Inspiration for a large contemporary beige two-story mixed siding exterior home remodel in Dallas with a shed roof
Inspiration for a large contemporary beige two-story mixed siding exterior home remodel in Dallas with a shed roof
 Tile Doctor Ltd
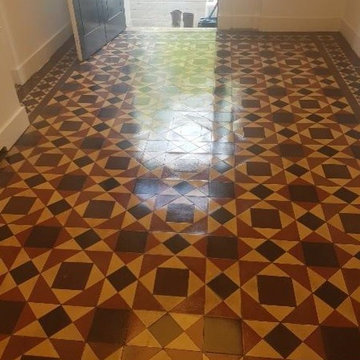
These are photos of a Victorian tiled floor we renovated at the new Scottish head office of the Peoples Postcode Lottery in the centre of Edinburgh City where the building was going through a multi million pound refurbishment. Edinburgh has a lot of Georgian and Victorian architecture, much of which is listed and as a result many still have original Victorian tiled flooring.
I’ve not really looked at the Postcode Lottery until now but put simply you give the lottery £10 a month and your postcode is your winning ticket number, there are prize draws every day and if your postcode comes up every one in the system with that postcode wins; they also give 31% to charity which is impressive.
You can see from the photograph that the floor was in good physical condition but was looking tired and dull. This is not unusual for Victorian tiles as once the sealer wears down dirt can penetrate into the pores of the tile causing it to lose its appearance.
On the first day we set about stripping the floor of what remained of the old sealant using a strong dilution of Tile Doctor Pro-Clean which is an industrial strength alkaline tile and grout cleaning product that is safe to use on Tile and Stone. The product is applied to the floor, left to soak in for ten minutes and the scrubbed into the tile using a black scrubbing pad fitted to a rotary bonnet machine. The floor was then rinsed and the now soiled cleaning solution extracted using a wet vacuum.
The process was repeated several times until we were happy the floor was clean and free of sealer and then given a final rinse with water. Before leaving for the day the floor was dried as much as possible using the wet vacuum to extract as much moisture as possible.
On the second day our first task was to check the floor with a damp meter in several places to ensure the tiles had dried off overnight. All was well and we began the process of sealing the floor with a Tile Doctor Seal and Go. This is a topical sealer which provides a high-quality low-sheen finish and protection against ingrained dirt and stains.
Victorian tiles are quite porous and five coats were needed to fully seal the floor. This took some time to complete as you have to wait until the first coat is dry before applying the next however it was well worth the effort as the floor looked fantastic afterwards.
Thomas Wilson
Edinburgh Tile Doctor
Find the right local pro for your project

 AZ Studio
 (3D Renderings)
Inspiration for a small contemporary formal and enclosed living room remodel with beige walls, no fireplace and a tv stand
Inspiration for a small contemporary formal and enclosed living room remodel with beige walls, no fireplace and a tv stand
 Tile Doctor Ltd
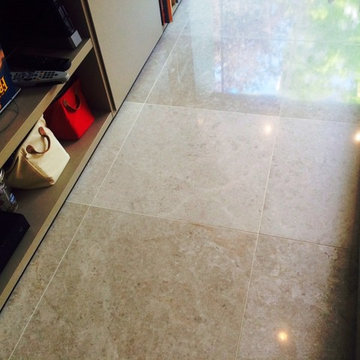
I was recently engaged to refresh the Limestone tiled floor at a house in St. John’s Wood, which is a very affluent area and apparently has the 5th most expensive postcode in London so as you can imagine this was a very expensive floor. The client had requested an improvement condition of the Limestone tiles in the living room and a thorough clean, polishing and seal was required. Over time, the floor in this busy living room – which was also used as a play area for young children – had become dirty and certainly worse for wear with all the use it had been getting. So, I set about my work to get this floor back to looking its best.
Cleaning and burnishing a Limestone floor
My initial task before beginning the cleaning process was to remove any furniture (as well as toys) from the room so I would have a clear area to work in. I then applied a layer of Tile Doctor Pro-Clean cleaner, diluted with water, to the floor. Pro-Clean is also suitable for use on other natural stone floors such as Slate, Granite and Travertine.
After leaving the solution to dwell for a period of a few minutes, I began to scrub the floor with a stiff hand brush. Whilst helping to remove a lot of the built up dirt on the surface of the tiles, the product also stripped off the old sealer and polish. Following this, I paid special attention to the dirty grout lines, cleaning them with Tile Doctor Oxy-Pro, a powerful, high-alkaline cleaner.
After completing the cleaning, I rinsed the floor with clean water to remove any excess cleaning products. I then began to burnish the floor using Tile Doctor Diamond encrusted burnishing pads. This was done in four steps, as I used four different pads (coarse, medium, fine and very fine) rinsing the floor with water between each pad. I would recommend using this setup of four pads for restoring the appearance of polished stone floors; you starting with a coarse pad and the gradually work your way up to the very fine pad achieving a high polish finish in the process. I finished of the process with a quick rinse and a buffing pad to give the floor a final polish before I commenced the sealing.
Sealing a Limestone floor
My choice of sealer was Tile Doctor Colour Grow, which is specifically designed to not only provide durable surface protection, but also to intensify the colour of the tiles. The sealer penetrates deep into the pores of the stone, providing water resistance and long-term protection from ingrained dirt and stains. As you can see from the photos, the sealer really helped to accentuate the fantastic natural colours in the Limestone.
My client was very pleased with the final result, and was amazed by how quickly I had been able to improve the state of her floor which, with a colourful and shiny finish, has really brightened up the living room.
1