
Search results for "Wire stripper" in Home Design Ideas
 Tile Doctor Ltd
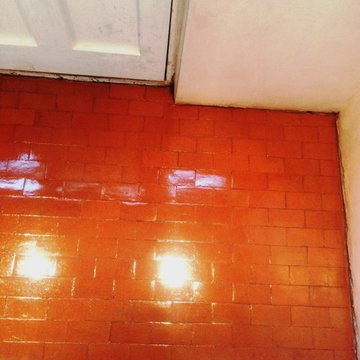
Here’s a quick job I completed in the coastal town of Eastbourne in East Sussex. While more commonly I am asked to work on entire floors, this customer was specifically interested in restoring a small doorway-like area with Quarry tiled flooring, the reason being that it had been covered for a long time by an old wardrobe and dog basket. As a result, the area had not been properly cared for, becoming very dusty and dirty. Also revealed were some unsightly splashes of white paint from previous decoration work.
The customer was keen to finally give this area of the floor the attention it needed, and so asked me to come in to provide a thorough clean and lay down some fresh sealer.
My first task was actually to relocate the old wardrobe and dog basket to the garage to get the area ready for cleaning. Then, to begin the cleaning process, I stripped away any old existing sealer and the white paint splashes by using Tile Doctor Remove & Go stripper in combination with a wire brush. Remove & Go is a versatile product that can also be used to break down glues and other adhesives.
I then washed the area down with water and promptly vacuumed up any moisture, before sitting down with a heat gun for an hour to dry the tiles. Usually a floor should be left for up to 48 hours to dry completely before sealing, but in this case the area was so small that I was able to dry it in the space of an hour.
Nonetheless, I opted to install a fan and leave the floor for an extra hour over lunch to ensure any excess moisture was removed. This is really important to do before sealing, as any remaining moisture can cloud the sealer and damage its performance.
To complete the restoration, I sealed the tiles using nine coats of the topical, water-based sealer Seal & Go, which is suitable for building up surface protection against dirt and stains on internal unsealed porous surfaces such as Victorian, Quarry and Sandstone tiles. The Quarry tiles were quite porous, which is not uncommon for Quarry Tiles and really soaked up the sealer.
As the photographs show, the results of the restoration were very good, with smiles all round – including from the slightly bemused family dog!
Rupert Mcleod
East Sussex Tile Doctor
 Tile Doctor Ltd
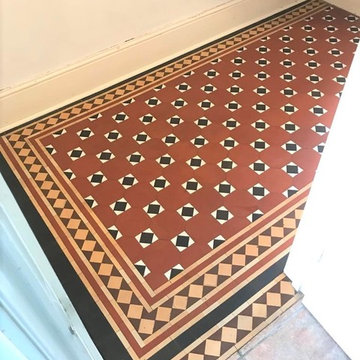
Our client had recently moved to a property in Newport, Gwent and when removing the carpet in the hallway she discovered this beautiful Victorian Tiled floor. The property had numerous period features and realising the value that the floor could add to the property she was keen to have it restored and so contacted Tile Doctor for help.
We popped round to survey the floor and except for a couple of broken tiles it had preserved well under the carpet. It was a shame the previous owner had covered the floor over but I was confident we could source some matching tiles to replace the broken ones and then restore the overall appearance. We gave the client a quote for the work which would take a couple of days. Pleased to hear that the floor could be restored and that it could soon be on show the quote was accepted and a date set to do the work.
We returned later the same month to renovate the floor and started by removing the broken tiles, cleaning out the old grout and adhesive and then relaying matching replacements. There are several specialist suppliers that can supply Victorian tiles so we can usually source reclaimed or reproduction tiles.
Some of the grout lines had dropped so as well as grouting around the replacement tiles more renovation work was needed to ensure the grout was level. We used quick setting products for this work, so I was able to move on to cleaning the floor later that afternoon.
To restore the appearance of the Victorian Tiles I used a strong dilution of Tile Doctor Pro-Clean combined with Tile Doctor Remove and Go which was left to soak in for ten minutes before being scrubbed into the tiles. This created a powerful cleaner/stripper cocktail which gets to work at removing dirt, grime and breaking down old sealers paint splashes.
After extracting the soil using a wet vacuum the floor was inspected. There were a few stubborn areas which were treated to a repeat clean and a wire brush to get the floor as clean as possible.
The floor was rinsed with water to remove any trace of cleaning products and then as much moisture as possible was extracted using a wet vacuum. The floor was left to dry off overnight and we arranged to return the next day to apply a sealer.
The following morning, we checked the floor was dry using a damp meter and this confirmed we were good to apply the sealer. The floor was sealed with Tile Doctor Colour Grow which is an impregnating sealer that protects the floor and enhances the beautiful colours in the tile. Three coats of the sealer were applied allowing each coat to dry before applying the next.
The client was very happy with the result and how beautiful the floor looked as you can see from the picture.
Paul Wales
Monmouthshire Tile Doctor
Find the right local pro for your project

1