Software
Houzz Logo Print
weedyacres

Geometric guidance needed on tile layout

18 years ago
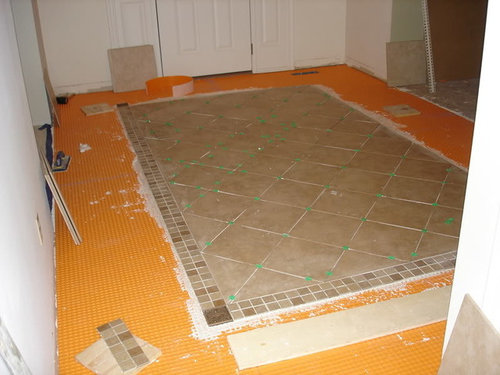
I posted this in flooring, but it's quiet over there, so thought I'd drag it to where the tile experts lurk.

We're retiling our foyer, and the design is a rectangular "rug" surrounded by lighter tile. Here's the rug part, lacking just a couple border edges.

Here's the dilemma: The outside border will be 16" tiles (actually ~15 3/4") laid straight. However the "rug" is 75" wide and 125.5" long. So I can't just do a full border all the way around and then go from there. (Why didn't I think of this before I started?) How do I lay the outside tile so it looks balanced/centered/right?

What I've tentatively come up with is (hope I can describe this adequately without a drawing) is to cut the corner pieces down so they're an L shape, then cut down everything between them, so the result is cut edges against the mosaic border all around. Spacing would be as though I laid out 6 tiles x 9 tiles and then centered the "rug" on top of them. So the first row around the "rug" would be about 10" deep, followed by full tiles, followed by, sadly, only about 2-3" of tile at the edges of the floor.

Am I completely off base? Any other ideas on how to do this? Do I just not worry about the lighter outside tiles not being centered in their layout pattern (seems like that would bug me, but perhaps not)? And how should I have thought this through before starting out to avoid this partial tile thing?

Comments (25)

  • 18 years ago

    You can do one of two things. If this area is only one part of a larger area being laid out and all connected, then you have no choice but to cut it in as it falls. If, however, this is the only area receiving this tile, you can use what's known in the trade as "Dutchman" cuts. At each of the ends, you'd have two rows of 13 1/2" cuts, with three rows of full tiles in between. On the sides, you could do the same thing-- two 14 3/4" cut rows on each side with 6 rows of tiles in between. It would be symetrical, and show as part of the design on the entry. It's too late tonight, but if you need me to, I'll draw it out tmorrow, scan it and post the drawing. One way or another, we can make this look not just good, but terrific!

  • 18 years ago

    This is a standalone area, so no need to match/merge/connect.

    I googled a bit and searched on JB, and as far as I can tell, Dutchman cuts would mean lay full tiles at the corners, lay full tiles next to them, and when I get to the center point on each side I'd put either a single tile shaved down on both sides to fit or two tiles shaved down on one side each (cut edges butted together?). Did I get that right? That doesn't sound exactly like what you described above, which seems to be the cut tiles at the corners and the full tiles in the center.

    I worry about the look of a cut tile edge against a non-cut edge, as these aren't rectified. How do you make it look like intentional design?

  • 18 years ago

    A dutchman isn't necessarily a single cut. A single cut in your case would stand out a whole lot more. On the sides it would be a 13 1/2" piece, and on the ends it would be 11". The whole reason it's called a dutchman is that it's supposed to be like the legend of its namesake, the Flying Dutchman-- you know it's there, but no one ever sees it. The larger the cuts, the less chance of it being picked out, and if you make it symetrical in the way I described above, even if it does get picked out, it'll add to the design of the entry. As for the cut edge, so long as they're clean straight cuts and grouted properly, you'll never see them unless you're looking for them

  • 18 years ago

    Weedy I just want to say- what a beautiful layout! I have really enjoyed your projects!

  • 18 years ago

    Same here. Most impressive. Bill's idea sounds great. Keep us posted.

  • 18 years ago

    Is this what you mean? F are full tiles, A are the cut edges, and B are the factory edges (or do you make the B's the cut ones?).

    Thanks for the encouragement, ladyC & g-babe.

  • 18 years ago

    Hatza the one!! :-)

  • 18 years ago

    Well, we got the tiling finished yesterday. Here's how it turned out:

    Thanks, Bill, for the tips. I was suprised that the dutchman cut tiles aren't more noticeable. My DH, who is becoming quite the tile cutter, even rounded out the corners on the cut side to make them look like factory edges.

    This is the 5th floor I've tiled, and I do keep getting better, thanks to everything I've learned here. This time around I applied your gridding method rather than relying solely on spacers (I'm too impatient to draw out all the grids, but I've got a decent eye, so I eyeballed in a grid and thus focused on the overall lines instead of trying the impossible task of making all the spacing between unequally sized tiles the same). I'm also using regular sanded grout instead of epoxy, so I'll be able to offer my opinion about the difference in a DIY install.

    So thanks again for your continued help & guidance.

  • 18 years ago

    That looks Great!

    I saw your post over in flooring and was watching for more --- Glad I got to see the sequel here --

  • 18 years ago

    beautiful!

  • 18 years ago

    Very nice installation! :-)

  • 18 years ago

    My sincere applauds- great design and excellent installation!

  • 18 years ago

    That's just super: this is why I looove tile. Allows so much more creativity than any other flooring type [oh, ok: I know you can order custom cut lino etc. But tile still wins, since there's so many more choices of color/texture/gloss, and it can be blended with natural stone, etc.]

  • 18 years ago

    Eh, voila! Got the floor grouted last night.

    I'm apparently backwards from the normal DIY-er, and cut my teeth on epoxy grout, so this was my first bout with normal sanded grout. Once I figured out that the consistency of a slurpee worked best, it went into all the cracks like butter...much more easily than epoxy grout. The washing took longer, though, and was messier, or perhaps I'm just at the bottom of the learning curve. It took 3 washings to get it reasonably clean, and then a 4th this morning, that I think got all the haze off.

    I've got a few grout remnants in the nooks and crannies of the decorative corner pieces, and will hack them out with a tiny screwdriver or something before it cures too long.

  • 18 years ago

    Beautiful work!! :-)

  • 18 years ago

    You're going to run out of house to redo!

    This is really, really nice!

    Round of applause!!!

  • 18 years ago

    Plenty more where that one came from!! LMAO

  • 18 years ago

    You're hired!

  • 18 years ago

    Careful guys, flattery will get you everywhere. :-) Just for kicks or curiosity, though, what would you pros charge for a job like this? Including demo of the existing tile floor (12" ceramic, no underlayment) first.

    raehelen, we've done 7 rooms so far, but we've still got, if I'm counting correctly, 10 rooms to go in our house. We're not even close to running out of projects.

  • 18 years ago

    I'm estimating that the entry is about 10x14? if that's the case, based on what you've told us, I'd be charging just over 1800.00, which would include labor, thinset, and disposal of the demoed materials.

  • 18 years ago

    Fabulous job!!

  • 18 years ago

    weedyacres,
    Your tile work is wonderful - I'm so impressed by everything you've done (including your amazing kitchen).

    When I saw your question here, it reminded me of the same issue I had in my master bath. Figuring out the geometry was driving me crazy! My tile guy's solution was a little different than yours, but he had more space to work with. He cut into the larger tiles so that they'd fit around the "rug", rather than making one of the larger tiles narrower. Here's a picture so that anyone else who runs into this dilemma can see an alternative solution:

  • 18 years ago

    annkathryn: That's actually the solution that I was thinking of, until Bill told me about dutchman cuts. But in our foyer's case, that would have left some 2-3" cuts at the edges, which isn't ideal, aesthetically. Fortunately Bill's trick worked beautifully. OT, but where did you get your vanity? I'm looking for something like that for our 4th bath.

    BTW, Bill, thanks for making me feel like I saved $1800. My knees and back are feeling more happy they made the sacrifice.

  • 18 years ago

    Weedyacres- This is O/T, but I was thinking about your projects today. I gave my DH a Paslode angled nailer for Christmas after seeing your recommendation in a previous thread. He spent this weekend putting in new baseboards with it and said it was great. So thanks, he got a new toy, I mean tool, and I got new baseboards!

    Your new floor looks great!

  • 18 years ago

    My vanity is from Ronbow. I couldn't buy directly from them since they don't sell retail, so I found an online store that had a good price an bought it there. The online store is in New Jersey, but they shipped directly from Ronbow to my house (about 15 miles). I had to pay shipping but no sales tax.

    Here is a link that might be useful: Ronbow Vanities