Software
Houzz Logo Print
bronwynsmom_gw

Since you asked ... my workroom

13 years ago
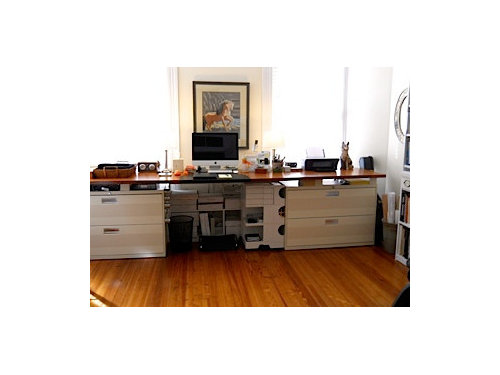
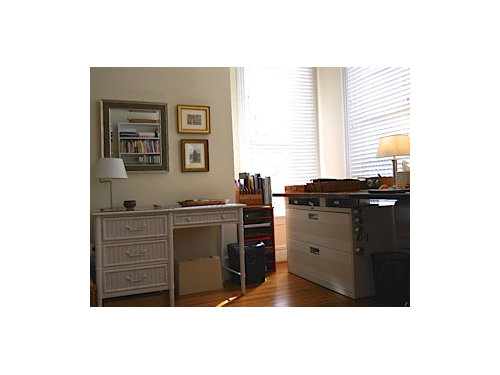
Didn't want to hijack beekeeperswife's file cabinet thread, so in answer to a couple of your questions about my home workroom, here's how it turned out.

I painted two old black file cabinets with Cabinet Coat and wallpapered and Mod Podged the drawer fronts - something I'd never done before, and I'm very pleased with how they turned out.

Then I had four lengths of 4X4 cut just a shade longer than the cabinets are wide and painted them with the Cabinet Coat to support the surface and gain the use of the space underneath. My chair adjusts enough to make the extra height comfortable.

The surface is made of two 32" X 6'8" solid core doors - one whole one makes the center section, and two pieces of the second one make the end parts. They're attached to the 4X4's with L-brackets, and the whole business rests on the file cabinets.

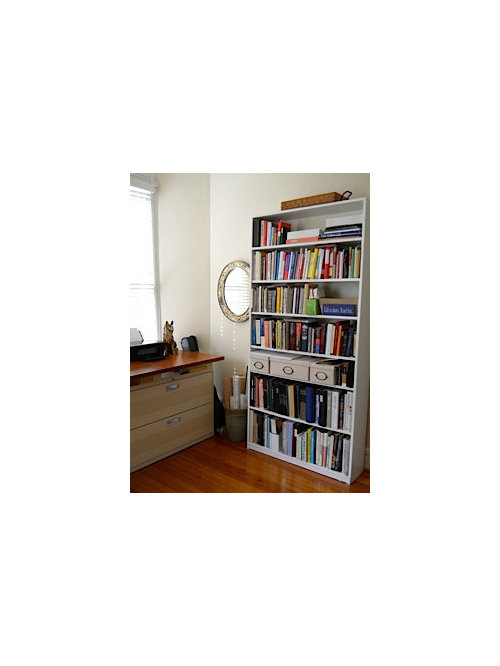
I tucked a shallow shelf unit that I already had in the space at the back of the center area to hold my project boxes - they are inexpensive paperboard mailing boxes you can buy flat at Staples. At the right of my knees is a rolling taboret cart that I've had since design school. The second and third photos are a bookcase on the wall to the right, and an old writing desk on the wall to the left that serves as my sewing table.

The part of the room behind me is not open to the public! It's a bit messy at present with some reorganizing projects that have yet to be finished.

And I will probably rehang the horses higher - I didn't allow for the computer when I put them up.

So here's the desk assembly:

To the left of the desk:

And to the right:

Comments (22)

  • 13 years ago

    Thank you for posting! I really love how ou created a stylish and very functional work surface. Are there 4 supports with 4x4s? Do you the divide between the solid core doors ?

  • 13 years ago

    Love your space!!

  • 13 years ago

    great ideas. I will soon be setting up a workspace in my new home, and could steal some of these ideas. thanks!

  • 13 years ago

    Thanks. I like it, too. It's a real luxury to have such a nice sunny space.

    GWlolo, the 4X4's support the ends of the three pieces - the cut lines land in the centers of the inner 4X4's.

    Here's a sketch of how it lays out in plan.

    Although I love the result, I wouldn't use solid core doors again - they weigh a ton, and figuring out how to put it all together so we could handle it was an intriguing challenge!

    Clearly, I'm never moving.

  • 13 years ago

    And here's a clearer photo of how the desktop sits on the 4X4's:

  • 13 years ago

    What would you recommend to use instead of the doors? A nice plywood that could be stained or painted? Although that's not exactly lightweight either.

  • 13 years ago

    I'd use doors, but hollow core rather than solid core.
    The disadvantage is that it's harder to cut pieces of them - the cut ends have to be reblocked - but a competent carpenter could do it, if you needed to.

    It was important to me to have the uncut piece in the center - partly for function, and partly for aesthetics. You can't sit at a desk with the join in the middle because the supports have to be there.

    But if you were making a L-shape, for instance, or only needed one, it wouldn't be an issue.

  • 13 years ago

    I am coming back with some additional questions.

    What did you modpdge on the filing cabinet?
    Can we see a pic of the actual work surface?
    How does a door wear as a work surface?
    Is the 4x4 painted with the cabinet coat as well? What color?

  • 13 years ago

    The file cabinets look nice. A large work surface is hard to come by. Nice job making it work for you.

  • 13 years ago

    Okay, GWlolo, here goes!!

    I bought a surplus roll of pre-pasted wallpaper from an outlet store, primed the drawer fronts, made a template from brown paper which I used to cut the wallpaper lengths and make the cutouts for the handles and the notches to work around the edges, and then used its own paste to stick it to the drawers.

    After it dried overnight, I put three coats of hard-coat Mod Podge over it to seal it and protect the surface. (It's holding up beautifully.)

    The wallpaper roll (as you see, I railroaded it):

    Two of the desk surface. I mixed the stain from a couple of colors to match the old floors in the room, and finished with three coats of MinWax Wipe-on Poly.

    And in anticipation of the next question, one of the attachment underneath:

    HereâÂÂs more than you wanted to know about how we put it together.

    There was no way to put it all together loose, and then attach the brackets, because there was no clearance between the underside of the doors and the tops of the cabinets.

    So I marked out the placement of the cabinets with tape on the floor, and put them exactly where they were to stand.
    We laid the doors bottom side up on the floor.
    I used a large carpenterâÂÂs square to position the 4X4âÂÂs exactly where I wanted them, to establish the overhangs front and back, and to make sure the pieces lined up exactly right.
    (A 5â overhang was deep enough to distribute the weight of the tops front to back, but shallow enough to get into the files easily.)
    I held the L-brackets in place and marked the placement of all the screws.
    I attached the brackets to the undersides of all the door pieces while they were on the floor, but not to all the 4X4's..
    I drilled pilot holes into the 4X4âÂÂs.
    Then I attached the outer 4X4âÂÂs to the brackets on the outer edges of the short pieces, but the inner 4X4âÂÂs only to the brackets on the long piece.
    That way, we could pick the pieces up separately, flip them over, and put them in place on the cabinets.
    Then I only had to attach the brackets on the short pieces to the inner 4X4âÂÂs by screwing in from the sides.

    Are you still breathing ... ??

  • 13 years ago

    It's easy to block off part of a hollow-core door.

    Cut it off about 1/4 inch shorter than you want it,
    Cut a chunk of 2x4 the length of the hollow (or any combination of lumber that fits and is about 3" wide) My door happened to be just the right size for a 2x4 to fit.

    Liberally coat the hollow with wood glue and slide the block into it.
    Cover the edges with lattice mold, glued and brad-nailed on.

    Run your computer cables and power strip through the hole the door knob would go in.

  • 13 years ago

    Hah!
    Ask for a skill, and somebody here has it.
    Thanks, L.G.

    Oh - and I don't remember the Cabinet Coat color, but it matched the wallpaper ground almost exactly.

    The desk surface is wearing perfectly well. It could probably use a good coat of wax, which I will do when the spirit moves me.

  • 13 years ago

    Terrific workroom, lucky you!

  • 13 years ago

    How are the 4x4s attached to the file cabinets? (sorry for my ignorance)

  • 13 years ago

    You're not so ignorant ... they aren't!

    They're about half an inch longer than the cabinets are wide, so they rest mostly on the frame. The weight of the whole business keeps them from budging.

  • 13 years ago

    bronwyn....I am impressed as much with the vision you had and the hours of work and patience(salute to you)that you put into this.
    The end result is more than impressive.
    Its easy to go to a store and purchase home office/work
    room but what you have accomplished with your talent
    is a wonderful space and with a wow factor.
    Congratulations on a job well done!

  • 13 years ago

    Golly.
    Thank you very much.

  • 13 years ago

    Brillant workspace!!

    And many thanks for posting your great DIY ideas -- and just how-and-when-and-why to put it all together! Always good knowledge to have at hand for future projects!

  • 13 years ago

    Well done!

  • 13 years ago

    Bronwynsmom, I had seen your project recently when I googled diy desk projects and wasn't surprised to learn that it was yours when I opened this thread!

    I am getting ready to do something similar (but smaller scale) for my college daughter's apartment. Her bedroom is on the third floor with some fairly narrow stairs. She kept showing me pics of banker's executive desks on CL, until I pointed out that those huge desks wouldn't make it up the stairs to her room...

    I just purchased two black particleboard/laminate cabinets on CL for cheap, and will use a hollow core door for the desktop. I plan to paint the cabinets white, and noticed you used Cabinet Coat on your laterals. I have never used Cabinet Coat -- was it easy to apply? My research indicates it would work on my laminate cabinets. I was planning to paint the door/desktop also, but your stained top has me rethinking that.

    Thank you for posting your workroom and giving such detailed descriptions of the construction -- you have helped me make some more functional choices for my daughter's desk project!

  • 13 years ago

    This is so creative and such a smart execution! Thanks for posting the super detailed notes on how you built this. I read your post several times and now have a picture of how you put this thing together. Thanks especially for posting the sequence of activities. That is super super helpful. Again, this is just so clever and brilliant.

  • 13 years ago

    Sugar-Plum, I found the Cabinet Coat reasonably easy to use, but I'm not a particularly good painter, and it dries quickly, so it's not very forgiving. I'd like to have achieved a perfect surface, but it's plenty good enough for this, and it's wearing well.

    I didn't want to maintain a painted surface, and it's very sunny in here (and my hair-throwing black cats are up here a lot) so I needed it to be dark. I'm also not a great stainer, but this turned out well enough, I think.

    GWlolo, and the rest of you nice people, thank you - I turned it over in my mind for days before I figured out all the steps, so don't give me too much credit!

    There's probably some simpler way to do something like this ... but by the time I was into it, I was too stubborn to give up.