Software
Houzz Logo Print
cliff_and_joann

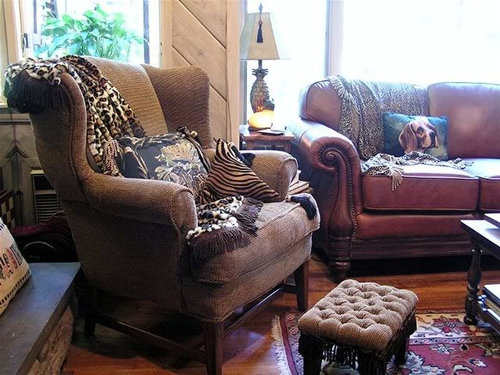
Good-Will Chair finished.

18 years ago
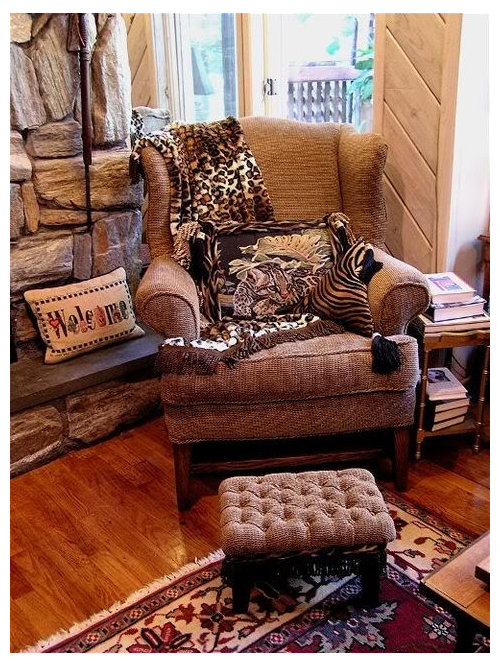
I really had a tough time with this fabric choice. I bought home a dozen swatches and ended up again with boring brown. The fabric guy helped me and even came here with fabric cause he wanted to see the two other chairs we did with his fabric.

The color and busy pattern in the rug (I call it rusty ming red)is what stops me from picking a fabric with a pattern. So after I get the fabric, btw I asked for six yards and he brings me 7 2/3 yards.

(he always gives me extra fabric at no cost) I start to have second thoughts that maybe it's too much brown. I said to Cliff, maybe we should pick another fabric...He said,

ok...But keep in mind, this fabric it is going to look different on the chair, and you know how much we love brown anyhow.

Well, it's done and I like it very much, a solid background in a good canvas for all my throw pillows that I love to make. I change pillows like most people change clothes. :)

It took 5 days to re-do the chair and make the little ottoman, that included stripping the chair, re-tying the springs and refinishing the legs to match the other furniture.

We also changed the cushion to 5" thick from 3" because I thought it would look better, the 3 " cushion looked skimpy next to the thick sofa cushions.

The legs on the ottoman are from my mothers coffee table, we have already used the bottom of the legs (with the little leaves) for the ottoman we made for the other good will chair that we did for the living room, and now we used the rest of the legs. My Mother passed away when I was nine, so I dearly love everything I have of hers.

The chair is very comfortable and if you remember I called it the grandma chair, however after re-upholstering it looks more like the grandpa chair...but that's ok, cause I love masculine furniture.

Hope you like it. :)

Comments (38)

  • 18 years ago

    Here is the chair before re-upholstering...notice how much bigger the chair looks in the brown fabric?
    Why is that?

  • 18 years ago

    The chair looks so much more comfortable and welcoming, I think before it looked too stiff. I like the color choice and the extra padding very much.

  • 18 years ago

    great job as always!!

  • 18 years ago

    It looks softer and more inviting in the brown, great choice!

  • 18 years ago

    Beautiful job! If I had to venture an opinion as to why it looks larger now, I would say:

    1) In the before, there were vertical stripes quite noticeable, and in the new fabric, while more muted, there is a horizontal pattern (at least on my monitor)

    2) The color of the legs are darker, which make it appear more substantial, as well as the darker color of upholstery.

    I love your home, by the way. Your gardens are incredible!

    Susan

  • 18 years ago

    Thank you cooperbailey, brutuses, mimi and Susan, for your comments,
    We did 3 wing chairs recently and this one was the hardest
    one. Here is a close-up, the colors are light tan, brown and rust.

  • 18 years ago

    It doesn't even look like the same chair! Excellent work, joann--it looks scrumptiously comfy. :)

  • 18 years ago

    It sure does look fantastic, and cozy! I love browns, too.

    As a budding 'upholsterer wanna-be', (just for me, for fun) are you self taught or did you take classes? I bought a chair on CL to play with, and have ordered two beginning upholstery books from half.com. Can you tell me what tools YOU have to do your upholstery - which ones you consider vital? I'd really appreciate it!

  • 18 years ago

    They always say that lateral stripes are "slimming".....guess that applies to chairs as well as people! The new upholstery job looks fantastic and the chair, itself, so comfortable! You did a beautiful job with it and it goes well with your other furniture.

    Hmmmm....I've got three wingbacks that need upholstering. I've done a few ottomans, but wouldn't dream of attempting anything as difficult as this! Shall I send them to you?

    Heidi

  • 18 years ago

    I can't believe it's the same chair! It looks fabulous. I want to curl up and read a book. Congratulations.

  • 18 years ago

    Great job! That ottoman is as adorable as the fabric is masculine ;-)

  • 18 years ago

    Lovely :)

  • 18 years ago

    You did a wonderful job with the Goodwill chair and Ottoman. It looks like you must've stained the legs on the chair as well. I love it that you were able to repurpose the coffee table legs on the ottoman and the tufting looks quite professional. It's a great fabric choice and how you dressed the chair is so inviting with the throw and pillows. Makes me want to curl up with a good book and some hot cocoa. I always enjoy seeing pictures of your home and reading about your latest projects.

  • 18 years ago

    WOW!! You did that?! I envy people with skills like yours. Great job!

  • 18 years ago

    Nice job, as usual - I have loved everything you've done - very talented.

    Sky

  • 18 years ago

    Wow, not only did you do a fantastic job but what a great addition. That looks like one of the great old Chippendale wingbacks from what I am seeing. Am I right?

  • 18 years ago

    Fantastic job! I only wish I had an ounce of some of the talent that I see on this forum!

  • 18 years ago

    Thank you everyone for your kind comments.
    Patricia, the label on the chair says,SOAR Cochrane, I did a google and their website and it is down, so I have no info on the chair. I love sitting in it as it is the most comfy chair I ever sat in. I know that I said that already, just can't help myself.
    Yes Val, I sanded down the legs and re stained them to match the other furniture. The chair looks so much better in dark legs. We did the same thing on the wing chair we did for the LR. Why do they make wing backs with such light wood?

    My 3 dogs, we are self taught. My DH will do anything. :)
    Do you have a pic of the chair(s) that you are going to do? I would like to see them.

    Stripping the chair is very time consuming, it takes a whole day to strip and prep the chair. You'll need a good awl and a dyke to pull all the staples out. In the old days we used a tack hammer and tacks, we now use a staple gun with a compressor. The compressor has multi uses as we use it for nailing in the furniture we make. If you don't have a compressor just a staple gun will suffice.
    When you remove the fabric, mark each piece. I use a paper with the info scribbled on it and pinned to the piece.
    We use all the pieces we remove on this type of chair for a pattern. When you mark the pieces be specific. You need to pay attention the way the fabric runs, so that you cut correctly --with all the fabric facing the same way. We mark the wrong side of the fabric with chalk. In the books you bought, see if they say to sew 'pulling strips' to the end of the fabric. In upholstering you need to pull the fabric very tight ...the pulling strips allow you to pull the fabric tight, without the pulling strips the fabric can twist and and pull crooked. You'll also need a good heavy duty sewing machine. I leave the brand that you need to get to the other sewers on this forum. The fabric we used on this chair was thick and heavy, a regular sewing machine would not go through 4 layers of this fabric. You'll also need a couple of curved needles. I found a website on upholstering wing chairs, that I'll look for and post for you.
    Our next project is going to be upholstering my DH's Grandpa's chair. We are going to use the leather that we stripped off our old leather sofa. We never upholstered anything in leather before and just bought the leather needles to do the job. I'll take lots of pic's of the job as we go along.
    Joann

  • 18 years ago

    My three dogs, I have pic's of the living room wing chair that we did last summer... First strip all the fabric and sand down and refinish the wood first (if necessary)
    The clean the chair, and add new foam and padding.
    The first thing we do is cut and sew (cut on the bias) all the welting and sew the cushion.

    preped and stained and ready to go.

    We do the inside seat first, then the inside arms, then the inside wings, next we do the outside wings, and arms lastly the outside back. Like the guy in the website below we work outside on the deck, and run up and down to use the sewing machine.
    oops, I have to open another browser to get the website.

  • 18 years ago

    website below

    Here is a link that might be useful: wing chair upholstery instructions

  • 18 years ago

    Oh, Joann, Thanks SO much! I am also an avid do-it-yourselfer as much as possible, and I have sewn for years, and as part of that have covered cushions. Like you, I also 'devoured' gardening, and have built simple 'country' furniture pieces (NOTHING like yours!) years ago. I have always wanted to try upholstery. I saw this chair on CL last week and got it for $55. The finish on it actually looks better IRL. My first purchase will be either a heavy duty electric stapler or one that uses a compressor.


    I wondered if a chair like this with exposed frame is easier or more difficult? And, granted, when I saw this Horchow chair below, the lines are slightly different from mine, but I like the use of more than one fabric. I will not be using fabric as heavy as yours, and can see that would be very tough to sew. I have three sewing machines, the oldest is a Kenmore workhorse that I have had had since 1972 that I use to sew through leather.

    I have also seen this chair more recently on CL and am trying to contact the seller on this one. I love the lines of it. But should I try a 'regular' chair without an exposed frame as my first 'victim'?

  • 18 years ago

    Joann. it looks wonderful!! At first I thought the fabric guy reupholstered it for you. I was even more impressed when I read further and saw that you did this yourself! Congrats! I really like the fabric you chose ~ what yummy texture! ~ and think the 5" cushion does look much better than the original 3" one. Good call! Thanks also for the link; I've already bookmarked it for the day when I get up enough nerve to redo my own chair.
    My3dogs, I've loved that Horchow chair since I first saw it! Hope we get to see your version of it someday.
    Lynn

  • 18 years ago

    Thank you Lynn...
    myh3dogs. I love that chair that you have upholstered in the floral print. Very nice look indeed -- with the cushion side and welt in a contrasting fabric.
    As far as the new wing, I actually think that's easier than the one we just did.
    When stripping a chair, you strip it the opposite way you upholster it. Fitst take off the back fabric, then the outside arms...from then on you can figure it out. Carefully take off each piece and mark it (this is your pattern. Cut the new fabric slightly larger than the piece your using for your pattern --you can trim off the excess
    after it's stapled on. You'll have sew to a lot of double welt for this chair. The welt is stapled on ( the staples are applied into the center of the double welt)
    On this chair I probably would start with the inside arms, then the seat, then the inside back...
    Remember, I said you'll have to sew pulling strips on the bottom of each piece (for the inside pieces) so that when you pull and stretch the fabric tight you won't be effecting the fabric. Stay away from stripes for your first piece, and also watch prints that have to be matched, you'll need more experience before attempting stripes and matching prints.
    The other CL chair is darling, I love it...I am on the lookout for another small chair for my den...I would even consider something like that chair.
    I can't wait for you to get started...years ago I taught my two neighbors how to upholster (when I was a stay at home Mom) One chair was a lazy boy recliner...
    It takes a lot of patience and practice, but once you master that craft, you'll be doing stuff all the time...
    Joann

  • 18 years ago

    oops...correction, we glue the double welt on. I'm having a senior moment...

  • 18 years ago

    Joann, Do you use regular glue sticks on them, or is there a heavier duty glue for upholstery? I'll probably learn all this when I get my books.

  • 18 years ago

    Yes, we use hot glue. When I was thinking about stapling the center of the double welt, I was thinking about kitchen chairs done in vinyl...the double vinyl welt is stapled in.
    Our dining room chairs, (striped) has double welt on the two end chairs. I want to do them over this winter, however, I have the same problem --it's hard for me to pick a fabric.

    Here is the chair that belonged to my Dad, I rescued it from my sisters garage, it was on the way to the curb. This
    was a matching pattern (don't get a matching fabric for your first chair) I like tufts and try to use them whenever we can...we made the ottoman to match. I think I like the big fat tufts (and less of them) better than the one we just made with the little tufts. again brown!!!
    This is the other wing chair in the den. We keep tools in the ottoman, so we don't have to run downstairs for every little thing...I don't know how long you've been a member of this forum, but I have two more chairs we did last winter I can show ya.

  • 18 years ago

    That's beautiful! I am very used to matching fabrics, and everything WILL (I vow) line up on whatever pieces I eventually do. I'm very anal about that. I'm also a big fan of nail heads,so will have to use some of those! That Horchow 'inspiration' chair has nail heads, double welting and purchased lip cord on the seat cushion. Nothing like dreaming big on my first project, huh? This is a cushion that I covered for a 'bench' (old 2 drawer bureau) at the end of my bed. I didn't have a big enough piece of fabric to match the print from the top to the sides, but I at least lined it up! :-)

  • 18 years ago

    Wow, you all are so talented!

  • 18 years ago

    My3dogs, great job on the sewing and matching...
    I know you'll do a wonderful job cause your such a perfectionist. I can tell by the interior of your house.

    Cliff is a perfectionist, like a dog on a bone, he'll do things over and over until it's perfect. He always tells me
    nobody could ever work for me, except him, cause I'm too fussy! LOL...where ever did he get that idea!?!
    Joann

  • 18 years ago

    cliff_and_joann, those chairs are wonderful!

  • 18 years ago

    Oh my gosh. WOW! Before i read the text, i thought, "I wish i had such obviously qualified upholsterers in my area." And then to see it's a "do it yourself" effort????

    I salute you!

    :)

  • 18 years ago

    oops...correction, we glue the double welt on. I'm having a senior moment...

  • 18 years ago

    What a great job you have done! Those chairs are Beautiful!!

  • 18 years ago

    Oh, that chair is just wonderful, Joann. The story about using the legs to your mother's table on the ottoman, as well as restoring your father's chair really touched me. What treasures you create!

  • 18 years ago

    Thank you all again for your kind comments. Each chair presents it's own individual challenge, and the one we are doing now is really a challenge...
    We are currently reupholstering in leather, Great, Great Grandpa's small antique chair. The leather we are using is the leather we removed from our old leather sofa. We never upholstered a chair in leather before, and it certainly has it's challenges. Leather is very unforgiving, as the wrinkles can't be stretched out like you can with material. We sewed the small pieces together, and I am happy to say it's coming out nicely, despite having to re-do the seat twice :(

    I think working in leather has given us a new appreciation for tailors, as well as upholsterers that work in leather. :) You sure need a lot more strength in your hands to pull the leather. Hopefully it will be completed in a day or two.

    I have leather cleaner, but need to get leather conditioner...Does anyone know what I would put on the leather to make it shine? Every time I see leather chairs on TV they are shiny. I want this chair to have a deep luster.(I'm not sure if conditioner does this, as I never used conditioner) Any advise on how to achieve a nice luster?

    Joann

  • 18 years ago

    Joann - Great reupholstering job on the chair! Lovely home as well. I have a chair in my attic that I will now take another look at. I have wanted to redo, but wasn't confident enough. Since it is only the seat cushion, perhaps that would be a good first project for me.

    Also, will you share where you found the throw that's on the chair? DD is redoing her bedroom, looking for the cheetah accents. We have found good quality cheetah print sheets, but not much else. I would love to find a throw for the chaise in her room!

    TIA

  • 18 years ago

    Excellent job -- really fantastic!

    Very well done indeed! :)

    Jan

  • 18 years ago

    Thank you teacats... :)

    Work in progress...I got the throw in TJ Max about a month ago, The chocolate brown fringe I added on myself.
    good luck finding it. Joann

Sponsored
Whisler Home Improvement
Average rating: 5 out of 5 stars9 Reviews
Franklin County's Committed Home Improvement Professionals