Software
Houzz Logo Print
babyfeets

Please help my plumeria!

11 years ago
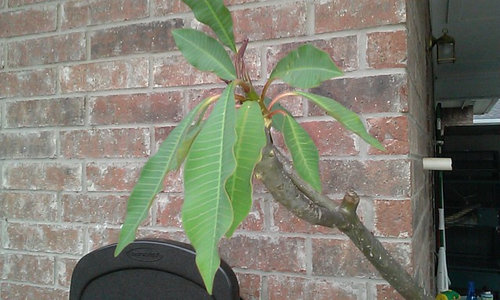
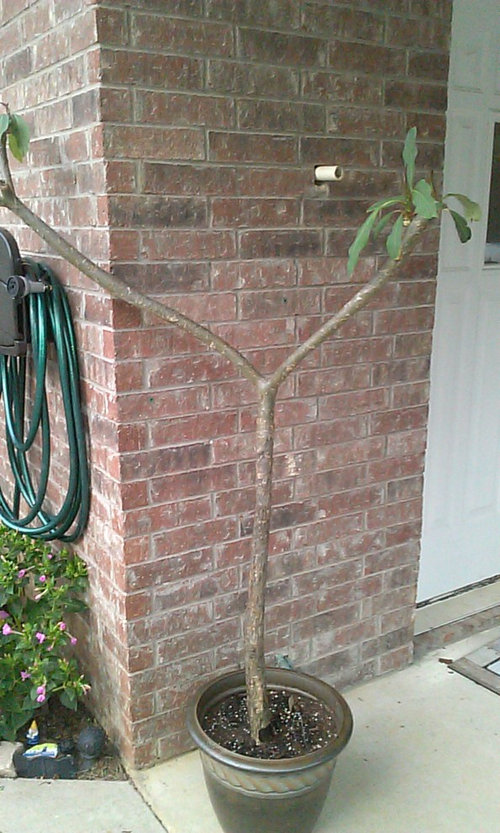
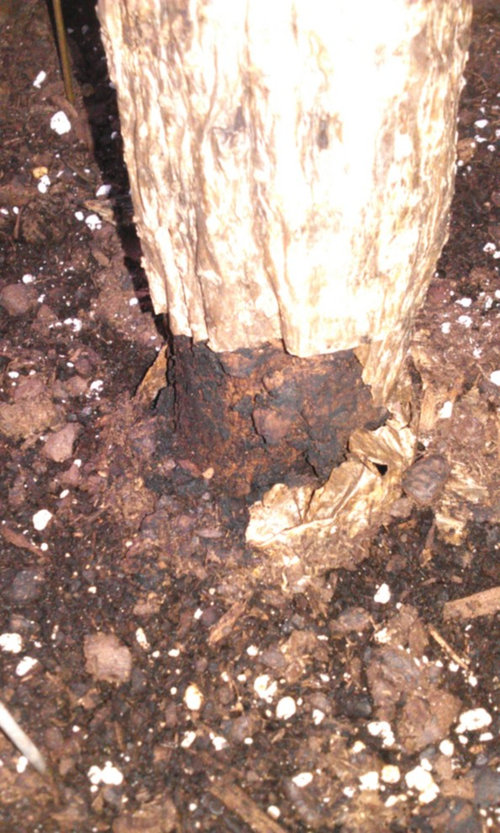
A couple of months ago, I won a 6 ft plumeria tree. It had no leaves but looked solid. Since then it has leafed out. A couple of days ago, I lifted the trunk and all the soil and put it into a larger pot. When I filled in the pot I noticed low down on the trunk it was soft and peeled away leaving a soft black trunk. It is soft up the trunk about 2 ft. However the leaves look much better since then. I understand this is probably root rot, but I am such a novice at growing plumeria I dont know what to do, or if any of this can be saved. I have included pictures with this post. Can someone give me any good news about this?

Comments (17)

  • 11 years ago

    I'm with you Dave.


    babyfeets thanked tdogdad
  • 11 years ago

    Personally, I'd cut the rotted portion off, and reroot this baby. Just my 2 cents.

    babyfeets thanked jedobaTX9b
  • 11 years ago

    I'm with jedoba, I would definitely cut this one and root it. That looks pretty bad. I've had a few that got bad sunburn and covered the bad part in soil and roots came out of the damaged area but yours looks like it rotten....I wouldn't chance it because it will probably just keep spreading.

    babyfeets thanked hendo13
  • 11 years ago

    I did decided to repot it and when I cut into the trunk it was black, soft and hollow. So I cut and discarded that part of the trunk only kept the 2 limbs that had leafed out. They looked to be in great shape according to what I have read on this forum. White and milky. I did repot those 2 at the time. I used 1/2 potting soil, and 1/2 cactus mix for them. I watered them lightly and am now waiting to see if they will survive. I am a brand new novice at growing plumeria so if anyone reads this and has advice for me I would be grateful.


  • 11 years ago

    Babyfeets normally I would let the cuttings callus before planting them in soil. This is how I do it.....others may do it a little differently. I cut the limbs until I see that it's a healthy cut, meaning no brown spots. I let the cutting drip for a few mins until it stops. I then dip the cut end into root hormone that you get at walmart or lowes or home depot. After that you can either take the cutting to a dark place (closet, garage) and just leave them for about a week or two...or you can plant them directly in a container of perlite for 2 weeks. Once you cutting has a callus then you plant in soil and water one time and then put outside under a porch overhang so that it doesn't get water again until you see leaves about 4-6 inches long. I have even planted directly in soil like you did right after making my cut but the success rate isn't as good....and it really depends on the variety of the plumeria.

    Do you know what color this plumeria is???

    babyfeets thanked hendo13
  • 11 years ago

    you must remove all the leaves too


  • 11 years ago

    The tag says yellow. Do you think it is to late for me to take it out of the pot and lay it up to callus?


  • 11 years ago

    It's not too late. Honestly, I've done it both ways; let it callous, and plant it directly. I usually let it sit for 5-7 days though.

  • 11 years ago

    I cut, wait a minute for latex to stop, dip into rooting compound, seal with plastic wrap, and wait 7-10 days. Remove wrap and plant, Water once with seaweed extract and Jump Start in water. Forget about it until leaves grow 6" which can be several months.


  • 11 years ago
    last modified: 11 years ago

    why seal with plastic wrap??? seems like that would promote problems. I see it as putting saran wrap over a fresh, moist wound instead of letting it scab over. But if it works for you, whatever.... As OP reading the various suggestions, you can glean that is must be relatively easy to root a plumie as many ways seem to work.

    I say, cut, let it callus until cut area feels like a scab, 1-7 days. You can dip in rooting powder immediately after cut to improve odds of rooting success but not absolutely necessary. I bring mine indoors and place on a table and they seem to scab over fast, probably the dryness caused by AC. But a shady outdoor spot will work also. Pot in light soil, water thoroughly, place in the hottest sun you have and do not water again until you see new leaves, about a month to 6 weeks, depending on the cultivar. As you see leaves developing/growing increase watering. Do remember that during rooting process, you can correct if underwatering but you CANNOT correct if overwatering--only outcome in that case is rot.

    Good luck.

    Edited to add: I see you live in z8 so rooting process will take a little longer, especially if nights are cooler. Plumies LOVE heat, the more brutal, the better. You can do this.


  • 11 years ago

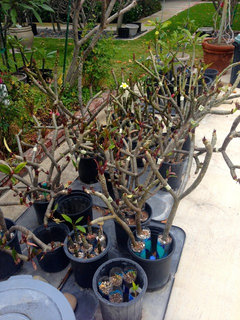
    Vossner- the saran wrap is something I picked up from major growers here in So. Cal. I successfully rooted 76 selected cuttings(the others I give to the Plumeria Society and other groups for prizes) with that method this year with no failures. I have been rooting 70-90 cuttings each year for several decades and this is the most successful method I have experienced. Also, I do not water until the cutting is leafed out and roots are visible in the plastic bottles I use. Also I do not move, touch, pull, etc. the cutting- I just forget about it. Once a week I mist the tops of the cuttings. Reds and Rainbows are more difficult than whites and yellows. Failures do happen, but careful procedures reduce the odds.


  • 11 years ago

    Bill, where do you place your cuttings after you wrap them in Saran? Shade? Sun? Warm? Cool?

  • 11 years ago

    Bill, never heard of Saran Wrap, interesting. Same question as Dave. Can't argue with your success track record. Do you know what is logic behind SW method?

    Bill also good tip about not tugging or peeking during rooting period. Years ago when learning to root roses, I learned to use cut plastic milk containers. For the terribly curious, it enables you to see root action thru the plastic. Any clear container works well and it eliminates guesswork

  • 11 years ago

    I think the saran wrap is like a bandage that keeps infecting germs away from the cut. I use 1,5L plastic water bottles cut off with holes in bottom. I put a few inches of gravel in a five gallon black nursery pot and can fit 5 bottles in the pot on top of the gravel which keeps heat and also adds weight so they do not tip over. When roots appear, I put the bottle in a large pot and fill with soil around. I wet the soil. Then I remove the bottle leaving a bottle sized hole in the soil. I cut the bottom off the bottle, split the sides, remove the soil and roots, and drop into the hole. Done.


  • 11 years ago

    I think humidity plays a big role in getting a good callous without shriveling the cutting and the plastic wrap or humidity chamber will give the ends a good seal without letting all the moisture evaporate. I only have good results with the plastic wrap when I place the end of the cutting on the heat mat while it cures, but that's just me. I know a lot of people just leave them laying around but our air conditioner must take all the humidity out of the house because they never do well for me that way,

    Bill, looking at your pics and success rate all I can say is wow wow wow!!

  • 11 years ago

    Your comment about humidity make a lot of sense. I hate to say this but I just pile the cuttings in three large pots on my porch for a week or so with no heat pad. I think dipping in rooting hormone before wrapping might be helpful. I also do not have heating pads for rooting. just the driveway. It does take longer for them to root. I do have to say that no failures this year so far is a first and quite surprising. This is the first year I have done all cuttings this way. Veterans like Dewaine Calloway, John Tarvin and Bud Guillot always pass on new and good ideas that I often experiment with. I think this is a process where ideas are continually modified until something works well.


Sponsored