Software
Houzz Logo Print
ltran54

Seedlings for experiment?

11 years ago

If you have many seedlings about 1 to 2 years old and want to try this experiment and see if the roots spread out.

It is in Vietnamese, but I can explain what he said in this 5 minutes video clip.

https://www.youtube.com/watch?v=P_ukin-0354&list=PLVBd1CBS9ClS4WUesptZlY48z0Ofqrmir&index=3

You need, seedling, glue, a piece of flat round plastic piece, perlite, soil and a knife.

Took out the seedling, cut top off, cut the base like the video, put glue on both places let it and dry in for 7 days.

He used rice peels but you can use perlite at the bottom for fast drainage, add plastic piece on top of perlite, seedling, cover with soil.

keep in shaded area and slowly water, 2 months later and show us what your plant looks like.

Marie

Comments (29)

  • 11 years ago

    hmm....slice peeled garlic, stir fry for 2 minutes, serve with ebi tempura.

    Seriously, I'm game. Except the ONE day I have time to do this, it's raining buckets outside. I think I'll do anyway.

    Pagan.

  • 11 years ago
    last modified: 11 years ago

    Pagan, you are so funny.....I am laughing out loud...

    Yes, 7 days or until it dry up a bit. Shaded area.

    Marie

  • 11 years ago

    Very cool! I will have some spares to experiment with in the near future. Marie, what is done with the plant once the roots are trained like this? Is this how they start training the arabicum dwarfs to pin their roots into perfect place?

    Tracy

  • 11 years ago

    Marie, that substance in the video that he puts on the top and bottom looks like a powder. Rooting powder?

    Rick

  • 11 years ago
    last modified: 11 years ago

    Yes, Rick I also noticed that. He even put the rooting powder on the top of the cut plant too. I wonder if this stimulates bud growth? I look forward to trying this out myself. Do you buy the plastic disk or do you simply improvise?

    Tracy.

  • 11 years ago

    I am wanting to confirm with Marie, if in fact it is a glue that he is putting on the top and bottom, as it looks to be a powder and I am not familiar with a dry glue product.

    I would think that you could make it. Possibly, a cap off of a large enough plastic bottle would work, inverted?

    Saw something similar on the Adenium group I like and I was surprised that the plastic disc was so much larger than the diameter of the base of tree cut.

    Really would like to try this.

    Rick


  • 11 years ago

    Tracy, after the plant has roots, you can spread it out like arabicum.

    Rick, that wasn't powder, that was glue, to dry out the cut.

    The plastic piece, we can make it from home. I saw some people used a bowl turn over to get it to curl

    Marie


  • 11 years ago
    last modified: 11 years ago

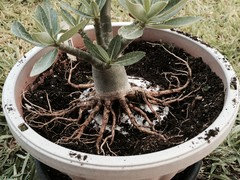
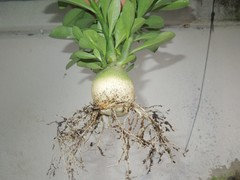
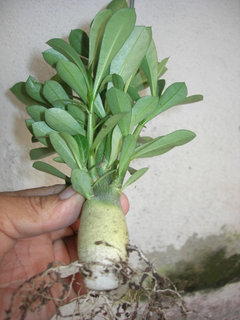
    My girlfriend tryed and this is her plant after 3 months. I asked her to dig it out and take picture and this is how it looks today.

    Marie

  • 11 years ago

    Tell her I think it looks great! I need to do this to a couple of mine.


    Kirk

  • 11 years ago

    Marie, If you do not mind asking your friend. Could ask what the name of the glue was that she used?

    Thank you Marie.

    Rick

  • 11 years ago

    Love the experimenting. Wonder how early you can start this.

  • 11 years ago

    Rick, she used Elmer's glue. I was the one who told her to use Elmer's glue.

    Kirk, I will let her know you like her experiment.

    Nicholas, it is about almost 2 years. Because our growing season only 7 months.

    Marie

  • 11 years ago

    I just went by Marie's translation and dipped my seedling in Titebond. I think I'll put a Christmas ball under this seedling when I pot it up. I have tried using plastic discs before and didn't much like the result---the roots grow horizontally over it (they have no choice) and then drop abruptly underneath. It looked like a death grip lol or Ripley's alien, which gave me nightmares as a child.

    I'm still free today until Sunday, Marie so if you have any more brilliant ideas, bring 'em on! lol

    Pagan

  • 11 years ago

    Pagan....haha

    Try this one. This belong to my friend who lives in Viet Nam. I post this in 2012

    http://forums.gardenweb.com/discussions/1652364/designer-adenium?n=16

    Marie

  • 11 years ago

    Thanks Marie. Really would like to try this.

    Pagan, you are such fun. You know, the Australian friends on the Adeniumsocietyofaustralia have had a lot on the site doing this root training. They had one where a piece of styrofoam was placed underneath the cut piece of caudex, exactly the same size. I though with this, they would get roots growing from outside edges only and then they would grow down.

    They call this centipede roots according to Jericson and his friend.

    Rick

  • 11 years ago

    Itran54,

    I have been trying the above method since about a year ago. Most of the obesum adenium which I have bought from the nursery were cut before repotting in to a 12 inches ceremic pot. I am not satisfy with the result because I think adenium obesum is not the variety for this.

    Can anyone highlight me on which variety to use?

  • 11 years ago
    last modified: 11 years ago

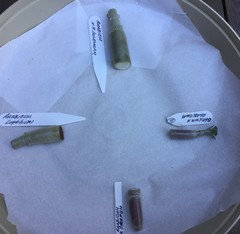
    Well, I could not stand the temptation to try this. Into the unknown for me. After seeing Marie's YouTube video and all the photo's that the Australians where posting of almost the exact process. Then, Pagan & Tony. I needed to give it a go.

    Clockwise (12 o'clock)

    Arabicum N.R.Sundaram

    - cut top & bottom off. - put glue on both ends.

    ( 3 o'clock )

    Obesum x Arabicum

    - cut of bottom & snipped all leaves a top In half.

    - put glue on bottom.

    ( 6 o'clock )

    Arabicum x Crispum

    - cut off top & bottom.

    - put glue on both ends.

    ( 9 o'clock )

    Arabicum lopbhuri

    - cut top & bottom off.

    - put cinnamon slurry on top and bottom. Auzzies use a fungal product, but I cannot

    get it here, so we'll try this. They say you can just blow it dry with a blow dryer.

    Will leave all and then pot up.

    These two root ends. I just could not throw them away. I need to see what happens. They had such nice root systems and I do not have anything to lose if they do not survive.

    Rick

  • 11 years ago

    You guys are all a hoot. I need to give it a go also since you guys have given me encouragement. LOL Pagan you made me laugh launching in so quickly and getting the project done ASAP. Nice job everyone.

  • 11 years ago

    My arabicum seedlings are not old enough yet, but they will be soon enough. I will have plenty to sacrifice for this fun experiment. Please take many pictures and post your results.

    Tracy

  • 11 years ago
    last modified: 11 years ago

    Rick, I started doing some research into powdered glue today. I read some guy asking question if anyone remembered a powdered wood glue from tlike the 70's-80's. An answer lead me to a powdered plastic resin glue making it waterproof. The guy responding used it on cabinetry and as a sealant on cut branches and such.

    http://www.dap.com/product_details.aspx?BrandID=63&SubcatID=10

    Seems Wal-Mart, Amazon, and a few other places carry it. I'm very tempted to try it out. Although I don't see why regular Elmer's Wood Glue wouldn't work just as well. Just thought I'd pass this bit of info on since you were just as curious about a powdered glue as I was.

    Kirk

  • 11 years ago

    That is interesting to hear, Kirk. I have looked back numerous times to see and it looks now that it is glue.

    Interesting though. When I first saw him putting glue on, I thought about the glue sealing the cambium layer on outside of caudex. Where I assumed the new roots would form?

    In the video that the Austrlians posted. The fella put a piece of styrofoam on the bottom of cut piece after it had dried and taped it to the bottom and planted?

    With the 4 that I had cut, the one that I left the top uncut and leaves just cut off. The caudex on the 3 (top and bottom cut) with glue. Caudex's very hard. The other with top not cut is quite soft. Interesting, to me. The glue sealed both ends from bleeding sap. Possibly this is why they are so firm to the touch.

    Rick

  • 11 years ago

    Thank you very much Marie, this is great info and awfully interesting can't wait to try it out.

  • 11 years ago

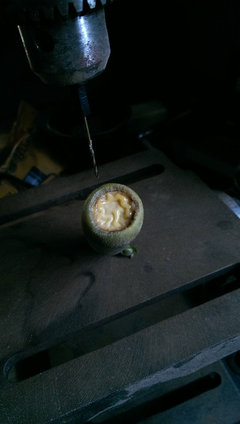
    Weldwood! Sheesh. My dad used to use that and I've tried it. That stuff will not flex! I don't like it at all. It cracks into these hard shards that you'll have to chisel out in order to fix. And don't get me started on the mixing part!

    Ahem..anyway, Marie, do you think this is dry enough to pot up? It's concave like a small bowl now and that wrinkled stuff you see is the dried-up glue.

    (Yes, its on my drill press. I needed the dog hole.)

    Pagan

  • 11 years ago
    last modified: 11 years ago

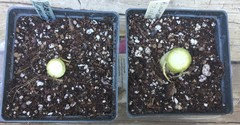
    Well, I planted mine up on their disc's and we will wait to see.

    Marie, do you know if you should water them in now or how many days after? Do they get watered from the bottom or on top of soil?

    Rick

  • 11 years ago

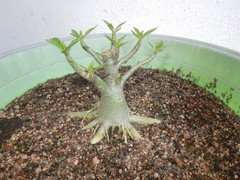
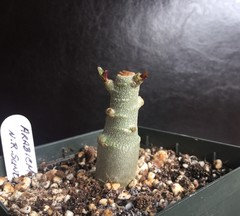
    Well here is one of the Arabicums that I cut the root section off and planted up on a disc.

    Not sure what lies beneath, but it is growing. So will just leave for now.

    Rick

  • 10 years ago

    Would like to see an update on these plants as I have tried without drying them out and had little succes

    So

    Would like to know survival rates

    Thanks

  • 10 years ago

    Mine is zero, so far. My one experiment melted when I spray-watered it then discovered later that the sprinkler was actually reaching the spot where I sheltered it from direct sun. I'll try again.


    Pagan