Software
Houzz Logo Print
reesepbuttercup

How to fix this?

11 years ago
last modified: 11 years ago
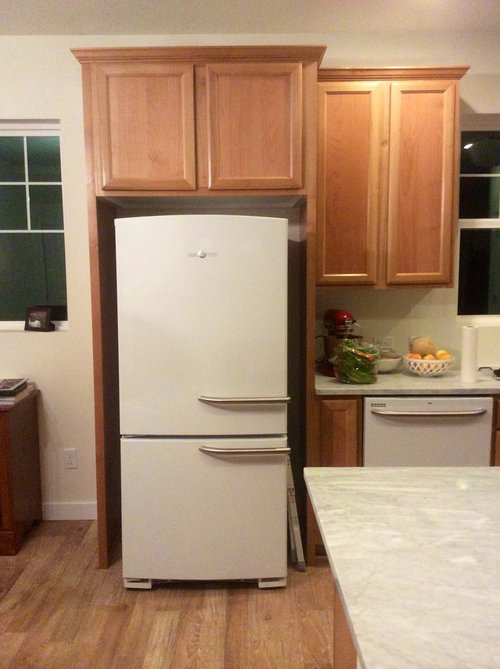
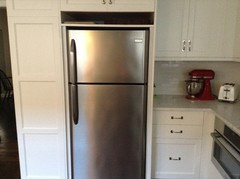
So my backsplash should be installed before the end of the month and I'm gearing up to paint my cabinets. I upgraded and modified the kitchen in my new construction home to have side panels and a deeper cabinet above the refrigerator. I was trying to achieve a more built in sort of look. What I didn't realize was that my fridge was smaller than normal and consequently there is extra space around the fridge. It probably is a good thing, because if I ever upgrade to a larger fridge in the future the cabinets will accommodate a 36" wide fridge vs my 30". However, for now it looks awkward and the space around the fridge detracts from the look I think.

Since I'm painting the cabinets it should be pretty easy to put some filler pieces in. I just don't know what or how. What I specifically don't know is how to attach any pieces to the existing cabs. I assume I would get some sort of smooth wood boards or mdf from Home Depot. I don't know how to go about installing them.


Alternatively, I could just leave it alone. What do you think? Fill in the space (and how) or leave it alone?

Comments (16)

  • 11 years ago

    I'd probably leave it unless I could afford a finish carpenter to do it - or was good at that myself.

    love your fridge handles. did it come with those or do you change them out? what brand is it? the handles look great with your dw handle.

  • 11 years ago

    We had the same issue but just at the top. Our installer had a bit of trim left over and just cut it to fit across the top below the cab. I think he just used a few finishing nails to attach it from behind. Took about 2 seconds.

  • 11 years ago

    Id leave it be. Fridges need a bit of breathing room. Yours can just take a deep breath!

  • PRO
    11 years ago

    Go to HD or lowes and get some poplar 1x4 or whatever width you need.

    Cut a piece for to fit the top of the opening. Drill pilot holes in the poplar and then use wood screws to attach it to the bottom of the cabinet face frame, making sure to use a screw of the right length. (You can also attach from the door opening of the frame if the filler board is too long to find a screw for, in that case just drill the cabinet frame)

    Then cut to fit pieces for the sides, drill some more holes in the fillers and attach.

    When you buy a larger fridge, remove the screws and cut the paint line.

  • 11 years ago
    last modified: 11 years ago

    I've done the same as daisychain's installer, except I inset the top
    trim between the sides. The gap on the sides of my fridge is much
    narrower, so I left it alone. Because my cabinets are painted, I
    countersunk screws from the sides--you could do the same on the sides with long whitewood 1 x 2s, 1 x 3s, or whatever it takes to fill the side gaps, pre-drilling as Taylor suggested.

    If attaching the trim to the front, I'd use finish
    nails, which will leave smaller
    holes to fill if you need to remove it. If attached on the face
    frame with finish nails, trim should come off with a quick hammer
    tap from the back side, after cutting the paint line, again as Taylor
    suggested. If you remove the trim to replace the fridge with a larger model, you'll
    need to touch up the paint, so make sure you keep some back. Or you might
    want to paint the box and let it cure for a few weeks before adding the
    pre-painted trim, then fill and touch up the nail or screw holes.

    ETA, if you have box clamps, or can borrow a couple, it will make insetting the long pieces of trim much easier.

  • 11 years ago

    I had my GC put trim pieces on the sides and a removable shelf at the top. I planned this to allow for a bigger refrigerator in the future so he had ordered material from the cabinet maker (barker).


  • 11 years ago

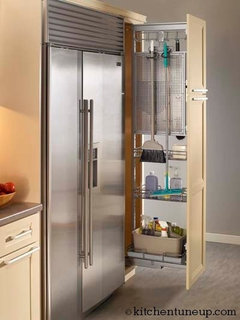
    I love the idea of using the space if you need it. I found this pic on pinterest and it looped back to a GW 2010 thread. All web roads lead to GW! :) I'd probably just get some hooks put on the inner wall if you used it this way or have a rolling cart. In the W/D discussion there was a narrow cart discussed but can't remember where they saw it.


  • 11 years ago

    We're going to have the same issue with our reno - we're planning to buy a 33" fridge, but allowing space for a future owner's 36". Our plans call for trim to disguise the extra space, but now I'm wondering. Anyone else have photos of trimmed-out spaces?

  • 11 years ago

    Desetsteph: the fridge/ stove/ dishwasher are all from GE's artistry line. They look nice for being very basic and affordable appliances. They do not have a lot of features but are alright


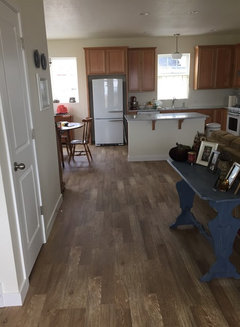
    Okay at so I think I understand how to attach the pieces. Screw through the outer existing cab panels (pilot holes first). As far as leaving it alone, I'm just not sure I can do it. It looks like a mistake to me I think and it is highly visible from my front door (house is small). But then again, maybe once the cabinets are painted (off-white linen color) it won't be as noticeable

    Standing at my front door

  • 11 years ago

    Paint the cabs first and then see if you still feel like you need trim. It may not be such a big deal because it should be less contrast. Also, paint the back wall behind the fridge the same paint as the cabinets, that might help to decrease noticibility of the gap.

    What are your floors? I love them!


  • PRO
    11 years ago

    No do not drill through the panels, put pilot holes in the filler pieces you are adding.

  • 11 years ago

    To drill through the filler pieces will involve moving the refrigerator and I'm afraid that could result in scratching up the floor.


    JessHS: the floor is a Shaw Laminate. I think it is one of their builder lines. It has a sort of wire brushed look and a very matte finish.

  • PRO
    11 years ago

    Most fridges are on wheels, roll it straight out. If for some reason it doesn't or the the wheels don't work, use moving feet under it to slide it out.

    If you screw through the outside, you'll see the screws. if you fill they screw holes, it'll be no fun when you need to remove the fillers.

  • 11 years ago
    last modified: 11 years ago

    How wide will the side filler pieces be? 3½"? That seems pretty wide for an amateur DIY'er to pre-drill, unless you have a drill press. Since you're painting, I'd still go through the outside of the cabinet box, barely countersinking the screws, using a screw pilot, then fill the slots and sand. Orient all the slots the same direction, then if you need to remove the fillers, use a utility knife to clean out the slots. You shouldn't need more than 3 screws for each side, although I used 2 on each side of the top trim piece on my fridge. If you've done such a great job that the screws can't be seen, use a magnet to find them, or mark their locations on a piece of paper, put it in a ziplock bag, and stick in the butter keeper in the fridge. ;)

    ETA, if you like the look, you can also sink the screws deeper and use button plugs, which can later be pried off, exposing the screw top.

    Button top plugs.

  • PRO
    11 years ago

    Or drill through the filler, then screw filler on. When it comes time to remove, remove screws, then filler. And done.

    Practice on a scrap piece a couple times if unsure, but you're making this way more complicated than it has to be.