Software
Houzz Logo Print
oldbat2be

autumn4 - Have You Started Tiling?

11 years ago

Please post some progress pictures - I am very much looking forward to seeing how that gorgeous tile will look!

Comments (49)

  • 11 years ago
    last modified: 11 years ago

    Yes oldbat! I should finish today. I had one wonky tile I missed that has thrown me off a bit. It took a few rows to work it back and it's just off of front and center of course.

    I am aggressively working on acceptance of my less than perfect skills. ;-O. I know it's DIY but I am still OCD!

    That said, I LOVE IT!

    edit: I will post a pic when I am not on my phone!

  • 11 years ago
    last modified: 11 years ago

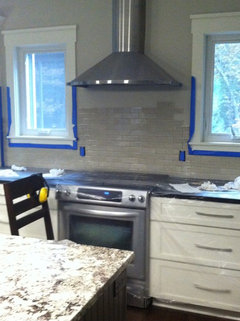
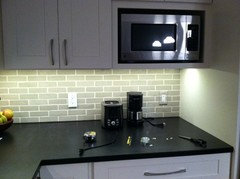
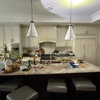
    Where we stopped yesterday. Today it is raining and supposed to all day long. Wow this really is a horribly grainy picture. I'll take some with my real camera today. It will have to sit a few days before I can grout it anyhow. We have a busy first part of the week with conferences and such.

  • 11 years ago

    It looks great. The color is just perfect. It's going to be everything you hoped for.

  • 11 years ago

    Thanks romy. So far it already is! I have to get back at it. My mortar mixer just came in with a fresh batch to start the day. ;)

  • 11 years ago

    LOVE IT!!

  • 11 years ago

    Very pretty!

  • 11 years ago

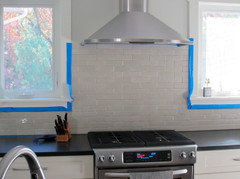
    Finished tiling - will take pics tomorrow in the day light for hopefully a better representation of color (crossing fingers no rain and a little bit of sunshine). Phew, big job done!

  • 11 years ago

    Looks great! Looking forward to seeing pics tomorrow!

  • 11 years ago

    That really is pretty tile, and I think the stopping point is just perfect b/c it ties in visually with the band on the hood!

  • 11 years ago

    Great job & beautiful tile! Looks so nice.

  • 11 years ago

    Very very pretty! Let's hear it for white cabinets, dark counter tops & subtle crackle tile! :)

  • 11 years ago

    amck2-thank you and love your doodle! ;)

    carrie-cheers!

  • 11 years ago

    It's just a nice, soft, cohesive look and it looks great where you stopped it. That's why my vote was iffy because of the math of laying it. Like Barbie once said "Math is hard!"

  • 11 years ago

    Wow, I'm totally in awe of your tiling skills.

    If that one tile that got a bit catty wompus (that's a technical term) bugs you, choose a grout that is closer in color to your tile to make the grout line variations less obvious. Or you could go with white and embrace it catty wompyness (another technical term). =)

    (btw, I'm going to call you Autumn Lisa from now on.)

  • 11 years ago

    mayflowers-yes math is hard or rather its firm and factual and you can't get around it! The tile dictated what we ended up with - at some point you have to embrace it and not continue to fight it and force it. I was initially concerned we'd end up with stacked tile between the window and cabinets. That would have been a no go. As is it is dead nuts center with the center of the hood it really worked out pretty darn good so I am not going to complain.

    lisa-aw thanks. All of our prior back splash tiling has been on a mesh and I have to say this wasn't so bad. If I am honest I chose to lay it because I *know* how I am and I'd rather have made the catty wampus (I know that technical term hehe) mistake as I did than have dh do it and me not be happy about it. Yeah the perfectionist tendency is that bad. He said, well I'm glad it was you and not me and he's right! I have thought about the grout but I think I need to just embrace it and be thankful it's below eye level although yes I can see it. I will choose to focus on it's beauty otherwise and be happy I saved myself about 800 bucks. I really like the white grout in the inspiration picture so at this point I am sticking with it!

  • 11 years ago

    Beautiful! I can see the variation in color saturation which is going to be even more evident after you grout. Big pat on the back for you & DH. It looks absolutely perfect.

  • 11 years ago

    Clicking in on the pictures to better appreciate the closeups... the tile variation is so very satifsying. {{Happy sigh}} Is that dinner in the crock pot? I don't ever think I noticed the placement of your microwave - genius! You get the money shot and the microwave where you want it:)

  • 11 years ago
    last modified: 11 years ago

    P.S. Go ahead and make that one more sample board, for photo-copying and decouppaging the outlets. Definitely let it dry for a few days before taking to Staples etc. You will get pretty close to this: (Edited to correct spelling)

  • 11 years ago

    Carrie, just saw your comment re Riley. Thanks! Our dog pics look like they could be cousins ;)

  • 11 years ago

    Oldbat-that looks so good! I need more info on that again. You take the board to Staples and put that heavy honkin thing on the copier? I still have my original board. I didn't need to take it apart as I have a whole box + left over. Very little waste, woohoo. They can get it that close to capture the detail of the tile? I am all about mod podge. ;)

    romy-thank you! I couldn't really see the shading while sealing it or tiling it. I had all 5 boxes out and open and just kept pulling from all of them randomly. I can see it on the pics though and I can't wait to see it grouted. I love that subtle shading.

    amck-that was me the OP and yes they do look a lot alike! Mine is 8 already. She is sweet but she is already in older dog mode just chilling out all.day.long. Ha! She was literally laying at my feet while I was trying to tile. Silly girl.

  • 11 years ago

    Autumn/Lisa/Amber & now Carrie!

    Your girl is still a pup ;) Mine and her littermate brother, Puck, turned 11 last week. Time flies! They still behave like puppies so I'm not going to break the news to them.

  • 11 years ago

    Perfect! Absolutely gorgeous tile and great job installing them. I can only imagine how great it will look when you get it grouted and get rid of the blue tape. And the crockpot.

  • 11 years ago

    ? Not this Carrie. I don't have a dog!

  • 11 years ago

    That looks amazing! No one is going to notice the wonky tile except you, and eventually you will forget about it. And if there is a gap under your hood I can't see it ;)

    If I end up deciding to tile only to the bottom of the hood I'm planning on going 10 full 3x6 tiles up and remounting the hood to sit on top. It will be a bit of a hassle but I'd have to take it down to tile behind anyway if I go to the ceiling. My hood doesn't have a lip like yours though.

  • 11 years ago

    Carrie, to clarify - The OP wrote "carrie, cheers!" under a compliment she paid my dog. I read it quickly & took it as a signature and addressed her as Carrie when I wrote to acknowledge it.

    My goof. When listing the names in my later post I was making a joke about how people have tended to confuse the OP's name with others & here I did it again with yours.

    Sorry to confuse. I tend to remember most of the pets here, & I know that you are one of our cat owners ;-)

  • 11 years ago

    amck2 - you mean one of those owned by cats? ;-)

  • 11 years ago

    fishcow-thank you! The lip caused problems. I didn't really want to notch out a tile like that and 'lock it in'. I asked about removing the hood and changing the height slightly as an option but the assistant said he really did not want to do that. I relented and let it go as the lip would still be a trouble maker in the mix no matter what height. As is, if the liner had been 3/4" I think we could have used it but then with the lip you are back to a sliver or a liner and a sliver. We bagged that idea. My 3M pads showed up Saturday, woohoo! I am ready to grout once I have the time to do it!

    amck2-no worries. I think I am confused with the Amber's a lot. Someone on the build a home forum just did it yesterday too. OT: My doodle has a lot of miles on her. She ran with me for years. We trained together for 1/2 marathons appropriate distances (I did consult the vet first) and never more than 5 miles at a time for her but over the long haul I think it has taken a toll. When not running we took daily walks 3-5 miles a day year round even in the snow. She is pretty stiff in the morning and after napping. I think she has arthritis. That said she still always wants to go-go-go. No more running but I do make her take rest days from walking now too. Besides that she is a seasonal allergy sufferer and has had a few cortizone shots in her life and I wonder if those have affected her. Poor girl. She still has her puppy moments though and is a wonderful pet. I can't imagine not having her.


  • 11 years ago

    I'm baaack. Happy soggy Halloween from West Michigan!

    So in typical fashion I am *almost* done. Let's just say I'm closer than I have ever been, lol! I still need to caulk which I forgot to purchase but I'll have it on Monday.

    I was so excited and thrilled with how it turned out that I am posting before the final finish but I suppose I will just do a 17 months 'new' kitchen reveal then.

    romy-thank you so much for posting that picture I used as an inspiration! I feel like that really helped seal the grout color for me as well as OLDBAT2BE's mad photoshopping skills! I finished up in the wee hours of Friday morning. I walked in from the other room the next morning and oh I had to stop and just take it all in. It looks just like I hoped it would! It's perfect for my space.

    fishcow-I hope you came back to look so you can see my comment to you. THANK YOU so much for recommending the 3M pads. Wow do they not ever make a difference! I am not a 'clean' grouter so I had a fair amount of scrubbing to do and they are amazing. Once it's clean I used them to buff it and they sparkle like - well a new backsplash much admired by it's owner, ha! I did end up using some Mapei epoxy haze remover but most of the work was done with the pad over slightly damp tiles - after they were set of course.

    Oldbat-where is the customer service in this world I ask you??? First off I have to tell you my sample board saga. I had it in the car on Thursday to go make copies to try the decopage switch plate thing and had to break a little hard while driving. Well the board was not laying flat (so stupid on my part) because I was 'just going to town quick it will be fine'. NOT. It tipped forward and bumped the back of my seat. Just that direction change was enough that they all FELL OFF the board. Are you kidding me? GRRRR! Grout debris all over and a nice clean slate on my board. So I had to make a new one which was easy enough because I was grouting on Thursday night anyhow.

    Fast forward to today when I went to Kinko's with my new board that was resting safely on it's back during transport. They made a copy that looked awful - it looked black and white. I said, oh I need it in color please (after I had explained what I was doing with it, duh). The clerk said well I had the color button pushed that's as good as it will do. Seriously? Hmmm. It's definitely black....and white..... So she begrudgingly did it one more time and it was no better. She said well that's just too hard to photocopy. Okay......I left thinking it just wasn't meant to be but Office Max was near so I stopped there just to see. That one actually looked like a color! Eureka! But this clerk was not too friendly either and I had to ask her to bring the sample back so I could look at it and see if it matched. I then asked for it a little lighter. So she did and brought me the copy - again didn't bring the sample back so I could compare. Whatever. It was not busy in either store, I was the only customer. I have 6 copies of my tile from Office Max and I am going to give that a try but I haven't had time yet. I was cleaning up my grouted beauties today.

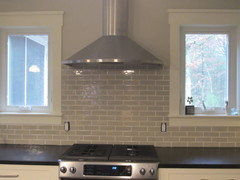
    Without further delay - my pipe smoke grouted with white grout. No flash. It's another horribly rainy day today.


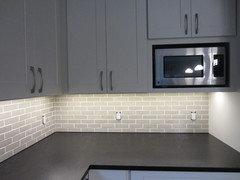
    Short side of the L:

    Overall I am very happy with my diy results. No it is most assuredly not perfect but I am pleased with how it turned out!

    Thanks to you all for following along and helping me along the way, I really appreciate it.

  • 11 years ago

    Gorgeous! Congratulations. Really, really beautiful work.


  • 11 years ago

    Looks great! Nice job.

  • 11 years ago

    Oh wow that looks amazing. Nice job and I like where you ended the tile so that it includes the hood, otherwise i think that the hood would look like it was hanging in the middle of nowhere.

  • 11 years ago

    Thank you ladies. Thanks blfenton - that is just where it worked out best. I fretted at first but I like it too.

    Here is a quick tape version mock up of the decopage vs. status quo difference.


  • 11 years ago

    It just really looks fantastic. I love the tile, the white grout, where you ended the tile at the hood, AND the decoupaged switch plates. Sorry you had such a hassle getting them done but they really do make a positive difference so I think it was worth the witchy clerks you had to deal with. You did an excellent DIY job!

  • 11 years ago

    Beautiful! Just beautiful....and you did it yourself :)


    Happy Halloween!

  • 11 years ago

    It came out great and better than many of the professionals.

  • 11 years ago

    It really does look beautiful, and very professional. And it looks like you aced the math portion of the exam - not a sliver in sight ;).

    I'm glad my tip on the white pads helped.

  • 11 years ago

    What??? You did that? I would never believe it was DIY and not a pro! Amazing job!

  • 11 years ago

    You all are really too kind. My photos are a little strategic but I think the grout helped hide my 'naughty throw the wall off' tile or you are too kind to point it out. Either way I will take it. :D I almost put that hand that oldbat photoshopped pointing at it. Ha!

    Normally I am the 'assistant' when it comes to tiling and dh does most of the work but this time I really wanted to give it a go.


  • 11 years ago

    autumn it really does look PERFECT!! Just stunning! :)

  • 11 years ago

    Really lovely! Love how it looks with the windows especially! but you need to take a picture with the island too, I want to see how the grouted tiles look with the island granite!

  • 11 years ago

    Well done, autumn! Looking forward to your reveal!

  • 11 years ago
    last modified: 11 years ago

    It looks beautiful, and you did it yourself. You should be so proud! Wow.

  • 11 years ago

    It looks fantastic! :)

  • 11 years ago

    Looks Great! Absolutely professional. Love how you laid out the bricks so they land perfectly behind the stove. Well Done!


  • 11 years ago

    It does look fantastic. It really compliments your hood, countertops & paint color. I just love it!

  • 11 years ago
    last modified: 11 years ago

    I love how the gray tile - and its subtle variations - plays off the white cabinets and black counters. Rich and restful at the same time.

  • 11 years ago

    raee-I thought someone might catch that. My island was covered with 'stuff' that I couldn't really get it in the picture and if I did you wouldn't have been able to see it. ;) I will include that when I do a final reveal even though my whole kitchen has already been revealed in bits in pieces throughout the backsplash process.

    I hope to do that within this week. I have to caulk and I have to decopage the outlets and then I can take pictures!

    Thanks again for your kind words about my kitchen. It has turned out better than I imagined.

  • 11 years ago

    I had to wait until I could see this on my big screen to comment. I just love this tile so much--immensely satisfying to view! That feeling of walking in on it and seeing it for the first time each day is wonderful - isn't it great when you get something so very right?

    I'd forgotten about the pain of photocopying - I tried it first by sneaking in my sample board and trying to surreptitiously make the copies but then realized it was better to involve the staff in getting the colors as close as possible to real life.

Sponsored
Urban Upkeep LLC
Average rating: 5 out of 5 stars6 Reviews
Columbus High Quality Painting Expert