Software
Houzz Logo Print
gumby_ct

Easiest Harvesting Method

10 years ago
last modified: 10 years ago

I am almost ready to do my first harvest and looking for the easiest harvesting method known to man.

One method I read about says to -

  1. make holes in a like sized bin#2;
  2. dump the contents of your bin#1 into the bin with the holes(bin#2)
  3. then fill the old bin(bin#1) with food and bedding;
  4. after which you would place the bin w/holes(bin#2) on top of the bin w/food(bin#1).

The thinking is when the food runs out the worms will eventually moved down to the bin w/food(bin#1).

My 1st question is does anyone have any experience with this method, let's call it method #1?

2nd question is - would doing the inverse work?

  1. Meaning - fill bin#2 w/food and bedding;
  2. place it on top of bin#1;
  3. Would the worms move up to bin#2 when the food in bin#1 is consumed?

Experience anyone?

TIA

Comments (12)

  • 10 years ago

    Whenever I get an avalance in my flow through, the entire "stuff" is quite muddy but it's finished compost with a lot of worms. Muddy, because the compost fell into leachete in the lower chamber.

    Here's how I seperated the worms and dried the compost. I use only 1/2 of the surface of my bin so as not to suffocate the worms still in the bin.

    Put the muddy "stuff" on a layer (or two) of burlap and place that on top of shredded newspaper of 1 side of the bin. In the beginning I did have to break up the pile every once in a while to airate it. It will become compacted and with no air, the worms get trapped and die. You won't have to do this breaking up if you are using this method for harvesting crumbly compost.

    In a day or 2, most of the worms have gone down into the bin. I had a Worm Factory in the beginning of my worm farming. The upward migration didn't work that well. They rather dwelled in the lower wetter tray. My guess is, even though I didn't feed the finished tray, there're still nutrition trickling down from the new tray. Remember, worms don't really munch on the scraps we feed them but the live on MO.

    Another note on burlap. I bought several ft. of burlap from a garden store but it was real thin and loose woven; BIG holes. Needed several layers when using this, for strength and coarseness so minimum compost will fall through. I do not buy my burlap any longer but get them for free from a company that roast their own. Real nice thick and strong ones and free. You know NOT to get the synthetic ones, right?

  • 10 years ago

    Not sure which one you have but the original worm factory did not have the worm ladder so worms more or less could not get out of the wet muddy conditions so some died. Then came the updated 360 model which I have with the worm ladder which allows worms to crawl out of the muddy layer back into the bottom tray. The worm ladder is just a section which fits into the drain tray with elevated sides so the worms can escape from bad conditions. I dont have this problem as I dont get any drainage[ unless I dump in a lot of melon].

  • 10 years ago

    I do not have the WF any longer. It was the old one w/o ladder. When I mentioned my FT, it is a DIY converted from a 96 gal. garbage cart.

    I also have a 24 x 48 (x24 height plus room for harvesting & catch basin underneath plus legs for casters) built according to the plan from Bentley.

  • 10 years ago

    I placed my 360 worm factory into operation last January 1, after receiving it as a gift from my daughter. It has the bottom tray for catching liquid and 3 trays on top of that. I have recently filled the last (top) tray with food and have not yet harvested the castings from trays 1 and 2. My better half made the strategic decision to move the factory from our basement to an unheated shed in Northern VA, so I expect the worms to get cold this winter; I hope they don't die. That said, I am considering using an electric space heater plugged into a temperature plugin that only is active between 35 and 45 degrees. My worry is that the breaker will trip with the heater. In any case, I need to harvest the two trays above the bottom. Hummer - When using the screen with 1/4" holes, do you simply move the castings around on the screen, allowing them to fall through the holes and pick up the worms and place them back in the factory? Do you let the castings set a few days and repeat the process in order to remove small worms that may have fallen through? Also, how do you store and use your castings?

  • 10 years ago

    <I am considering using an electric space heater plugged into a temperature plugin that only is active between 35 and 45 degrees.>

    This sounds like a device used to keep water pipes from freezing. I understand worms like to be above 65* - I certainly would not go below 50. Or find out and correct the reason "she" wants the worms out of the basement.

    Meanwhile, I forgot to mention, my setup is a 10 gal. Sterilite bin I put together on Oct 10, 2015. So nothing pre-fab or stackable (yet).

    After research and reading about methods to harvest I think I will try using some old pots to allow the worms to transfer themselves from old to new.

    My thought is to put the contents of the bin into some old plastic pots - (the kind with rather large holes in the bottom) so the worms can migrate into the new feeding area. The pots will be place inside the bin on top of the new food/bedding.

    I am sure it won't get every last worm but I am not sure any harvesting method will.


  • 10 years ago

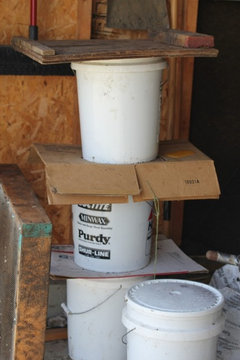
    I usually pick out any worms I can see , put in a container to go back in my bins. I use my hands to move the vc around so it falls thru the 1/4" screening easier than trying to shake the screening. Also any worms that fall thru I can pick them back out , but if some worms are left in the mix below no problem. Since I keep/store my vc in 5gal buckets and few worms left in there will continue to live and work in the mix. I dont let the mix dry out unless it would happen to be too wet and muddy to sift thru the screen. Mine is not usually that way. I prefer to keep the mix moist in the buckets. These storing buckets should probably have some air holes in them. I also dont cover the buckets tightly. just a light covering that doesnt seal. Heres a shot of my stash.


  • 10 years ago

    Gumby, I use the same bin as you. I set up a new bin with about 4-5" of soaked paper egg cartons (broken up into individual cups) and moistened shreaded cardboard/newspaper. I inoculate this bin with some of the vermicompost from my current bin and the let it sit for a week or two to give the microbes a head start before adding the worms.


    I then place a transfer bin (that has about 100 holes in the bottom) on top of the new bin and place 1/2 of the contents of the old bin into it. (I put 1/2 in it because I split each of my old bins into two new ones each time I harvest so my operation can grow.) After two days most of the worms have migrated down to their new home. Then I sift the vermicompost, picking out any straggling worms from the finished product. I put the stragglers into the new bin along with any material the worms haven't fully processed yet (the stuff that doesn't go through the sifter). This helps establish the new bin as a familiar environment which will help reduce the number of wanderers you'll have.

  • 10 years ago

    Hummer - I decided to use your mechanical method for harvesting. I found 1/4 inch hardware cloth (mesh) at Home Depot and built a sieve like yours 2 feet X 20 inches to fit over my wheel barrow. After watching a video on line, I decided to also separate the caccoons using a 1/8th inch sieve. I found 1/8th inch hardware cloth on line from bush mountain beekeeper supplies (?). When this arrives I will try my first harvest. When you strain out the caccoons, do you just dump them into a new feeding tray with the worms taken from the harvest?

  • 10 years ago
    last modified: 10 years ago

    I have two sifters I made some 13 yrs ago using both 1/2" & 1/4 hardware cloth but didn't want to spend the time needed to pick out each worm and realize the eggs will still be left behind (no matter how this is done).

    I decided to do what I mentioned before -

    <After research and reading about methods to harvest I think I will
    try using some old pots to allow the worms to transfer themselves from
    old to new.

    My thought is to put the contents of the bin into some old plastic
    pots - (the kind with rather large holes in the bottom) so the worms can
    migrate into the new feeding area. The pots will be place inside the
    bin on top of the new food/bedding.

    I am sure it won't get every last worm but I am not sure any harvesting method will.>

    So before going on vacation (about 3 weeks ago) I transferred the bin contents into two of the pots. Then added enuff food to last the month and topped with crosscut shredded papers in the old bin. Finally placing the two pots containing the worms on top of the shredded papers.

    Placed a cover on top only to provide some darkness it was purposely left loose to provide air but would not seal anyway cuz the pots stick out above the bins rim surface.

    All this took place in the basement with furnace turned down to 49* so I also placed a seed starting mat under the bins. I have always had the worm bin placed inside another bin cuz I was taught the bin would need a tray for leachate but luckily I have never had any leachate.

    I keep 4 old pill bottles (soda bottles will also work) under the worm bin to make it easier to lift the worm bin out of the tray (2nd) bin this way there is no vacuum and no problem separating the two bins.

    Upon returning home I found many, many worms under the two pots. I am not certain that all of the worms have transferred or that all of the eggs have hatched but I am certainly very pleased with the results.

  • 10 years ago

    Here are some pics after the worms moved themselves from the pots on top to the bin below the two pots.

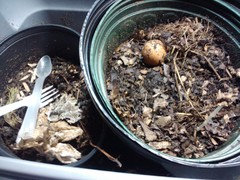
    Below are the two pots I dumped the contents of the bin into for the transfer.

    You can see there is still plenty of food but I was worried about leaving them for 3 weeks so felt it was time to try this out. It actually was 4 weeks cuz I started this a week before leaving to make sure it would work. This makes week 5.


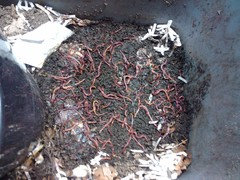
    This is below the above green pot.


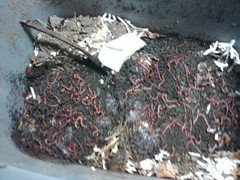
    This is below both pots. I am sure there are more worms out of sight below them. Some of the crosscut shredded paper that covered the top part of this bin is still visible.


Sponsored