Software
Houzz Logo Print
margi46

Red Blotch of death

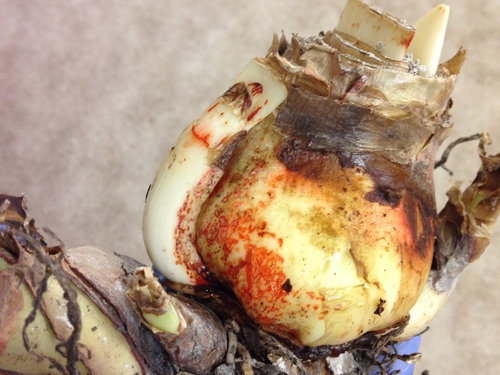
I was going to pot up a few of my MANY amaryllis this afternoon. I have been fighting the red blotch fungus for some time. Recently I read to remove the brown, loose, papery layers before planting, so I did that on the first bulb and found that the inner layers are reddish and soggy. I checked the next one and found the same situation. These pictures are of the two sides of the third one I looked at today. Same thing. What's an amaryllis lover to do?

Late last summer, heading into fall I sprayed the plants (planted directly in my vegetable garden) with a fungicide several times at about a one week interval. As I prepped the bulbs for winter storage i powdered the bare bulbs with captan, put each bulb in an open brown paper lunch sack which had a small handful of vermiculite/potting mix tossed in the bottom of the sack. Then into an open container and stashed in the basement in a location that has bare concrete on three sides, the remaining sides are insulated, but not airtight, so I believe this is a cool part of the basement. I'm !ot sure what more I could have done, and I'm not sure if I will have ANY surviving bulbs this year. Anyone have any advice for me? My flock is about 35, many of which are offspring of a bulb my mother grew from seed close to 30 years ago. I would be sick to lose this strain.

Comments (13)

  • 10 years ago

    I had this problem too a few years ago and I found that leaving them in the pot and allowing them to dry out before winter storage helps. If I do get some red blotch I un-pot the bulb, cut away as much of the rotted bulb, dust with sulpher powder and let it dry for a few days. I then pot it up in fresh medium and keep it on the dryish side until new growth starts. It as was told to me sooo many times with the amaryllis family, "Cold and wet = red blotch and death". Good luck, especially with the cherished one from your mom.

    Warm Regards,

    Fred

  • 10 years ago

    Thanks, Fred, for the comment.

    Just to clarify...my Fall routine went something like this: I dug the bulbs which had been planted directly in the garden, remove soil, and lay the bulbs in a single layer in a well-ventilated flat. The flat(s) then got stored in the shed to allow the bulbs to dry for 2-3 weeks before I removed the dry/drying leaves and proceeded with the routine I stated in my original post.

  • 10 years ago
    last modified: 10 years ago

    If things look really dire, you might want to search for the most healthy and clean bulb and try twin scaling or chipping.

    With the other bulbs, I would definitely remove outer layers until I reached healthy layers. How are the basal plates?

    Also, Fred is right - cold and wet encourages red blotch so you want to get/keep them dry .

    A few more questions: when you removed them from your garden - there was no indication of disease or fungus - it developed in storage? Captan should have prevented that so is there some way they could have gotten wet in storage? Have you always planted them in your vegetable garden - with the veggies? I ask because sometimes veggies carry diseases. Just a thought in case it isn't red blotch but some other issue,

    I truly hope you save the bulbs you received from your mother as some things are just not replaceable- J

  • 10 years ago

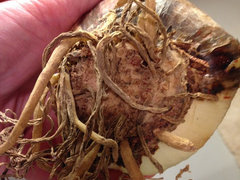
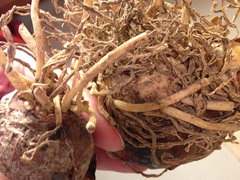
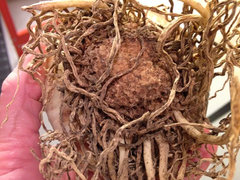
    Here are pictures of bottom side of the 3 bulbs I am currently dealing with.

    The first has very few roots. Second actually has more roots and even a bulb-let. The third has better root development around the perimeter of what I assume is the basal plate.

    Sadly, there WAS evidence of problems in the bulbs when I dug. And actually most of the bulbs showed signs of disease during last year's blooming. Many of the scapes were stunted, were streaked with red, or didn't fully emerge. When I dig, I don't remove the outer dry layers. Perhaps if I would have I would have seen the red on the inner layers. My treatment with captan was an effort to cut back on the possibility of red blotch taking hold. There is no way that the bulbs could have gotten wet in storage.

    Re: planting in the vegetable garden...I have a large garden and the crops rotate every year. Actually, this is the garden that my mother worked for years before she passed away. I just stepped in and took over over 6 years ago. Fortunately, she was a good teacher.

  • 10 years ago

    Why don't you peel all the dead layers off, remove all the dead roots and let's see what the bulbs look like all cleaned up. Don't be afraid to go down below the layer just under the dried skin if need be to see if they're still red. Donna☺☺

  • 10 years ago

    I agree with Donna. Remove all dead and rotting layers. The rot may not extend past the outer-most layer, but if it has gone deep anywhere, cut that all out. Remove all discolored tissue and leave only clean, healthy parts. Don't be tempted to leave any of the slightly pink tissue at the edge of the rotted spots. If you can, dust the cut surfaces with Captan and allow it to air dry for a few days. If you don't have fungicide, soak the cut surfaces with in 1% peroxide for 15 minutes or so before drying. Peroxide is ususally sold as 3% concentration, so dilute 1 part peroxide into 2 parts water to get 1%.

    From what we can see, the bulbs do not look too terrible. Many of us have recovered bulbs with much more rot than this. Bill

  • 10 years ago

    Very sound advise. Many times when I've gotten bulbs by mail, that look exactly like yours. I just trim the outer layers, carefully cut off the dried/dead roots and soak the healthy roots in a shallow bowl of water with a little fungicide over night. This helps to plump up the roots, but make sure you just soak the roots and basal plate. I've tried this many times with very good success. Also, if the basal plate is so thick that it hasn't any roots, don't be afraid to trim a thin layer and treat with rooting hormone, just make sure you let it dry for a few days before planting. I know this seems drastic, but it does work and the bulb responds with new roots in no time. Good luck :-))

  • 10 years ago
    last modified: 10 years ago

    I tried planting amaryllis in the ground one summer, and it was the first and last time. In good-size pots it's easier to control variables like competition, bugs, nutrition, exposure, infections, etc. Mine all go in large pots on the south side of the house, exposed to full sun all day. The 'indoor' leaves burn off immediately, only to be replaced by sturdy leaves that seem to stand up against anything. One of them flowered in mid-summer, and even the flower looked fine after a pouring rain.

    My big concern now is NBF (narcissus bulb fly), and I wonder if a preventive insecticide can be sprinkled into the crown of each plant? Maybe a systemic insecticide would work?

    Rick in CT

  • 10 years ago

    OK. Well, now you should just wait.

    Do not water the bulb after the initial watering in fact I may not have watered it at all and just let it sit on top of the soil for some (a few weeks) time so you could easily lift it up to check on whether or not you had dried it properly and look for the possibility of rot which can certainly happen at this point.

    I do that often with bulbs that I have either trimmed the basal plate or had cut some tissue due to a rot issue and want to be sure that it had dried properly. Later, you can just add an inch or two of soil on top and once again your bulb will be buried.

    I see that you bud tip has turned reddish green, probably just the variety (Charisma buds have a red cast to them if I'm not mistaken) and nothing to worry about. Make sure the soil is not constantly wet. At this point dry is much better than wet.

    Good luck and check back when the bud starts to elongate which is most likely all that the bulb will do initially... bloom first and then think about roots and leaves.

    Donna☺☺

  • 10 years ago

    Rick,

    Don't sprinkle any granules directly into the crown of the plant because it dissolves when watering the plant and you don't want to have the crown of your plant continually wet. It also gets stuck in there, I know from experience. It's hard to be neat when you're sprinkling a granular systemic (which I sometimes use). Of course you can use anything you want, liquid drench is good too. The roots will take up the poison and distribute it to the entire plant.

    Of course, I'm more than sure you already know all of this,;-) Good luck against the NBF, I've had massive devastation in the past but sometimes when the larvae gets in the bulb early and starts its munching the bulb goes into survival mode and simultaneously starts producing many offsets. Most of the time in the end I'll still have survivors of the variety, maybe not the mother but sometimes.

    Donna☺

  • 10 years ago

    Everything Donna said, plus I would take out some of the soil so that it is almost sitting on top and there is just enough to keep it in place. That way you can see if the rot is spreading and pull it out completely to air dry. We have all had our share of dealing with rot and understand how frustrating it can be when it gets hold, especially when the bulb is special and can't be replaced.

    Again, good luck and keep us up on how this turns out. - J

  • 10 years ago

    In addition, I'd sterilize my surgery tools between bulbs (even between cuts) to make sure I don't transfer the blight from one plant to the next.

Sponsored