Software
Houzz Logo Print
riotbrrd

Please review my layout!

10 years ago
last modified: 10 years ago
Hi all,

I've finally stopped futzing and have a preliminary layout for my kitchen. I would really appreciate any feedback!

Background: We have a 1958 ranch house here in Mountain View, CA. We're going to basically gut the "public" wing of the house and add just about 140 SF. I live here with my husband, our 10-year-old, and a couple of cats.

The plans below are what I've cobbled together in Home Designer Interiors software. It's a bit limited, so please ignore some of the weird details like toekicks in the wrong place, countertops looking funky in plan view, no actual elevations, etc.

This is really a general layout plan; I haven't finessed the details like end panels and outlet placement. I also haven't applied colors or materials.

Due to budget, we'll be getting our cabinetry from Ikea with custom doors from a source still TBD.

So.... tada!

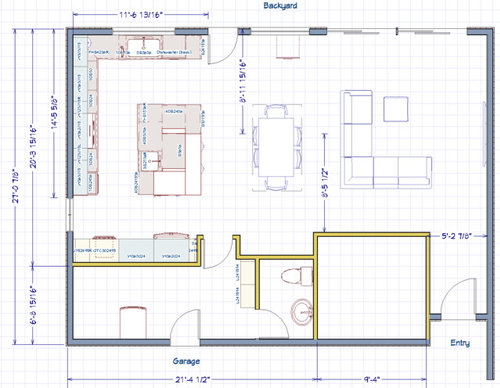
Where the kitchen fits in the house:

Note there is a 4'-wide pantry area just through the door in the utility room.

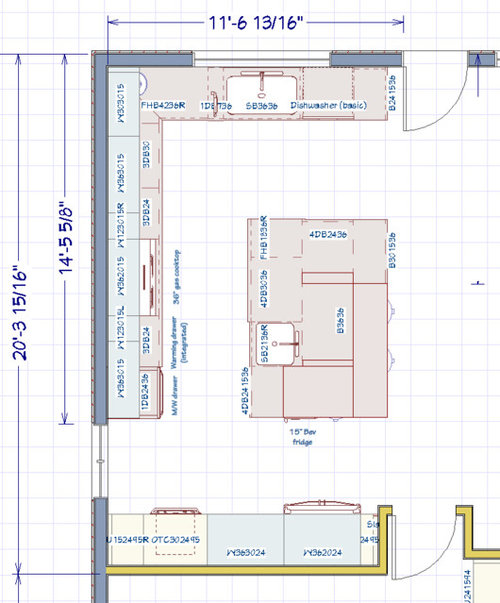
The kitchen floorplan:

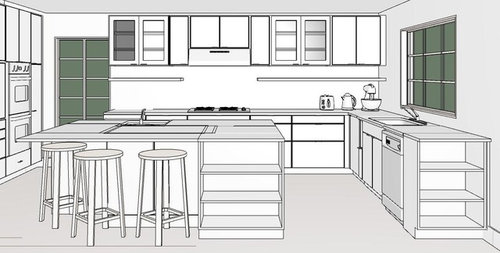
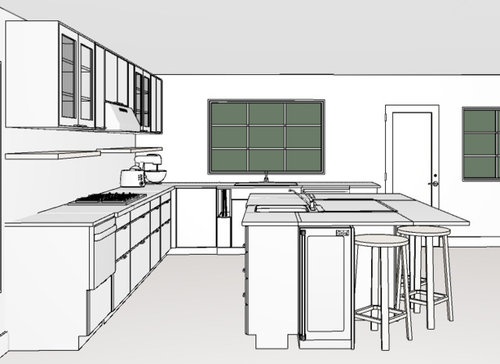
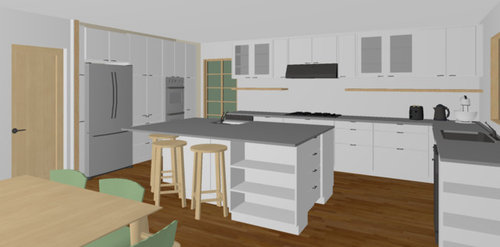
A rendering (again, without color/material selections):

The ceiling is actually vaulted, but the rendering doesn't show it. There will be a big glulam beam running across the room basically where the kitchen ends and the dining area begins. I think it's at 8' high.

Details on the cabinet layout (my software can't do actual elevations)...

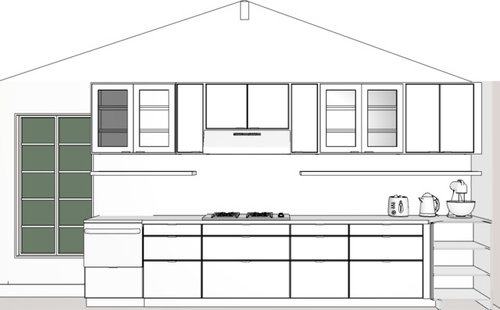
The stove wall:

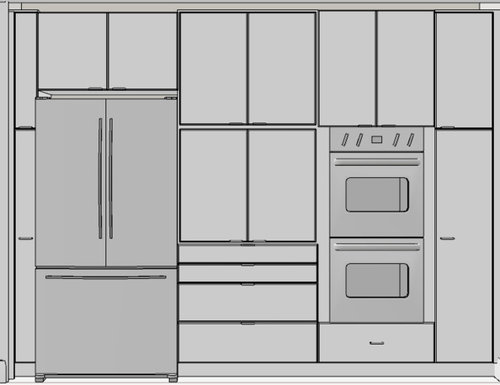
The fridge wall:

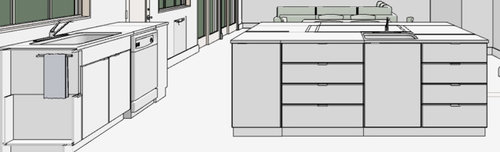
The island from living room:

Island from other side:

Island and stove wall:

I'm a little concerned about the weird shapes I've created under the island. I really want to have seating go around the corner rather than just in a straight line, and I wasn't sure what else to do. I guess I could get rid of the beverage fridge (it's not absolutely necessary) and do a little rearranging so that the entire side in the picture above just has a straight 10-15" overhang.

Thanks in advance! And let me know if there's any more info you need.

-Kim

Comments (9)

  • 10 years ago

    Overall I like it.

    Do you bake much? There's not a really good space to spread out for that. (with proximity to ovens)

    Kim Ladin thanked nancyjwb
  • PRO
    10 years ago

    Thanks, herbflavor! Good point about seating in the island.

    Regarding the big cabinet between fridge and oven, I've been through lots of ideas on this one and haven't really nailed it down. I had originally thought to do a countertop there, but I've been leaning against it because I don't really need ANY more counter space in this kitchen. What I do need is pantry space, because the pantry in the utility room is only 4' wide.

    Regarding glassware and dishes, here's what I'm thinking:

    - Glasses (water, wine, juice, etc.) will go in the cabinet between fridge and oven. That way they're close to fridges and the island faucet.

    - Coffee cups will go to the right of the stove where I've placed the electric kettle. Some will sit on the open shelf, others will be above in the closed cabinet.

    - I'll also put plates and bowls on that open shelf, again with more in the cabinets above.

    What do you think?

  • PRO
    10 years ago

    nancyjwb, I do actually bake quite a bit. It's one of my two favorite things to do in the kitchen (the other one is making jam). I see what you mean about space to spread out near the ovens. I don't see a good solution to that... any ideas?

  • 10 years ago
    last modified: 10 years ago
    The layout is pretty good, with only a few issues. It's very good for a first layout, btw!

    .

    Wall of Tall and Barrier Island...

    Your island is a "barrier island" - a barrier b/w the refrigerator and the Prep Zone on the island as well as a barrier b/w the refrigerator and Cooking Zone. To fix it, I'd rearrange the wall of tall to be:

    • Utility (where it is now)
    • Refrigerator
    • Ovens
    • Pantry cabinets

    This helps with the "barrier island" effect. You no longer have to run around the island to get to the refrigerator.

    .

    Hood...

    The hood should be 6" wider than the cooktop - especially if you plan open shelves anywhere in the vicinity. You want to minimize the spread of grease, steam, etc., so you don't develop a layer of grease or "gunk" on whatever you store on the open shelves.

    .

    Open Shelving...

    Anything you store on open shelves will need to either be used every day or two or you will need to dust/wash them b/f using - each time. Also, keep in mind that the shelves themselves will definitely need to be frequently dusted and, if near the cooktop, washed frequently to reduce the grease/gunk buildup if your hood is undersized and/or under powered. (And please be sure to follow the manufacturer's recommendations for installing it - don't install it higher.)

    Just so you know - the advice I'm giving you about the shelves and the dust comes from personal experience. I have two open cabinets with open shelves (not by design, long story) - one on each side of the cooktop, but not directly adjacent (there's another cab b/w the hood and open cabs) - and I have to dust the shelves frequently. It seems no more than I dust them, the dust starts accumulating again! I don't have grease/gunk build up b/c my hood is 6" wider, I use it every single time I use my cooktop, and I have that cabinet b/w the hood and open cabinet on each side. I also put my electric kettle under the hood when I boil water to reduce the steam on my cabinets and the open shelves.

    .

    Trash Pullout...

    I would place the trash pullout on the end of the island closest to the Cleanup Zone (and cleanup sink). This puts it in the Prep Zone (where it's used/needed the most), near the Cooking Zone (where it's used/needed the 2nd most), and near the Cleanup Zone.

    .

    Island Seating and Aisles...

    If you plan seating on the end of the island, in front of the wall of tall, then you need more aisle space. Right now, you have 36" b/w the refrigerator and island. Ideally, you should have 54" tor a decent aisle b/c it will be a work aisle as well as have seating. If you rearrange the wall of tall as I recommend, you can probably get away with 48" - but it may be a squeeze to use the pantry when someone is sitting at the island.

    If you don't need that beverage refrigerator, I would forego it if you want seating on that side - or forego the cabinet to the right of the prep sink in favor of the beverage refrigerator.

    .

    Island Seating and Overhang/Linear Space...

    Seating overhang...The minimum recommended overhang is 15" of clear leg/knee space - after accounting for the cabinets + 1" decorative door/end panel on the back and/or sides of the cabinets. I can't tell for certain what you have, it looks close for the seats on the long side, but you don't have that much for the seat on the end. Remember that two seats cannot share leg/knee space on the corner.

    Linear space...Each seat needs 24" of linear space, again, the two seats on the long side have enough space but the one on the side does not.

    .

    Keep in mind a few other things...

    • If you are going to have 30" wide ovens, your tall oven cabinet will need to be at least 31.5" wide. Normally, they're put in 33" wide cabinets, but you can get away with 31.5". If you're using IKEA, there won't be a 31.5" wide cabinet.
    • The refrigerator will need a bit of air clearance around it, so be sure you have room for that.
    • It is going to be difficult to access items in the 36"W x 24"D cabinet under the overhang. Normally, I would recommend no more than 15" deep when under a seating overhang. You won't be able to do a drawer on the top b/c it would be inaccessible. You will need to do roll out tray shelves as best you can to be able to get to anything.
    • Blind corner cabinets are the least efficient types of storage in a Kitchen, as well as the most difficult to access/use. Personally, I'd rather void out a corner than have a blind corner cabinet. What does work well is a corner susan. Corner susans provide excellent storage for pots & pans, small appliances, and anything else heavy or bulky. Items on corner susan shelves are easily accessible b/c they're always in front - just rotate the shelf until the item is in front and lift it out. Vs a blind corner that required either crawling into the cabinet or using swing outs that can fail and allow things to fall off (which then require a small child to crawl inside to retrieve b/c the fallen item will prevent the swing out from closing).

    .

    Kim Ladin thanked Buehl
  • 10 years ago

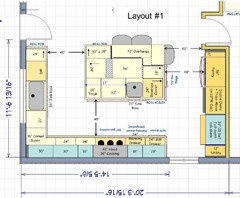
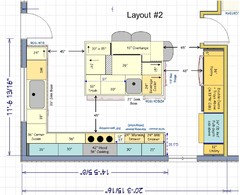
    Here are two layouts - They both have the change in the "wall of tall" on the far right.

    The first has the tweaks to your layout that I mentioned above (corner susan, seating overhang, etc.)

    The second has even more tweaking to give you 3" deeper counters on the cooktop run and 12 more inches on the outside side of the cooktop for a Baking Center. With the deeper counters and over 5' of counterspace, I think it will make a nice Baking Center. In addition, b/c of the offset arrangement, you can be baking while someone else is preparing a meal.

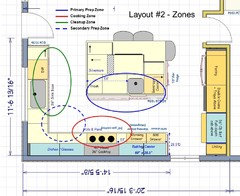
    In both, you also have two Prep Zones - one on the island and one b/w the cleanup sink and cooktop. In both cases, there is plenty of counterspace as well as a water source.

    The Zone Map applies to both layouts as well.

    Layout #1

    .

    Layout #2

    .

    Zone Map

    .

    Kim Ladin thanked Buehl
  • PRO
    10 years ago

    Thanks so much Buehl! That gives me some good ideas to work with! I love the idea of doing a deeper counter on the cooktop side -- there's certainly room for it. It would be so nice to have a generous baking center. Do you by any chance know how to do that with ikea cabinets? Do you just do a rough frame in back of the cabinets where the hang rail is?

    I'll need to figure out whether I can move the cooktop off-center from ridge beam. It's a purely aesthetic issue, of course, but it matters.

    I'm going to think seriously about getting rid of the beg fridge altogether to open up that side of the island.

    Regarding the rearranging of the fridge/oven wall... I'll have to chew on that one. I had a few reasons for arranging it as I did originally:

    • My fridge actually gets used more frequently for accessing beverages, ice, and fruit than for cooking, which argues for having it on the outside edge of the kitchen for easy access and workzone protection.

    • I'm a little paranoid about having an open oven door in a prime pathway, which that would be if I put the fridge on the other side of it.

    • In my last kitchen, I had a fridge on the opposite side of the island from the prep sink. I know that was a complete violation of all rules, but it actually didn't bother me that much. (In fact, I think the extra 2.5 calories I burned walking around the island may be responsible for my slim figure! -- ha ha, if you knew me, you'd know what a joke that is!)

    • This is purely aesthetic: I hate the way it looks when you put a double oven and fridge right next to each other. They never line up at all, so it looks really messy to me. That's why I separated them with the pantry cabinet.


    Of course, if I kept the bev fridge that would somewhat mitigate the first two points at least somewhat.

    Thank you again for the excellent input!

    Cheers,

    Kim


  • 10 years ago

    I'd put your beverage fridge on the outside of your island where you show that bookcase. Easy access for everyone and keeps people out of the kitchen.

    Kim Ladin thanked ck_squared
  • 10 years ago
    last modified: 10 years ago
    "I love the idea of doing a deeper counter on the cooktop side...Do you by any chance know how to do that with ikea cabinets? Do you just do a rough frame in back of the cabinets where the hang rail is?"

    Yes, you build out a frame from the wall 3" deep - or more if you like! Then, you install the cabinets against the frame.

    I know this does not apply in your case, but the added benefit of doing something like this on a sink wall if you live in an area with very cold winters is that you now have an air space b/w the outside wall and the cabinets and any plumbing - it reduces the chances of pipe freezing. Add insulation in that air space and you protect the plumbing even more.

    .

    "...I'll need to figure out whether I can move the cooktop off-center from ridge beam. It's a purely aesthetic issue, of course, but it matters..."

    You could move the cooktop farther over to line up the hood edge with the beam. That would give you another 6" in your Baking Center - maybe a win-win!

    .

    "My fridge actually gets used more frequently for accessing beverages, ice, and fruit than for cooking, which argues for having it on the outside edge of the kitchen for easy access and workzone protection..."

    If you put the refrigerator there, then you need to either give up the seat on the end or reduce the depth of your island by about 6" to accommodate both the extra depth of the refrigerator and a seat back-to-back.

    I think CK_Squared has a good point - if you move the beverage refrigerator to the back of the island, you can store both fruit and beverages in it. You could also get an icemaker, but unless you and your family use a lot of ice, I don't think that's necessary.

    In addition, the refrigerator is on the periphery. On the Zone map, notice there is no crossing of work zones to get to/from the refrigerator from the outside.

    .

    "...I'm a little paranoid about having an open oven door in a prime pathway, which that would be if I put the fridge on the other side of it..."

    How is that a frequently used path? Is that a doorway b/w the cooktop wall and the wall of tall? It looks like a window in all your layouts/elevations.

    Personally, I would prefer more room around the oven for easier access/maneuverability than what you have when it's so close to a wall or window.

    .

    "...This is purely aesthetic: I hate the way it looks when you put a double oven and fridge right next to each other. They never line up at all, so it looks really messy to me. That's why I separated them with the pantry cabinet..."

    Regarding the pantry cabinet - in actuality, a 36" wide pantry cabinet is less useful than two 18" pantry cabinets. Why? Because unless you have one of those complicated swing/turn contraptions in your 36" pantry cabinet, things will get lost due to the deep and wide shelves. Add the extra height for the top shelves, and some things are going to be impossible to see, let alone access, without a ladder. In effect, you are eliminating the top shelves as useful pantry space and adding the headache of deep/wide shelves.

    In addition, if you don't know what shelf you put an item on, you will need open/close each shelf until you find what you're looking for.

    Even with the swing/turn contraptions, you lose a lot of space to the extra hardware, spacing, and extra shelf walls.

    A better option is two 18" wide pullout pantries. With a pullout pantry, everything pulls out so you can see what you have at one time. Because the shelves are not that wide, you should be able to see/access everything from one side or the other - so nothing will get lost in the depths of the shelves.

    You could flank the ovens and refrigerator with the pantries to separate them.

    Also, you could use one pullout for snacks, etc. and one for baking supplies. Actually, you can fit three, if you'd like - combine the 12" & 16" into one 18" cabinet. Now, you have: 18" Pantry + 33" Oven Cab + 18" Pantry + 36" refrigerator + 18" Pantry

    • Store snacks (and maybe cereal) in the outside one
    • Store food in the second one
    • Store food + baking supplies in the third one (the one closest to the Baking Center and the window)

    .

    .

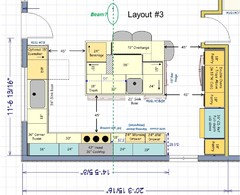
    So, incorporating all that I discussed above, how does this look?

    Note: I'm assuming that mark at the "top" is the beam - I've noted it in green. I also drew a line from the mark to the cooktop to show you how the hood lines up with it.

    Overall, I think this actually gives you a better layout. Instead of the beverage refrigerator inside the Kitchen, it's outside and easily accessed by snackers.

    You've now gained another 24" drawer base for storing prep tools/dishes, etc. (to the right of the prep sink).

    By moving the cooktop, you now have close to a 68" wide Baking Center and there is still 42" b/w the cooktop and the corner (there used to be 48"). 42" is plenty of space for a secondary Prep Zone (even for a primary Prep Zone!)

    .

    Kim Ladin thanked Buehl