Software
Houzz Logo Print
smithmal

Questions regarding fert injection using a Mazzei injector design

10 years ago
last modified: 10 years ago

Disclaimner: total newb here on fertigation

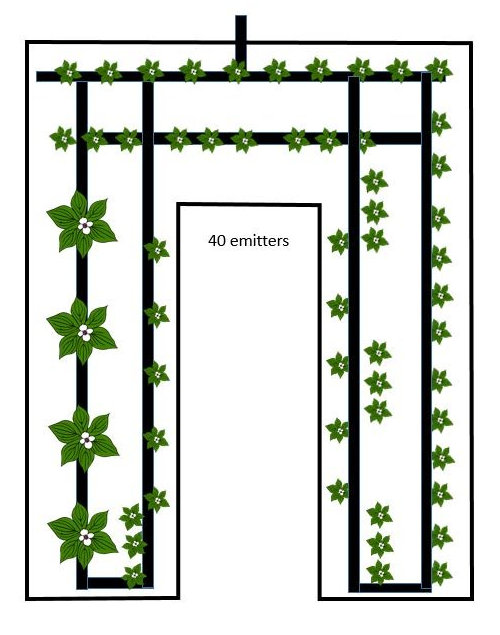
Currently have a small vegetable garden on 40 1 gallon emitter drip irrigation design that looks as follows:

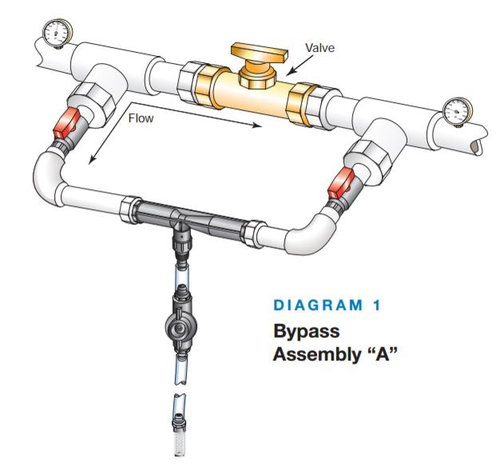
Using a Mazzei 283 injector, I'll be constructing an injector made of PVC piping similar to what is seen below:

The only components not seen above that I will add is is a backflow preventer upstream and a 155 mesh screen filter downstream of the injector assembly.

The injector will be located directly above a 5 gallon bucket with a small hole in the top to insert the suction line.

So, here are my questions for anyone that has used a similar setup:

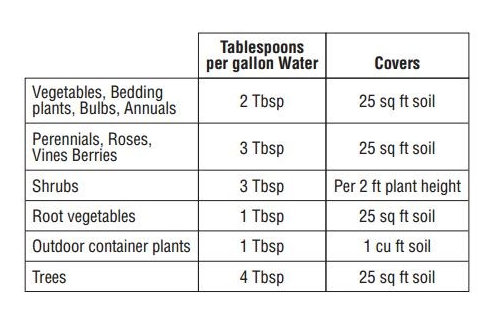
1. I intend to use liquid "Alaska fish fertilizer" (see here) which has an application rate as follows:

The benefits of this product is that you can't over feed/burn your veggies and that it is relatively cheap (you can purchase a gallon @ HD for less than $15)

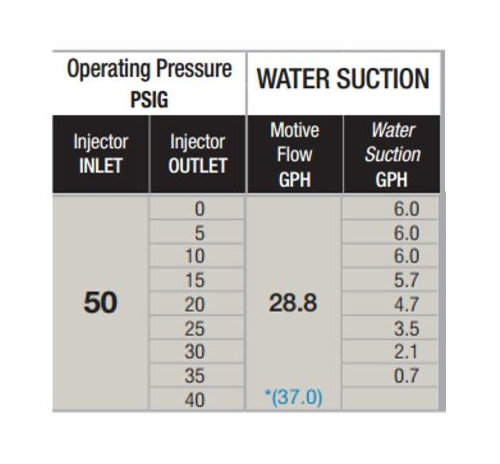
2. The Mazzei 283's performance table @ 50 psig (I'm on well water, so pressure is anywhere from 45 to 65 psig) is as follows:

If I'm reading this appropriately, If my inlet pressure is 50 psig and I dial my gate valve so that my outlet pressure is 15 psig (which is what most drip irrigation systems call for) the system should suck up roughly 5.7 gallons per hour. If I want to irrigate for only 30 minutes, I should fill up my 5 gallon fertilizer bucket to 2.5 gallons, dial my valve so my outlet pressure is 15 and all 2.5 gallons should be inject in 30 minutes. Does that sound right?

Thanks,

smithmal

Comments (6)

  • 10 years ago

    Completed my build of a Mazzei Injector fertigation assembly (see pic
    below).

    Main Injector Assembly
    Components:

    • Mazzei 283 PP injector ($20.44)
    • PVC Ball Valve (x3; $2.27 each)
    • PVC Tee (x4; $0.60 each)
    • ½ Male Adaptor (x2; $0.38 each)
    • ½ Female Adaptor (x3; $0.64 each)
    • PVC Union (x2; $2.56 each)
    • PVC 90 elbow (x2; $0.28 each)
    • Pipe bushing (x2; $4.18 each)
    • Brass fitting ($4.74)
    • ¼” NPT Pressure Gauge (100PSI; x2; $9.98 each)
    • Smith-Cooper International 167L Series Brass Vacuum Breaker, Potable
      Water Service, Inline, 3/4" NPT Male ($10.60)
    • DIG 3/4 in. Hose Thread Screen Filter ($6.68)

    *all PVC fittings ½”

    Filter Assembly components:

    • 3/8-Inch Diameter by 1/4-Inch Clear Vinyl Tubing ($7.19)
    • S-84 Mazzei Strainer ($7.95)
    • SS Hose clamp (x2; $0.78 each)

    Additional materials/tools:

    • ½” PVC pipe (to make 2” connectors between fittings)
    • PVC pipe cutter
    • PVC Cement (all weather)
    • Teflon tape
    • Measuring tape
    • ½" galvanized pipe clips


    Some notes on my build:

    I decided to build my assembly similar to
    the Mazzei assembly illustration noted earlier in this thread. This increases the price a bit due to the
    pressure gauges. The benefit is that you
    can easily identify your inlet and outlet pressures. The outlet pressure must be dialed to a
    certain pressure to regulate the water flow (gpm) suction of the Mazzei injector as noted above in the Mazzei performance table. Your gpm may need to change depending upon
    your fertilizer type and concentration.

    I also decided to go with all PVC
    ball valves, even for the pressure adjusting valve (red valve in pic). I’ve noted several builds used the more
    expensive brass gate valve but I was told by a plumber that brass gate valves
    eventually leak on the stem below the hand wheel so it’s actually better to go
    with straight PVC ball valves. The blue
    valves allow me to completely shut down the Mazzei injector arm of the assembly
    when I want to irrigate with only water.
    The red valve is my pressure regulator which will allow me to adjust the
    outlet pressure as needed.

    I also used 2” PVC cemented connectors
    with my assembly instead of going with threaded fittings. This was basically b/c my Home Depot didn’t
    have all the fittings I needed in threaded form, so I went with straight slip
    on adapters. If you can obtain all threaded
    adapters that’s probably the best way to go as you can easily disassemble your
    injector if necessary. Since I glued
    mine together I can’t do that.

    My injector also has a check
    valve upstream and a filter downstream of the injector. This should protect fertilizer from
    accidentally back flowing into my water system (via the check valve) and reduce
    clogging of my drip irrigation adapters (via the filter).

    I will be attaching this assembly
    to a ¼” plywood board (using the galvanized pipe clips). This will allow me to easily hang it on my
    fence during the summer and then remove and store it during the winter months
    hopefully extending its lifespan.

    All parts were purchased @ Home Depot except for:

    • Mazzei 283 PP Injector (Kisco Sales)
    • Mazzei S-84 Filter (Berry Hill Irrigation)
    • Smith-Cooper ½” Check Valve (Amazon)
    • 3/8” to ¼” Vinyl tubing (Amazon)

    Please let me know if you have any
    questions.

  • 9 years ago

    My kinda newb! lol Thanks smithmal, I'm researching such systems and may follow yours to a T (except I'll be using synthetic fertilizers for containerized plants in 5-1-1 soil-less mix). Any follow up as to how its working for you?

  • 9 years ago

    Also, did you put two of these in series to control pH as well?

  • 9 years ago

    Derrick,


    Thanks for checking out my post. Unfortunately I wasn't able to assemble all the parts until almost the end of the growing season. But it's ready to go first thing when I start everything up this year.


    In terms of using this in serial, I've seen posts in which this has been done, but haven't thought of doing it myself.


    Smithmal

  • 9 years ago

    I think the acid can be added directly to the fertilizer harmlessly, but I'm not sure. I look forward to your updates.

    Derrick

  • 5 years ago

    When I look at the picture, it appears that you've installed a Pressure Regulator at the outflow of your assembly and right after your "downstream" Pressure Gauge. Is that correct?

    I have my irrigation lines set up with a Pressure Reducing Regulator and am wondering if I can install my Mazzei Assembly between my mainline from the hose bib and the Pressure Reducing Regulator at the assembly's outflow. Will that create the necessary pressure differential or is that dependent upon the ball valve (the red one , in your pic) in the assembly?

0
Sponsored
Snider & Metcalf Interior Design, LTD
Average rating: 5 out of 5 stars25 Reviews
Leading Interior Designers in Columbus, Ohio & Ponte Vedra, Florida