Software
Houzz Logo Print
bostonoak

Miele dryer plug slightly mangled

9 years ago
last modified: 9 years ago

This thread is somewhat related to another thread I have below.

As I mentioned in the other thread, I bought a used stackable Miele washer and dryer two years ago.

But it's only now that I got around to having a plumber hook them up because I had other pressing matters.

Anyway, the plug for the dryer won't go into the outlet because the neutral prong is slightly mangled (see photo below). It may have gotten crushed during the transportation. I should quickly point out that I got the right outlet installed for this plug.

I'm going to try to straighten our the neutral prong with a pair of pliers. But if I do not succeed in getting the plug to fit into the outlet, can the plug itself be replaced onto the cord or do I have to call the manufacturer (Miele) and have a whole new plug and cord installed into the machine?

Comments (35)

  • 9 years ago
    last modified: 9 years ago

    You bought it used, right? Not under warranty? That's the only reason, in my non-professional opinion, I can think of not to change the plug if necessary, though I think the pliers should work. For insurance purposes, it might be wise to have a licensed electrician change if if you have one handy. The main thing is that being in a wet area, you have to be very careful that there's no way for moisture to seep into the join. Actually...thinking on it more, that might be a good reason to have the whole cord replaced, rather than changing the plug...

  • 9 years ago

    plllog,

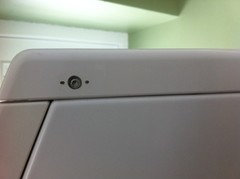
    This is the photo of the back of the dryer where the cord is attached to the machine. Maybe I can just unscrew the screw on the bottom left corner of the cord/plug mechanism and install a new cord and plug?

  • 9 years ago
    last modified: 9 years ago

    Exactly. If the existing plug blade doesn't straighten, it will be much easier and faster than cutting in a new plug. Probably no more expensive than replacing the plug, too,

    I'd just get a generic 4-wire dryer cable from the hardware store for around $15 to $20 dollars.

    Miele's own branded cable is doubtless built to mil-spec standards, but you do not need that for an out-of-warranty appliance like yours. I see no practical reason to pay three or four times as much (plus shipping) to get one from Miele. Unless you just love the gorgeous blue cabling, of course. :>)

  • 9 years ago

    I would order a Miele cable. I ran into an issue where someone replaced a plug on the Miele rotary iron and it would not heat. Had to purchase the Miele cable and it worked. The last time I ordered the plug, it was roughly $48 but this was for the rotary iron. This was the 240volt iron and i don't remember the issues we had with the cable but the plug update fixed it.

    Good luck!

  • 9 years ago

    That'll straighten fine with either a pliers or a vise.

  • 9 years ago

    This is a picture of what the Miele plug should look like, what are you attempting to straighten? I am not sure from looking at the picture. The neutral should look like an L.

    This is a picture of my older washer but the dryer looks the same (T1526)

  • 9 years ago

    One more thought, do you have the corresponding NEMA 14-30R wall receptacle?

  • 9 years ago
    last modified: 9 years ago

    homepro01,

    Yes, I have the right wall receptacle.

    To answer your other question, I'm trying to straighten the neutral prong (the other prongs are fine). Thanks for informing me that it has to look like an L. Oops! Mine is flat because I have been bending it in the opposite direction! :) I think it's safe to say that my cord plug is beyond repair at this point.

    In the meantime, I've just found out tat a replacement cord from Miele is very expensive!

    I just called Miele tech support. They said that they recommend getting a replacement cord from them. The only problem is that they sell a cord for $174.97. That's quite expensive, if you ask me.

    I asked them whether there would be a problem with the dryer if I got a cord from somewhere else. They said that for liability purposes, they cannot answer that question.

    The dryer's manual states:
    ______
    "The dryer comes with a 5 ft. long, 12/4 AWG cord and a NEMA 14-30 P plug.

    "It should be connected to a 120/208-240 V, 30 A, 60 Hz AC power supply. A 3 pole-4 wire grounding power outlet (NEMA type 14-30 R) is necessary."
    ______

    I wonder whether a non-Miele cord, like from Home Depot or Lowes, would actually work with my dryer.

  • 9 years ago

    I'm failing to understand why the electric current cares whether or not the cord is sourced from Miele as long as it's a four-wire dryer cord rated for 30 amps, 240 volts, and has a 14-30R plug at the end.

  • 9 years ago
    last modified: 9 years ago

    Holy smokes, $175 for a dryer cable?

    Just to be clear for Bostonoak, those specs that you quoted from the Miele manual --- those are just tech speak for exactly the kind of dryer cable you will find at HD, Lowe's, your local hardware store, et al.. Just tech-speak for plain vanilla, near-universally available, North American, standard 4 wire cord for electric dryers which has screw-on eyelets at the end that connects on the back of the dryer under that little cover in your photo above. You will be hard put to find anything else. That is why dadoes said that the current doesn't care if you get the proprietary dryer cord or a generic one.

  • 9 years ago

    At a $175, you can buy a new used Miele dryer. There is one Miele power cord on eBay if you are willing to risk it for $65. I had an issue with the rotary iron but it happened so long ago, I don't remember the tru cause. If Dadoes is telling you any dryer plug will fit, believe him. He does this for a living:-)

    One question, was the plug L-shaped before you started straightening it?

  • 9 years ago

    Go to Home Depot and buy this dryer cord.

    Dryer cord

  • 9 years ago
    last modified: 9 years ago

    I successfully removed cap covers that conceal the screws (a box cutter blade worked perfectly):

    After the lid came off a surprise awaited me. The dryer power cord wires don't appear to be screwed on. Instead, it looks like they are plugged in with what looks like spade connectors. The GE Universal cable that I planned to use has eyelet connectors:

    Is there a way I can still use the Universal cord? Also, there are a lot of wires in the back of the dryer that one has to be very careful to isolate the ones that actually come from the power cord. Damn!

    I just called Miele regarding the connectors for the wires. They are called Amp Connectors. One can order them from Miele. They cost $2.42 each. Shipping is around $12.00. I have no idea whether one can get them from a store like Home Depot.

  • 9 years ago

    AMP is a manufacturer of electrical connectors.

    Go look and see if you can find the other end, the 14-30R plug. Cut it off the cable and attach the new one. Might be simpler that getting the proper spade connectors (available at HD/Lowes but you might need metric).

  • 9 years ago

    weedmeister,

    If I understand you correctly, you are saying that I leave the cable that came with the dryer on. However, I cut this Miele cable where it attaches to the plug that goes into the wall. I then connect the cable to the plug that's attached to the GE Universal cable. If this is what you're saying, the only problem is that both plugs appear molded to their cables. In other words, the plugs do not detach by unscrewing something.

    Getting back to the connectors, what is interesting is that I can already see where the Green (Ground) and Red (Hot) wires go into inside the dryer. You can see them in the photo.The White (Neutral) and Black (Hot) seem to go to another box-like thing to the right (not visible in the photo). Does this make sense?

    When I get home I will pull out the Red in order to see how the connector looks like.

  • 9 years ago
    last modified: 9 years ago

    Good practice to photograph the existing connections before taking anything apart!

    Seems to me the easiest fix is to splice the existing connectors in place of the crimp-on eyelets on the new cable. Unless dadoes and jakvis say otherwise, I'd get the yellow crimp-on- butt-splIce connectors which are for 12-10 AWG wire. (If I could find them, I would use the ones with heat shrink insulation covers for extra peace of mind but I don't know ifHome Depot still carries them.) Anyway, no messing with trying to match spade fittings (which might be some weird Miele special item). Much less bother than trying to replace the molded plug on the other end.

    For future reference, please ignore any internet advice you might run across that might
    suggest trimming off the bent leg part of the L to get the plug to fit. That L shaped blade on the plug is for important safety reasons. It makes sure that there is only one way -- the correct way -- for the plug to go into the 240v socket.

  • 9 years ago

    Yeah, this is an unexpected complication ... but there are ways to work around it depending on the DIY skills involved.

  • 9 years ago

    Here is the Miele power cord on eBay if that would help.

  • 9 years ago
    last modified: 9 years ago

    homepro1,

    Thanks for sharing that link. However, I don't think that's the right cord. My cord has 4 prongs (not 3).

    Below is another photo of my damaged dryer plug. Notice that the Neutral prong is where the damage is. This is the prong that is at the top of the plug. It's supposed to be L shaped. But the one on my cord got accidentally flattened so it cannot fit into the wall outlet:

  • 9 years ago

    Below is a close-up photo of how the Green and Red wires of the power cord attach inside the dryer:


    And below is a photo of how the White and Black wires attach:


    Today I gently tried to pull out one of the wires (Red) so that I could see how the connector actually looks like. But it felt quite secure and I did not want to force it in case I broke something. If I know for sure that the connectors can be pulled out then I'll give it another try.

  • 9 years ago
    last modified: 9 years ago

    No, I meant that you take the GE cord back, then get a 14-30R plug, cut off the plug from the Miele cable and attach the new plug.

    This may not be the correct one, but you should get the idea.


    plug

  • 9 years ago
    last modified: 9 years ago

    weedmeister,

    Your tip may be the real solution!

    I just called a local electrical supply store that sells the same plug you suggested (http://www.westsidewholesale.com/leviton-275-t.html?keyword=Google_Shopping&gclid=CjwKEAiA8dDEBRDf19yI97eO0UsSJAAY_yCSBm-70B65WhNwIH4_FEQyFcslTRmFP6unXx0t4TjZ-hoCLELw_wcB).

    When I first read your suggestion, my concern was that I would have a cord with a big electrical tape bulge.

    However, the electrical store explained that connecting the 4 wires does not need electrical tape or even heat shrink tubing. The reason is that the plug is deep enough to take in part of the cord itself and not just the wires. It then clamps down on the cord.

    Does this make sense? Just trying to be sure because I know nothing about this stuff.

    Again, I really appreciate the feedback you've given me.

  • 9 years ago
    last modified: 9 years ago

    " Just trying to be sure because I know nothing about this stuff."

    I'm not trying to be unkind but the prudent thing would be to spend the $174 on the cord supplied by Miele and have someone who knows what they are doing -- like an electrician, appliance repair person or better yet a Miele certified tech change out the cord. That's what makes sense.

    Sometimes it's expensive to do things cheaply.

  • 9 years ago

    I would add that installing the spade connectors onto the stranded cable conductors is best done with the correct crimp tool.

    Replacing the plug with a new one on the existing cable is the best approach here, time and effort wise assuming normal cable construction, although some plug retention configurations would be best dealt with using ferrules (also requiring some crimping) on the conductor ends where they are retained by the plug. The need will be evident if the strands do not seem to be well retained.

    One may sense in my comment the need for special tools for special occasions. In my view, and in my preference, one can buy tools and do research to address each home repair problem. In the long run* this becomes cost effective due to tool reuse, and allows one to be free of the "constant rent service" of hiring someone for every repair task. Often the tool cost is commensurate with the hired labor cost, so in the early phase one works for free as an apprentice.

    On the other hand, this is not the best path for everyone, either due to lack of interest in all the subjects one has to learn about, or lack of space for the accumulating tools, or lack of cost-effectiveness if one has an effective hourly income much higher than the labor costs of the repairs (and repair labor is always available for emergencies).

    kas

    *As John Keynes noted, while making an excuse for looting peoples savings via inflation, in the long run we are all dead. The tools, however, can live on aiding someone else's home repair projects.

  • 9 years ago
    last modified: 9 years ago

    If you do not have already one, the specialized tool you might want is a wire cutter/stripper/splicer like this one from Home Depot for about is $11.

    If you want to to replace the plug end, HD seems to charge $15 for the Leviton 14-30R replacement plug you were looking at from the wholesaler link above.

    For replacing the plug, the first thing you need to do is ascertain which color wire goes to which blade on the plug. A wiring diagram should show this. There should be some wiring diagrams inside the back of the Miele. You also can
    find a Leviton wiring diagram here for the NEMA 14-30R plug here. If you do not read wiring diagrams, then you may be able to determine which wire goes to which blade by stripping a bit of the blue cable covering from back behind the existing plug's molding. Make notes before you cut off the existing plug, Now, cut off the existing plug. Open up the replacement plug (probably just two screws and you can pop the cover.) On the now cut cable, peel back and cut enough of the of the molded blue covering to expose enough of the wires to fit inside your new plug. On the end of each wire, use the cutter/stripper tool to strip off enough insulation to expose just enough of the copper to bend around the mounting post and fit under the retaining nut. (Some people I know would skip the tool and just use a pocket knife but I find the stripper tool easier to use for these tasks.) Tighten the nuts on each post to hold the respective wire. Make sure you have no loose strands. Close up up the new plug and screw it together. You should be good to go at this point.

    If you decide to work on the dryer end of the cable, you just match wire colors (red to red, green to green, etc.) Also, it looks like you can splice with the existing connections remaining in place. You will want the crimping/cutting/splicing tool plus a small pack of these "butt-spice connectors" (for $2.39 from HD). Here's a simple you-tube video that explains stripping and crimping-on butt-splices with this kind of tool.

  • 9 years ago

    rococogurl, kaseki & jwvideo,

    Thank you so much for taking the time to advise me! If I'm going to use a replacement plug (as opposed to a replacement cord and plug) I will definitely need to learn how to wire the plug correctly and safely. I plan to do the necessary research. If, after the research, I'm not comfortable, I will not do it. In any case, your tips and general feedback have been invaluable.

    In the meantime, I thought it would be worth it to explain something. My dryer plug (from the cord that came with the dryer) has info printed on it. The plug has the following info on it: http://www.feller-at.com/

    I googled this company and was able to talk to their U.S. office. They told me that they could not get me the power cord because they only deal with huge orders. Also, they told me that from the URL that's on my plug (http://www.feller-at.com/) it means that the plug was made from their Austria location. I don't know whether this means that the plugs made in their U.S. location (http://www.feller-us.com/home.html) are different.

    You learn something every day.

  • 9 years ago

    You'll need to cut the cable. You'll need to be able to trim back the insulation of the main cable to expose an inch or two of the 4 wires. You'll need to be able to take about a quarter inch of insulation off the end of each wire.

    Of the 4 wires, the two you need to worry about are the Green and White. The Green is ground and goes to the round connector at the bottom of your picture. The White is neutral and goes to the L-shaped connector at the top of your picture. The Red and Black are L1 and L2 of the 240 volt line and go to the two flat prongs on either side. And though some may not like me saying this, it doesn't matter which.

  • 9 years ago

    "it doesn't matter which . . . " --- just to complete the thought -- for purposes of supplying power, it should not matter which hot line is connected to which hot blade in the plug. That is because the red and black wires are each a hot, 120v line. Some of us make a practice of matching black to black and red to red just because it avoids any confusion if and when we ever need to trace lines at some later date.

  • 9 years ago

    I cannot comment on the plug or its replacement as I'm not qualified.

    What I can say is that I have a lot of Miele electrics and do know that Miele products work in very specific ways.

    If that particular plug is on a Miele product there is a reason.

    Miele has excellent technical support people. I would call in the morning so you get the Princeton call center. Explain the issue and ask them to escalate it to someone who can tell you exactly what to do.

    Kas and others here are very knowledgeable. However, with Miele I would be very careful. My rotary iron, f.ex. has a very specific cord and plug. I wouldn't dream of switching that out, or switching out the cord on my dryer without fully consulting with them.

    I recently replaced my washing machine hoses (14 yrs old) and had my plumber do it. Turns out, there was a special tool needed to make the old parts compatible with the new.

    The last thing anyone needs is a serious electrical issue with a major appliance that heats because there is an assumption that whatever will work with GE or Frigidaire will work with Miele.

    It's possible but IME unlikely. I'd want them to explain what do do that's safe and produces the best result.

    Best of luck with this.

  • 9 years ago

    Now, now, rococogurl, let's not be timid when we are so close. For the OP, let me just add, as perhaps a patina of comfort, that in the USA, acceptable plug styles are not determined by Miele, but by the NEMA, with their construction approved by UL as specified by NFPA 70. There may be higher and lower (but still acceptable to the UL) versions of a given type plug or receptacle, but any that are marked UL, or by another approved cooperative national testing lab, such as CE in Canada, are approved for use.

    kas

  • 9 years ago

    rococogurl,

    Thanks for your concern. I have still not made a final decision. Right now I'm leaning towards replacing the cord cap (plug), and leaving the Miele cord in place.

    They have replacement 4-prong dryer cords like this one:

    http://www.westsidewholesale.com/leviton-275-t.html?keyword=Google_Shopping&gclid=CjwKEAiA8dDEBRDf19yI97eO0UsSJAAY_yCSBm-70B65WhNwIH4_FEQyFcslTRmFP6unXx0t4TjZ-hoCLELw_wcB

    You can also find them at Home Depot and Lowes.


  • 9 years ago

    Weedmeisters solution is the one that most Appliance Techs would use. It is safe, would not violate any codes and is NEC and UL accepted.

  • 9 years ago

    I'm going to suggest the 'other' solution. I'd try this before cutting the existing plug off and splicing on a new one. That plug has double protection against backwards insertion. I would grind down the small leg on the 'L' to the point where the remainder can go into the socket. The round leg still remains to guarantee correct insertion.. . . . . Before I took this step I'd clamp the long leg of the prong in a vise up to the spot it needs to turn 90*. Be careful determining this point. I'd then tap the shorter leg flat with a hammer to create the 90*. It's brass and easily worked.

  • 9 years ago

    The problem is that if your create too much torsion inside the rubber part of the plug you could possibly disconnect the blade from the wire.