Software
Houzz Logo Print
elsa2016

Wicking questions

9 years ago

I'm trying my first wick. I follow the instructions here and mix 50% potting mix and 50% perlite. The wick is 1/2 inch width pantyhose. The top half the pot is moist but the bottom half of the pot is quiet soggy. The pot is 4 inch. Is this ok? Should I add more perlite in the mix? Or add perlite only at the bottom of the pot?

Thanks

Elsa

Comments (24)

  • 9 years ago

    I agree with Irina. Way too much wick. I'd either cut it MUCH thinner strip or replace it with unraveled yarn, etc. Always use the thinnest wick you can that works reliably. You want the top of the soil to be able to dry out slightly but stay faintly damp right below. Also, you don't have to run your wicks all the way up. I also use a 1/2 soil mix with 1/2 perlite for all my wicking usually with a layer of only perlite on the bottom.

  • 9 years ago

    I followed irina's instructions above. I cut the pantyhose 1/4" width and it seems still too wet. I will get acrylic yarn instead. Is there any particular size for the yarn?

  • 9 years ago

    Some of the yarn repels water, some conducts... every brand is different. Any synthetic yarn will go. Wet it first and add a drop of Dawn dishwashing liquid. I will strt with a thicker yarn frst - 4 ply may be.

    Regarding the pantyhose - stretch the wick to thin it.

    Elsa thanked irina_co
  • 9 years ago

    For my humidity level, using yarn at it's regular thickness is way too thick for my AV's but if your humidity is low, it shouldn't be a problem. Everyone's situation is different so you'll need to tinker. ;)

    Elsa thanked Hyn Patty, Western NC Mountains (USA)
  • 9 years ago

    I think I finally get it with couple of trial and error. I found this in 99 cents store and replace the pantyhose coz it's still very wet for the av.

    The thickness is about 1mm. I used 2 ply on the 4 inch pots and seems a little bit dry. So I put another 2 ply in the other side of the pot (2 wicks in a pot). Hopefully that should be ok. I think it will give a better control that I can use 1 or 2 wicks depends on the weather or humidity level.

    Thanks all of your advice. :D

    Elsa

  • 9 years ago

    Irina, Patty

    I put 2 inch perlite at the bottom. Is this layer of perlite suppose to be wet? I took the plant out of the pot and found out the perlite at the bottom is wet. However, the mix (soil +perlite) on top of perlite is not as wet. Is it ok? The plant is under the wick about 1 week or 2 and it look normal. How long it take a plant to show symptoms of rotten root because of too wet?

  • 9 years ago

    Sounds good. Adding a thick layer of perlite at the bottom is called the Texas method. It is normal for that perlite to be wet as it is also conducting the wicking action but also allows plenty of air and drainage. The /larger/ the chunks of perlite the better though. Course pieces around 1/4 to 1/2 inch are far more ideal than fine, smaller granules that tend to pack down and may be very dusty, leaving very little by way of air gaps.

    How long varies but it may start showing wilt rapidly due to roots rotting. Ideally you want to balance it out before it tanks that far gone. Sometimes only the leaf tips will blacken and turn mushy and that's a warning sign before collapse. If the soil above the layer of perlite is merely damp rather than wet, then you are probably fine. A lot of this also depends on your relative humidity. Mine is very high so it's easier for me to over wick than someone who may have a low humidity.

  • 9 years ago


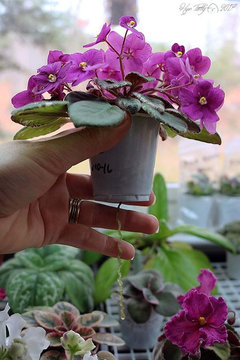
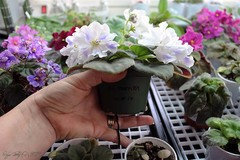
    For example, here is a mini African violet on a thin wick. I used acrylic yarn that is completely unraveled down to a single strand and it keeps this Rob's Macho Devil plenty damp. I didn't bother with a layer of perlite beneath it, but I do with my streptocarpus. Most of my large AV's are on the /same/ size very thin wicks. But it varies with the individual plant. My RS Rosinka for some reason drinks a lot more water and therefor dries out on a very thin wick, so I use a wick that is about twice as thick. Here it looks over potted but actually I just removed the outer layer of leaves to put them down to make baby plants. The roots fill the container and keep it in fairly constant bloom. I will be due to repot it in another two months.


    I happen to take these photos this morning to show someone else who wants to set up wicking for his gesneriads. I try to use the thinnest wick possible. If it dries out repeatedly after brief soaks to restart them, then I'll bump up to a little thicker wick. After a while you will get good at judging which is best for your plants in your situation.

  • 9 years ago

    Incidentally, that nasty looking little plant to the right of RS Rosinka with all of the leaves hanging down around the pot? It got too cold. I'm about to repot it and start it on plate training to reform the leaves spread out flat but I'm saving it for this Saturday's local AVSA demo.

  • 9 years ago

    Patty,

    Thanks for the detail explanation. Your av are so pretty.

    Elsa

  • 9 years ago

    Patty,

    When the reservoir dry out, should I wait for couple of days before I refill the water? I thought I read a post here before that someone mentioned to refill after couple of days but I couldn't remember why.

    Thanks

    Elsa


  • 9 years ago

    I do not let my reservoirs dry out, myself. I use 10 inch by 20 inch flats with grids that each hold about a gallon of water. No harm if you do, but you'll have to re-soak your plants and wick well to restart them.

    Some people prefer to let streps in particular dry out a little between refills and that's fine but it will make for more work for you and I personally haven't seen a benefit in doing so. Not unless you have a really stubborn plant that won't bloom and you want to add to the stress and let it wilt before you water again.

    If it gets hot enough in my studio that my plants start to try to rot, I will take all of my streps off of the wicks and change over to light hand watering until the extreme heat lets up. If bacteria or fungus is already there in your pot that causes root rot, drying it out briefly won't keep it from reviving in the old soil as soon as it is damp again. The old soil should be thoroughly removed, the plant sterilized and repotted in fresh media that is barely damp, and domed.

    Elsa thanked Hyn Patty, Western NC Mountains (USA)
  • 9 years ago

    Can I but in here with a quick question? What do you do to stop or prevent algae growth?

  • 9 years ago
    last modified: 9 years ago

    Algae isn't an issue for me because I pull all of my reservoirs every month to wash and sterilize them. With bleach for my larger trays, with soap and water or the dishwasher for my smaller reservoirs.

    You can add chemicals to keep algae from developing, such as Physan 20, or kill algae by adding a few drops of bleach but in my opinion if you are getting more than a faint trace of algae you aren't managing your reservoirs frequently enough.

    Algae itself is not harmful to your plants but does indicate a build up of nitrates and phosphates. It also builds up various bacteria, including slime bacteria, that may be harmful to your plants and their root systems. Regular cleaning of your reservoirs also allows you to check for signs of insects such as thrips, gnats, and root mealies.

    If your plant, pot, soil, and wick become a harbinger of algae, then you should repot your plant and use sterilized materials to break the cycle. I bleach all pots, use fresh wicks, and try to repot every 3 to 4 months. I could see using Physan 20 once to break a cycle in the plant pots themselves but you shouldn't have to use it as a regular treatment with good reservoir management. Using Physan 20 or another product regularly will fix the visual problem but does nothing to correct the water quality issue that causes algae to form.

  • 9 years ago

    Thank you! This is super helpful. :)

  • 9 years ago

    I have 2 plants on wick, the reservoir are frosted glasses. I notice there is always some grey tiny bugs floating on top of the water. Does anybody know what it is? The other reservoir is mason jar which I don't see any bug there. So, I'm not sure whether a see through glasses and a frosted glasses will make a difference in the existence of these bugs.

  • 9 years ago

    Can you take a pic?

  • 9 years ago
    last modified: 9 years ago

    Yes, photos of both the tiny bugs and the plant itself would be good. They may only be spring tails, which would be nothing to be worried about, but if they look kind of white they could be soil mealies. Are the leaves yellowing?

    Incidentally, if you do get water starting to grow algae in it, Dale Martens says that /slightly/ algaefied water is actually really good to start cuttings or tubers with. I find this very interesting and may have to intentionally make some 'agae' water just to try it as with sinningia cuttings. It apparently works pretty fast.

    Elsa thanked Hyn Patty, Western NC Mountains (USA)
  • 9 years ago

    The plant look ok, no yellow leaves. I will take a picture later because I just cleaned the glasses.

  • 9 years ago
    last modified: 9 years ago

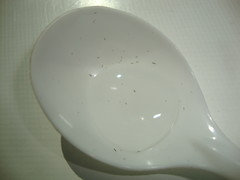
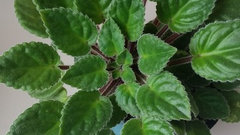
    Here is the picture and I can't make it bigger. They are so small like dust. I saw them in the reservoir for at least 3 months and always wonder what they are.

    The leaves in reality is not dark green as this picture. It has a yellow tone. I don't remember what color of the leaves when it arrived.

    Thanks

  • 9 years ago
    last modified: 9 years ago

    As they are 'dark' against a white spoon, and your plant looks very healthy with no obvious sign of leaves yellowing, these are almost likely spring tails. Which are not only harmless but beneficial to your soil. Another check is to depot your plant and look at the roots carefully. If they have soil mealies you will see small pockets of white fuzzy, waxy 'nests' where the mites lay their eggs. With spring tails these will be lacking.

    Lastly, if still in doubt, in the USA every county usually has an agricultural extension office. You may take a sample infected plant to them and they can make a FREE ID of the insects for you at no cost at all. They can easily verify if they are indeed harmless spring tails or are a root mealie infestation.

    Lastly, I suggest you do an internet search on both kinds of insects and look at photos. Of them and of /root/ mealie infestations. If you have any kind of magnifying glass at all, you should be able to make a pretty conclusive ID yourself based on the photo comparisons with magnification. As the name suggests, spring tails may 'spring' or jump if disturbed which can also help with ID when they aren't floating around in water and are alive (they do drown in water).

    The same is true should you encounter predatory mites on your plants, which are also beneficial but are not elongated. Those too you can see with the naked eye and they can move fast.

    Elsa thanked Hyn Patty, Western NC Mountains (USA)
  • 9 years ago

    I realize this thread is getting a little age on it but I thought, just in case the op was still looking for wicking info I would respond.

    I am a total amateur who was converted to wicking some time ago and knew what it was but not much else. I tried a few materials but ultimately read somewhere about "Masons" string. It is a thicker style of nylon string that is used to put up cement walls, etc.

    One strand works very well for me in all my pots up to 4". I don't know after that because I don't have any pots over 4".

    There are lots of utube vids and how-to's on the net. The most useful tip that I had found was to soak the wicks in water before installing them in your pots. Some say to add a drop of dish soap to the water you are soaking your wicks in. I don't know why but I know under other applications, soap could reduce surface tension. At any rate, it's what I do now and I have been very lucky.

  • 9 years ago

    You are exactly correct, Jeff. Mason's twine does work well, as does acrylic yarn, etc. Adding the drop of dish soap (Dawn being better than something anti-bacterial) not only breaks water tension but also helps strip out chemical residues. So it's a good idea to rinse the wicks afterwards. For larger pots, if you find the wick isn't thick enough to keep working, you may simply add additional wicks. A big, broad tray filled with trailers or episcia, for example, might easily have 3 to 5 wicks spread out.