Software
Houzz Logo Print
orneryponystudio

More Seedling Grafting

9 years ago
last modified: 9 years ago
Some grafted plants arrived yesterday and the first thing I want to do is attempt to make backup grafts. Then if down the road any of my original grafted plants should die, I won't loose them if any of my new grafts have taken. I will also practice doing some meristem tissue culture but I still need to order the proper media.

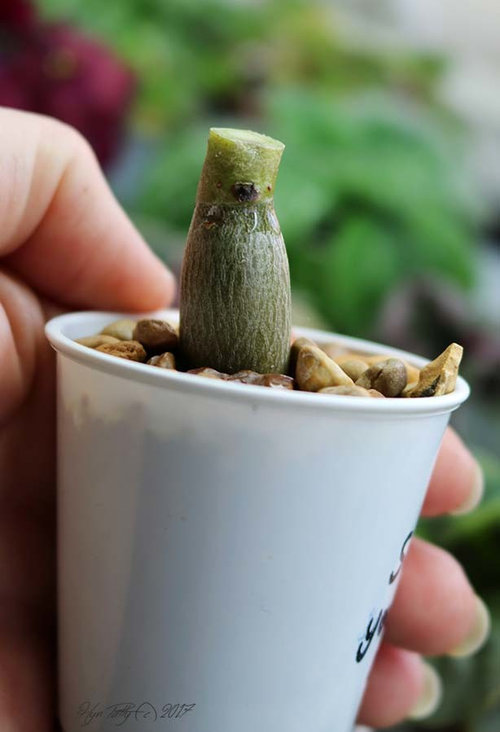
Here is one of my obseum seedlings that you can see is hardened off after a winter. Though small, it's about 6 months old or a bit more. I'm in no hurry so I don't mind at all that they went pretty dormant over winter.

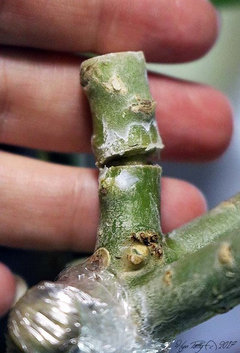
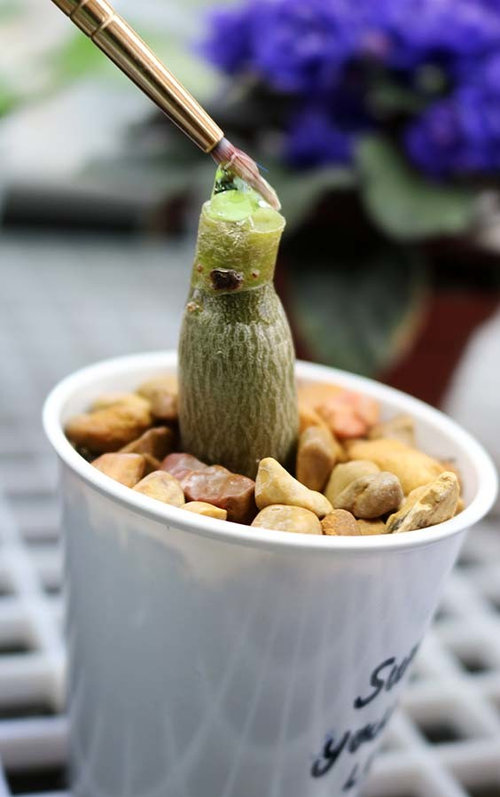
I have sterilized a scion and seedling with alcohol spray, then sliced a couple of eye buds off in a piece less than half an inch. While pressing the graft down I have super glued around it lightly. Blow on it and it dries almost instantly.

I haven't really gotten super glue on myself doing this yet but if it happens it's not a big deal and peels off later, or you can use fingernail polish remover when done. It is ideal not to jostle the union right when you apply the glue but the natural sap extruding also helps keep the super glue from seeping into the cut.

After it's dry, I applied aloe vera gel which when dried, forms a breathable seal to help keep the graft from dehydrating. From here I can simply bag the entire seedling whole, pot and all or dome it. No baggie on the stem, no rubber bands. This is cacti style.

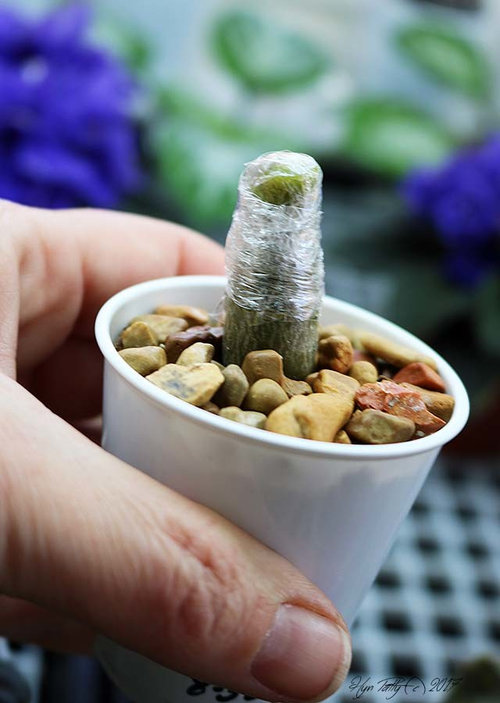
My humidity is pretty high in my studio but if it it offers a piece of mind, you can go ahead and opt to add grafting tape or in my case, sterile food plastic wrap to help keep the graft stable and to further lock in moisture. I like that thin plastic wrap allows gas exchange, and both seals are clear so I can keep an eye on the progress. The self sticking wrap is a bonus IMO. With a traditional graft sealant made of tar or sulfur you have an opaque barrier which means you can't see if your graft area is having problems or initially budding.

Will this method work with my adeniums? It works great with cacti and other succulents so now I wait and see. These have gone into a domed flat under lights indoors and on a seedling heat mat. If it doesn't work I'll keep tinkering until I have success.

Comments (11)

  • 9 years ago

    Aloe vedra btw is only suitable as a seal when the graft is indoors and not exposed to the elements, obviously.

  • 9 years ago

    Hyn Patty, although I have never really attempted grafts before, I think this is an interesting experiment to watch. It will be good to see if the super glue creates a better union between stock plant and scion. Looks good so far. Please keep us updated with your progress. Good luck :) Rachel.

  • 9 years ago

    Thank you. /This/ is why I started 400 seedlings. I'll keep a very few for their best flowers but most of them will be trash roost stocks to play around with and see how I can push them and learn.

  • 9 years ago

    Hi Hyn Patty, thats an interesting and good backup plan! Good luck... looking forward to see the updates :)

  • 9 years ago

    Update so far though there isn't much to see, here goes:

    Most of the small side limb grafts didn't take. I feel this is entirely my fault though because I opened the baggies to air out excess condensation and left the dome lid off, then forgot about them until the next day! Those tiny grafts mostly wilted. if I hadn't had to run out the door in a hurry I might not have forgotten them.

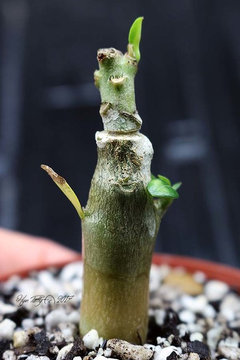
    The grafts such as shown above, done to the tips of my seedings, have been a great success so far! Looks like about 17 of 20 have taken, but it's a -little- early to be sure so I'll wait and see if they bud and start growing.

    Of the sliced seedlings I bound in doubles and trios in another thread, so far ALL of those are doing great and most of them are putting out new leaves. So I'm pretty happy but I'll have to try more of all three techniques to see what my long term averages come out to be, and get more photos later when they've grown in a few months.

  • 9 years ago
    last modified: 9 years ago
    A fresh update! My second big round of seedling grafts were done the first week of June and so far almost all of them appear to be taking! Yay! The first round was hit and miss. Some kinds of grafts had a high failure rate though I also think I unwrapped them too soon. Spliced seedlings had 100 success rate with no losses.

    This time I'm going through them and out of twenty, so far I have only found one obvious failure. But I still have a few more to go and time will tell what takes and what hasn't. After checking them, and very carefully removing the saran wrap, I am regluing any that look fragile and barely attached. Then spraying all lightly again with a fungicide and rebagging them without saran wrap to let them grow on a few more weeks before I will ease the baggies off slowly.

  • 9 years ago

    Here are some grafted scions that are some of the more obvious ones to have taken and are doing well. Here's an adenium obseum 'Quartest' graft on a generic obseum adult root stock I'd picked up at Lowes. About three weeks grafted, I hope it'll start to leaf out soon. Not one of my cleanest grafts but it'll fill in that gap over the next few months and smooth out in time. The 'neck' it's making in between the cuts is the new tissue. I'm still keeping it bagged for a few more weeks even though I have now removed the plastic food wrap film that I use instead of grafting tape. You can see a second 'Quartest' graft right below it that hasn't taken well enough to uncover yet. It may be a failed graft but so far it is still green so I'll wait and see.

    A seedling graft I unwrapped today to check it. Looking good! I can see new tissue growing a 'neck' between the cuts. Again I am still keeping it bagged for a while yet but left off the parafilm wrapping.

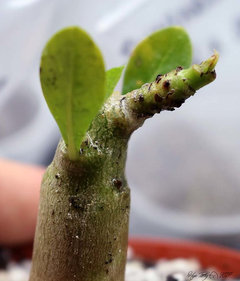
    And one more seedling with a new graft added about three weeks ago. So far so good. No obvious 'neck' on this one yet but the tip of the scion is starting to leaf out. It's wet from the fungicide I've sprayed it with, as well as inside of the baggie before I enclose it again. I find rubber bands can be too tight but tying the baggie shut beneath the graft with a strip of raffia or plastic food film works better and doesn't leave marks like rubber bands sometimes do.

  • 9 years ago

    Woo hoo! Patty I'm glad that most of your tiny grafts are successful! Thank you so much for step by step instructions, I'll try some grafting in August. Hopefully some of my yearlings will bloom by then and I can chop them off.

  • 9 years ago

    Well done :), Im so excited for you, they look gorgeous.

  • 9 years ago
    last modified: 9 years ago
    Haha, you are too kind, Agartta. They are ugly as sin to be honest. But given time and growth they should look better. I think the key is keeping them covered longer. Of twenty grafts, I had two failed and one that didn't take but still looked good and was leafing out, but not attached! So I sliced that one and glued it again.

    I hope you are inspired to try, Elena! I am eager to see my seedlings bloom for the same reasons, though I doubt mine will bloom this year.

    I graft a lot of things besides adeniums and I have learned a thing or two. With woodier grafting the common opinion is you really need to line up the cambium layers in the bark as much as possible. But with adeniums it seems that doesn't matter - lining up the soft sapwood instead is helpful as that is what grows back first.

    You can bind with grafting tape, wide flat rubber bands or strips of other soft rubber, plastic food film, raffia (real or synthetic), etc. Anything string like that is flat enough not to bite into the soft woody material. Ideally stretchy helps but isn't required. Binding the baggies with rubber bands doesn't seem to be ideal and it's easy to get them too tight. You especially don't want that with adeniums as it can shut down the flow of moisture and nutrients from the root stock to the scion. So many of these I bound the baggies on more gently using raffia and that seems to have worked much better, leaving no marks.

    For sealing wounds you can use lots of different things as well. Nail polish, glues of various kinds, wax, and tar all being popular in traditional grafting. I happen to like clear materials so I can keep an eye on the progress.

    While every kind of plants have their idiosyncrasies, most grafting behaves about the same. So if you can't find enough inspiration to try when doing internet searches on how to graft adeniums, simply do searches on 'plant grafting' instead. You'll see there are a lot more options to try than just flat grafts or clefts. I'll be trying more variety myself.

    Incidentally, I also ran into a gal on Facebook who roots all of her adenium cuttings in water! She gets a much higher rate of rooting hydroponically than putting them in soil so I'll be trying that as well, just because I'm now curious as all hell to try it. This sounds right up Jericson Pastor's alley. ;)