


What to do with stowaway worms?

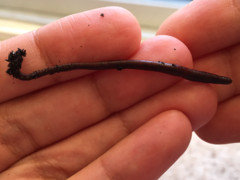
I bought a little rubber plant from a nursery yesterday. While I was repotting it, two little worms wriggled out of the original soil. Two worms does not a worm farm make, but I’d like to create a welcoming habitat for them if possible. Can I do anything to keep them alive?
Comments (51)

kittykombucha
Original Author6 years agoI went through my recycling bin and found a plastic water bottle. I cut the top off and made holes in the bottom, put in a little damp cardboard, then the worms and soil, then a tiny little bit of old banana. I put the whole thing in an empty can so that the light wouldn’t bother them.
One of them is acting reaaally sluggish. I’m not sure they’ll make it but I hope they liked the banana at least. Thank you for helping us!kittykombucha
Original Author6 years agoWorm update, both are still alive. The teeny bit of banana I placed on top has molded (very fuzzy). Is that okay for them? Given the presence of moldy food, it safe to keep my worms in a covered container in the kitchen? I have a balcony but the nights are getting colder. Would that be a better place for them?
Related Professionals
Barrington Hills Landscape Architects & Landscape Designers · Hyattsville Landscape Architects & Landscape Designers · Amesbury Landscape Contractors · Brookfield Landscape Contractors · El Segundo Landscape Contractors · Kaneohe Landscape Contractors · Las Vegas Landscape Contractors · Miller Place Landscape Contractors · Saint George Landscape Contractors · Merrimack General Contractors · Monroe General Contractors · New Milford General Contractors · Norristown General Contractors · Saint Paul General Contractors · Williamstown General Contractors
11otis
6 years agoMoldy food scraps is good. And keep things damp. I see you are in CA., and how cold does it get overnight? If you don't mind it, I'd say keep them indoors.
kittykombucha
Original Author6 years agoRight now we’re hitting mid 40s at night, which isn’t actually that cold (for humans). I can certainly keep them indoors.
11otis
6 years agolast modified: 6 years agoGood. Just make sure they don't dry out. Even if you have some sitting wetness at the bottom of your container, since it's a small container it is OK, as long as they can crawl up if it's too wet for them down there. You can remedy that with adding some crumpled newspaper pieces to the bottom so it gets some oxygen and won't stink. This is really interesting. Let us know when you start seeing a cocoon. However, before this is possible, I have a question. Do you see their clitellum? Just hope they are of the same species because worms don't cross-breed. They might mate but the eggs are not viable.
I re-read your previous posts and re. the water bottle, if you can find another one, I would move the worms and all, w/o having holes at the bottom. I am not a fan of holes at the bottom. It makes a mess. Many years ago I was in Bali and was invited to visit somebody who had a worm farm operation that he was going to operate commercially. He used water bottles, lots of them, cut out a rectangle piece off the side big enough to stick your hand in to muck around, kept the lid, and lay them horizontal. I guess the worms just coped having a clear home with light going through.
Yeah, 40 is a bit cold for their comfort.
kittykombucha
Original Author6 years ago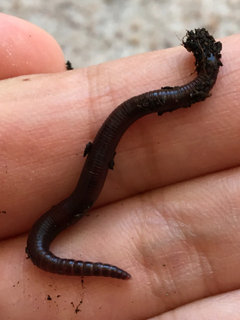
I cant see anything that resembles a clitellum. Does that mean they’re not old enough to be mating?
I’m going to see if I can find a more comfortable (hole-less) habitat for them today.11otis
6 years agoHmm, could they be Eisenia Hortensis? The clitellum will show in a few weeks, I hope. My EHs are doing much better than the EFs
kittykombucha
Original Author6 years ago
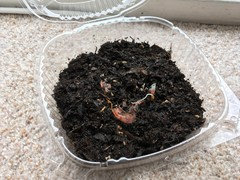

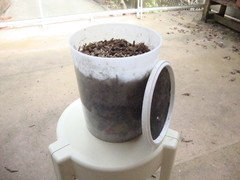
Some pictures of the new worm home and an old bit of tomato that is determined to grow. The container is housed under an inverted pot right now, but I think I ought to find a shoebox so it’s more breathable. I dampened the soil a bit yesterday and there is a light layer of shredded paper at the bottom. Please let me know if I should adjust anything.
11otis
6 years agolast modified: 6 years agoLooks good. Any reason why you don't use paper product in your bedding mix? I guess with just a pair of worms it's no big deal. Egg cartons will hold moisture quite well and worms like to shed their cocoons between the layers, easy to rub/get it off. In general worm farming, I have found if I did not use (enough) paper product, the compost was more paste-like as supposed to crumbly, more difficult to mix evenly with the planting medium. Although it doesn't really matter one way or the other. Just a matter of preference, I guess.
kittykombucha
Original Author6 years agoI had no idea! I’ve gone and added a layer of shredded egg carton under them. There’s no trace of tomato left, so I added more. The worms seemed to move quite fast/energetically which I was happy to see. No clitellums yet.
kittykombucha
Original Author6 years ago
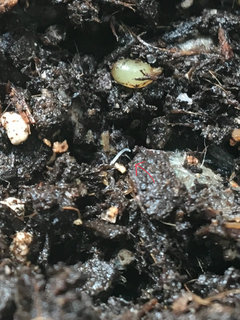
I think I saw a baby worm today!! It was like a clear wiggling noodle. WOW!11otis
6 years agokitty: the clear wiggling noodle might be a pot worm. Sorry to disappoint you. Unless it has a pink hue. I see a cocoon above it. Looking really good.
Way to go. And be patient.
kittykombucha
Original Author6 years agolast modified: 6 years agoOh no! I’m reading that pot worms are likely not harmful but they do indicate that my soil isn’t quite where it needs to be. Uh oh. Should I freshen it up with more potting mix or egg cartons? I’m really excited to see what comes of the cocoon!
11otis
6 years agoSome pot worms are acceptable and you do not have to worry. If that bugs you, you could lure/bait them with with a small piece of bread. For your size of bin, the size of a crouton is enough. Wet it with a little bit of milk just to dampen it and half burry it. Check after a day or two and see if you got more pot worms lured. Dispose of it and replace with another piece. I doubt you have many pot worms because it's a new bin, sort of, and I see no evidence of too much food.
It's a losing battle trying to get rid of pot worms in a worm bin, that's my take.
kittykombucha
Original Author6 years agoI won’t worry too much about them then! As long as they’re not bothering the worms everything is fine.

theparsley
6 years agoPot worms are not a big concern if you only have a few (or one!) If you see big numbers of them it's an indication that your food stocks are too wet and that tends to create bad conditions for your composting worms. But a small number of them here and there is normal in the diverse environment of the worm bin.

Jon Biddenback
6 years agoI admire the guts in taking on a 2-worm challenge and a tiny tub challenge at the same time, without even knowing for sure whether they're the same species, nor if they're fast-breeding composting worms.
That is definitely a cocoon up there. By now it's probably gone darker, but not quite become one or more baby worms yet. Hang in there! You're doing something right.
kittykombucha
Original Author6 years agoNew year, new worms? I noticed a lot more pot worms so I wanted to add a little more dry egg carton bedding and I noticed these. I see at least two!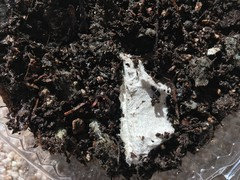
11otis
6 years agoSorry Kitty. What are we supposed to be looking at? My eye sight is not getting better with the New Year.
Jon Biddenback
6 years agoThose are baby worms for sure. Sweet. Making me want to round up the wandering ENC from the bottom of my CFT, and start up a new bin to produce worms, not vc. Have some bait available for fishing next year.
kittykombucha
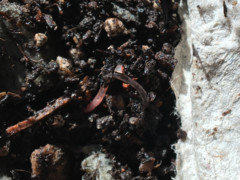
Original Author6 years agoYes, Otis! My parent worms seem to have really hit their stride. I found lots of cocoons and baby worms while fishing through my bin today. You were so right about the egg carton, they really love to wriggle around on it.
A few cocoons I spotted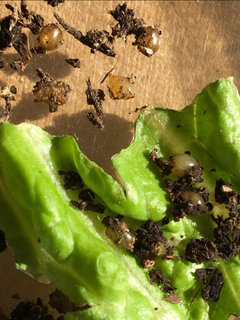

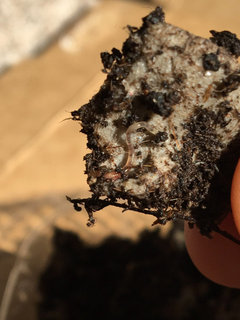 This guy in particular really wedged himself in a crease in the egg carton!
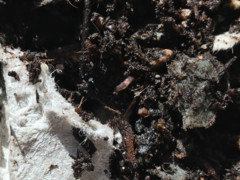
 The two parent worms with a clump of their offspring! I forgot to count how many but they’ve clearly been very busy.
11otis
6 years agokitty: Thanks for the pics. You are definitely a winner; starting with 2 and today you have a herd. They look very healthy. Congrats.
kittykombucha
Original Author6 years agoThank you for believing in my 2-worm project! I’ll have to upgrade their habitat soon.
11otis
6 years agoIt's good to give them more room to grow but not too much. Too much room will mean less chance to bump into one another.
On the other hand, one doesn't really need to be too considerate re. worms' habitat but it's our nature (at least mine) to want to maximize our chances and start over thinking every move. One way to keep ourselves busy I guess.
kittykombucha
Original Author6 years agoI wanted to move them into something “tidier” than the clear plastic takeout box. More for my sake than theirs, definitely.

socks
6 years agoWhat did you get? This is such a fun story.
I hope you aren't going to have any problems with inbreeding!
11otis
6 years agoYeah, I have been wondering about inbreeding with worm Will be hard for us to see their abnormality.

otcay
6 years agoThis is almost as a good as the survivor shows, banishing 2 individuals to a forsaken place and let's see how they thrive. A bit voyeuristic I say but quite amusing!
kittykombucha
Original Author6 years agoHey otis! Hey everyone! I’m so happy to see this interest in my worms.
The worms are are still alive, and I moved them to a bigger plastic container which I’m covering with Saran Wrap. It’s a terrible setup! I’m hoping to make something like this for the long term:11otis
6 years agoI watched it. Excellent idea and I would have followed it to the letter 10 yrs. ago when I started worm farming. With the years, I have learned how to cut corners in terms of $$ and efforts w/o effecting the well being of the worms. Also, I admit it is always easier to spot and correct existing ways.
There are 2 "main" things you can forego. The spray painting and using the netting. I have seen solid colours bins to buy. If clears bins are what you have, you still can use them. Use corrugated cardboard to line the sides and that will help absorb extra moisture, provide a little bit extra air, give the worms a place to hang out where they can rub off their cocoons, and still keep their home dark. You can replace this lining once wet and easy to rip into strips/bits by hand, paying attention not to rip by accident the worms hiding in there.
IMHO, the screen used to line the inside of the bin will not be effective once the bin starts to fill. The screen will get clogged anyway and about preventing escapees, worms can get through the tiniest opening if they have made up their mind to go through.
A very good idea is to elevated the upper bin, or they will get stuck and difficult to separate. You can use nursery pots of the correct height in the corners or empty cans or anything, really.
""which I’m covering with Saran Wrap"" Did you poke holes in the saran? I used a bamboo skewer/tooth pick for that. For watering my mini bins, I used a plastic bottle covered with saran wrap, secured with a rubber band and 4 or 5 holes poked into it.
Good luck Kitty and don't be a stranger. I have directed people to your posting when asked about worm farming.
kittykombucha thanked 11otis
GroundskeeperSmalley
6 years agolast modified: 6 years agoThis thread is the coolest. I have gone from one bin to three in five years or so with worms, and given out a few other handfuks to friends and family to start their own bins. But never two worms! That is awesome stuff.
kittykombucha
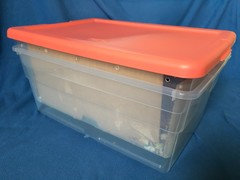
Original Author5 years agolast modified: 5 years agoThank you otis, your post was the push I needed to buy the plastic bins and get this project moving. I assembled the bin today, and here are the pictures.
The bad news: I think our original worms have passed away. The largest worms in the worm colony are lacking clitellums, and I couldn’t find a single worm cocoon. Yikes. I estimate maybe 20 worms have resulted from the union of our original two. RIP worm mom and dad.
I bought a set of two 16 quart bins for around $4. (Too big?) I don’t have a drill, so I melted air holes in the bottom and sides with a screwdriver heated on the stove. I raised the second bin on some cat food cans for air circulation.

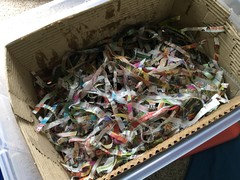
Here are our wormy pioneers on top of some moistened egg carton. I followed the video’s instructions and gave them a slice of bread, but I also tossed their old dirt on top of the bread.

Then some more shredded paper bedding. I lined the bin with corrugated cardboard and sprayed it all down.
Now I wait.
It seems the old bin was not a hospitable environment. I think I kept it too dry and didn’t feed enough since I was worried it would be overtaken by pot worms. I need to monitor this one more closely. I would love advice on how I can improve this setup.
11otis
5 years ago""The bad news: I think our original worms have passed away."" Oh no! I have grown fond of them. Sorry for your loss. I thought they would last for a year or two.
Pot worms and mites. Somehow they always find a way to get to worm bins. They hitch hiked with the fruit/veggies we bought and we only need 2 to start a colony. I am tired trying to rid them. Spare feeding and low moisture will keep them down but I have noticed that the worms weren't too happy. They got cranky, didn't multiply as fast and that is slow composting. I believe that egg shells keep the pH balanced and I invested in a Manual Corn and Grain Grinder after I ruined 2 blenders that I bought from Craigs List.
When I go on a CCB collecting spree, I take only the double/triple layers ccb. I also use multiple layers, especially in starting/re-starting bins or just when there is extra room. That way, I can feed them a messy slop that they like w/o worry of drowning, the extra moisture got absorbed and is there w/o having a "wet" condition in the bin and it is not compacted. Having the ribs going vertical, there is more excess to O2 than having it going horizontal, the cut edge/holes of the ribs exposed. Leave what you already have in there, just add a few more layers. You do have to watch that the bin doesn't dry out since you have drainage holes.
Not sure if you want to do anything about the lid. I usually remove the centre of the lid, double taped/glued weed cloth to that. What is the dimension of your lid? You might be able to just cut an oversize piece of weed cloth, put it over the bin and jam the lid over it. A bit cumbersome but that's what I do with my 3 gal. bins since that last jar of contact cement I bought didn't bond the cloth to the plastic. Any body here have a suggestion what I should use for bonding?
kittykombucha
Original Author5 years ago“Oh no! I have grown fond of them. Sorry for your loss. I thought they would last for a year or two.”
Me too. They taught me a lot. I’m grateful we have their babies.

I lifted the bedding to see what they were up to, and they seem to be snacking pretty contently on the moldy remains of the bread.
kittykombucha
Original Author5 years agoI’ll try saving my eggshells. I can try to run them through the food processor when I have a good amount.
Regarding the cardboard, I wasn’t sure how thick I should keep it. I peeled those layers off of an Amazon box. I won’t do any more peeling. Where’s a good place to find the triple layer cbb?
I’m still uncertain about the lid. It’s about 17in x 12in. I should put some air holes in the top, at the very least, right?
The woman from the Youtube video I posted on apartment bins mentioned that she used 100% silicone to bond the screen to the plastic, she seemed pretty satisfied with it as a bonding agent.

Donna Danenhower
5 years agoI have to say this is an amazing feed I started a worm farm with worms I picked up outside I noticed they are multiplyig slowly but I think I am gonna do a 2 worm project too BTW I started doing this for my 5 year old nephew last month. I am continuing it because I fell in love with them...lol
11otis
5 years agokitty: right, I'll try Silicon. Expensive though and I only need a dab. I'll accumulate all the jobs that need silicone-ed,
kittykombucha
Original Author5 years agoI’ve dreaded making this update, but those who have been following this thread have a right to know.
I moved the worms again shortly after introducing them to the new bin, this time into a smaller plastic container. I was overthinking things and getting worried that the plastic bin was too large for them to encounter each other and mate. The small plastic container was pretty similar to the original setup, and I was leaving the lid partially open to allow for meager air flow.
I was checking moisture and food weekly and the worms seemed to be doing well. Very energetic and quite a few were showing clitellums, so I thought I’d see some cocoons soon.
I checked today and realized that I had left the lid pretty tightly sealed. I took the lid off, and I saw all of my worms on the surface of the soil, unmoving. Some were wedged into the corners of the plastic lid, looking for escape. The smell was so, so terrible, I can’t even describe it.
Even the pot worms were dead. I couldn’t find a single moving thing.
Sadly, I think this marks the close of my stowaway worm experiment. For half a year I’ve been getting by on beginner’s luck (and the great advice provided by 11otis here on gardenweb) and I think I’m going to educate myself more thoroughly before trying again. Aside from committing mass worm murder, it was a lot of fun.
11otis
5 years agoAw, that's too bad. I hope you didn't throw all out. If you have a corner in your yard or balcony where the smell wouldn't bother you and you have the space, there might still be cocoons in there that will hatch. Just keep the lid off to get rid of the smell (hopefully in a few days time) and after that keep it damp, with shredded newspaper (damp) on top. People usually wouldn't bother but ....
We have a lot of fun too, following your experiment. You sure have a lot of people following your post. Thank you for reporting and let us know when you start again.
Donna Danenhower
5 years agoOh no what a shame don't give up try and find some worm seeds and start all over..lol
GroundskeeperSmalley
5 years agoI had a lot of fun reading about your worms. I agree with 11otis, there may be some cocoons left if you give it some time, maybe the worms could surprise us all again. Either way, thanks for sharing.
HU-525447731
5 years agoI just read the entire thread. Like a novel with a sad ending. Have you started again? I would love to send you some worms to start again. I a beginner myself. Let me know.

11otis