Software
Houzz Logo Print
orneryponystudio

Seedling Update

8 years ago
last modified: 8 years ago
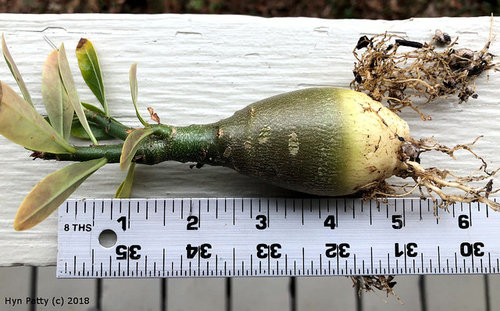
Most of my adenium seeds were obtained in August or September of 2016. That means they were started and grew a few weeks but had to be brought in almost right away to over winter where they went dormant while still very small. I kept them a bit too over dry but I lost literally only two or three out of 400. The following summer in 2017 was their first real season to grow.

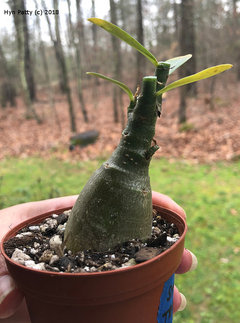
Therefor, this seedling obsesum is technically 1.5 years old but is really a yearling that has had one summer of growth, about to start it's second. The photo angle is a little deceptive but this adenium is slightly less than 5 inches from the growing tip to the bottom of the caudex, and slightly more than 1.5 inches wide. The short, thick double tap root was cut last autumn and side feeder roots have formed. It has four branches - two short and two longer leaders. Height from soil line is about 4 inches.

At this point I am about to trim back the two taller branches to get more light to the shorter branches, and to encourage more branches through new buds. I am also going to cut off the bottom of the caudex since it's very uninteresting from the start, seal it with super glue and replant to continue growth of the side feeder root system. As it spreads, and as I begin to gently wire the branches, this plant will be on it's way to making a fine little bonsai. It will likely be a single red flower as it is a seedling of 'Star of Top', not variegated. I may also angle the cut to give the small tree a slight lean to make it more interesting than just being upright.

Anyway, as I begin the slow process of repotting I am doing a little root trimming and training. Nothing has been wired yet as they have been too small. Some of the seedlings are smaller, some have very nice gnarly roots forming, most have multiple branches though I do have a few single tops. I'm looking forward to the coming summer growth and the hope to see first flowers on some of these babies.

Comments (11)

  • 8 years ago

    Nice healthy specimen. Should make a beautiful bonsai. Please post photos of your progress with this one along the way.

    Hyn, can I ask a question about your super glue technique for the cut base. Do you cut and seal immediately with glue or do you briefly wipe any sap/moisture from the cut end first and then seal with glue? Also is it a very thin layer of glue applied to the cut base or is a slightly thicker layer better? Thanks :)

  • 8 years ago
    last modified: 8 years ago

    If I remember, I'll followup with another photo later in the year of this seedling. With 300 pots it's easy for me to loose track of which one is which when I have a bunch of Star of Top seedlings, but I'll try to remember.

    If I can seal it right away as soon as I have cut it, there is nothing to wipe away. But if it takes me a few moments before I come back with the glue, then I'll wipe excess sap off first so I can be sure the glue makes a good seal. I use only one coat but I make sure it is thoroughly covered. This is the liquid glue (instead of gel) as it is much easier to cover all of the wound quickly. It also flakes off later very easily if any spills over onto the plant's skin. Being self leveling, there isn't much variance in the glue thickness but obviously a thicker layer is better than a very thin one if you want it to be a moisture barrier.

    As soon as the glue is dry, I pot right up without spending weeks waiting for the cuts to dry. So far I haven't lost a single plant from decapitating. I think I am going to hollow one out aggressively and experiment with sealing it with the glue just to see if the plant survives. If it does, it would have a lot of interesting character much like one that would have survived being hollowed out due to rot. But I will wait a bit longer for warmer weather before I try it.

  • 8 years ago
    last modified: 8 years ago

    Another traditional wound sealer is melted wax, especially for grafting. Some people use tar based wound sealers but they are ugly and far more obvious than something that is clear like super glue or thin wax. I haven't used wax on adeniums since super glue works so well, but I do use it for other grafting and if I am going to ship cuttings.

  • 8 years ago

    Thanks for the tips on how you use the super glue. I’ve been thinking of playing around with the odd seedling and this info is very helpful. :)

  • 8 years ago

    Seedlings are cheap and easy to practice on. Things that work on them might be used to save a favorite older plant from rot, later.

  • 8 years ago
    last modified: 8 years ago

    OK, because you asked me to post some follow up photos, I made a note on the pot with another tape label so that I won't loose track of it and forget.

    Also, here are a few more photos of what I did after the original post. I trimmed the branches and sliced off the bottom like I said I would do. I oriented the slice under the caudex to an angle to make the plant tilt over towards the smallest, weakest branch of the four. Three branches are a better number visually than four in this case so I'll simply remove that tiny nub.

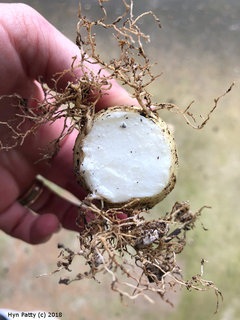
    Here is the view of the bottom of the obesum seedling after I sliced it and after super glue has been applied - shown here still drying. I have left the side feeder roots though I will trim them back slightly to encourage more of them.

    Here is the plant back in it's pot, tilted over. That lower nub I will probably remove. Cut branches at the top are also sealed with super glue to keep them from drying out and dying back further. New buds will branch out from there. Over time I may continue to tilt the entire plant over more and more but it depends on how the roots look. I may also cut into and hollow out some of the caudex later for blast old tree trunk effect which would also be sealed with super glue. But I'll wait until it's getting nice and hot to decide who will be my test subject for that experiment. Later these branches will eventually get wired and shaped.

  • 8 years ago

    If I want the roots to spread out entirely flat (I do not) I would have potted it up to a larger, wider dish. I don't entirely want them fanned out super flat and too symmetrical though because I like a more natural rippled and interlaced effect that doesn't look so formal. So the smaller, slightly deep pot suits my purposes better in this case I think.

  • 8 years ago

    I can certainly do that. There are photos online of hollowed out adeniums - those that had rot to be cut out but were saved. They look pretty awesome actually. I had a good photo of one but it was on my old computer.

  • 8 years ago

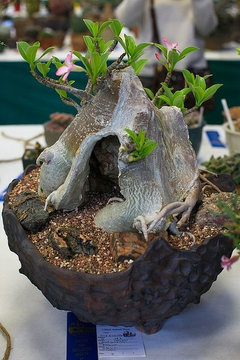
    Here's a photo example of a hollow trunk adenium. This one isn't mine, it's off of the internet. Looks like it suffered rot at some point and also lost the top, then grew out new branches on the side. It's not at all uncommon among other kinds of bonsai to go for a hollow tree look. Applying a coating of sulfur to the cavity now and then is the usual long term preservation method though I would initially seal it with a clear coat of super glue which crackles and peels off nicely over time.

  • 8 years ago

    That is a nice example it still takes talent to get that cave appearance i tried it on a privot tree which i bonsied it didn't look good but im not good with any type of sculptures. :×)