Software
Houzz Logo Print
alek_davis

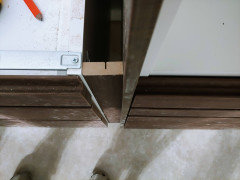
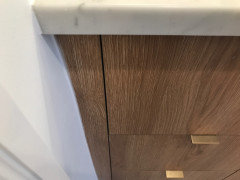
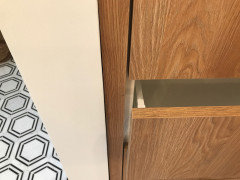
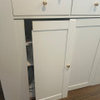
IKEA kitchen: white cabinets showing against walnut doors

5 years ago
last modified: 5 years ago
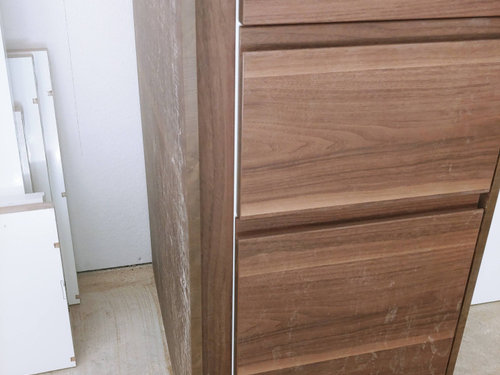
I'm installing IKEA kitchen cabinets (VOXTORP Walnut + RINGHULT High Gloss White) which look very nice, but there is one problem: the white cabinets next to extension panels are more visible than I expected. They do not bother me when they are between drawers or next to the side cover panels because they are mostly hidden by the shadows, but in two places where I had to add extensions, because extensions are on the same level, it just does not look good. I am wondering if anyone ran into this issue and if so, how you addressed it.


The two solutions that came to my mind were:


(1) cover them with some after-market strips (not sure if I can find a proper color match) or

(2) add another extension panel on top of existing one (but not sure how to attach them at this point.


Are there better ideas? Thanks.


P.S. The cabinet in the photo will be adjusted and the white strip will be visible somewhat less, but still it will show a bit more than I'm willing to see.

Comments (34)

  • 5 years ago

    Usually the filler pieces are installed so they are flush with the front of the doors/drawers which minimizes the white spaces. It looks like your fillers are further back.

    Alek Davis thanked K L
  • 5 years ago
    last modified: 5 years ago

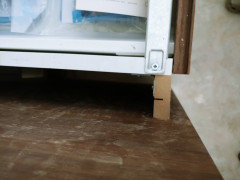
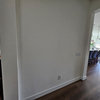
    @K L: Yeah, that's what I first thought but then I can't see how these would be installed flush unless fillers were two times thicker:


  • 5 years ago

    We put in a piece of scrap wood and attached the filler to that, which made it the same depth as our doors and drawers. Yours is sitting flush with the cabinet, and you can see why that’s not what you want.

    Alek Davis thanked Hillside House
  • 5 years ago

    @Hillside House: That was a smart move, but I assume this is an experienced installer's hack. This was the first IKEA kitchen my installer installed, although he did plenty of traditional, and he says that this is how filler pieces are supposed to go. Which kind of makes sense. Especially if you think that IKEA gives you a filler piece that you may cut multiple times so both ends would be exposed making flush installation non-feasible (we had to use the cornice pieces because IKEA delivery broke my filler panel and they do not have any replacement in stock, so had to improvise, so in my case, your idea may have worked, but it's too late to fix now).

  • 5 years ago

    Have the installer put the blocking behind, and then wait for the replacement. When it (eventually) comes in, he can come back and attach it. It’s a 15 minute job.

  • 5 years ago

    They’re correct above, the filler needs to come out. Above advice is good about using a piece of scrap. You could also use brackets if you have enough room to attach them.

  • 5 years ago

    At this point, instead of removing the current filler, could the original poster, Alex Davis, just put an additional piece of filler ton top of the current? The already installed filler would act as a spare piece of blocking. More expensive, but maybe more practical.

    Alek Davis thanked blubird
  • 5 years ago

    Thank you all for comments. I think at this point, my best bet would probably be using https://www.fastcap.com/product/fastedge-peel-and-stick-edgebanding It'd be cheaper and consistent. Redoing the fillers would mean removing the cabinets (there is not much space so can't just remove and reinstall the fillers). Besides, this would do nothing for the white cabinets/shelves showing through the tall cabinets, so would need to use FastEdge anyway. Just need to figure out which color to pick. I'm just bummed that I did not think about it and nobody at Ikea bothered to mentioned it to me, since I assume I'm not the only one with this dilemma.

  • 5 years ago


    I'm thinking that if it's not an exact match it won't look too bad. The white stands out, but the area is actually in shadow, so when it is wood tone, it shouldn't really be noticeable. It will likely just read as dark.

    When sewing, the rule of thumb when choosing thread is to go dark when deciding between two almost matches as lighter will catch your eye. Same rule could apply here.

    We had the same issue around our dishwasher when our black stained lower cabs were installed. I fixed it with a tiny paint brush and some black paint. 15 years later, I still don't notice it, even tho my painting was less than perfect.

    Alek Davis thanked daisychain Zn3b
  • 5 years ago
    last modified: 5 years ago

    Blubird, that would absolutely work.

    Alek, if it won’t bother you to have the filler recessed, go ahead with the edge banding. It would absolutely drive me nuts, because it ruins the lines of a full-overlay cabinetry line. It makes it look like a partial-overlay, and I think draws attention to the fillers.

    Alek Davis thanked Hillside House
  • 5 years ago

    @Hillside House @blubird Attaching another piece on top of existing one is a very good advice. Thank you. I was actually thinking about it myself, but I kind of left that thought because I could not figure out how to attach it? There is no space to screw it from the back. Any ideas?

  • 5 years ago

    Fascap is good. I prefer iron on edge banding. Can be stained, or don't worry if close enough.

    Alek Davis thanked measure_twice
  • 5 years ago

    Can you use some Liquid Nails type adhesive? Then, if the top and bottom are still open, you can squeeze in some clamps to hold until dry.

    Alek Davis thanked Amy Lynn
  • 5 years ago

    @Amy Lynn: I guess. Would rather used screws, but if there is no better option, may go with glue.

  • 5 years ago

    While edge banding would solve your issue with the white, you are going to have serious issues trimming it to size now that the cabinets are installed and the fillers are in place. Come up with a plan before proceeding...

    Alek Davis thanked sparkshooter
  • 5 years ago
    last modified: 5 years ago

    We did ours using a brad nailer, but I think a construction adhesive would be sufficient if you don’t have tools. Bonus: you won’t have to fill any holes.

    Alek Davis thanked Hillside House
  • 5 years ago

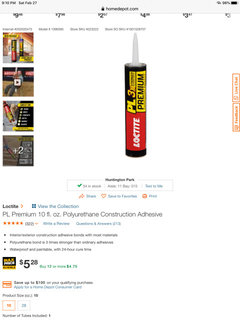
    Trim was not done correctly should have used an “L” shape but doesn’t matter now just glue a piece over it . Simple fix. Use a good quality panel advise. Slide it around a bit if you have any room when pressing it into the glue to create a suction. Use tape and shims if it wants to move out of place. I use this brand at Home Depot.


    Alek Davis thanked jdesign_gw
  • 5 years ago

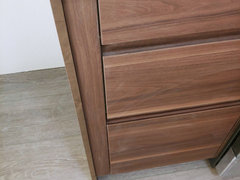
    Alex- Here are a couple of pictures of how ours is installed.

  • 5 years ago
    last modified: 5 years ago

    In any place there was filler strip, I had the installer take a door and rip down an edge to install OVER the filler strip. This brought the filler flush with the cabinet door or drawer. In the case of the walnut look Voxtorp your are using, a door front would be awkward because it has that finger pull, so you need to buy extra filler panels for this purpose.

    The problem with the side panels is that they are 1/2" thick while the cabinet doors are close to 3/4" thick. The fridge side panels are more like 3/4" thick.

    By the way, it looks like your installer used light rail as a filler strip, that view from above is showing a light rail on edge with a groove to fit the clips that screw into the bottom of the upper cabinets.


    KL above has a nice install, but those are clearly custom panels from a third party, not IKEA panels.

    Alek Davis thanked silicon74
  • 5 years ago

    Good eye! They are Semihandmade, but I believe would have done the same type of installation if they were IKEA.

  • 5 years ago
    last modified: 5 years ago

    This looks a bit better now. Thank you, all, for the ideas and suggestions.


  • 5 years ago

    Looks great! What did you end up doing?

    Alek Davis thanked Hillside House
  • 5 years ago
    last modified: 5 years ago

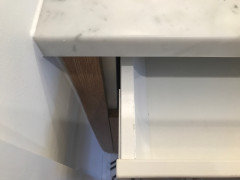
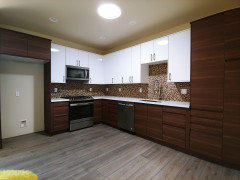
    @Hillside House: Used the recommendation to glue in the filler (actually, deco strips) in front. Here is the (almost) final looks:


    White still shows between the doors of the tall cabinets, but it's less hideous than next to the filler pieces, so it doesn't bother me that much. I also need to figure out how to get scribes next to the cut filler pieces. Why IKEA does not offer scribes is hard to understand. For the walnut color, I can probably find a matching paint or stain. But high gloss white would be a challenge.

  • 5 years ago

    what do you mean by scribes?

  • 5 years ago
    last modified: 5 years ago
  • 5 years ago

    Hi Alek, for the Semihandmade walnut, was your color dark brown or did you get red - sort of cherry hints, like the pictures on Semi's website?

  • 5 years ago

    @trendtown I have no idea what you're talking about. What is Semihandmade walnut?

  • 5 years ago

    Sorry - it was KL that used Semihandmade. Semihandmade is a compnay that provides doors from IKEA boxes.

  • 5 years ago

    Alek Davis as for the white showing between the cabinet doors, what do you think of using the fast edge on those shelving pieces? I took the idea from you where you mentioned it above and am considering using it for the grey Bobdyn white shelving facing if we buy those.

  • 5 years ago

    @narnia75: I do not live in this house, so at this point, it does not do not bother me that much, but if it does, that's the only thing that I can think of. My major concerns are: (1) picking the right color and (b) shaving off the edges. For (1) I wish I could order a cheap sample. For (2) I think there is some tool that you can use, but I am not sure if it can be used on the sides that cannot be removed (not an issue for the shelves). So, there are some complexities that I can think of, but again, if the white bothered me too much, I'd figure out what to do and most likely use FastEdge.

  • 5 years ago

    Alek Davis I went to the link that you had shared and saw that they offer custom color-matching. I guess you would have to send in a sample.

  • 5 years ago

    @narnia75 I think this would be prohibitively expensive and their standard colors have enough variations. For the inside, close enough colors should do

  • 5 years ago

    I just saw this. You can make your own scribes with drawer fronts, or side panels and a table saw.

    Alek Davis thanked silicon74