Software
Houzz Logo Print
webuser_121936772

Cracks in 1950s tile

4 years ago
last modified: 4 years ago
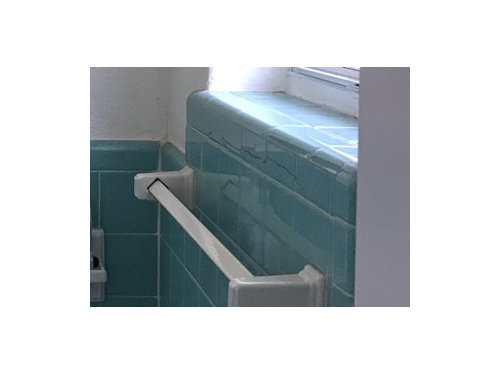
I am trying to preserve the retro turquoise tile in a small 1950s bath. Except for a few cracked wall tiles in a dry area, most of the walls and the cute hex tile floor are in great condition. Does anyone have tips on how to make the cracks less noticeable? Also, the elderly prior owner had grab bars installed everywhere. I removed them in the shower and caulked the holes. Is that sufficient to protect from water damage? Thank you for any advice you may have.

Photo of the cracked tiles. We are in the process of removing wallpaper and painting, and updating fixtures.


Comments (25)

  • 4 years ago

    Are the cracks along grout joints or through the tiles themselves? If the holes left by the grab bars are on vertical walls you should be ok if you fill them with silicone caulk.

    L P thanked Jeff Meeks
  • 4 years ago

    Thank you, Jeff. I just added photo. Yes, the cracks are in the tile themselves, just a few in the entire heavily tiled room! The grab bars were on the walls, so vertical. Thank you for your reply!

  • 4 years ago

    Nice tile!


    You might consider reinstalling grab bars in a better style if the grab bar holes don't fill well.


    There is a enamel patch product you might be able to find in a close color to sort of fill in the cracks. It won't be perfect but it'll make them less apparent. And a little bit of visible wear is cool in a vintage bathroom.


    L P thanked Fori
  • 4 years ago

    Thank you, Fori. I like the way you think about vintage tile! Except for those few cracked tiles, all the other walls are in great condition. I’ll look for the patch product. Great idea!

  • PRO
    4 years ago

    Good for you keeping the original fabric.

    L P thanked Joseph Corlett, LLC
  • 4 years ago
    last modified: 4 years ago

    I’m no pro, and without seeing in person, this is just speculation, but those cracks really raise some red flags for me. Tile isn’t prone to cracking in that way unless there are serious issues underneath. Be prepared to find some repairs - possibly extensive. Try saving those bullnose tiles to rework that tile by continuing the wall tile as it is on each side of the window. This will hopefully help you preserve the rest and still address whatever is going on with that window.

    L P thanked Therese N
  • 4 years ago

    The cracked tiles are in a highly visible location. I wonder if it might be possible to swap them with some tiles elsewhere in the room that are the same size, but down lower or hidden behind something else, such as a toilet.

    L P thanked Nancy R z5 Chicagoland
  • 4 years ago

    I'm wondering if those cracked tiles are from water damage from the window.

    L P thanked cpartist
  • 4 years ago

    @ Nancy R z5 Chicagoland: Thank you for your suggestion. The only way to remove any of the tile is to knock down the walls entirely and build up the wall again. They are practically cemented on and the walls have some kind of steel mesh in the construction. I don’t know how to explain it except to say those tiles were meant to last!


    @ Therese N: An inspection did not reveal any structural issues, but maybe something will come to light in the future. I hope not! The walls behind the tile are cement block, and the blocks are even filled with cement! Contractors tell me no one goes to that length anymore. Your point is well taken so I will explore possible reasons for the horizontal crack, It is the only area in the house with anything like that. Thank you.

  • 4 years ago

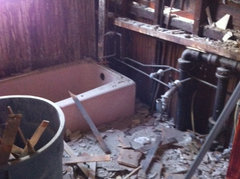
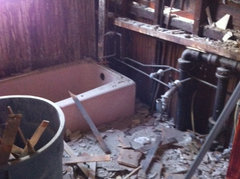
    You have the old mortar bed construction with metal lath. It's really tough to demo. Here's the mess that was my bath after the mortar and lath was mostly on the floor.


    L P thanked Jeff Meeks
  • 4 years ago

    Yes, I hope I’m wrong. I was somewhat imprecise in my wording. Of course you won’t find repairs - but possible something needing repairs. Just clarifying, though I’m sure it was understood.

    L P thanked Therese N
  • 4 years ago

    @Therese N: Yes, thank you, I did understand! I don’t see anything amiss around the window or outside, and the floor is solid and level. Will dig out the inspection report and see if I overlooked something. Better to be proactive if there is a problem!

  • 4 years ago

    @Jeff Meeks: That’s it! Yes, very messy and dusty. Did you reconstruct with mortar (I think I heard it called ”knock down”) or drywall? I am guessing that when these houses were built no one would have imagined anyone would want to deconstruct them some day!

  • 4 years ago

    LP, if you're looking to replace the tiles, this company has the right kind of tile and color-matches tiles. https://www.instagram.com/bwtilecompany/

    L P thanked emilymch
  • 4 years ago

    @emilymch: That’s a great resource, thank you! I’m saving it ”just in case.” I found some supplies left by the prior owner, but unfortunately no tile!

  • 4 years ago

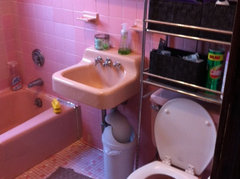
    @L P I had many issues with my 1950's pink bathroom; far more that your few cracks. The walls had been patched multiple times with different shades of pink tile and there was a leak in the floor. I would have loved to save some of it, but it really was a gut job. It doesn't look like you need to do that, just maybe replace a few tiles, or fill and color match the cracks.


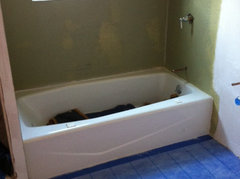
    Nobody would rebuild with the mortar and wire lath today...except maybe inside a shower when using big tiles and a perfectly flat wall is needed. I rebuilt with blue board and plaster outside the bath/shower area and cement board, Hydroban waterproofing and tile around the bath. The floor was 1" plank subfloor, 0.5" plywood, Nobleseal TS isolation membrane and 1" hex tile.

    L P thanked Jeff Meeks
  • 4 years ago

    @Fori: That’s an interesting thought, much better than having a structural problem causing the cracks. No change at all in almost two years. hmmmm…

    I hope the POs did something to compensate you for the cracked tiles and any damage to the toilet. When you start that project I hope it goes well!

  • 4 years ago

    @ Jeff Meeks: I hear you about the mortar and lath. That was a bear to work with in another bathroom and all I had to do was stay out of the way! Love the idea of your hex tile. The floor of the bath that has the cracked border tiles has the original turquoise hex tiles and they’re in great shape. We need a new vanity in there and possibly a toilet that will be more compact (the current toilet is set too far forward from the wall) and I’m hoping the floor won’t be affected. Thanks for sharing your experience.

  • 4 years ago

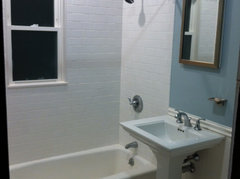
    A neat and tidy older bathroom looks fantastic IMO. I had pink 1" mosaic tile, which I loved, but when I gutted the bathroom I took a less colorful path, but kept with traditional fixture and tile choices. Before, during and after:


  • 4 years ago

    Jeff, That is a fabulous bathroom, both before and after! i remember reading an article about a group called ”Save the Pink Bathroom” and I know sometimes that can’t be done. You did a great job on the reno. I am working in what looks like a bath of similar size to yours., about 92” x 52”. It is TINY! I am currently trying to figure out how to replace the vanity, which is only 2-3” from the wall and looks cobbed together by the prior owners. I want the new one to go to the wall but I guess it will have to be custom since ready made vanity tops have an overhang which would result in another gap. I thought about gutting and starting over, but I love the original tiles and it is a huge, expensive project to get tile off the mortar and steel walls, and then re-build. Where you have a tub, I have a shower with a thick tile wall (6”) so the only real benefit would be putting up a glass shower wall to gain light and a few inches of space. Your bath looks amazing, and I love the pedestal sink and tile floor. Great job and interesting to learn about your reno!

  • 4 years ago

    If you can save things it will save money and I think conservation is nicer than renovation so I love your sensitive approach. In my original picture you can see the different colored pink tiles and also the metal tape on the bath to patch a leak. The window was also trimmed in wood and that wasn't good. I considered doing a renovation and replicating as much as possible, but the availability and cost of pink tile made that silly, so I was sensible and made the structure quite modern and used easily available fixtures and tile with a period feel. The bath is cast iron which is very typical where I live and I went with a shower curtain because I think they just work better than glass, particularly on a bath.

  • 4 years ago

    I think you nailed the period feel! Classic and functional. I had 3 of those platform type pedestal sinks in a prior home (either American Standard or Kohler) and would gladly buy them again. Your floor tile is my #1 choice for baths! In the one bath that was recently renovated, I have a cast iron tub like yours that I let the contractor know was staying. I padded and covered it and the demo guys still threw all kinds of debris in it…grrrr. . The GC said well, just get it refinished but I know that opens another whole can of worms with peeling, etc. That bath didn’t have any tile or fixtures worth saving so it was just updated with a new vanity, countertop, mirror, hardware, and paint. I see you moved your shower/tub control up higher…good idea, looks modern!

  • 4 years ago

    I think code is 2'4" for the shower valve in a bathtub, but my contractor said he usually put it right at 36" because the shower is used most and 36" is easy to reach when standing, but also ok for a bath. The inspector was just fine with it.

  • 4 years ago
    last modified: 4 years ago

    Yes, we did the same. Just moving the valve higher made the shower look more modern. Definitely makes more sense!