Software
Houzz Logo Print
seasiderooftop

Pittosporum Tobira leaf damage: what causes this?

4 years ago
last modified: 4 years ago
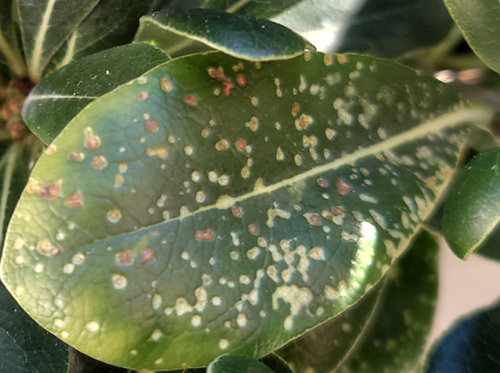
My dwarf Pittosporum Tobira was growing nicely until these weird puncture-like dots started appearing on the leaves.


I am in zone 11 (Malta), gardening in pots on my rooftop. None of my other plants seem to be affected.


What is the cause of this? What can I do about it?

Comments (6)

  • 4 years ago

    Adding this to the Garden Clinic forum.

    If anyone knows what this is I would really appreciate your comments.

  • 4 years ago

    Thank you @tapla (mid-Michigan, USDA z5b-6a) !!

    This plant is in the sunniest area of the roof: full sun all day. I usually water first thing in the morning except:

    I water very infrequently at this time of year because air humidity is so high that the soil doesn't dry otherwise.

    No rain, but air humidity for January and February so far has been between 85-90%, and often, like today for example, we get a full 100%. There is a lot of wind though, that helps a bit, but still.

    So what you are saying makes total sense with humidity this high, the plant can't transpire.

    I will withhold any more water for a while. This plant is due for a repotting soon so I will do it next week and make sure the drainage is improved.

    Thanks again for your insight and advice, I really appreciate it.


  • 4 years ago
    last modified: 4 years ago
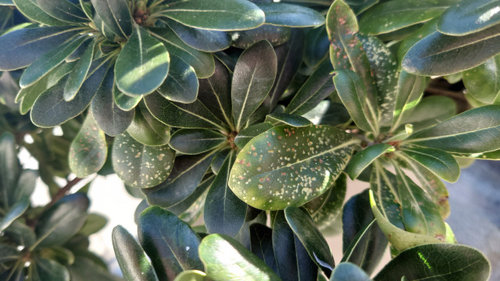
    'Pit-making Pittosporum scale' can be a problem for this plant, so do check carefully for evidence of a scale infestation.

    Early spring is the best time to repot this plant, and repotting is much to be desired over potting up, as the later is a half-measure and ensures the limitations imposed by root congestion remain until a pair of hands actually gets into the root mass to sort things out and remove problem and unnecessary roots.

    Try monitoring moisture levels with a tell.

    Using a 'tell'

    Over-watering saps vitality and is one of the most common plant assassins, so learning to avoid it is worth the small effort. Plants make and store their own energy source – photosynthate - (sugar/glucose). Functioning roots need energy to drive their metabolic processes, and in order to get it, they use oxygen to burn (oxidize) their food. From this, we can see that terrestrial plants need plenty of air (oxygen) in the soil to drive root function. Many off-the-shelf soils hold too much water and not enough air to support the kind of root health most growers would like to see; and, a healthy root system is a prerequisite to a healthy plant.

    Watering in small sips leads to avoid over-watering leads to a residual build-up of dissolved solids (salts) in the soil from tapwater and fertilizer solutions, which limits a plant's ability to absorb water – so watering in sips simply moves us to the other horn of a dilemma. It creates another problem that requires resolution. Better, would be to simply adopt a soil that drains well enough to allow watering to beyond the saturation point, so we're flushing the soil of accumulating dissolved solids whenever we water; this, w/o the plant being forced to pay a tax in the form of reduced vitality, due to prolong periods of soil saturation. Sometimes, though, that's not a course we can immediately steer, which makes controlling how often we water a very important factor.

    In many cases, we can judge whether or not a planting needs watering by hefting the pot. This is especially true if the pot is made from light material, like plastic, but doesn't work (as) well when the pot is made from heavier material, like clay, or when the size/weight of the pot precludes grabbing it with one hand to judge its weight and gauge the need for water.

    Fingers stuck an inch or two into the soil work ok for shallow pots, but not for deep pots. Deep pots might have 3 or more inches of soil that feels totally dry, while the lower several inches of the soil is 100% saturated. Obviously, the lack of oxygen in the root zone situation can wreak havoc with root health and cause the loss of a very notable measure of your plant's potential. Inexpensive watering meters don't even measure moisture levels, they measure electrical conductivity. Clean the tip and insert it into a cup of distilled water and witness the fact it reads 'DRY'.

    One of the most reliable methods of checking a planting's need for water is using a 'tell'. You can use a bamboo skewer in a pinch, but a wooden dowel rod of about 5/16” (75-85mm) would work better. They usually come 48” (120cm) long and can usually be cut in half and serve as a pair. Sharpen all 4 ends in a pencil sharpener and slightly blunt the tip so it's about the diameter of the head on a straight pin. Push the wooden tell deep into the soil. Don't worry, it won't harm the root system. If the plant is quite root-bound, you might need to try several places until you find one where you can push it all the way to the pot's bottom. Leave it a few seconds, then withdraw it and inspect the tip for moisture. For most plantings, withhold water until the tell comes out dry or nearly so. If you see signs of wilting, adjust the interval between waterings so drought stress isn't a recurring issue.

    Al

    seasiderooftop thanked tapla (mid-Michigan, USDA z5b-6a)
  • 4 years ago
    last modified: 4 years ago

    Thank you very much for this @tapla (mid-Michigan, USDA z5b-6a) !

    I will take this into account in the future. Heh, I was using those moisture meters but I'll try the simpler wooden "tell".

    Root-pruning was scary the first time but after seeing my holm oak handle it well I will be doing this for all future repottings.

    I had read one of your posts about perched water tables which led me to stop using a so-called drainage layer at the bottom of my pots and I now use screens instead. I also now regularly tip my pots at a 45° angle to get extra water out of them and it is amazing how much more comes out. And I have started to include a wick coming out of the bottom of my seedling pots, and this has really helped with avoiding too much moisture.

    As far as the mixes go, I am not using your formulas because the key component is not available in Malta (we have no forests so the bark fines are an imported luxury here). I have however switched to reduced peat or peat-free potting soils, which I combine with more perlite, rough sand, pumice and clay than I used to.

    All this to say: even though I may not follow it to a T, the advice you have given is not falling on deaf ears with me. Thank you!

  • 4 years ago
    last modified: 4 years ago

    It's always uplifting to learn the info I provided is being used by someone to enhance their growing experience, so thank you for the kind words.

    Moisture meters measure electrical conductivity, not moisture levels. To verify, clean the probe of your device and dip it into a clean cup partially filled with distilled water and note the device indicates the water is 'DRY'. Sprinkle a little table salt into the cup and watch the needle move to read 'WET'.

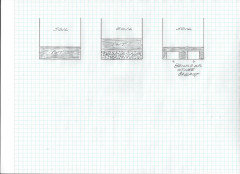
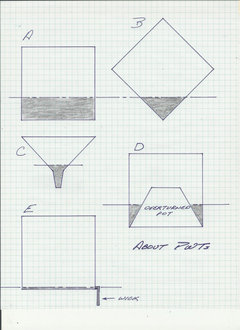
    If you're using a medium you suspect is too water-retentive, another way to passively limit the amount of excess water it is capable of holding is by using ballast.

    Figure D shows an over-turned pot (with its drain hole covered) being used as a form of ballast. Compare the shaded part of image D to image A to get a sense of what kind of difference it can make.

    If we move our focus to the figure on the right in the drawing immediately above, you'll see how bricks (as ballast) displace soil that would otherwise be filled with water. The ht of the perched water table in the image on the right is 3 units. The bricks are 3 units wide by 2 units tall. The pot is 10 units wide. If we rolled the bricks so they are 3 units tall, and added 2 more bricks, it would displace nearly all the soil capable of holding perched water. The image would show a volume of soil 2 units wide and 3 units tall, so 80% of the soil capable of holding perched water will have been displaced by ballast. As much as 95% of a perched water table can passively be eliminated by ballast. It is important, though, to make sure there remains an unbroken soil column which extends from the top of the soil column to the bottom of the pot. This column is essential because it will serve as the conduit through which water that would normally perch, moves down and exits the drain hole. If the bottom is entirely filled with ballast, water will simply perch above the ballast, as it does above a "drainage layer".

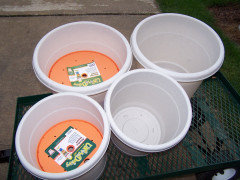
    The owner of the company that makes these UpsaDaisy devices asked me to test them, and sent me an entire case of mixed sizes. Upon receiving them, I told them they will not improve drainage or aeration, that water will simply perch above the device, and all it does is move the bottom of the pot (from the perspective of hydrology) to a higher position, so its only falue would be to limit the amount of soil a pot could hold.

    He argued that they work like a charm, so I planted tomatoes in one and a mixed planting (flowers and foliage plants) in the others. Plants in all pots were at first healthy and growing strong. By the first of August (mid to late summer, here) the plantings with the devices were starting to wane due to root congestion and were in very sad shape by the end of the month, while the other plantings were still healthy and growing well. There IS a way to modify the shape of these devices so they will work as he hoped they would work, but I have an engineer son and a couple of friends that are still interested in producing a product that will work as well as or better than the examples illustrated in the line drawings I provided above. There is enough information in this post for anyone to figure out what type of modification would be required.

    Good luck with all you're growing endeavors, Seaside. I used Google Earth to look at your island and it looks like a beautiful place to live!

    Al

    seasiderooftop thanked tapla (mid-Michigan, USDA z5b-6a)