Software
Houzz Logo Print
webuser_911936849

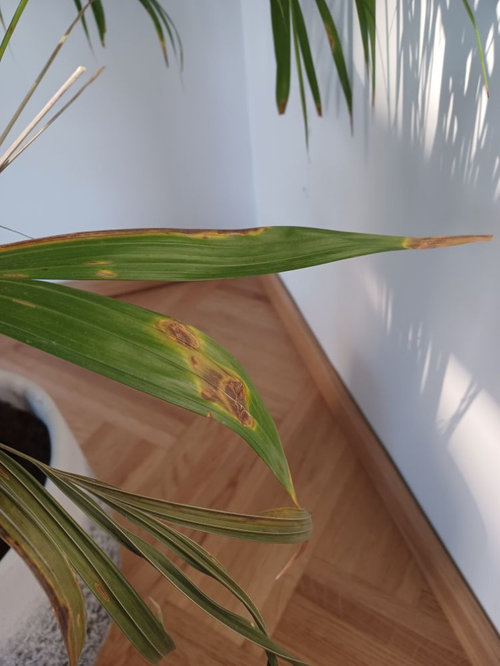
Yellowing and browning indoor palm

3 years ago
Hi all,

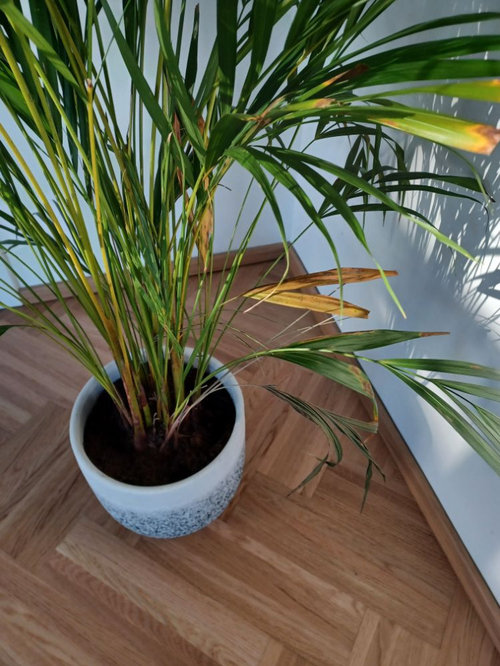
Looking for some help with my poor palm. Does this look like over watering?

I was watering once per week, recently reduced slightly but it hasn't seemed to make a difference. The soil does seem almost completely dry between watering. Occasionally misting in between. I'm using distilled water as our water is very hard.

The leaves are turning yellow and brown, usually at the tips but some have brown patches or even holes in the middle.

My apartment is bright but the plant is not in direct sunlight. Decent level of humidity. I repotted after I bought it because it was in a lot of clay.

Thanks for any tips!


Comments (5)

  • 3 years ago

    most of us believe misting os of no use to any plant .. but if it makes you happy.. it doesnt hurt ..


    ALL palms need annual pruning as the old fronds just get old and ugly.. have you dont that in the last year or two??.. if not;. just prune out all th3e bad ones..and lets see how much better it looks..


    the old fronds are never going to heal or look better.... so off they go...


    then.. we can watch new growth.. and determine if there is any ongoing process that needs to be addressed ..


    does the pot drain.... or is it pot in pot... if no draining.. you are better off letting it dry completely before the next watering ...


    the shadows behind the plant suggest light is not an issue...


    ken

  • 3 years ago

    Thanks Ken. The plant is actually new, I only bought it in April. It was fully green when I got it and sadly has been deteriorating since then, so it's definitely something I am doing.


    It's not a pot in a pot but there is a good layer of clay balls (leca) in the bottom, to make sure there is soil drainage and the plant can't sit in a load of water.

  • 3 years ago

    The clay balls are not doing anything. Well, that's not quite true. They are making sure the plant sits in stagnant moisture. All plant pots must have drainage holes. Repot in a cheap plastic pot and place that in your decorative outer pot.

  • 3 years ago

    Thanks, I will try that.


    I must say though, it doesn't feel like it is sitting in stagnant water. When I feel the soil it has always felt very dry, even feeling right to the centre at the roots of the plant.


    From the symptoms showing on the plant itself, does it look like over-watering or could it also be not getting enough water?

  • 3 years ago

    Flora is right. You make your job far far more difficult than it needs to be by growing in a pot w/o a drain hole, and there are 3 reasons. 1) Checking moisture levels in the middle of the pot says little about what the water situation is at the bottom of the pot. In a 10" deep pot, the top 4" can feel dry to the touch while the bottom 3-4" can be 100% saturated with soil. Roots can't grow in the stagnant water at the bottom of the pot, and every time you DO water, you're killing another batch of fine roots that stop the plant from growing until the plant can regenerate the roots lost to over-watering. 2) The lack of oxygen essential to normal root function limits the plant's ability to efficiently move water to its most distal parts. The limited root function causes the plant react as though it's dying of thirst - a drought response while roots are awash in a sea of plenty, and a normal drought response is the shedding of leaves to limit water loss via transpiration through leaves. 3) IF you are fertilizing (and you definitely should be), lack of a drain hole ensures that all dissolved solids (salts) from tapwater and fertilizer solutions remain in the soil where they build up to levels that actually reverse the flow of water INTO cells, pulling water OUT of cells by the same mechanism curing salts pull water from the cells of meat like bacon or jerky.

    Getting your watering intervals right is very important - drain hole or not. If you use a wooden tell made from a $2 wooden dowel rod, you'll get a very accurate reading of what moisture levels are deep in the pot where it matters. More on that below.

    Also, you can drill a hole in the pot you have - tutorial also below.

    Using a 'tell'

    Over-watering saps vitality and is one of the most common plant assassins, so learning to avoid it is worth the small effort. Plants make and store their own energy source – photosynthate - (sugar/glucose). Functioning roots need energy to drive their metabolic processes, and in order to get it, they use oxygen to burn (oxidize) their food. From this, we can see that terrestrial plants need plenty of air (oxygen) in the soil to drive root function. Many off-the-shelf soils hold too much water and not enough air to support the kind of root health most growers would like to see; and, a healthy root system is a prerequisite to a healthy plant.

    Watering in small sips in order to avoid over-watering leads to a residual build-up of dissolved solids (salts) in the soil from tapwater and fertilizer solutions - which limits a plant's ability to absorb water – so watering in sips simply moves us to the other horn of a dilemma and creates another problem that requires resolution. Better, would be to simply adopt a soil that drains well enough to allow watering to beyond the saturation point, so we're flushing the soil of accumulating dissolved solids whenever we water; this, w/o the plant being forced to pay a tax in the form of reduced vitality, due to prolong periods of soil saturation. Sometimes, though, that's not a course we can immediately steer, which makes controlling how often we water a very important factor.

    In many cases, we can judge whether or not a planting needs watering by hefting the pot. This is especially true if the pot is made from light material, like plastic, but doesn't work (as) well when the pot is made from heavier material, like clay, or when the size/weight of the pot precludes grabbing it with one hand to judge its weight and gauge the need for water.

    Fingers stuck an inch or two into the soil work ok for shallow pots, but not for deep pots. Deep pots might have 3 or more inches of soil that feels totally dry, while the lower several inches of the soil is 100% saturated. Obviously, the lack of oxygen in the root zone situation can wreak havoc with root health and cause the loss of a very notable measure of your plant's potential. Inexpensive watering meters don't even measure moisture levels, they measure electrical conductivity. Clean the tip and insert it into a cup of distilled water and witness the fact it reads 'DRY'.

    One of the most reliable methods of checking a planting's need for water is using a 'tell' (more reliable than a 'moisture meter'. You can use a bamboo skewer in a pinch, but a wooden dowel rod of about 5/16” (75-85mm) works better. They usually come 48” (120cm) long and can usually be cut in half or in several pieces, depending on how deep your pots are. Sharpen both ends of each tell in a pencil sharpener and slightly blunt the tip so it's about the diameter of the head on a straight pin. Push the wooden tell deep into the soil. Don't worry, it won't harm the root system. If the plant is quite root-bound, you might need to try several places until you find one where you can push it all the way to the pot's bottom. Leave it a few seconds, then withdraw it and inspect the tip for moisture. For most plantings, withhold water until the tell's tip comes out nearly dry. If you see signs of wilting, adjust the interval between waterings so drought stress isn't a recurring issue.

    Drilling holes in pots

    The 2 types of drill bits most appropriate for drilling holes in pots are diamond core bits for the highly vitrified (hard material - baked at very high temps - glass, ceramic, ......) pots, and a drill with several names for drilling clay pots fired at low temps, such as terra cotta. That (carbide) drill is called a 3-point drill, spear point drill, or a spade drill, seen here:


    For the hard stuff, diamond core drills are best,

    core drills:


    though the 3 point drill will drill the hard stuff, too. Both are available in many sizes, with bits sized 3/8 or 1/2” best for pots.

    You can buy either type at big box stores, and they're not that expensive, but you won't find a 'set' of diamond core bits worth buying for $9. The bits last a long time, depending on quality and how you use/care for them. They are best used with a steady stream of coolant from a squeeze bottle (contact lens solution bottles work great for this) or with the work surface barely submerged. IE, put the pot upside down in a tub and fill the tub with water until it just covers the work surface. If you use a spritzer or squirt bottle, a 50/50 mix of antifreeze and water is an excellent coolant, and soapy water is better than plain water but not as good as the antifreeze mix. The coolant keeps the tool from over-heating, and in doing so, increases the life of the tool substantially - like triple or quadruple the number of holes you can drill. While drilling, apply very little pressure, just the weight of the drill motor with you providing only guidance is sufficient. Drill at medium speed – somewhere around 1,600 rpm. NEVER use either type of drill mentioned above without a lubricated coolant. The heat will cause thermal shock and fracture in glass and ceramics and heat build-up will destroy the tool.

    Regular masonry bits are "ok" for drilling terra cotta or cement (you can make them work), but inappropriate for anything harder. The right tool makes everything easier.

    masonry drill bit:

    ..... questions or input? Fertilizing is important, ask if you want suggestions.

    Al