Software
Houzz Logo Print
danny_shea85

Updating kitchen island

last year
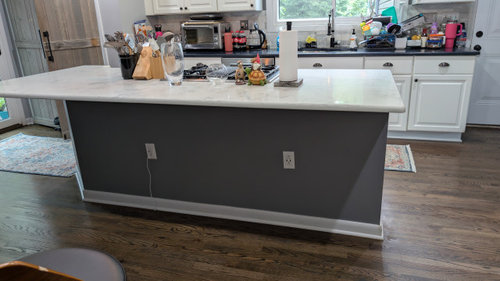
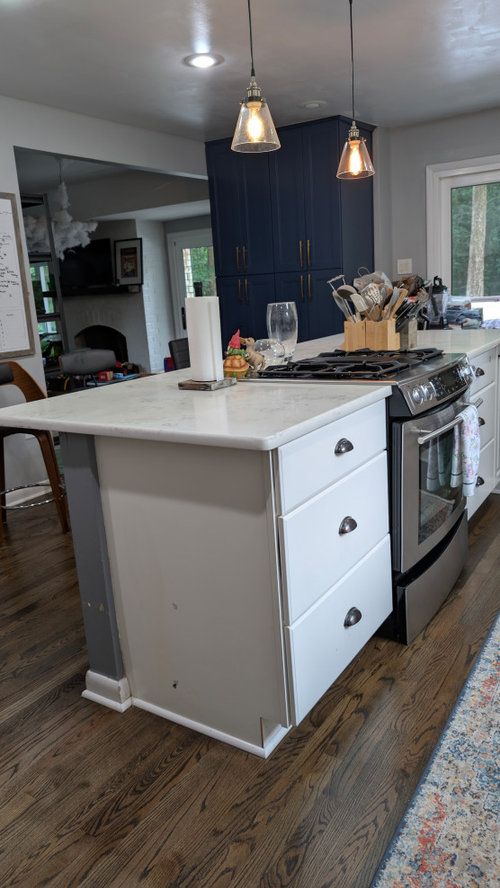
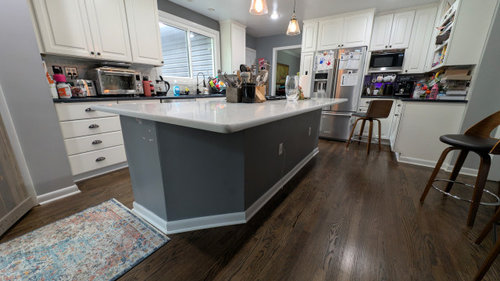
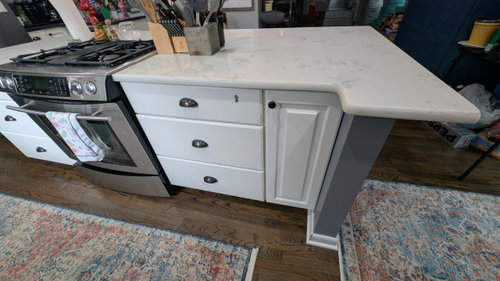
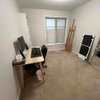
Hello, our kitchen island could use a little bit of an update. We've done a little bit of cosmetic updates to our kitchen since we bought it, including changing it from a bar top to level island to a flat single level island. That being said, I feel like it's missing something with some trim or color. I included various angles of the island. Does anybody have any ideas?

Comments (7)

  • last year

    An island can be finished in drywall (in which case you don’t choose white shoe molding and white outlet switches), but it is more often finished in the same wood as the cabinets. Were it mine I’d finish it with white painted maple end panels like the ones that finish off your cabinet runs. Right now it resembles a pony wall more than an island. If you want it to be grey, don’t choose the same grey as the walls.

  • last year

    Paint it white.

  • last year

    Paint the whole thing white. Add the same base molding to the end side as what wraps around the other sides. If you are opposed to painting it all white, then change the one white end to grey so there is continuity in it wrapping all the way around. When add white base molding.

  • last year
    last modified: last year

    Many production builders choose to complete islands by simply attaching a drywall box vs. adding panels that match the cabinets (similar to an end panel at the end of run of kitchen cabinets). It will make your kitchen look more "custom" if you change the drywall back of the island (and sides).

    Here are some examples:

    Before:


    After:


    The person who completed this DIY update didn't have a good photo of the before - just this one where plywood and some trim had already been added to the back of the island:


    After:


    Before:


    After:


    Before:


    Here is the "after" photo - she decided to stain the island - I don't think it turned out very well (splotchy and dark). You can see the pieces of trim that were added better in the photo that was taken right before the stain was added:


    The following is a "before" photo of a kitchen that was updated by Carla Aston:


    Below is the updated kitchen:


    Changing the drywall portion of the island makes the kitchen look more custom (although I'm not a huge fan of the shape of of the island - however, there was a column that couldn't be eliminated which affected the new shape).

    Before (another one from Carla Aston):


    The island was updated by adding more than just some trim and moulding= more complicated than most of the other examples):


    Before:

    Carla Aston provided a client with a plan to update her kitchen:


    Here is an example of a simple way to finish your island - you could add some beadboard + some simple boards in order to cover up the drywall + add it to the side of your island that is currently the side of a cabinet (without a panel added):


    Below is another "before" photo of an island that has a drywall back (like your island):


    This is the "after" photo - it also is a simple diy project that uses two sizes of boards to create a board and batten look on the back of the island (I assume that something was also added to the sides before everything was painted):


  • last year
    last modified: last year

    I would paint all the gray in the kitchen another color. The gray does not go with your flooring. The island is fine, just not a good color for your room.

  • last year

    The least expensive, easiest change is to paint the island and the room a color vs the pure black/white/gray palette. Depending on the color selected you may want two shades of the same color, darker on the island and lighter on the walls. Muted blues and greens are very popular, but I have seen beautiful kitchens that have yellow, red, orange or purple. There isn't a rule that must be followed, but the color you use should relate to the colors you have in the rest of the house. (Example - you could have a blue sofa with yellow or orange pillows and then bring the yellow into the kitchen with a few blue accents.)


    No matter what you to add color you also need to reduce clutter. I know it can be hard when we work full time jobs and far more to do every day than we can possibly fit in. Things grow out of control.


    I am at retirement age and all of my friends who are retiring talk about the first thing they are going to tackle when they retire (garage, basement, kitchen). You are not alone in having more than you can handle.


    I am going to suggest that you can make things better (not perfect) without adding the task of cleaning everything out and deciding what to keep and what to get rid of.


    Start with your island. Take everything off the surface. Buy yourself a new crock for tools that you use while cooking. Place the old crocks across the room where it is a chore to walk over and get a tool. Leave everything in that inconvenient place unless you absolutely need it to cook your meals. If you use something place it in the new crock. At the end of 2 weeks take everything that is left in the old crocks and put them in a box in your garage. Mark the date on the box. Over the next 3-6 months there will be things that you had to go out to the garage to retrieve. The rest you don't use and don't need and the box can be donated to the local thrift store.


    Use the same process with each of your drawers and cabinets. You will be amazed at the amount of stuff you own that you don't use that is just taking up space and making it impossible to keep things organized.


    I use a very similar process with clothing. I use bags, safety pins and place little rubber bands over the hangers every January. As I use things they come out of the bags (socks, underwear, bathing suits) Other folded items get the safety pins removed when I wear them and the rubber bands get removed from the hangers. At the end of the year I take the things I didn't wear and donate about 90% of them. There are always a few pieces that I are seldom wear outfits (holiday, wedding, special event clothes) that I hang on to for another year.


    Rubber bands on the handles of pots and pans and post it notes on small appliances with the last date used make those reductions easy as well.


  • last year

    No vent hood over the gas range…the biggest faux pas in this kitchen.