Software
Houzz Logo Print
toscana26

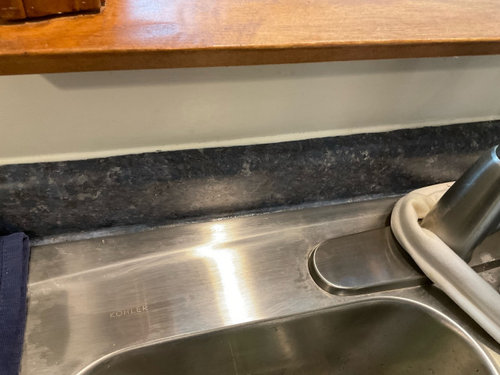
Gap behind kitchen sink

29 days ago
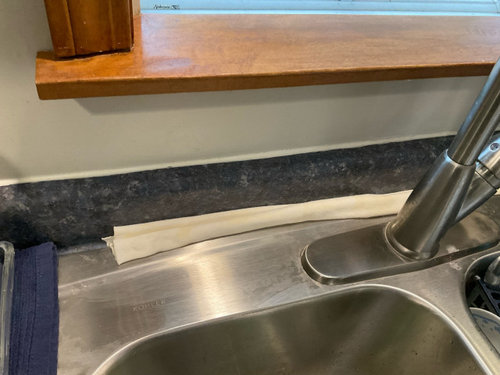
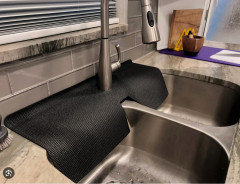
What is the best way to finish the gap behind our kitchen sink?
When our kitchen sink was installed, the contractor used a thick bead of GE clear waterproof silicone between the sink and the countertop, including along the back where the sink meets the wall/back panel. It didn’t look very good because the silicone was quite thick.
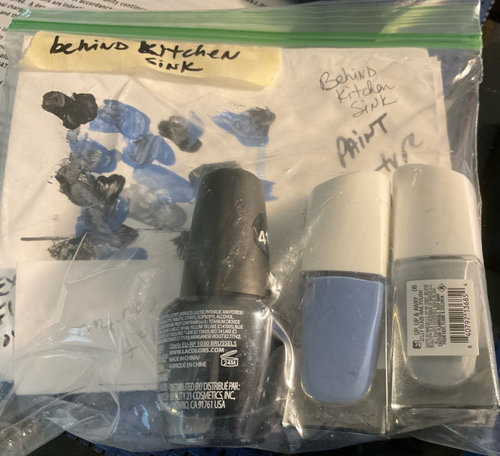
When we removed the silicone, it pulled off the paint behind it as well. We ended up filling in the damaged area with different shades of nail polish to try to match the surrounding color. For now, my husband puts a towel behind the sink to keep water from getting into the gap, but it looks terrible and we’d really like to find a better permanent solution.
There is approximately a 1 cm (about 3/8 inch) gap between the back edge of the sink and the wall/back panel. I’m not sure what this area is technically called or what the proper way to finish it would be.
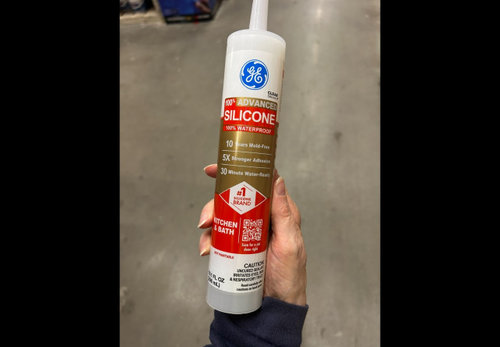
We tried filling the gap with GE Advanced Silicone 100% Clear, but even though it was labeled clear, it dried cloudy rather than clear, so it didn’t look good.
There is already silicone underneath the sink from the original installation, but there is currently nothing sealing the exposed edge/gap along the back of the sink.
We don’t want to keep using a towel, and we also don’t want to have to constantly wipe water from this area. We’re concerned that repeated wiping could eventually damage the nail polish we used to touch up the paint.

What would be the proper way to finish or seal this approximately 1 cm gap so that it looks neat, or put there, to keep water from getting behind the sink, and doesn’t require a towel or constant wiping? We’d especially like a solution that looks clean and unobtrusive rather than another thick bead of silicone.

Any suggestions for the right product or method would be greatly appreciated! Please see photos.

Comments (21)

  • PRO
    29 days ago

    Can we see the whole sink , that looks odd to me to have the ledge there

  • 29 days ago

    That ledge appears to be the 4” backsplash. When counter was installed it should have been installed up to the wall or within the depth of the 4” backsplash. If this is a recent build/remodel contact the contractor for resolution.

  • PRO
    29 days ago

    I see a ledge on the back of the sink then the backsplash .

  • 29 days ago

    is the space behind the sink a trough where water gets caught and sits, or is it an actual gap between the sink and wall/ledge where water falls down into the cab below?

  • 29 days ago

    It’s a trough where water can sit. It is not a recent build. My husband bought a new sink and it was a bit smaller than the old one. But I do remember a bit of a gap even with the old sink.

  • 29 days ago
    last modified: 29 days ago

    If it were me, I’d want something stainless steel back there to match the sink and deflect the water - there are tons of options on etsy, likely just take some measuring and understanding the shape you need - there’s a seller on Etsy called EpicQT out of NJ that does tons of smaller custom strips, ledges, crumb catchers etc for kitchens that might be a place to start


    Eta can also be helpful to determine whether water is from dishes or using the faucet with wet hands - some folks move the faucet lever to the front over the sink

  • 28 days ago

    I see the seller on Etsy. How would we fasten a stainless steel strip. Wouldn’t we have the same issue with water getting underneath? Because the back of the sink edge is rounded off, not flat.

  • PRO
    28 days ago
    last modified: 28 days ago

    I don't understand the problem.

    Why are you concerned about getting water there?

    Do you have a leak -- is water getting into the cabinet below?

    I've never seen that space protected in any way. It's normally just as you show.

    Your countertop looks like plastic laminate (Formica) and is not painted, unless someone did paint it.

  • 28 days ago
    last modified: 28 days ago

    I was thinking of a splash guard to keep the water from going into the trough - not sure if it would work with if your sink is curved and/or the location of your faucet handle, likely you are going to need to do some trial and error to see what works for your specific situation - if you google "sink splash guard" you will see different ways people handle it depending on their sink & faucet set up


  • 27 days ago

    The "gap" (meaning exposed laminate counter top) between the back of the sink flange and the backsplash of the laminate counter is supposed to be there. No sink should butt up against the laminate backsplash.

    Simply, avoid getting water running on top of the flange. Splash will occur, but that is not the same as running/pooling water there. If it goes down onto the laminate, just use a sponge to soak the water up. That is all, just care in use. The laminate is a waterproof surface (and should not be painted), and as long as the sink is caulked below the flange, no water will enter the cabinet.

    Some sort of flange extension being discussed does not fix the problem. It will not deflect water - to where? It will just move the "gap" you are concerned with to somewhere else. Just a lot of trouble when care in use is all that is needed.

  • 25 days ago

    3onthetree- I interpret it as the depth of the sink is too short for the hole that was cut since it was a replacement sink and there is a gap at the back where water can run off the laminate and into the substrate. That is my understanding and why I suggested a flange because the sink is too small for the existing hole.

  • 25 days ago

    I do not see a gap indicating the sink cutout ius too small, I think the OP is assuming the sink flange is supposed top be all the way to the 4" riser/backsplash.

  • 20 days ago

    Thank you for all of the responses! After reading through the comments, I realize I probably didn’t explain the situation as clearly as I could have in my original post.

    The approximately 1 cm gap behind the sink is intentional and is supposed to be there. There is already silicone underneath the sink from the original installation, so from what I understand from the comments, water shouldn’t be able to leak through into the cabinet. My question was really about how, or whether, the exposed gap along the back of the sink needs to be finished or sealed.

    When the new sink was installed, a full bead of silicone was applied all the way around the sink. Some of it was underneath the edge of the sink, but there was also a visible bead along the outside edge. The silicone was very thick and cloudy-looking. While he was installing the sink, I removed the excess that was visible along the front and sides, but I left the bead along the back until the following day, it had dried. I then removed the visible silicone along the back as well.

    The new sink had a slightly smaller flange than the original sink, so the area along the entire back edge was already scratched/etched where the new sink didn't cover the same area. When I removed the silicone from the back, almost all of the color/finish along that entire strip came off with it, leaving the scratches and etched area visible all along the back of the sink. I ended up using several shades of nail polish to touch up the entire strip so that it would blend in with the surrounding finish, which is what you see in the photo.

    It sounds from the comments that I may not actually need to put anything in this gap, and that as long as I keep water from running into it, it is fine as it is. If that’s the case, that certainly makes things easier! I was mainly concerned that I needed to put some type of small silicone bead or other seal along the exposed edge.

    My only remaining concern is that if water does get into that area and I wipe it up, the nail polish touch-up can come off. I’m trying to avoid having to repeatedly wipe the area or redo the touch-up.

    Thank you again to everyone who took the time to respond and offer suggestions. I really appreciate the professional advice and the different perspectives, it has helped me better understand what is actually necessary.

  • 19 days ago

    Thank you toscana26 that explains it a lot better. My personal opinon is to put in a splash guard on the back of the sink. Since you do get water there as is the indicator of a towel I would put in a splash guard that will certainly help.

  • 17 days ago

    If you think about it, a water impermeable counter backsplash is to protect a lower wall from an errant splash. To then add another splash guard, which protects that backsplash from splash, seems a bit redundant.

    A shallow depth sink, and/or a tall faucet, often leads to inadvertent splashes.

  • 17 days ago

    That gap would drive me crazy. A custom metal piece is one solution; it could be fastened with a bead of silicone along the sink edge and the back edge. Or you could figure out some sort of filler strip of solid material (some type of granite or stone?) that would fit into the gap and be sealed with silicone. The height of the filler strip could be such that it is not necessarily level with the surrounding countertop but is a bit higher -- maybe even higher than the edge of the sink. You could find a plain stone perhaps in a dark shade that blends in with your backsplash.

  • PRO
    15 days ago

    After reading this I figured out you do not have your counter behind the sink so that was a bad install that needs to be redone so what is your counter ? My sink is very close to the tiled wall at the back but there is a small strip of counter back there and silicone between the counter and the tile and silicone under the sink edge all the way around all my counter are buterblock so I oil the area around the sink a bit more often and of course dry the area when it gets wet

  • 14 days ago

    This a crazy thread. The picture is provided. It is a normal install. I guess everyone commenting has an undermount on granite so this is a foreign situation.

  • 13 days ago
    last modified: 13 days ago

    I would purchase DUROSOL 0.375 in. D x 39 in. W x 39.36 in. L-Shape Stainless Steel Natural Molding and Transition Trim.

    1. Cut the trim to the width of the sink.
    2. DO A DRY FIT: PUSH THE TRIM DOWN INTO THE GAP -- LONG SIDE AGAINST THE WALL -- TO MAKE SURE THE TRIM WILL FILL THE GAP BETWEEN THE SINK AND THE WALL. THE TRIM -- SHORT SIDE -- SHOULD BE FLUSH WITH THE SINK.
    3. Pull out the trim.
    4. IF THE TEST WAS SUCCESSFUL, apply a bead of clear silicone adhesive to the wall side of the gap (it will hold the trim in place). Apply beads of silicone caulk to the front and side edges of the trim (they will prevent water from leaking under the trim).
    5. Push the trim down into the gap -- long side against the wall -- until it's flush with the sink.

    -- not an expert

  • PRO
    6 days ago

    A 1 cm gap is too wide for a neat bead of silicone on its own. That is why the original bead looked thick, and why the clear GE turned cloudy. Clear silicone often dries milky, and a deep joint shrinks and collects dirt.


    The cleaner fix is to close the gap, then seal a small joint:

    • Repair the pulled paint first with primer and a matching paint. Nail polish will keep failing where water sits.
    • Fill most of the opening with a thin strip that matches the counter or back panel (solid surface, PVC trim, or a cut piece of the same backsplash). It should sit tight to the sink rim and the wall so only a hairline joint is left. Backer rod behind it keeps the joint from being a deep pool of caulk.
    • Finish with a color-matched kitchen and bath silicone, not clear, tooled smooth with a wet finger or caulk tool. White or a close color disappears more than clear does.
    • If you are redoing that wall anyway, a backsplash that laps the sink rim is the lasting version. Water then sheds forward instead of into the gap.

    The towel can go once that joint is closed. Silicone alone will not look unobtrusive at 3/8 inch.


    We do kitchen finish work, tiling, and plumbing in New Westminster, BC. New Westminster Handyman, 604-200-6490, https://www.newwestminsterhandyman.ca/