Software
Houzz Logo Print
johnfrwhipple

A Leak Free Hansgrohe Shower - How to prepare waterproof your shower.

13 years ago
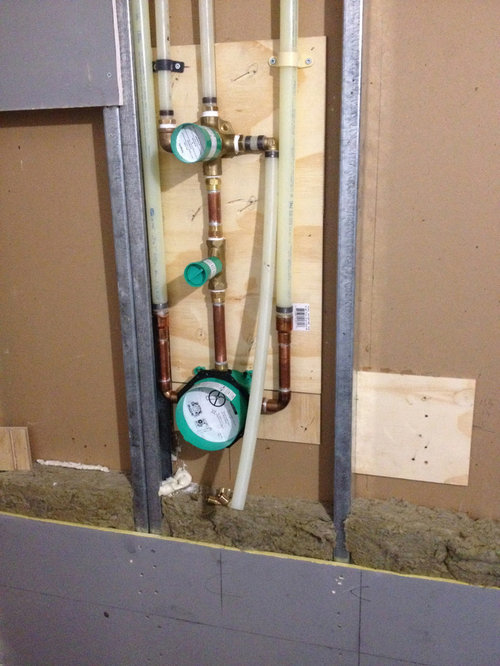
We are building a pair of shower's featuring shower packages from Hansgrohe. I'm a fan of these fixtures but I dislike the waterproofing material included with the rough in's.

Here is a look at how I build and install a Hansgrohe shower package to be leak free.

Comments (13)

  • PRO
    13 years ago
    Hansgrohe has taken many steps to detail their shower fixtures online and to make things very straight forward. That said most times the men installing these premium shower fixtures are unclear on how they should be installed to prevent leaking inside the walls. There needs to be better communication between the tile setter and the plumber.

    The shower fixtures from Hansgrohe have some clever details to them (like the green collars shown below) and they also have a rubber gasket designed for waterproofing. It is this gasket I have issues with and the one part of the design I do not like. This gasket is made from rubber and it is not fleece coated like the waterproofing material from Schluter Systems (Kerdi, Kerdi DS) or Noble Company (Wall Seal, Nobleseal TS). In a shower build when we use a rubber liner and a clamping drain we need to add between 1.5" - 2" of mortar directly over top. Since mortars to not bond that well to rubber we prefer bondable membranes and these all have a fleece layer added to them for bite.

    With your shower walls you will not be adding a thick mortar layer most times - unless of course you live in California where this practice is popular. So - if you plan to do this step (floating out the walls) then the rubber gasket is perfect in behind this prep work.

    If however you are using a topical waterproofing approach like a liquid membrane (Hydro Ban, Red Guard, Aquadefence etc), a sheet membrane (Kerdi, Kerdi DS, Wallseal, Nobleseal TS, etc) or a cementitious membrane like Ardex's 8+9 then this rubber gasket is junk in my opinion. I'll show you how I easily make my own flashings to replace the rubber ones supplied by Hansgrohe. My favourite plumbing supplier is Dornbracht - Dornbracht includes a Kerdi Flashing with it's rough in's and it is the total design on Dornbracht that has inspired my waterproofing systems for the other brands like Hansgrohe.

    So what do you do? I would, and I will - make my own from some Kerdi sheet membrane. These showers are being built with a combination of Kerdi, Kerdi DS and Ardex 8+9. I will make a flashing detail out of Kerdi and then seal it with a touch of Kerdi Fix - a waterproof adhesive from Schluter Systems.

    Here is a peak at the work so far and some steps we are taking to ensure they are waterproof.

    Larger Image's located here: http://no-curb.blogspot.ca/2013/09/a-leak-free-hansgrohe-shower-fixture.html
  • PRO
    13 years ago
    This is a Vancouver Condo in Yale Town. Like most of our multi family housing, condo, town home's in Vancouver's downtown core the framing for the walls and ceiling are made from steel. Steel Stud is a pain to work with and the amount of info to build a strong shower could fill many blog posts.

    For today I'll show of a couple tips and you can see one of the tips behind the shower rough in's right now. That is plywood blocking. The walls for this shower are only 2"x3" steel stud. This means we had only 2.5" of space and this was more than enough. We had to add in a 1/4" plywood backing to the drywall's back side to ensure our wall build out's where proper.
  • PRO
    13 years ago
    So I'm off to work and will document today the flashing detail steps I take. At days end yesterday the plumbers had everything installed and they had just cranked up the pressure test on the water lines to 200 PSI. This is a code required step for all waterlines here in Vancouver and the rest of Canada. I advised my client to document the test and snap some pictures. I'll see if he can send me one for this blog post.

    Much of the US does not require this step (200 PSI Pressure Test of the water lines) but I tell you it is so well worth it. Care was taken on this install and the pressure test revealed one bad fitting. The fitting was perfectly crimped but still leaked under pressure. This is why we have these test requirements here in Canada - you American's looking to build a better shower should inform both your general contractor and your plumber that you wish to include this step.
  • PRO
    12 years ago
    FYI: Hansgrohe has replaced the rubber seal with something comparable to the Schluter gaskets. This should no longer be an issue.
  • PRO
    12 years ago
    last modified: 12 years ago
    The Schluter gasket is one of the worst things I have seen. When I did use the Schluter System (quit using their line all together a few months back) I never found a single shower fixture the gasket worked with.

    Does your gasket come with the same silly non-modifed setting material restrictions Schluter's comes with?
  • PRO
    12 years ago
    Noble Company's NobleSeal TS and NobleSeal CIS tie in nicely to your rough in with NobleSealant 150. That's an easy fix to improving a topical waterproofing system into your rough in.
  • PRO
    12 years ago
    The gasket/membrane is actually only a secondary waterproofing barrier - it's use isn't required to waterproof the shower. We recognize the tile installer won't always utilize the part and/or install it incorrectly. The primary barrier is to caulk/silicone between the plastic mud guard and the finished tile surface.
  • PRO
    12 years ago
    Really - that's your primary barrier. You know grout is not waterproof right. It is far simpler use a compression fitting made from NobleSeal CIS, NobleSeal CIS, Noble WallSeal and the like. Then a little bead of NobleSealant 150.

    A rubber gasket sounds to me a poor choice. How does this get affect to the walls or tie into a topical waterproofing product?

    The US and Canada are miles behind the Australians and European systems. I think your North American divisions should understand this and find a system that works here. I've waterproofed dozens and dozens of your fixtures with ease.

    I would trash the rubber gasket idea myself. So many easier ways....
  • 12 years ago
    John,

    I've visited your site, specifically the page you've referenced above and while I find the details you've posted incredibly helpful, I'm unable to find the additional methods you've described as being advantageous to a successful waterproofing for the iBox.

    Can you help point me in the right direction as I'm getting ready to rough this in and have planned to waterproof with the Schluter product line. I understand you're not using them any longer but any insight would be helpful as I 'will' need to waterproof my shower. :P

    Thanks in advance!
  • PRO
    12 years ago
    Thanks Micheal. I had the process documented before with Schluter's Kerdi. But since I quit using their waterproofing products I deleted the posts and removed the pictures.

    Sorry about that.

    Lots of people find it helpful to sign up for the password to view my private photo albums or to make a donation to my blog page to get me helping with the design.

    The secret is the compression coupling.
  • 12 years ago
    John,

    Are these details within the area in which I need a password? If so, where do I sign up? I don't recall seeing this prompt.
  • PRO
    12 years ago
    There should be a handful of photos. You can get the password by sponorsing my blog page. Info is on every page top left corner. If you don't find them I'll work on a new album just for you.... www.no-curb.com
Sponsored
AIS Renovations
Average rating: 4.5 out of 5 stars15 Reviews
Custom Craftsmanship & Construction Solutions in Franklin County, Ohio