
Search results for "Application process" in Home Design Ideas

 Manomin Resawn Timbers
Reclaimed wood box beams and timber posts create a bold architectural framework in this bright transitional lower level, their deep dark brown tones and strongly grained faces standing in striking contrast against white walls and light flooring to naturally define the game room space from the living and bar areas beyond. Rather than walls or partitions, these antique timbers do the work of shaping the space while keeping the entire floor plan open and connected. Sourced from 19th and early 20th century structures and prepared through our process of denailing, kiln drying, and precision milling, every Manomin box beam brings genuine antique character to any application, structural or decorative.
Whether you are a homebuilder, a home remodeling contractor, or a homeowner looking to use reclaimed wood box beams and timber posts to define spaces in an open concept lower level, Manomin Resawn Timbers has been helping people discover the antique charm of reclaimed wood since 2002. We ship nationwide and are happy to help you find the right pieces from anywhere in the country. Visit our showroom in Hugo, MN or reach out to us with a call or a message to get started.

 User
The most notable design element is the exceptional use of reclaimed wood throughout almost every design component. Sourced from not only one, but two different Indiana barns, this hand hewn and rough sawn wood is used in a variety of applications. Underfoot, Oak wood flooring is salvaged from a tobacco barn, giving it its unique tone and rich shine that comes only from the unique process of drying and curing tobacco.
Photography Credit: Ashley Avila

 Danes Custom Homes
Inspiration for a mediterranean light wood floor enclosed dining room remodel in Dallas with white walls and no fireplace
Find the right local pro for your project

 BuilderElements
Collection: Light Weight Mother of Pearl Tile
Material: Seashell
Color: Natural White, majority chips are white, with small percentage of natural yellow and minimun natural grey; overall is white
Surface Finish: Glossy, easy for cleaning
Shape: Subway
Size: 12 x 12 In.305*305mm
Chip Size: 3/5 x 1-1/6 In.15*30mm
Thickness: 2mm
Detailed Description: Each sheet of this tile is approximately 1 sq ft per sheet and is mesh mounted on high quality fiber glass for easy installation of your mosaic tile projects.
Application: Mother of Pearl mosaic tiles are impervious to the elements, thus it is great for both interior and exterior use so moisture is not an issue. Mother of Pearl mosaic tiles are great on floors and walls and have been most popular in bathrooms, spas, kitchen backsplash, wall facades and pools as well as a variety of other applications.
Characteristics: The mother of pearl mosaic tile has a zero water absorption rate, and this tile exceeds ANSI standards for water absorption for mosaic tile. It is strong, durable, contamination free, and only the best quality tiles are selected as our tiles are inspected for blemishes before shipment.
Brand Name: Home Elements
Manufacturer: Home Elements,Inc. This manufacturer has the biggest selections of glass mosaic tiles.
Disclaimer: Mother of pearl tile, also called shell tile or shell mosaic tile, is 100% natural and green products made of natural shell, polished and processed by hands. The color variation and occasionally small size variation naturally exist from chip to chip, from sheet to sheet, from job to job. However, the overall sizes are consistent and will NOT have any negative impact on installation; on the contrary, some small variations on sizes reflect the nature of the products thus making your wall or floor tiling project a more natural one. Also, the color variation caused by different computer screen or browser exists from different pc screens. Therefore, the possible color/size variations between the mother of pearl tile sample and actual shipment or the product color shown on the screen and actual shipment should not be considered as quality issues.

 Debbie Waldner
Woodland Cabinetry
Reclaimed Patina finish on Rough Sawn Hickory, Cosmos Granite
Contractor: Cody Hemeyer, Spearfish, SD
Example of a mid-sized mountain style master bathroom design with an undermount sink, recessed-panel cabinets, medium tone wood cabinets and granite countertops
Example of a mid-sized mountain style master bathroom design with an undermount sink, recessed-panel cabinets, medium tone wood cabinets and granite countertops

 Windy City Painters
Professional wallpaper installation transformed this Evanston sunroom into a stunning focal point. Evanston's diverse architecture, from historic homes to contemporary residences, requires specialized expertise to ensure wallpaper installation complements existing design elements.
Materials and Products
We utilized premium moisture-resistant wallpaper specifically designed for sunroom environments, paired with professional-grade adhesives from trusted manufacturers like Roman and Zinsser for superior bonding and longevity.
Installation Process
First, thorough surface preparation including cleaning and priming. Second, precise measurements and pattern planning for seamless alignment. Third, careful adhesive application using professional tools. Fourth, meticulous installation with attention to corners and edges.
Chicago Home Challenges
Evanston properties face unique challenges including temperature fluctuations, humidity variations, and aging surfaces. Our wallpaper installation process addresses these concerns through proper surface preparation and climate-appropriate materials.
Results Achieved
The finished sunroom showcases flawless wallpaper installation with perfect pattern matching, smooth application, and professional-quality results that will withstand years of use and seasonal changes.
H2 Professional Tips
Always prime surfaces before wallpaper installation, choose moisture-resistant papers for sunrooms, and hire experienced professionals familiar with Chicago's climate challenges and building characteristics.
See more work and request free estimate at windypainters.com.
Q: What type of wallpaper works best for Evanston sunrooms? / A: Moisture-resistant vinyl or fabric-backed wallpaper handles humidity and temperature changes better than standard paper in sunroom wallpaper installation projects.
Q: How long does professional wallpaper installation take? / A: Most sunroom wallpaper installation projects require 1-2 days depending on room size, pattern complexity, and surface preparation needs.
Q: Can you install wallpaper over existing paint? / A: Yes, wallpaper installation over painted surfaces is possible after proper cleaning, priming, and surface preparation to ensure adhesion.
Q: Do you remove old wallpaper before installation? / A: Professional wallpaper installation often includes complete removal of existing coverings and thorough surface preparation for optimal results.
Q: What preparation is needed for wallpaper installation? / A: Wallpaper installation requires clean, smooth, primed surfaces with all imperfections filled and sanded for professional results.
Q: How do you handle wallpaper seams and patterns? / A: Expert wallpaper installation includes precise measuring, cutting, and alignment to create invisible seams and perfect pattern matching.
Q: Is wallpaper installation suitable for high-humidity areas? / A: Yes, proper wallpaper installation using moisture-resistant materials and techniques works excellently in sunrooms and humid environments.
Q: What warranty do you provide on wallpaper installation? / A: Windy City Painters backs all wallpaper installation work with comprehensive warranties covering materials and workmanship for customer peace of mind.
Q: Can wallpaper installation be done in winter? / A: Professional wallpaper installation can be performed year-round with proper climate control and material handling for optimal adhesion.
Q: How do you ensure wallpaper installation quality? / A: Our wallpaper installation process includes thorough preparation, premium materials, professional techniques, and detailed quality inspection for lasting results.

 Redland Clay Tile Inc.
Mid-sized tuscan beige two-story stucco house exterior photo in San Diego with a hip roof and a tile roof

 Mr Shishir
Computer numerical control or CNC machining is an automated manufacturing process used to make components of devices or appliances. It employs computer-aided software and codes to control complex machinery, including mills, grinders, lathes, and cutters. It is used to manufacture multiple parts from diverse raw materials such as aluminium, brass, acrylic, plastics, and wood.
It is a subtractive process in which a solid piece of material is carved into a 2D or 3D object of any shape or size. This enables the creation of prototypes for parts and finished products. It also enables automated mass production of parts such as fittings, housings, brackets, gears, fasteners, shafts, electrical contacts, and moulds using specific materials.
This process is a quick, safe, versatile, precise, and cost-effective production method. These advantages allow it to be used for various applications in industries ranging from healthcare and electronics to aerospace and the military. Moreover, it is used to create parts for several objects you use at home every day.
Here are 10 things in your house that you may not know are manufactured using CNC machining:
1. Kitchen Appliances
Several manufacturers employ CNC machines to create heavy-duty parts for durable kitchen appliances. Through pre-programmed software, the machine produces parts of different shapes, sizes, colours, and textures using a variety of materials like metals and plastic.
CNC-machined components of kitchen appliances include metal plates, covers, textured handles, pins, rings, and wires. These small but essential parts improve the utility of your everyday kitchen appliances such as the electric can opener, dishwasher, hand blender, grinder, and coffee brewing machine.
2. Electronic Devices
Components of electronic devices are usually small in size and have fine details and shapes that require precision machining. CNC machines offer the flexibility and efficiency to manufacture large and small parts of various shapes, sizes, and materials required to complete electronic appliances.
CNC machining enables accurate, computerized prototyping and the production of detailed, intricate, and sensitive parts from a wide range of metals. It can be used to produce parts such as connectors, housing, wires, heat sinks, semiconductors, and fixtures. It can also be used to create the chassis or the framework of various electronic appliances.
You can find CNC-machined parts in the following electronic home appliances:
- Laptops and Computers
- Mobile phones
- Cameras
- Television
- Speakers
- Keyboard
- Mouse
- Router
- Refrigerator
- Air conditioner
- Washing machine
- Fans, air purifiers, and humidifiers
- Robotic vacuum cleaners
- Remote control

 cobykane
Water Treatment and Wastewater Recycling Plant in Oil and Gas Production
WATERMAN ENGINEERS AUSTRALIA
Introduction
Water is a critical component in oil and gas processing, playing a crucial role in various stages of exploration, production, and refining. However, water handling in such processes poses serious challenges, mainly in connection with treating high TDS and salinity water. The situation is even more serious in oilfield sites, gas field sites, and exploratory sites where the need for water recycling and treatment is always necessary to minimize the impact on the environment and to keep operational costs at a minimum.
The oil and gas industry has seen a growing concern toward water treatment and recycling. These processes underline the sustainability of operations, license to operate, and low environmental footprint. This paper discusses the roles water treatment plants can play in mitigating the problems of high TDS and salinity during oil and gas production by recycling and reusing water to minimize waste and environmental harm.
The Water Challenges in Oil and Gas Production
Water finds its application on a large scale in the oil and gas industry for several purposes, such as in drilling, hydraulic fracturing, cooling, and hydrocarbon processing. The water used in these aforementioned processes frequently comes into contact with a wide array of contaminants, among which are hydrocarbons, heavy metals, several various chemicals, and high concentrations of dissolved salts. This contaminated water, often referred to as produced water, produces a great environmental risk if not properly treated.
Produced water typically contains high TDS concentrations, including salts, minerals, and other dissolved solids. Reservoir location and depth can make the salinity of this water vary widely. For many produced waters, these TDS values are very high and not suitable for direct discharge or reuse without treatment. The presence of salts and other dissolved solids can result in scaling, corrosion, and other operational problems of equipment, pipelines, and storage vessels.
For details visit: https://watermanaustralia.com/water-treatment-and-wastewater-recycling-plant-in-oil-and-gas-production/

 Mike Schaap Builders
The most notable design component is the exceptional use of reclaimed wood throughout nearly every application. Sourced from not only one, but two different Indiana barns, this hand hewn and rough sawn wood is used in a variety of applications including custom cabinetry with a white glaze finish, dark stained window casing, butcher block island countertop and handsome woodwork on the fireplace mantel, range hood, and ceiling. Underfoot, Oak wood flooring is salvaged from a tobacco barn, giving it its unique tone and rich shine that comes only from the unique process of drying and curing tobacco.
Photo Credit: Ashley Avila
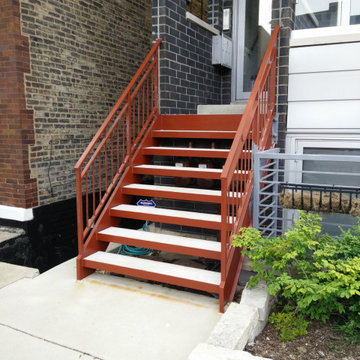 Windy City Painters
Does your iron fence look like Chicago winters have been winning the battle for years? That slow orange spread across pickets and rails is not just an eyesore - it is active corrosion undermining the structural integrity of metalwork that frames some of Chicago's most architecturally significant residential properties. Windy City Painters addresses iron fence rust at the source, using professional-grade rust conversion chemistry and direct-to-metal coatings engineered for the specific abuse Chicago's climate delivers.
PROJECT OVERVIEW
This project involved a heavily rusted ornamental iron fence on a Chicago North Side residential property. Rust had progressed beyond surface oxidation into moderate pitting on lower rails, a pattern Windy City Painters sees frequently on properties within blocks of treated roadways where salt drift accelerates corrosion. The scope included mechanical descaling, chemical rust conversion, DTM priming, and a durable gloss topcoat matched to the original fence color.
MATERIALS AND PRODUCTS
Ospho Rust Converter: A phosphoric acid-based treatment that chemically reacts with iron oxide, converting it to iron phosphate - a stable, paintable compound. Corroseal Water-Based Rust Converter is an alternative for situations requiring lower VOC handling. Rust-Oleum Professional DTM Primer and Sherwin-Williams DTM Acrylic Coating serve as the primary coating system, formulated for direct metal adhesion with built-in rust inhibitors. For structurally compromised sections, welding is coordinated before any chemical or coating work begins.
THE PROCESS
Step 1 - Mechanical Preparation: Wire wheel grinding on an angle grinder removes loose rust scale, mill scale, and flaking paint. For advanced pitting, Windy City Painters deploys a needle gun descaler, which impacts the metal surface thousands of times per minute to drive scale from deep cavities. This step determines whether the fence can be coated or needs welding first.
Step 2 - Chemical Rust Conversion: Ospho or Corroseal is brushed onto all remaining rust surface. These products do not simply seal rust - they react with it. The conversion process takes 24 hours to fully cure before topcoating. Skipping this step is the single most common reason iron fence paint jobs fail prematurely.
Step 3 - DTM Priming: Sherwin-Williams DTM or Rust-Oleum DTM primer is applied by brush to ensure full penetration around decorative elements, picket tips, and weld joints. Spray application is used on open sections for even film build. DTM formulations bond directly to prepared metal without a separate shop primer.
Step 4 - Finish Coating: A DTM topcoat in gloss or semi-gloss provides the final weather barrier. Gloss is preferred for iron fencing because the harder surface sheds water more effectively and resists dirt adhesion between maintenance cycles. Windy City Painters applies two finish coats for maximum film thickness.
CHICAGO-SPECIFIC CHALLENGES
Chicago's freeze-thaw cycle is the primary enemy of iron fence coatings. Water infiltrates micro-cracks in paint film, freezes, expands, and delaminate coating from beneath. Properties on the North Side and Near West Side also contend with lake-effect humidity that keeps metal surfaces damp for extended periods, slowing cure times and promoting under-film corrosion if preparation is inadequate. Greystones and Victorian brownstones typically feature ornate cast iron or wrought iron fencing with complex geometries that trap moisture and demand hand-brush application to fully coat recesses.
WHAT TO EXPECT LONG-TERM
A properly prepared and coated iron fence in Chicago should hold 5-8 years before requiring recoating. Annual inspection of weld joints, picket tips, and base rails closest to grade will identify early rust return. Addressing small spots with touch-up converter and primer extends service life significantly between full recoats.
PRO TIPS
Tip 1: Never pressure wash a rusted iron fence immediately before painting. Water drives moisture into pits and delays the surface drying needed for chemical converter adhesion. Allow 48 hours of dry weather before prep begins.
Tip 2: Picket tips and rail ends are the first failure points. These end-grain equivalent areas on metal concentrate corrosion. Ask your painter to apply an extra brush coat to every tip and terminus.
Tip 3: Black is the traditional and most durable color choice for iron fencing. Dark pigments absorb UV rather than reflecting it, reducing thermal cycling stress on the paint film at color change boundaries.
FAQ
Q: What does iron fence painting cost in Chicago?
A: Most residential iron fence painting in Chicago ranges from $400 to $1,200 depending on linear footage, rust severity, prep method required, and whether structural welding is needed before Windy City Painters can coat the surface.
Q: How do I know if my fence needs a welder before painting?
A: If you can press a screwdriver through a rail or picket, the metal wall has failed. Windy City Painters inspects all fencing before quoting and identifies weld-required sections so repairs happen before any coating investment.
Q: Is Ospho or Corroseal better for my fence?
A: Both convert rust effectively. Ospho is solvent-based and fast-acting, preferred for heavy rust. Corroseal is water-based with lower odor, preferred in enclosed or residential settings where off-gassing is a concern. Windy City Painters selects based on site conditions.
Q: Can iron fence painting be done in winter in Chicago?
A: Application requires temperatures above 50 degrees Fahrenheit for DTM coatings to cure properly. Most iron fence painting in Chicago runs April through October, with scheduling flexibility based on extended warm stretches.
Q: How do I maintain my fence between professional recoats?
A: Inspect annually in spring. Sand any rust spots to bare metal with 80-grit paper, apply Ospho, let cure 24 hours, then spot-prime with DTM primer and touch up with finish coat. Windy City Painters offers maintenance inspections.
Q: Do you paint courtyard building fences and coach house gates?
A: Yes. Multi-unit courtyard buildings and coach houses are common in the North Side neighborhoods Windy City Painters serves. We coordinate with property managers and HOAs for larger perimeter fence projects.
Q: How long after painting can I touch the fence?
A: DTM coatings are typically dry to touch in 2-4 hours and hard dry in 24 hours. Full cure for maximum hardness takes 7 days. Windy City Painters advises against pressure washing or heavy contact during that cure window.
Visit windypainters.com to request your free iron fence assessment and project quote.
 Business_Name_Placeholder
Shrikant Steel Centre is a trusted Stainless Steel Seamless Tubes Manufacturer in India offering high-quality tubing solutions for demanding industrial applications. As a reliable Stainless Steel Seamless Tubes Supplier, we provide products with excellent strength, corrosion resistance, dimensional accuracy, and durability. Our tubes are suitable for petrochemical, chemical processing, power generation, engineering, and infrastructure applications.
As an experienced Tubes Manufacturer in India, we supply precision-engineered tubing solutions designed to meet diverse industrial requirements. Being a dependable Stainless Steel Tube Manufacturer in India, we focus on consistent quality, smooth surface finish, dimensional accuracy, and long service life. Our products suit applications involving high pressure, elevated temperatures, and corrosive operating environments.
Our specialised range includes Stainless Steel Seamless Tubes for applications requiring corrosion resistance and dependable performance. Inconel Seamless Tubes deliver reliable performance in demanding high-temperature environments, while Nickel Alloy SeamlessTubes suit applications requiring excellent chemical resistance and mechanical strength. We are also a leading Stainless Steel Seamless Pipe Manufacturer in India.
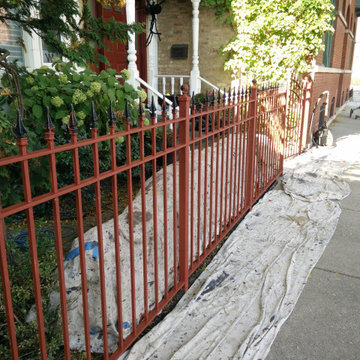 Windy City Painters
Iron Fence Painting in Wicker Park: A Windy City Painters Case Study
Iron fence painting in Wicker Park is one of the most requested exterior services Windy City Painters performs each season, and this recent project shows exactly why. Set behind an ornate 1890s greystone two-flat, the client's wrought iron fence had endured years of Chicago winters without professional attention. Rust had spread across the pickets, the original black enamel was flaking away in sheets, and the fence's structural hardware had begun to loosen at several joints.
As the trusted local expert for Chicago's North Side and Near West Side, Windy City Painters approached this project the same way we approach every iron fence painting job in Wicker Park: with a methodical, multi-step process designed to outlast Midwest weather rather than simply mask the damage.
The Process, Step by Step
Step 1 — Rust Removal and Surface Preparation. Our crew wire-brushed and mechanically ground every rusted section down to clean, stable metal. For pitted or heavily corroded areas, we applied a chemical rust converter to neutralize corrosion at the molecular level before any coating touched the surface. Furthermore, because this greystone was built well before 1978, Windy City Painters tested the existing paint layers for lead and followed strict containment protocols throughout the removal process.
Step 2 — Spot Repairs. Loose pickets were re-secured, small pits were filled, and hardware at the gate hinges was tightened. In contrast to a quick spray-paint refresh, this stage ensures the fence is structurally sound before a single drop of primer goes on.
Step 3 — Priming. A full coat of rust-inhibiting primer, engineered specifically for ferrous metal, was applied by brush to every surface — with particular attention to welds and joints where moisture tends to collect and restart the corrosion cycle.
Step 4 — Topcoat Application. Two finish coats of industrial-grade, direct-to-metal enamel were applied by brush and roller. This built a durable, uniform barrier in classic gloss black, the most popular finish among Wicker Park's historic properties. Finally, our team inspected every inch of the fence for thin spots or missed sections before calling the job complete.
Project Specs
Surface: Ornamental wrought iron fence, posts, and gate hardware
Products used: Rust-inhibiting DTM primer, chemical rust converter, industrial-grade direct-to-metal enamel
Coats applied: 1 primer coat, 2 finish coats
Finish: Gloss black
Timeline: Completed in under two days
Advice for Wicker Park Homeowners
Before starting a similar iron fence painting project in Wicker Park, homeowners should keep a few things in mind. Notably, never paint directly over active rust — trapped moisture underneath will cause the new coat to fail within a season. Additionally, always ask whether a contractor tests for lead paint on pre-1978 homes, since many Wicker Park greystones fall into that category. Meanwhile, hand brushwork matters: the intricate scrollwork common on Wicker Park ironwork requires careful, detailed application that spray equipment simply cannot replicate. Therefore, hiring a crew experienced specifically in historic Chicago ironwork, like Windy City Painters, makes a measurable difference in the finished result.
Windy City Painters also handles related exterior and interior work for Wicker Park properties, including interior painting, drywall and plaster repair, and additional metal refinishing for porches and railings.
Iron fence painting in Wicker Park protects one of the neighborhood's most defining architectural features while restoring curb appeal instantly. As a result, this greystone now has a fence that matches the quality of the home behind it — and will hold up through many more Chicago winters.
See more of our work and request a free estimate at www.windypainters.com.
Ready to transform your Wicker Park home? Contact Windy City Painters for a free estimate — visit www.windypainters.com today. Proudly serving Wicker Park, West Town, Lincoln Park, Roscoe Village, Lakeview, Ukrainian Village, River North, and all of Chicago.



 Tile Doctor Ltd
I was contacted about a Georgian property in the Kent village of Leeds , to see if I could do anything to improve a Travertine tiled floor. The use of Travertine was extensive and had been installed throughout the ground floor including the kitchen, dining room, utility and bathroom WC. Travertine is probably my favourite stone, but it is acid sensitive and attracts dirt easily, due to its ‘holey’ composition.
Initially we discussed the floor over the phone where I got to know about the issues they were experiencing, and I detailed the renovation process I normally use to restore it including the products and timelines. Naturally they wanted to me to provide a quote for the work however its tricky to do that accurately without seeing the floor, so I arranged a date to pop over.
Upon arriving I could see the tiles and the wide grout joints had extensive, ingrained dirt indicating the previous sealer had long since worn away. This is a common issue with stone floors, and to re-assure myself and the client it could be resolved I cleaned a small area in the utility room with pleasing results!
This test clean helped me to understand which products and methods would work best on the floor and later that day I emailed over a detailed quote for the renovation. Happy with the quote I received a reply the same day asking when I could start.
My colleague and I arrived on the agreed date and work started with adding protection to all areas that required it. We use a lot of water during the cleaning process and some materials such as MDF can become damaged with water ingress, so it makes sense to do this.
To get the floor clean, a coarse Carbide Brush fitted to a rotary machine was run over the Travertine tiles to scrub in a strong solution of Tile Doctor Pro-Clean. This process generates a lot of slurry as the dirt was washed out of the stone and grout which is extracted with a wet vacuum as we progressed.
Next it was on hands and knees with more Tile Doctor Pro-Clean and handheld brushes run over stubborn areas and along the grout lines to take them from 80% up to 100%.
Happy with the results, the next step was to renovate the stone using a series of diamond encrusted burnishing pads. Using only water for lubrication this process starts with the application of a coarse 400-grit burnishing pad attached to the floor buffer. This produces a lot of slurry which again was removed with a wet vacuum.
This left the Travertine clean, but the pores of the stone had been opened giving the floor a matt finish and more absorbent than it was originally. To further refine the appearance of the stone the next two burnishing pads were applied which are 800 and 1500-grit. These pads polish the stone and close the pores, restoring the natural sheen in the process. After each pad was applied the slurry was rinsed off the floor with water and extracted with the wet vacuum. Once complete the floor was left to dry off fully overnight.
I arrived the next day and took several moisture readings from the floor to check that it had dried off sufficiently overnight. The results were good, so work moved onto sealing the Travertine with two coats of Tile Doctor Ultra Seal which is a natural look impregnating sealer. It works by soaking into the stone, occupying the pores and thereby preventing dirt from becoming ingrained there. This ensures dirt remains on the surface where it is easily cleaned away.
The final step in the floor’s renovation was to apply the last of the diamond polishing pads which is a very fine 3000-grit. This pad further improves the polished appearance of the stone resulting in a satisfying sheen.
The work made a massive difference to the floor, and I received an email the next day from one of the owners who was really pleased with the transformation:
”Floors look brilliant. Very pleased.”
For the care and maintenance of polished sealed floors I recommend the use of Tile Doctor’s Stone Soap which is a gentle but effective cleaning product that won’t impact the sealer and contains a patina enhancer. When it comes to sealed floors my mantra is:
“If you look after the sealer, the sealer will look after the floor!”
Graham Davis
North Kent Tile Doctor
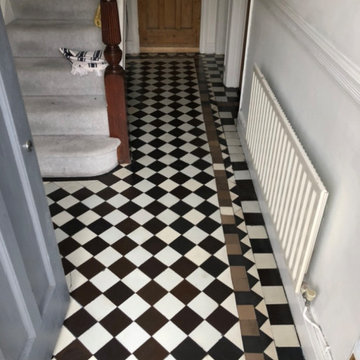 Tile Doctor Ltd
This job was carried out in a terraced property in Llanelli which had a Victorian Tiled Hallway laid in a diamond pattern that looking worse for wear and in need of some attention. The clients were a young couple who had moved in two years previously and had only recently decided they wanted the floor renovated. This was earlier in the year, so I was able to pop over to the property and take a detailed look at the floor before recommending a course of action to renovate the tiles.
Upon arrival the first thing we noticed was that the border had been laid with an inconsistent pattern, non- matching tiles had been patched in essentially filling voids as you can see in the images. The floor wasn’t terribly dirty however it wasn’t very clean either.
I discussed with the client replacing the non-matching tiles, so the floor pattern was uniform however they decided against it and were happy to just to have it cleaned and sealed. We can usually source either reclaimed original tiles or some great reproduction ones, so most floors can be restored if needed. I worked out a quote for the work and they were happy to go ahead.
If you have never been you should know that Llanelli is the largest town in the county of Carmarthenshire and famous for Rugby and the production of Tin. It is located on the Loughor Estuary, some 10 miles from Swansea and 12 miles from Carmarthen.
With no tiling to do the first job was to protect the woodwork such as skirting and staircase with tape. Once done the process of cleaning began with the application of a 400-grit burnishing pad fitted to a buffing machine. The process is lubricated with water and the pad run over the whole floor two to three times to remove dirt and refine the appearance of the tile. Even after the first application of the pad we could see a massive improvement to the appearance of the tiles. To get right into the edges of the tiled floor we use a 400-grit handheld diamond block, this proved especially useful under the stairs where our buffer machine could not reach.
During this process, the water turns into a fine slurry which is rinsed off with more water and extracted with a wet vacuum. On this occasion the floor was not dirty enough to require any chemicals, the use of water and the machine was enough to get the floor cleaned up.
This job was very straight forward, and we did not run into any problems at all. After allowing the floor to dry out for 24 hours we returned to seal the tiles checking first that the floor was sufficiently dry first using a damp meter. Fortunately, the burnishing method uses a lot less water than a chemical clean, so I was able to get straight on with sealing.
The client wanted a satin sheen finish, so I applied four coats of Tile Doctors Seal and Go which works well on Victorian tiles. The sealer really put the life back into the tiles and will protect them from staining going forward. It will also make the floor much easier to maintain and keep it looking good for much longer.
I’m pleased to say the owners were very happy with the floor and recommended us to one of their friends who we also did some work for. For aftercare I recommended the use of Tile Doctor Neutral Tile Cleaner. This is an everyday tile cleaning product that is sealer friendly and not prematurely reduce the life of the sealer which can happen with many household cleaning products which are simply too strong.
Adrian Iacono
Swansea Tile Doctor
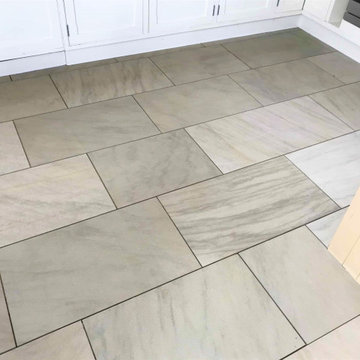 Tile Doctor Ltd
I received an enquiry from a property in Crowthorne to come and survey an unknown Flagstone Floor in a converted barn that was ready to be rented out. The owners where concerned the stone was letting the rest of the property down due to it being dirty and heavily stained, particularly around the kitchen and entrance areas. If your selling or renting out a property it really needs to look its best if you want to achieve a good price. Having spoken over the phone we agreed a date for me to pop over to complete a survey.
From further inspection I confirmed the stone was in fact a Sandstone, it was also clear that the sealer protecting the stone from ingrained dirt had worn away and was now allowing dirt and staining to ruin the appearance of the flagstones. It was a large floor so I measured up so I could work out the quantities of cleaning and sealing products needed and then walked the customer through the cleaning process. Later that day I sent over a detailed quotation which was accepted, and a date agreed for my return.
I should mention this work took place during the Covid restrictions, fortunately being a rental property, I was able to work in the property alone.
To deep clean the floor and remove the ingrained dirt and staining I used a strong dilution of Tile Doctor Pro-Clean. It is sprayed onto the floor and left to soak in for five minutes before agitating with a Black scrubbing pad fitted to a weighted buffing machine. The resultant slurry was then wet extracted away using a powerful high-pressure van mounted extracting system.
This action cleaned up most of the stone nicely however certain areas where heavily stained, particularly in the kitchen area where food and drink stains were more apparent. To tackle this, I applied a stronger cleaner/stripper product called Tile Doctor Remove and Go this time allowing ten minutes for it to soak in before scrubbing the surface with a very coarse 100-grit soft milling pad. This took quite a few attempts each time extracting the slurry away and then inspecting the floor to see if more work was needed.
Happy the stains have been removed, I then focused on renovating the surface Sandstone after the application of the coarse pad. This involves the application of several finer grit burnishing pads which close the pores and adds a subtle polish to the Sandstone. As I started with 100-grit pad it was necessary to gradually refine the surface with an incremental series of pads that included 200, 400 and finally 800-grit pads. Then to ensure a uniform finish across the floor I continued the 400 and 800 grit pads throughout the property. Water is used to lubricate the process and this turns into a fine slurry that is rinse extracted as before.
The cleaning process took up the whole of the first day and I am pleased to say the Sandstone floor looked very clean after I had finished.
The stone was then allowed dry off overnight with the aid of an industrial air mover and I returned later the next day to apply a new protective seal. In the meantime, my customer had been over to check out the floor and were over the moon with how it looked and wanted to keep the finish as natural as possible.
With this in mind, I applied Tile Doctor Ultra-Seal sealer to the Sandstone throughout, only two coats were needed. This is a premium sealer that is almost invisible and works by penetrating the stone thus preventing dirt from becoming ingrained. Once done the floor looked very clean and much brighter than before, it now had that wow factor which will help it attract a good yield in the rental market.
The trouble with rental properties of course is making sure the tenant uses the right product to maintain the floor and not a typical supermarket tile cleaner that are only designed for use on Ceramic and Porcelain tiles. In fact, these types of cleaning product can slowly strip the sealer off the floor so it’s always worth checking the label before purchasing. Fortunately Tile Doctor sells a product called Neutral Cleaner that is ideal for maintaining sealed stone floors, so I left them with a complimentary bottle and recommended they get some more to leave under the sink for the new tenant.
Dennis Buckland
Berkshire Tile Doctor
 China Marmoglass Co.,Limited
Nanoglass 10 Mm, Nanoglass 10 Mm Suppliers and Manufacturers at Chinamarmoglass.com
wholesale Nanoglass 10 Mm, Nanoglass 10 Mm suppliers, Nanoglass 10 mm factory
Nanoglass 10 Mm, Wholesale Various High Quality Nanoglass 10 Mm Products from Global Nanoglass 10 Mm Suppliers and Nanoglass 10 Mm Factory,Importer,Exporter at Chinananoglass.com.
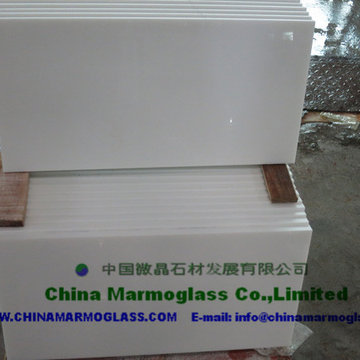
Artificial stone pure white nano crystallized glass
Nanoglass NANO2016 Nano crystallized glass, also known as white marble floor,marmoglass, is a new type of high-level decoration material. It is derived from natural inorganic material through a high temperature process, and it possesses excellent characteristics including the followings:
1.High Performance
2.Acid-proof alkalinity and anti-corrosion
3.Fine Texture
4.Pollution-resistance and easy maintenance
5.A wide application range
6.Heat-bend reformation
7.No radioactive elements
Crystallized Nanoglass can be processed into slab, tile, countertop, column and vanity top, wash basin and etc. It is applicable for flooring, interior and exterior wall cladding, stairs and table.
Nanoglass NANO2016 Slab Size:
2400x1600(1400)mm
2600x1600(1400)mm
2800x1600(1400)mm
3000x1600(1400)mm
Nanoglass NANO2016 Cut-to-Size
300x600mm
12"x24"
600x600mm
24"x24"
800x800mm
32"x32"
900x900mm
36"x36"
1000x1000mm
40"x40"
1200x1200mm
48"x48"
Nanoglass NANO2016 Accept Customized Nanoglass Cut-to-size !!
Nanoglass NANO2016 Thickness: 10mm,18mm 30mm
Nanoglass NANO2016 Application : kitchen countertop,bathroom vanity top,any tops,flooring,wall cladding,stairs and so on.
 HU-762543144
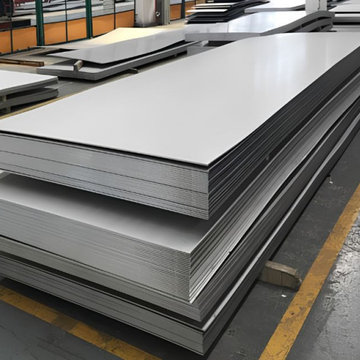
R H Alloys provides stainless steel plates for industrial applications that require durability, strength, and corrosion resistance. A stainless steel plate Manufacturer focuses on maintaining consistent dimensions, surface quality, and material properties across different specifications. These plates are widely used in fabrication, construction, engineering, processing equipment, and infrastructure projects. Grade selection depends on operating conditions, fabrication requirements, and the desired level of corrosion and heat resistance. You can select different thicknesses and finishes based on specific project requirements.
A stainless steel 405 plate manufacturer in India can supply Grade 405 plates for applications requiring suitable mechanical properties and service performance. The material can be cut, formed, machined, or welded, depending on project requirements. Stainless steel 409 plate suppliers serve applications where oxidation and corrosion resistance are critical, particularly in automotive and industrial environments. Buyers should evaluate grade, thickness, surface finish, dimensions, and applicable standards before selecting a suitable plate for their application.
For material planning and logistics, a stainless steel plate weight chart helps estimate the approximate weight based on plate dimensions and thickness. A Stainless steel plate weight calculator can further simplify calculations when multiple sizes or quantities are involved. Accurate weight estimation supports transportation planning, inventory management, and fabrication costing. International buyers may also work with a stainless steel coil supplier in the UAE when sourcing related flat stainless steel products. Reviewing technical specifications and project requirements ensures the selected material is suitable for its intended use.

 Rechsteiner Signature Homes
This transitional home blends a modern aesthetic with a character home in a historic neighborhood of Metro Vancouver. Featuring custom architectural concrete, paving stones, horizontal cedar fencing and siding, backyard metal trellis and a very unique and modern landscape, this home is a perfect space for entertaining.
6