
Search results for "Avoiding last minute" in Home Design Ideas
 Aeris Home
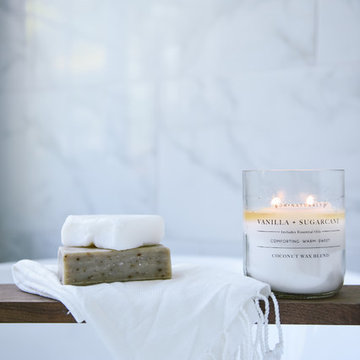
My client decided to sell his house. Fantastic location, best schools in the area, minutes away from the ocean... All that was missing were signs of life and updated finishes. We instantly agreed on whites & greys; a free standing tub, double vanity, and long-lasting / easy-maintenance tile. We now have a clean white space that can be molded into anyone's perfect bath. White canvas gives opportunity to add color and drama. I call this "Baltic White" because sky reflections and tint in the shower glass cast just enough blue to remind me of snowy winters in Scandinavia. To demonstrate character, I staged with black accessories, a tribal rug and added warmth via walnut tub shelf. Candles and salt rock ground the airy feel and leave us with a balanced space that is as welcoming as it is elegant.
Photos - Hale Production Studios
 Cabinets by Trivonna
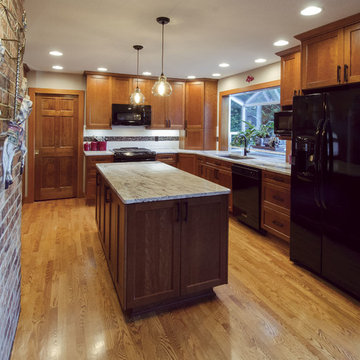
Photo by Ross Irwin --- The clients performed a massive face-lift on their home over the years, the last room that needed some TLC was the kitchen. The cabinets were looking tired and lacked accessibility. We didn't revolution the layout, but we did streamlined it. We reduced the size of the island, eliminating the overhang. Also, we turned a clutter-magnet desk area, into an upscale looking hutch. Also, we elongated the wall cabinets to make them touch the ceiling and avoid dust-collection.
 Crescent Garden
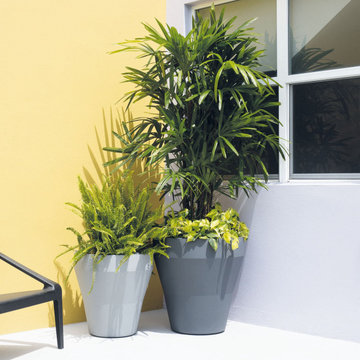
Reinterpreting the old, the Rim planters mimic traditional Italian rimmed containers. Unlike their predecessor, these self-watering pots are incredibly versatile in design and can be used to complement any style home from Mediterranean to Modern. The double-wall planter helps insulate the roots of your plants when the temperature shifts from cold to hot, preserving the longevity of the plant's life. Created for the first-time gardener or the savvy enthusiast, the TruDrop system feature allows your plants to better survive the outdoors and can go weeks without watering for phenomenal results. The ingeniously designed reservoir in the planter, which reduces watering frequency and avoids over-fertilizing, is an innovative environmental solution for container gardening. This 100% recyclable and food-safe container is resistant to chipping, fading and mildews, resulting in healthier plants and more efficient gardening. The Crescent Garden's TruDrop One self-watering planting pots are available in a great variety of colors, sizes and styles. Using quality materials that are backed by a 10-year warranty, these lightweight planters are known for their durability, designed to withstand extreme weather, and made to last.
Find the right local pro for your project
 Kindred Designs LLC
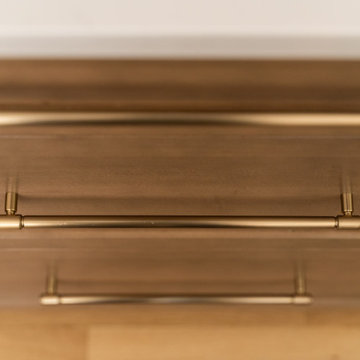
This project was a full 1st floor renovation tackling the Kitchen, Pantry, Mudroom, Powder Room, Family Room, Living Room and Dining room. We converted this 1970's Colonial with chunks of spaces forming it's windy first floor to a more open layout with better flow, storage, sightlines and circulation space. The Powder room was shifted to rear of house out of view. The Mudroom was shifted to avoid trampling over shoes. The Kitchen wall separating Powder and Mudroom were extended to create a longer wall of Kitchen cabinetry and appliances, and the center load bearing walls was removed freeing up space for a 10 foot Kitchen island, oversized Wolf range, double ovens, and refrigerator. Lastly, the Dining and Family rooms were flip flopped giving more wall space in the Family Room for the sofa and tv and more windows in the Dining. Tri colored cabinets, brushed brass light fixtures and cabinet pulls, farmers sink and quartz counters combined to create an earth-toned neutral Kitchen.
 Skill Construction & Design, LLC
Last week we featured an incredible new kitchen with an open floor plan and unique architectural interest. I alluded to a change in the staircase and here it is. Part of designing a new kitchen or bath is looking at surrounding spaces and how the remodel will affect them. Will the current master bedroom seem dated as an entrance to the new bath? Is the dining room that adjoins the kitchen badly in need of flooring and lighting? Some projects might have to wait. But if the immediate area has an adverse affect on the newly remodeled kitchen it might be just as important to address these areas within your remodel.
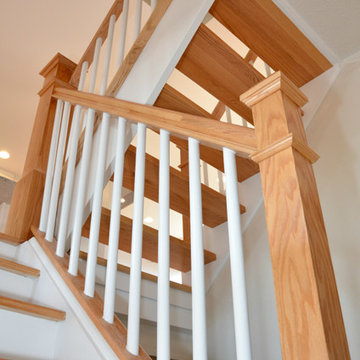
Although the staircase was in harmony with the homes existing era and colors, it simply didn’t work with the new kitchen. Despite its open risers, the existing balusters and railings with their colonial turnings and dark stain, were the opposite of the finished kitchen. With the carpeting gone from the floors, it looked dated and out-of-place on the stairs.
We carried our kitchen theme to the staircase. We used the natural oak of our flooring for the treads, handrails and posts, but kept the balusters and trim crisp white. The effect perfectly reflects the feel of the kitchen, light and airy.
Before, the dark wood details drew the eye up, ultimately to the textured ceiling in the dining room. The darker tone created a dramatic ending as it traveled up to die into the wall.
Now, as the eye travels up, the staircase seems to soar. The textured ceiling was replaced with a smooth white one and the wall color is a soft warm contrast. The handrail still ends at the wall, but with white balusters and the light oak handrail, the ending is softer.
It isn’t a lighting change, the staircase simply lets the light shine through. The treads are slim and sleek, while the white walls, trim and balusters reflect the light for an overall brighter feel.
The newel posts were a great choice. The larger size and square craftsman like features add substance and architecture without seeming heavy or bulky.
The final touch completes the look. From front door to back, up and down, this remodel is finished. This home now bursts with sunshine the minute you enter and stays bright and sunny no matter where you turn. From the architectural details that are the center of attention, to the modern stainless steel appliance, this space is perfect for entertaining, or any day.
http://www.designsbyskill.com/
http://www.rjkconstructioninc.com/
 Diehl Concrete
Decorative Concrete Walkways for Great Curb Appeal
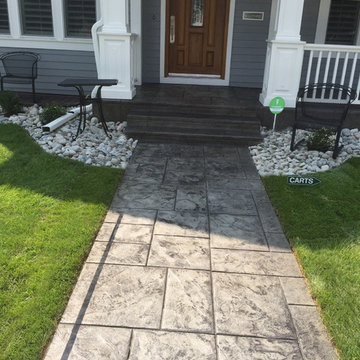
When navigating around a property and creating a pathway, a concrete walk will do a great job. Concrete is often used for walkways as it is the perfect solution to provide a contoured, conforming surface to the ground while blending in with it’s surroundings. Concrete walkways are a popular choice when a solid consistent surface is desired. Concrete will help to avoid weeds growth as well as offer a smooth surface without any trip hazards that are common with shifting concrete pavers or brick walkways. Concrete is also ideal if you want to include concrete steps, curves or ramps as it can be formed and poured into any shape or curvature.
Decorative concrete can blend seamlessly into the surroundings as it has limitless design possibilities, options and color choices. Concrete walks can be customized to suit your needs and landscape decor. Stamped concrete is an ideal way to add a textured pattern or design to a freshly placed concrete slab walkway.
Concrete can add a lot of curb appeal to your Denver home and the best part is that concrete walkways can be a cost effective solutions when compared to other hard surface materials, while providing a long lasting solution.
Even though concrete is recognized as a grey boring surface, Colored Concrete will add the much needed flare that makes your concrete walkway or pathway stand out from the rest while offering a great way to get wherever it is you’re going around your property.
 S & S Homes, Inc.
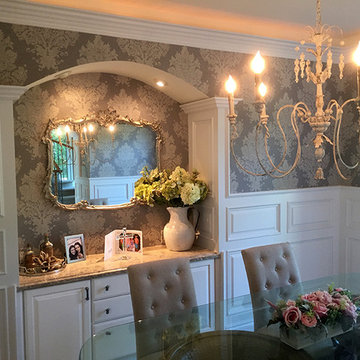
This room encompasses one of the most technical examples of woodwork we’ve seen in a long time. Normally, to create a raised panel wainscot wall, pieces of 1x wood are cut and used to create the boxes, and panel moldings are installed inside the frames to finish off the look. This can be done by typical finish carpenters. The problem is that over time, the numerous joints separate and look bad. In the case of this project, we wanted to avoid that pitfall and do something exquisite AND long-lasting. Over several days, each section of the wall was laid out to determine the appropriate size of each panel. Electrical outlets or switch plates that weren’t centered were moved. Each panel was then specially made at the shop out of 3/4” MDF because its smooth surface is ideal for painting. The raised panels (the pieces that go into each square opening) as well as the panel mouldings (the pieces that frame out each interior panel) were fabricated off site at the shop. Between the set-up, fabrication and the installation, two skilled craftsmen required three solid weeks to make each aspect absolutely perfect. Other finishing details including using a “Back Band” moulding to cap the top of the wainscot and using matching moldings (base, window casings and crown moldings) in areas that needed it for continuity of design.
This room’s woodwork is an exquisite example of true craftsmanship. Words and pictures cannot describe the level of skill required for this project. Once everything was completed, it was sprayed with white enamel paint and wallpaper was installed above the wood wainscot to finish off the room. In a nutshell, each wall panel was constructed like a custom made high end cabinet. Literally.

 Wellfor Group INC
▶Hangs vertically or horizontally on your wall by Z-bars. ▶Slope Frame Edge with R-shaped corners design. ▶Adjustable color temperatures changes from 3000K-6000K. ▶Tap-tap to change the light temperature from 3000K, 4000K to 6000K. ▶Dimmable 100%-10% function. ▶The brightness and light color state are restored when the mirror is powered off. ▶Power switch and anti-fog switch are separate control. ▶IP54 Large-size Anti-fog pad provides better defogger performance, and anti-fog power will be automatic shut off after 60 minutes, safe and energy-saving. ▶Packed with a plug so the mirror can be installed with plug or hardwire as your wish. Hardwire installation support wall switch control the mirror light and defoger ON/OFF. ▶Integrated LED bulbs have an estimated life expectancy of 50,000 hours. ▶Brightness at 2200 lumens ensures consistent lighting with no hot spots or dark spots. ▶Mininum 90 CRI(color rendering index). ▶Wider LED light frost area. ▶Explosion-proof mirror glass can avoid accidentally broken. ▶ETL-listed for US and Canada, conforms to UL Std. 962, certified to CSA Std. C22.2 No. 250.0.
 Cure Design Group
BABY BOY NURSERY // HE’S ONE HAPPY CAMPER
When we found out our second child is a boy, it took me a minute to get going on his nursery plans. For those who know me, this is very unusual. Why? Because I one-hundred-and-ten-percent thought I was having a girl. (I still can’t believe I have a boy!) I know, I know, statistically there’s a fifty-fifty percent chance; but I had NO DOUBT in my mind this baby was going to be a girl. I mean, I had 3 Pinterest boards created with different girl themes, and NONE for a boy! So, once I wrapped my head around the gender of our new family member, I just needed to find my piece of passion: the design inspiration that would set the wheels in motion… I was looking for a print, a color, a piece of art or something to inspire the rest of the room. For me, it’s usually fabric or a rug, and in this case it was the former. And I should’ve known, the Land of Nod did it again! When I came across their “Nature Trail” bedding collection, I was a smitten kitten. Heart-shaped pupils and all. This is a perfect theme for our new little man’s room because our family (on my husband’s dad’s side) goes camping for a week at the end of July e v e r y . s i n g l e . y e a r . for over the last 50 years. It’s kind of a big deal and this bedding couldn’t be more spot-on.
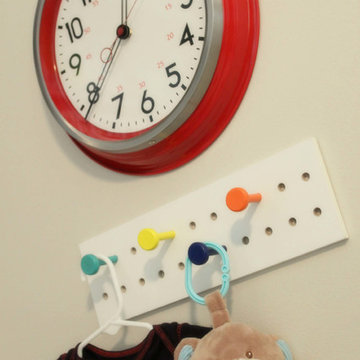
Moving our daughter to a different bedroom and reusing her old nursery as his new nursery should have been an easy switch. But (ask my husband), I make nothing easy. Regardless of how we got there and how long it took – we got it done before baby arrived and I think it turned out adorable (ah hem, if I don’t say so myself). It certainly takes the sting out of rocking a screaming newborn back to sleep at 3 am, that’s for sure.
 The Muir Showrooms
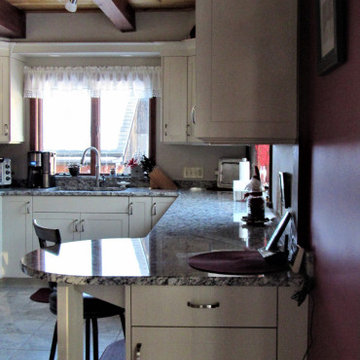
Our designer turned the last cabinet so that it is accessed from the end of the cabinet run to avoid having wasted space behind the peninsula.
Example of a mid-sized transitional u-shaped eat-in kitchen design in Boston with an undermount sink, shaker cabinets, beige cabinets, granite countertops, stainless steel appliances, a peninsula and gray countertops
Example of a mid-sized transitional u-shaped eat-in kitchen design in Boston with an undermount sink, shaker cabinets, beige cabinets, granite countertops, stainless steel appliances, a peninsula and gray countertops
 Wellfor Group INC
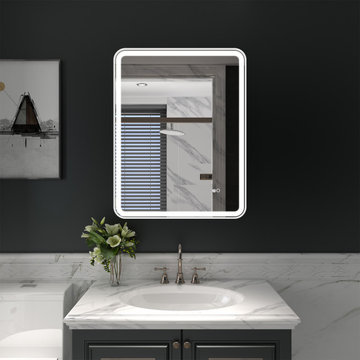
▶Hangs vertically or horizontally on your wall by Z-bars. ▶Slope Frame Edge with R-shaped corners design. ▶Adjustable color temperatures changes from 3000K-6000K. ▶Tap-tap to change the light temperature from 3000K, 4000K to 6000K. ▶Dimmable 100%-10% function. ▶The brightness and light color state are restored when the mirror is powered off. ▶Power switch and anti-fog switch are separate control. ▶IP54 Large-size Anti-fog pad provides better defogger performance, and anti-fog power will be automatic shut off after 60 minutes, safe and energy-saving. ▶Packed with a plug so the mirror can be installed with plug or hardwire as your wish. Hardwire installation support wall switch control the mirror light and defoger ON/OFF. ▶Integrated LED bulbs have an estimated life expectancy of 50,000 hours. ▶Brightness at 2200 lumens ensures consistent lighting with no hot spots or dark spots. ▶Mininum 90 CRI(color rendering index). ▶Wider LED light frost area. ▶Explosion-proof mirror glass can avoid accidentally broken. ▶ETL-listed for US and Canada, conforms to UL Std. 962, certified to CSA Std. C22.2 No. 250.0.
 Windy City Painters
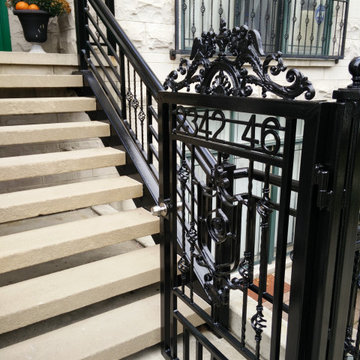
Ever notice how your iron fence looks more rust than paint after another brutal Chicago winter? That is usually the moment homeowners start searching for a painting contractor who actually understands metal - not just someone who will brush a coat of black paint over active corrosion and call it done. At Windy City Painters, iron fence restoration is one of our most requested services on the North Side and Near West Side, and for good reason. These fences are old, they are beautiful, and they deserve a proper finish system.
PROJECT OVERVIEW
This project involved a full ornamental iron fence on a North Side greystone property. The fence was original to the building - likely installed in the 1910s or 1920s - and had gone through multiple paint cycles without any rust conversion work. By the time Windy City Painters arrived, the horizontal rails showed active pitting, the vertical spindles had surface rust under lifting paint, and two corner posts had minor joint separation. The homeowner wanted the fence restored to a sharp satin black finish that would hold through multiple Chicago winters.
MATERIALS AND PRODUCTS
Ospho Rust Converter - phosphoric acid formula that chemically neutralizes iron oxide and converts it to iron phosphate, a stable paintable surface. Used on all pitted and actively corroded areas before primer application.
Rust-Oleum DTM Rust-Inhibitive Primer - direct-to-metal primer that bonds to both converted rust zones and bare metal, blocking moisture intrusion at the substrate level.
Sherwin-Williams DTM Acrylic Topcoat - flexible, moisture-resistant finish formulated to expand and contract with metal through temperature cycling. Applied in two finish coats in satin black.
For cases with deeper rust penetration, Corroseal Water-Based Rust Converter and Metal Primer is an alternative that combines conversion and priming in a single product, useful on complex ornamental profiles where two-product systems are harder to apply.
THE PROCESS
Step 1 - Mechanical Preparation. Windy City Painters wire-wheels all loose rust, flaking paint, and scale using angle grinders fitted with wire wheel attachments. On heavily pitted sections, needle gun descaling is used to reach rust in tight ornamental grooves. This step is non-negotiable. No coating bonds reliably to iron oxide, and skipping this step is the single most common reason iron fence paint fails within a year.
Step 2 - Rust Conversion. Ospho is brushed into all pitted and bare metal areas and allowed to fully react. The surface shifts from orange to a grayish-black iron phosphate layer. This stable base accepts primer without the risk of rust migrating upward through the paint film over time.
Step 3 - Primer Coat. Rust-Oleum DTM rust-inhibitive primer is applied full coverage over the entire fence surface, including areas that appeared clean but showed minor surface oxidation. DTM primer acts as a moisture barrier and mechanical adhesion layer for the finish coats.
Step 4 - Finish Coats. Two coats of Sherwin-Williams DTM acrylic topcoat are applied in satin black, with adequate dry time between coats. The DTM formula remains flexible after cure, allowing the iron to expand and contract through Chicago temperature swings without the topcoat cracking or peeling at joints.
CHICAGO-SPECIFIC CHALLENGES
Ornamental iron on Chicago greystones, two-flats, and Victorian brownstones was almost never hot-dip galvanized. It was painted from installation and has relied on continuous paint maintenance ever since. Chicago winters add specific stress: freeze-thaw cycles force water into any paint film crack, expanding it; road salt spray elevates corrosive chloride exposure; and humidity during spring thaw keeps metal surfaces wet for extended periods. This combination accelerates rust spread beneath paint films that appear intact on the surface.
WHAT TO EXPECT LONG-TERM
A properly prepped and primed iron fence finished with a DTM topcoat system should hold 5-8 years in Chicago conditions before any touch-up is warranted. Annual inspection of joints, welds, and areas near grade level will catch early moisture entry before it becomes a larger rust issue. Windy City Painters recommends scheduling touch-up earlier rather than waiting for full paint failure to protect the prep investment.
PRO TIPS
Tip 1 - Address joint separation before painting. If fence rails have separated at welds or mechanical joints, water will enter and rust will restart from inside the connection point regardless of the exterior coating. Flag any separated joints for welding before any paint system is applied.
Tip 2 - Never use latex house paint on iron fences. Standard exterior latex lacks the adhesion and flexibility for bare metal. Always use a product labeled DTM or specify a rust-inhibitive primer underneath any finish coat applied to iron.
Tip 3 - Paint in late spring or early fall. Iron fences exposed to full sun in peak summer heat can reach surface temperatures that cause solvent-based coatings to blister during application. Ideal application conditions are 50-85 degrees Fahrenheit with low humidity and no direct intense sun on the metal surface.
Learn more about iron fence painting cost in Chicago and schedule your free estimate at windypainters.com
FAQ
Q: What does iron fence painting cost in Chicago?
A: Windy City Painters typically prices residential iron fence painting at $8-$18 per linear foot. Variables include rust severity, spindle density, ornamental profile complexity, and whether rust conversion products like Ospho or Corroseal are required before priming.
Q: Can you paint over rust without grinding it off first?
A: No. Windy City Painters always performs mechanical prep before any coating. Wire wheel grinding removes loose scale and flaking paint. Rust converters handle residual oxidation chemically. Skipping this step means the new paint film will delaminate within one season.
Q: How do I know if my iron fence needs a welder before painting?
A: Windy City Painters inspects all joints and rail connections during the estimate. Rail separation, cracked welds, or sections that flex when pressed indicate structural issues that should be welded before any paint system is applied to avoid reopening at stress points.
Q: What is the difference between Ospho and Corroseal?
A: Both are rust converters. Ospho is a phosphoric acid solution applied as a separate step before priming, giving maximum control over conversion and primer selection. Corroseal combines conversion and primer in one product, which works well on complex ornamental profiles where a two-step system is harder to apply evenly.
Q: How long does the paint last on an iron fence in Chicago?
A: With full mechanical prep, rust conversion, DTM primer, and two DTM topcoats, Windy City Painters clients typically see 5-8 years of performance before touch-up is needed, even through Chicago freeze-thaw cycling and road salt exposure.
Q: Do you paint iron fences that are still structurally sound but heavily rusted on the surface?
A: Yes. Surface rust, even heavy pitting, does not necessarily indicate structural failure. Windy City Painters evaluates each fence individually. As long as the metal is sound under the rust, proper mechanical prep and a rust converter restore the surface to a paintable condition.
 Aeris Home
My client decided to sell his house. Fantastic location, best schools in the area, minutes away from the ocean... All that was missing were signs of life and updated finishes. We instantly agreed on whites & greys; a free standing tub, double vanity, and long-lasting / easy-maintenance tile. We now have a clean white space that can be molded into anyone's perfect bath. White canvas gives opportunity to add color and drama. I call this "Baltic White" because sky reflections and tint in the shower glass cast just enough blue to remind me of snowy winters in Scandinavia. To demonstrate character, I staged with black accessories, a tribal rug and added warmth via walnut tub shelf. Candles and salt rock ground the airy feel and leave us with a balanced space that is as welcoming as it is elegant.
Photos - Hale Production Studios
 George Ocampo
Central El Paso Backyard Renovation:
Fifteen years is a long time for a backyard to quietly wait.
At first, it was full of intention—a pool that promised summers, laughter, and long evenings. But time has a way of settling in. The water turned still, then green. Edges cracked. The space became less of a destination and more of something you looked past. Life moved forward, but the backyard stayed behind.
Then came the decision: it was time.
Not a patch job. Not a quick fix. A complete reset.
The transformation didn’t begin beautifully—it began with demolition. The old pool was drained, exposing years of neglect etched into its surface. Crews stepped in, breaking, clearing, reshaping. What once held stagnant water became an open cavity of possibility. Steel rebar formed a new skeleton, precise and intentional. Every line measured. Every elevation reconsidered.
This wasn’t just construction—it was rethinking how the space should live.
The shell was rebuilt. Surfaces were refined. Plumbing, structure, and flow were corrected at their core. What had once been outdated and failing was now engineered to last.
Then the shift happened.
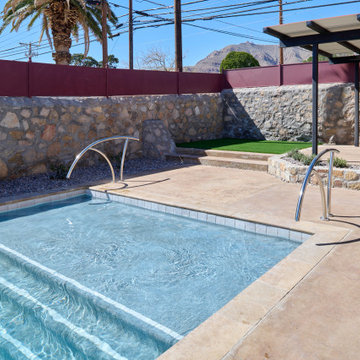
Hardscape came in—clean, warm-toned concrete replacing worn decking. Stone walls, once just boundaries, were elevated into features. Subtle textures, intentional lines. A visual language that matched the architecture of the home instead of competing with it.
The pool returned—but not as it was.
Now it was sharp, modern, and inviting. A long, clean body of water with a shallow tanning ledge that catches the sun just right. Stainless steel scuppers arc water into the pool—movement, sound, life. Steps are crisp, geometry is balanced, and the water reflects clarity instead of neglect.
Around it, the yard found purpose.
Artificial turf introduced contrast—green, controlled, low-maintenance. A pergola structure rose in the corner, creating a destination within the destination. Beneath it, a built-in outdoor kitchen turned the backyard into a place to gather, not just pass through. Lighting stitched everything together, making the space just as alive at dusk as it is under the midday sun.
By the end, nothing felt accidental.
What was once forgotten is now deliberate. What was once avoided is now the center of attention.
Fifteen years later, the backyard didn’t just come back—it finally became what it was always supposed to be.

 SUPERIOR CHIMNEY SERVICES CORPORATION
Let’s be honest. Chimney cleaning probably isn’t the first thing on your spring to-do list. But if you used your fireplace this past winter, scheduling a chimney sweep before warm weather arrives is one of the best home maintenance decisions you can make. Here’s why Spring is the best time to schedule your chimney cleaning.
Your Chimney Just Worked Hard All Winter
It’s tired, simply burnt out! Every time you burned wood this season, creosote, also known as soot, was clinging to the inner walls of your chimney. It’s a natural byproduct of burning wood, but it’s also highly flammable and the leading cause of chimney fires. The longer it sits, the more it builds up. A professional chimney sweep, such as Superior Chimney, takes a look at your chimney flue liner, damper, and firebox — clearing it all out before that creosote becomes a serious issue.
Spring is the Best Time to Take Care of the Chimney
Fall is when everyone panics. The temperature drops, and the fireplace suddenly seems appealing. By scheduling now, in spring, you get to clean your chimney now so your house doesn’t smell from the creosote left in your fireplace and chimney Superior Chimney includes a FREE 14-Point Certified Written Inspection with photo documentation sent straight to your email with every chimney sweep we do. That’s the kind of full-service you want, and you’re more likely to get it when things aren’t hectic.
Catch Problems Before They Get Expensive
Here’s something homeowners don’t regularly remember: a chimney sweep isn’t just about cleaning. It’s about integrity. When a CSIA Certified Chimney Sweep technician pushes rods and brushes through your chimney system, if pieces of fire clay tile, tile joints, or brick start falling, that tells you exactly where a structural issue exists. That’s critical information for fireworthy, continued use of your fireplace.
Avoid Any Obstructions
Obstruction-free chimney systems is another key reason for a spring chimney sweep. Birds, squirrels, and raccoons love a quiet chimney during the warmer (and definitely the cold) months. Nesting, debris, and feces can create blockages, and a simple cleaning alone won’t remove most of them. Knowing what’s going on inside your chimney before critters move in is a whole lot easier than dealing with it in October.
It’s the National Safety Standard — Not Just a Suggestion
The NFPA 211, CSIA, NCSG, and IRC all recommend annual chimney inspections and cleanings for both wood burning and gas fireplaces. It’s not optional; it’s a safety standard. As the CSIA puts it simply: clean chimneys don’t catch fire. Well put CSIA.
Did You Know?
All of Superior Chimney’s technicians are certified by the CSIA, so you know you’re getting expertise you can trust. Then we take the extra step of taking pictures so you can ‘see’ exactly what’s going on with the chimney. Everything looks good from the ground. We’ll email the pictures to you so you can keep your own records of what we all saw during the last visit. Now you know why spring is the best time to schedule your chimney cleaning.
Contact us or give us a call today at 877-244-6349 to get started.

 ESF Home Textile LLC.
Chiara Rose Anti-slip Armless Sofa Cover Furniture Protector Chair Size Diamond
Dimensions: 29 Inch X 70 Inch
BEST SOFA PROTECTOR - This Slipcover is Extremely Sturdy, as well as an Instant, Magical Solution to Renew your Old Furniture with an Elegant Look! Ultrasonically welded seams prevent ripping apart and unraveling. The Edges are Laser-Cut to give a Chenille Trim Effect. Its Velvety Texture is Soft and also functions like a Warm Pet Bed giving a Sense of Security while your Pet is Resting. Our Covers are absolutely Pet-Friendly.
PROTECTIVE! Best Protection for ANIMAL SCRATCHES FUR SHED-HAIR DIRT FOOD SPILLS WEAR TEAR! STAIN PROOF! Perfect Guard against Cats Dogs Kids Children!
DECORATIVE! Great Stylish Coverage and Luxury Decoration in Living, Sitting Room with Full Solid Colors and Beautiful Printed, Patterned Designs, Extra Deluxe Décor, Nice Plush Texture! New Modern Look! CUSTOM-FIT! Relaxed fitted in Wing-back, Club, Rocker, Single Chair and a Half, one two three Pillow Coach, 1 2 Seaters, Box, T cushion, L, U shape Seaters! Big Large Long Wide Couches! Leather Velour Denim Twill Linen Sofas!
NON SLIDE! Slid-Resistant with PLASTIC DROP BACKING! No More Slipping Off / Sliding Over! Plastic Dots firmly Grip Upholstery! Stays in Place! No Zipper, Mat, Elastic Strap! No Pads under!
EASY CARE & WASH, DURABLE, DETERRENT! Machine Washable! Easily Removable Ready Made Furniture Throws! Cheap and Inexpensive! Heavy Duty Fabric! Stretch Enough to Cloth up Perfectly and Look Form Fit! NO ARMS! Slipcovers with Armrests DON’T properly FIT IN the Armrests and always create Fitting Problems. You know, they also have an Ugly Look. But with Chiara Rose no Need to Worry about Armrests anymore!
• PLEASE MAKE SURE TO READ DETAILED PRODUCT INFORMATION BELOW!
________________________________________
Product Description
WHY CHIARA ROSE SOFA COVERS?
Kids and Pets; We love them but we also love our furniture. Cleaning furniture is one of the most difficult chores and that’s why you need to protect it from dirt. The easiest and economical way of preserving your furniture is Chiara Rose Sofa Protector. Just put the sofa protector on your sofas (futon or couch) and stop worrying about stains and spills. It is perfect for homes with kids and pets. Pets love to scratch upholstery of the furniture. The enduring 220 gsm polyester fabric of Chiara Rose Sofa Protectors prevents tears and any kind of debris on your sofas. Its sturdy texture doesn’t let any spill and dirt penetrate the upholstery.
Besides being durable, Chiara Rose Sofa Cover is suitable to all types of decoration. To express your own personal style, you can choose from a variety of color and design options that fit perfectly to your home décor. With brilliant colors and attractive patterns, Chiara Rose Sofa Covers will give your room a completely new outlook. Unlike other covers, you don’t need to remove Chiara Rose Sofa Protector when you have guests. It will both protect your furniture and become a part of your home decoration.
WHY CHIARA ROSE SOFA PROTECTOR IS DURABLE?
The most common problem with traditional sofa covers is that after a short time of use the stitches come apart. The edges of Chiara Rose Sofa Cover are manufactured with ultrasonic laser cut technology. This technology prevents the edges from unraveling. What’s more, the 220 gsm polyester knitted fabric is the most long lasting fabric used in furniture protectors. While being durable, this fabric gives a warm sense
of touch and pleasure to sit upon.
WHY CHIARA ROSE IS THE BEST ANTI-SLIP SOFA PROTECTOR?
We always use the most contemporary technology to develop our products. That’s why we decided to use the patented plastic drop design on the back side of our covers to create the anti slip effect. These plastic drops firmly grip the upholstery of furniture so that the cover doesn’t slip off the seat easily. Even after your kids and pets jump on the sofa, Chiara Rose Sofa Cover holds on to your furniture. A quick adjustment is all it takes to get it back to look smooth. Chiara Rose Sofa Cover is the only sofa protector that uses this new technology.
WHY IT IS EASY TO USE CHIARA ROSE SOFA PROTECTORS?
No zippers, no elastic straps, no metal hooks!!! The anti-slip drops will take care of everything! , As shown on the image, just lay Chiara Rose Sofa Cover on your sofa, and tuck it between the cushion and the arms of the sofa. That’s all you need to do to put it on.
Chiara Rose Sofa Protector doesn’t allow everyday dirt, pet hair and food spills reach your sofa. The pattern of the fabric prevents accumulation of dirt on it. You can easily take off this dirt. In order to get best results, use a vacuum cleaner or shake your cover off before machine wash.
Chiara Rose Sofa Protector is easy care. It can be machine washed on max. 30°C or 85°F water temperature. Don’t use bleacher. Machine dryer can be used on low heat setting. To avoid wrinkles, use gentle cycle on washing machine and hang from a line while drying. If necessary, iron at low temperature.
 Dengfeng City Yuke Glass Technology Co.,LTD.
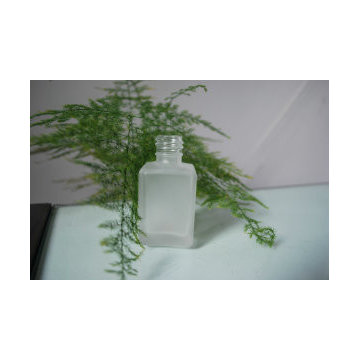
Product: oil-sand effect glass etching powder
Appearance:Powder
Color: White
Function: etching and beautify the glass material.
Medium: with sulfuric or hydrochloric acid as medium in the production.
Applicability: It is used to frost ordinary glass made with soda-lime material.
Feature: The frosted surface is is relatively bigger and with strong sense of three-dimensional、shinning as diamonds under the light.It is easy to clean and manage as the fingerprint will disappeared soon after touching.
Production processing:Clean glass product—immerse in the frost liquid(about 1-3 minutes) —remove—rinse—dry.
Storage: The glass frosting powder should be stored up in the dry and ventilated place to avoid moisture.
 Pure Energy Construction
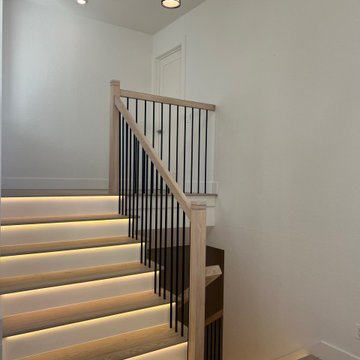
Transforming mundane to majestic! Our team undertook a comprehensive home remodel, breathing new life into every corner of the property and elevating it to unparalleled levels of luxury and sophistication. Among the many stunning transformations, the staircase was the focal point, grasping attention with its grandeur and elegance. From the exquisite balustrades to the meticulously crafted handrails, every aspect of the staircase reflects our commitment to excellence and our dedication to exceeding our clients' expectations. Lastly, of course the floors were undoubtedly just as breathtaking. The light natural wood flooring elevated the home and brought a sophisticated appearance the minute you walk in.

 TOMARO CONSTRUCTION CO INC
Night shot of Sky Blue !/4", 1/2" 3/4-1" aggregate exposed in border of stamped patio. We are certified dealers and installers of this product. 10 minutes of sun equals a night time of glow! last 20 plus years!
 Eco Star Painting
Step #1 Apply BM CLEAN
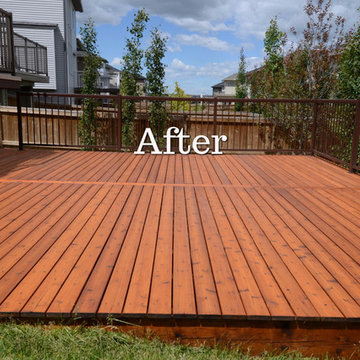
As you can see in the 'Before' picture above, this cedar deck was extremly dirty. This required an extra step in comparison to the typical deck stripping process. My paint rep at Benjamin Moore recommended a product called CLEAN. It comes in one gallon plastic containers and can be applied out of a plastic pail or with a garden sprayer. We used a Garden sprayer and chose a flat tip for application. The three gallon garden sprayer was filled with 2 gallons of water and one gallon of the CLEAN solution. This is a strong mixture and can be reduced to up to 6 parts water and one part of the Benjamin Moore CLEAN.
This approximately 22x20 deck had a board running perpindicular to the rest of the floor boards which divided it into 2 equal parts. Our method was to apply the solution to 3-4 of these 10' boards at a time. Allow it to set up for a few minutes and then scrub away with the deck brush. The agitation loosens up the dirt and grime and is then removed with a pressure washer a board a time. The flat tip on the pressure washer was almost the same width as the floor board. It is important to clean the sides of the board too because any remaining dirt or stain will be visible.
Benjamin Moore Deck Restoration products named Clean,Restore,brighten
Step #2 Apply BM RESTORE
The second step is exactly the same as the first step but with a different solution called Benjamin Moore RESTORE. The deck was dry before we started the 2nd step becuase it was baking hot outside. You use the same 2/1 mixture of water to chemical. This chemical will remove the stain still present in the deck floor. Make sure to rinse the garden sprayer clean before adding the restore solution. Unlike the BM CLEAN, the BM RESTORE has an orange-ish color in appearance. It did a fine job of removing most of the stain, but not 100% of it. There were a few areas that required a 3rd coat of restore but the process was quicker.
Step #3 Apply BM BRIGHTEN
The third step is exactly the same as the first two step but the chemical solution used was Benjamin Moore 'BRIGHTEN'. Again, the garden sprayer was cleaned and filled with 2 parts water and one part Brighten. The brightener not only lightens the wood but it also neutralizes the previous stripper solution. As stated before the Restore adds a bit of color and the Brighten will remove any traces of it. you still have to agitate the brightener with a scrub brush and either pressure wash it off or use a garden hose. We used the pressure washer for faster results. After it dries the wood look a lot brighter but we still found some spots of stain that had not come off.
Apply Sikkens Stain
As stated above the stain we used is called "Sikkens Proluxe" which is basically just a slight re-branding of the classic Sikkens Stain. The formula is exactly the same. In fact, the secondary name is still called 'Cetol' SRD RE. The color chosen was "CEDAR".
The weather was quite hot for a typical Calgary Spring day so we stained a 10' section of floor board at a time. The deck has a metal railing so the supporting feet had to be brushed in with a 2.5" natural bristle paint brush. for the rest of the job a 6" Wooster natural bristle deck brush was used. The handle was remove and a broom handle was inserted. The stain was stirred frequently and poured into a plastic Simms brand roller pan. Semi transparent Oil based stain has the consistency of water so you need to be careful not to spill any of it. When applying to a board you hit the sides first with the brush and then fillin the rest. Ten feet of floor board can be stain in a short period of time. it's important not to leave any streaks so it is adviseable to back-brush the entie length before moving on to the next board. The staining only took about 2.5 hours to complete. One coat is the manufacturers recommendation.
One last thing about Sikkens Stain. To maintain this beautiful look the deck should be re- coated once a year, preferably every spring. It's like applying sunscreen yearly to protect the wood against further damage. Two gallons was enough to cover this 450 sq foot deck.
35