
Search results for "Base fail" in Home Design Ideas
 Solid Base Construction
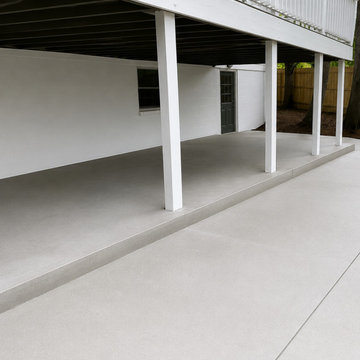
Concrete Patio & Under-Deck Storage Upgrade
Removed severely cracked and failing concrete and installed a new reinforced concrete slab beneath the elevated deck to create a clean, functional storage area. The project also included a concrete retaining wall beneath the staircase to help manage water runoff and prevent erosion around the new slab. The completed installation transformed an unusable space into a durable, attractive extension of the property while improving drainage, accessibility, and long-term performance.
 The Decorating Therapist
When these homeowners needed new appliances, they used the opportunity to elevate their kitchen with a luxury partial remodel rooted in timeless Old World Mediterranean design. Since they had no plans to move, the goal was to create a more refined, functional kitchen that felt warm, intentional, and beautifully integrated with the existing home. By preserving the perimeter cabinetry and tile flooring, every new design decision was carefully selected to create a cohesive, custom-looking kitchen renovation.
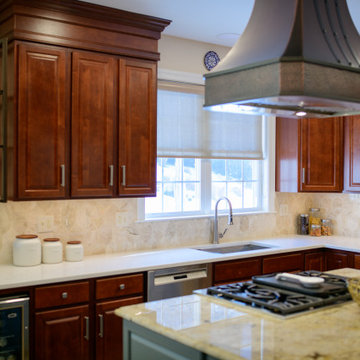
To enhance the existing cherry-stained cabinetry and eliminate the dust-collecting gap above the wall cabinets, we added 12 inches of layered crown molding, professionally stained to match the dark cherry finish. This created a seamless built-in appearance and added architectural richness to the luxury kitchen design. A bronze and glass multi-shelf display unit extended the visual line of the wall cabinetry, while a new 24-inch-deep cabinet above the refrigerator improved storage. The base cabinetry was also expanded with a beverage refrigerator and upgraded rollout drawers for more efficient, everyday kitchen functionality.
Because the original island cabinetry was not functioning well for the homeowners, it was replaced with a custom kitchen island designed for beauty, storage, and performance. The new island cabinets were painted in an elegant gray-green finish, creating a refined contrast with the dark cherry perimeter cabinetry. Slender pullouts flanking the range keep spices and utensils organized within easy reach, while relocating the microwave below the island freed valuable counter space. On the seating side, tile was added beneath the island to protect the cabinetry from scuffs, creating a durable, thoughtful detail that supports everyday entertaining.
A major luxury kitchen upgrade was replacing the failing island downdraft ventilation with a powerful ceiling-mounted statement hood. Custom made in hammered aged copper with graceful lines and dark bronze detailing, the ventilation hood became the dramatic focal point of the kitchen while complementing the cherry cabinetry and enhancing the Old World Mediterranean aesthetic.
The homeowners had always disliked their double-bowl sink, so it was replaced with a large single workstation sink that dramatically improved prep, cleanup, and daily usability. The double wall ovens were upgraded to a steam oven and convection oven, while the lower drawer was replaced with a warming drawer that quickly became the client’s favorite and most-used appliance. These premium appliance upgrades brought modern performance into the timeless kitchen renovation.
For the first time, the kitchen gained a backsplash, adding another layer of texture, polish, and luxury detail. A warm neutral polished marble tile in a large arabesque pattern offered a subtle nod to Mediterranean design while softening the transition between the dark cherry cabinetry, painted island, and updated appliances.
The final finishing touch was replacing the outdated hardware. The original small round knobs on the 48-inch-tall wall cabinets were swapped for antique pewter linear pulls with an aged, muted finish, reinforcing the Old World kitchen style while giving the cabinetry a more tailored, elevated look.
Every detail in this luxury kitchen remodel was chosen to refine the space, improve flow, and enhance functionality while making the new elements feel original to the home. The result is a warm, inviting, Old World Mediterranean kitchen that feels timeless, highly tailored, and beautifully suited to homeowners who love to cook and entertain.
 Windy City Painters
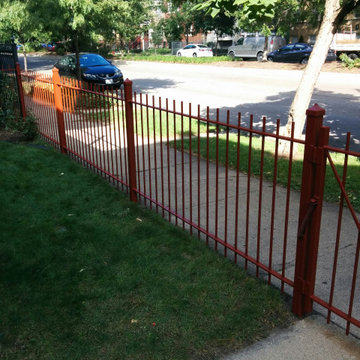
Ever notice how your iron fence looks worse every spring after another Chicago winter? That slow deterioration is not cosmetic - it is active metal failure that compounds every freeze-thaw cycle until replacement becomes the only option. Windy City Painters works with homeowners across the Chicago North Side and Near West Side to restore original iron fencing on greystones, two-flats, Victorian brownstones, and coach houses before that point is reached.
PROJECT OVERVIEW
This iron fence restoration involved a classic Chicago residential property with original wrought iron fencing showing surface rust across the majority of pickets, flaking previous paint coats, and localized deep pitting near the base rails. A structural check identified two loose pickets requiring welding before any surface preparation or coating began. Total linear footage fell in the mid-range for a standard Chicago residential lot.
MATERIALS AND PRODUCTS
Windy City Painters selected Ospho rust converter for chemically neutralizing active iron oxide before priming. Ospho reacts with rust to form a stable phosphate compound that stops corrosion progression rather than simply sealing over it. Sherwin-Williams DTM rust-inhibitive primer was applied to all bare and converted surfaces, followed by two finish coats of Rust-Oleum DTM in satin black. DTM - direct to metal - formulas provide corrosion inhibitors built into the coating matrix, which matters significantly in Chicago's climate.
THE PROCESS
Step 1 - Structural Assessment and Welding Coordination. Before any surface preparation begins, Windy City Painters inspects every picket and rail connection for structural integrity. Loose or cracked iron must be welded before coating. Paint applied over a compromised joint will fail within one season as movement continues to break the bond. On this project, two pickets were tack-welded by a coordinating welder before prep started.
Step 2 - Wire Wheel Grinding and Needle Gun Descaling. All rusted sections were ground to bare or near-bare metal using wire wheel attachments and needle gun descaling tools. This step removes loose scale, flaking previous coatings, and surface contamination that would prevent primer adhesion. Skipping mechanical prep is the single most common reason iron fence paint fails prematurely on Chicago properties.
Step 3 - Ospho Rust Converter Application. Ospho was brushed into all pitted and converted areas and allowed to cure fully. The phosphoric acid chemistry converts iron oxide into iron phosphate, arresting active rust and creating a surface that accepts primer more effectively than bare metal alone. Corroseal is an equivalent alternative used on projects with heavier pitting.
Step 4 - DTM Primer and Finish Coat Application. Sherwin-Williams DTM rust-inhibitive primer was applied across all prepared surfaces. Two topcoats of Rust-Oleum DTM in satin black followed after full primer cure. DTM finish coats add a second corrosion-inhibiting layer and provide the UV and weather resistance needed for Chicago exterior iron work.
CHICAGO-SPECIFIC CHALLENGES
Chicago iron fencing faces conditions that accelerate corrosion faster than most US markets. Lake humidity keeps metal surface moisture elevated through much of the year. Road salt splash from winter maintenance reaches fencing along parkways and sidewalk edges, introducing chlorides that aggressively attack iron. Freeze-thaw cycles expand any rust pocket that has formed under paint, lifting coatings from the inside and creating the classic bubbled-paint appearance homeowners notice every spring.
WHAT TO EXPECT LONG-TERM
With Ospho conversion, DTM primer, and two DTM finish coats properly applied over mechanically prepared surfaces, most Chicago residential iron fences hold 5-8 years before needing significant touch-up. Annual visual inspection for any chips or bare spots, with immediate touch-up using Rust-Oleum DTM, extends that window considerably.
PRO TIPS
Tip 1 - Address any bare metal spot the same season you notice it. A pinhole of exposed iron becomes a rust bubble within one Chicago winter and a flaking section by the following spring.
Tip 2 - Never paint over active rust without a converter step. Ospho or Corroseal is inexpensive insurance against a complete repaint two years early.
Tip 3 - Check picket bases at grade level every spring. Ground contact accelerates corrosion at the base faster than anywhere else on the fence. Catching it early keeps welding out of the equation.
Contact Windy City Painters at windypainters.com for a project estimate.
FAQ
Q: What does iron fence painting cost in Chicago? A: Residential iron fence painting with proper rust prep typically runs $300-$900 for standard lot footage. Windy City Painters provides itemized estimates based on linear footage, rust severity, and whether structural welding is required before surface preparation begins.
Q: Do you paint over rust or remove it first? A: Windy City Painters always addresses active rust before priming. Ospho or Corroseal rust converter chemically neutralizes iron oxide, and wire wheel grinding removes loose scale - coating over unaddressed rust guarantees early failure on Chicago iron fences.
Q: When does an iron fence need welding before painting? A: Loose pickets, cracked rails, or connections with visible movement require welding before any coating work begins. Paint cannot stabilize a structural joint - Windy City Painters coordinates with welders when this condition is identified during initial assessment.
Q: How long does iron fence paint last in Chicago? A: With mechanical prep, Ospho conversion, and Sherwin-Williams or Rust-Oleum DTM coatings, properly restored iron fencing holds 5-8 years in Chicago's freeze-thaw climate before needing significant maintenance.
Q: Is Ospho better than Corroseal for Chicago iron fences? A: Both are effective rust converters. Ospho is a liquid phosphoric acid treatment suited for moderate rust and pitting. Corroseal is a latex-based converter-primer hybrid better suited to heavier rust profiles. Windy City Painters selects based on site conditions.
Q: What finish sheen works best on iron fencing? A: Satin or semi-gloss black is the traditional and most durable choice for Chicago greystone and brownstone properties. Satin hides minor surface imperfections better than gloss while still providing adequate UV and moisture resistance.
Q: Can iron fence painting be done in spring or fall in Chicago? A: Yes. Windy City Painters schedules iron fence work in temperatures above 50 degrees Fahrenheit with low ambient humidity - spring and early fall are often ideal windows that avoid both winter cold and peak summer humidity.
Find the right local pro for your project
 Master Pavers
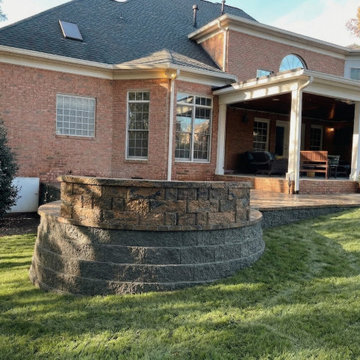
Most failed paver patios in the Charlotte area don't fail because of the pavers. They fail because of what was skipped underneath.
When you see a finished patio, you're looking at the final 2 inches of a 10-inch build. Here's the work that decides how long it lasts:
Excavation. 8 to 12 inches below the final surface, down to stable soil. A patio built on topsoil sinks. A patio built on compacted ground doesn't.
Base layer. 4 to 6 inches of crushed stone, compacted in lifts. This is the structural backbone — the deeper and denser it is, the straighter the surface stays.
Bedding sand. A 1-inch precisely screeded layer of sharp sand. Not decorative — it locks the pavers in place and allows micro-adjustments without disturbing the base.
Edge restraint + polymeric sand. The perimeter restraint keeps pavers from spreading sideways. Polymeric sand swept into the joints seals against weeds, insects, and water migration.
What you pay for is the 2 inches on top. What makes it last is the 10 inches underneath. That's the difference between a patio that holds up for two decades and one that sinks near the downspout in year three.

 lost love spells 0739143863 lost love spell caster
love spellsINTERNATIONAL TRADITIONAL HEALER SPECIALIZED IN THE FOLLOWING; *Powerful love spell. *Revenge of the raven curse. *Break up spells. *Magic spells. *Protection spell. *Curse removal. *Remove negative energy. *Curse spells. *Spiritual cleansing. *Africa witch craft healers. *Hex removal. *Spiritual healing spell. *Wicca witch craft. *Good luck charm. *Break up spells. *Magic love spells *Sangoma traditional medicine. *Gay love spell. *Real magic spells. *The spell to defeat your rival. *Fertility spells. *Divorce spell. *Marriage spells. *Native healer. *Traditional healer. *Herbalist. *Fortune teller. *Madness coursed by witch craft. Break Up & Come Back To Me Get your ex back, even if they are currently with another lover. They will break up and he or she will come back to you, to be in your loving arms, the way it should have been all along. Break them up and bring back your lost love with The Break Up and Come Back To Me Love Spell . Binding Love Spells Meant for more serious relationships like marriage, or the path to something very special and permanent. Once the binding love spell is cast, it is extremely difficult to reverse. It is highly recommended that you ensure you are choosing the right person for yourself before asking us to cast The Binding Love Spell . Stop Divorce Are you going through a divorce you just don’t want? Still feel strong love towards your husband or wife and they no longer feel the same way? If it’s not about the legal fee’s, division of personal property, the countless arguments, or nights on the couch. Stop a divorce with The Stop a Divorce Love Spell, PLEASE NOTE THAT MY SPELLS ARE BASED ON AFRICAN TRADITIONAL HEALING AND A BELIEF IN THE MYSTICAL. RESULTS VARY FROM INDIVIDUAL TO INDIVIDUAL. Have a serious problem that needs fixing? +27739143863 Rustenburg, Brits, Moruleng, Mafikeng, Zeerust, Vryburg, Ventersdorp, Nelspruit, Secunda, Witbank, Middelburg, Pongola, Piet Retief, Malelane, Evander, Kinrose, WITBANK Kriel, Carolina, Bethal, Ermelo, Naas, , Hazyview, Hendrina, Bushbuckridge, Belfast, Polokwane, Mokopane, Northam, Thohoyandou, Louis Trichardt, Musina, Entabeni, Ladybrand, Ficksburg, Kroonstad, Klerksdorp, Odendaalsrus, Vareeniging, Sasolburg, Carltonville, Westonarea, Parys, Kimberly, Kuruman Grahamstown, Queenstown, East London, Port Elizabeth, King Williams Town, Somerset East, Alice Cape Town, Bellville, Paarl, Beaufort West
 Allman Remodeling Contractors
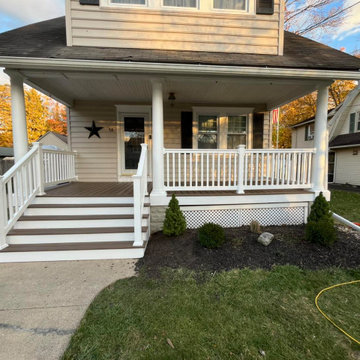
Front Porch Transformation – From Failing Wood to Full Composite Upgrade ✨
This porch had years of peeling paint, rot, water damage, and structural wear. We rebuilt it from the framing up and gave this home a clean, modern, low-maintenance upgrade that will last for decades.
What we did:
✔️ Removed all failing decking, treads, and trim
✔️ Repaired and reinforced the existing framing
✔️ Installed new composite decking in a beautiful wood-tone finish
✔️ Rebuilt the stair system with composite treads & white risers
✔️ Installed new vinyl railings and posts
✔️ Wrapped all exposed structure in PVC for a clean, maintenance-free finish
✔️ Sealed, repaired, and refinished column bases
✔️ Added all new fasteners, blocking, and waterproofing where needed
The result? A porch that’s safer, stronger, and absolutely elevates the curb appeal of this home.
If your porch or deck is showing signs of age — peeling paint, soft spots, loose rails, or rot — we can rebuild it the right way.

 Architect
Not all architectural imagery is created equal. Some renderings look obviously computer-generated, with flat lighting and plastic-looking materials that fail to convince viewers. Others are so precise that they are indistinguishable from photographs. That second category, realistic architectural visualization rendering, has become the standard expectation for architects, developers, and marketers who need imagery capable of withstanding close scrutiny from investors, buyers, and planning authorities. As audiences grow more visually literate, the tolerance for obviously artificial, video-game-like imagery in professional presentations continues to shrink.
What Sets Realistic Visualization Apart
Realistic architectural visualization goes beyond simply modeling a building in three dimensions. It requires physically accurate lighting simulation, true-to-life material properties, and careful attention to the small imperfections that make real-world photography convincing, such as subtle reflections, ambient occlusion in corners, and natural depth of field. The goal is an image that a viewer would believe was captured by a camera on-site rather than generated by software. Achieving that level of believability typically means dozens of small adjustments layered on top of one another rather than any single dramatic setting.
Realistic Versus Stylized Rendering Approaches
Stylized or conceptual renderings still have their place, particularly in early design phases when a looser, more artistic representation helps convey mood without locking in every detail. But once a project moves toward marketing, investment, or permitting, stakeholders need to see exactly what they are getting. Realistic visualization removes ambiguity, showing true material colors, accurate proportions, and honest lighting conditions rather than idealized abstractions. Understanding which approach a project actually needs at each stage helps clients avoid paying for a level of polish that a given milestone does not yet require.
Why Realism Builds Client and Buyer Confidence
Buyers and investors are understandably skeptical of overly polished or unrealistic marketing images. When a rendering looks convincingly real, it builds trust rather than raising doubts about what the finished project will actually look like. This is especially important in real estate presales, where buyers are committing significant sums based largely on visual material rather than a finished physical space. A rendering that later turns out to have misrepresented the finished product can also create legal and reputational exposure for developers, making accuracy a genuine business risk rather than just an aesthetic preference.
The Technical Pillars Behind Every Realistic Scene
Achieving true realism depends on several technical disciplines working together: physically based rendering engines that simulate how light actually behaves, high-resolution texture libraries that replicate real materials like stone, wood, and glass, and careful camera work that mimics real photographic lenses and exposure. Post-production adds a final layer of color grading and atmospheric effects that ties everything together into a cohesive, believable image. Each of these pillars depends on the others; even flawless material work can be undermined by lighting that behaves in a physically implausible way.
Applications Across Residential, Commercial, and Institutional Projects
Realistic visualization serves a wide range of building types, from single-family homes and luxury condominiums to office towers, hotels, schools, and healthcare facilities. Each typology has its own material palette and lighting expectations, and an experienced studio adjusts its approach accordingly, whether that means warm, inviting tones for a residential lobby or crisp, professional lighting for a corporate headquarters. Institutional clients such as universities and hospitals often have additional requirements around accessibility signage and wayfinding, which need to be represented accurately alongside the architecture itself.
How AIMIR CG Delivers Photorealistic Accuracy
Our studio specializes in realistic architectural visualization rendering that holds up under close inspection. Every project moves through a disciplined pipeline of modeling, texturing, lighting, and post-production review, with artists cross-checking material references and lighting studies against real-world photography. This attention to detail is why clients consistently describe our end product as impressive and our process as easy to work with. A dedicated quality review stage before delivery catches inconsistencies that might otherwise slip through a faster, less structured pipeline.
Common Challenges in Achieving True Realism
Realistic rendering is technically demanding. Common obstacles include accurately simulating how light bounces between surfaces, matching material reflectivity to real product specifications, and avoiding the uncanny, slightly artificial look that comes from over-processed images. Overcoming these challenges requires experienced artists who understand both the science of light and the craft of photography, not just software proficiency. Rushed production schedules are often the real culprit behind unconvincing renderings, since realism typically requires several iterative passes rather than a single render.
What to Look for in a Realism-Focused Rendering Studio
When evaluating a rendering partner, review their portfolio critically. Do the images include convincing shadow detail and material variation, or do surfaces look uniformly smooth and artificial? Ask about their revision process and how closely they work with architects to source accurate material and lighting references, since realism is ultimately the product of disciplined collaboration, not a single software setting. It also helps to ask for examples of past projects in a similar building type, since a studio's strengths can vary across typologies.
Ready for Renderings That Look Real
If your project deserves imagery that can stand up to the scrutiny of investors, buyers, and planning boards, AIMIR CG is ready to help. Our team combines technical precision with artistic judgment to deliver visualization that looks and feels genuinely real. Contact us to discuss how photorealistic rendering can strengthen your next presentation or marketing campaign, and let us show you examples from projects similar to your own.


 Tile Doctor Ltd
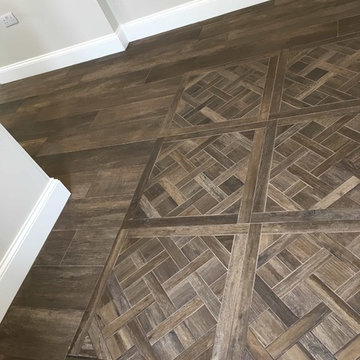
Grout haze or grout smears as it is often called can be a huge problem when laying tiles. Grout haze is basically grout that has been left to dry on the surface of the tile after installation. It’s a common problem which is exacerbated by the use of quick drying products. Take for example this interesting Wood Effect Ceramic Tile installation at a house in Guildford following installation by a builder.
I was a bit slow in following up on the initial enquiry as we had been very busy so by the time, I got in touch I was told they had employed someone else to carry out the work. I apologised for my late response and said to call me if he needed help in the future. Three days later I got a call so we arranged a visit so that I could carry out a test and quote a price.
As it turns out the builder had returned and failed to remove the grout haze and so had a rival firm that seemed more interested in selling unnecessary sealer than fixing the problem. I was astonished to see what a state the builder had left his floor. Grout was all over the floor with footprints walked across thresholds and more. I could understand it if there was some grout was missed after installation but not to this level!
I carried out a successful test and confirmed to the customer that there was absolutely no need to rip and replace his £2k floor. We agreed a date to resolve the problem and to say he was relieved was an understatement!
The builders had used Mapei grout which contains polymers. Polymers offer better flexibility and adhesion, however in order to remove the grout haze we would first need to break down the polymers in the grout first and this is why the rival firm failed.
With that in mind, my first action was to apply Tile Doctor Remove and Go to the floor and leave it to dwell for five to ten minutes. I then worked it into the tile using a scrubbing pad fitted to a rotary machine.
After washing the soil away with warm water and extracting with a wet vacuum I applied Tile Doctor Grout Clean-up to treat the grout. Grout Clean-up is an acid-based product that breaks down the grout so it can be rinsed away and extracted as before. Afterwards I rinsed the floor with warm water and extracted again to remove any trace of product and neutralise the floor. After removing as much moisture as possible with the wet vacuum I speed dried the tiles with a blower.
Ceramic tiles won’t accept a sealer so once the floor had dried the job was finished and it took less than a day.
The customer was over the moon with the difference. While his floor was in such a state, he has been unable to bring in new furniture as the serious possibility of removing the tiles was hanging over him.
Relieved that the problem was now resolved he kindly left the following review:
“I had a floor that had just been laid with very heavy grout haze. I had already had advice from two other professional floor cleaners who had advised me that the floor was irreparable and would need to be pulled up. As soon as I spoke with Rupert, it was clear he was extremely knowledgeable. He asked questions none of the other companies had. By understanding the specific nature of the problem, he was able to solve it by first removing the grout polymers and then applying an acid wash. The floor came up brilliantly. Rupert was the only person I spoke to that could fix this, everyone else told me I needed to replace my floor! Superbly knowledgeable, professional and did an excellent job. Don’t bother speaking to anyone else, just call Rupert! “
Rupert Mcleod
West Surrey Tile Doctor

 Hub Surface Systems
Impressive Decorative Driveway for an Impressive Home in South Surrey, BC
Rainbow Paving just completed this decorative stamped asphalt driveway at this residence in South Surrey, BC. A total removal and replacement of the driveway were done as the original was failing due to poor initial installation. Rainbow removed the old one, re-graded the base, installed new asphalt pavement and applied StreetBond – Advanced Coatings for Asphalt to complete the project. An impressive improvement to the street appeal of this lovely home.
 Tile Doctor Ltd
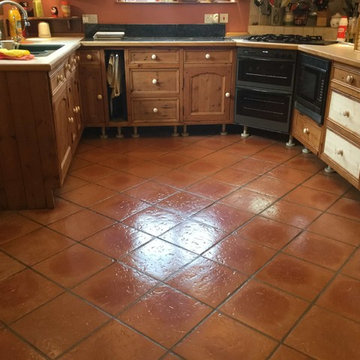
This Terracotta tiled floor was installed in the kitchen of a cottage in the small village of Maidford near Towcester. The tiles were not looking their best and the owner of the property realised it was time to do something about it and contacted Tile Doctor to have the floor stripped and resealed. Stripping and Sealing tile and stone floors is our bread and butter so I was more than happy to pop round and survey the floor which was approximately 9m2.
The grout had darkened with dirt and the previous tile sealer was failing so dirt was now getting ingrained in the Terracotta making it difficult to clean in places and leading to a patchy appearance. We discussed the work involved, my quote was accepted, and a date agreed for me to return and complete the work which would take two days, one to clean and one to seal.
After tidying up the Kitchen and removing the kickboards from underneath the kitchen units I set about working on cleaning and stripping the Terracotta floor of old sealers. To start I tested a small area with a strong dilution of Tile Doctor Wax Away. Wax was quite often used on Terracotta so I figured this product would be a good place to start. My suspicions were proved correct, and I found this to be the best product for removing the many layers of sealant on the floor. Wax Away is a new alkaline product by Tile Doctor and ideal for cleaning clay-based tiles such as Terracotta.
With my sights set on the rest of the floor Wax Away was scrubbed into the tile using a 17” rotary floor scrubbing machine and a black scrubbing pad running on a slow speed which helps to reduce splashing. This activity soon brought the dirt off the floor and the soiled cleaning solution was removed using a wet vacuum and the floor was rinsed down with clean water. The cleaning process was repeated a couple of times until I was happy with the floor, a stiff hand brush was then used along the grout lines with a dilution of Tile Doctor Pro-Clean to clean up the grout.
After rinsing and extracting the floor again the floor was inspected, and I noticed there were a few stubborn paint splashes on the tiles. I managed to remove these and these by spot treating the affected area with Tile Doctor Remove and Go and a steamer to lift the stain out of the clay tile. Once happy the floor was clean it was given a thorough rinse to neutralise it and remove any trace of cleaning products and then left it to dry.
I allowed the floor to dry for several days before returning to seal the Terracotta using numerous coats of Tile Doctor Seal and Go which is an ideal sealer for Terracotta and provides durable stain protection together with a low sheen finish. Terracotta is by its nature very porous and so it’s not unknown for it to take up to nine coats of sealer, which can take some time to apply as like paint you have to wait until it’s dry before it will take the next coat.
The customer was so impressed by the results I achieved in their kitchen they decided to go ahead and book me in to carry out this process throughout the whole of the ground floor which included lounge, study and hallway.
Phil Vissian
Northamptonshire Tile Doctor

 Techo-Bloc
This rustic cabin look features many of our products from the pavers on the floor, to the pavers on the walls and even the pizza oven !!
Dreaming of a log cabin feel in your own backyard? Check out our website to shop the look! You're one click away from the backyard of your dreams !!

 Arin Carlyle
"Maximize Your Space:
The Upstreman Black BR321 Mini Fridge
I'm a college student living in a tiny dorm room, struggling to keep my snacks, beverages, and leftovers fresh. My regular trips to the communal kitchen fridge are time-consuming and frustrating. I often discover my snacks mysteriously disappearing.
This was the exact situation I found myself in before investing in the Upstreman BR321 Mini Fridge. It was a game-changer for me in more ways than one.
One scorching summer, my friends and I hosted a movie night in my dorm room. We brought our snacks and even ice cream. Given the limited space, I doubted one appliance could handle it all. Still, with a capacity of 3.2 cubic feet, the Upstreman BR321 Mini Fridge exceeded my expectations.
As we stocked the fridge with beverages, the efficient single-door and adjustable thermostat stood out, cooling our drinks to varying preferences seamlessly. It ran quietly during our movie night, its soft 38 dB hum lost amid our enjoyment, unlike the disruptive communal fridge. It operates smoothly on 115 volts.
The freezer impressed us further by keeping the ice cream firm, complementing the ready ice cubes from the included tray. The Upstreman BR321 Mini Fridge proved excellent for storing frozen delights.
Discovering the Upstreman BR321 Mini Fridge's full capabilities was enlightening. Its crisper drawer extended the freshness of my produce, and the removable shelves made for intelligent storage. This fridge became an indispensable time and money saver in my dorm.
The included accessories, like the defrost tool, and responsive customer service added convenience. Outshining other models, it integrated into my college life effortlessly, keeping my food and drinks ideally chilled.
Pros:
1. At 17.4" deep, 33.1" wide, and 18.7" high, this space-saving, single-door design is ideal for snug spaces.
2. Customizable thermostat for personalized cooling.
3. Silent operation that doesn't disrupt your peace.
4. A crisper drawer and removable shelves for organized storage.
5. Comprehensive package with valuable accessories and reliable customer service.
6. Weighing just 39.7 pounds, this item is easily portable.
Cons:
1. None to mention, it exceeded all my expectations.
Conclusion:
The Upstreman BR321 Mini Fridge is a stellar choice for anyone needing a compact, reliable appliance. As a student, it exceeded my expectations, proving itself daily. At around $137.9, it is budget-friendly.
—----------------------------
"Chill in Style:
The Upstreman Black FR-17 Fridge with Freezer
One evening, Dad came home looking troubled. Over dinner, he shared how his office fridge was failing, struggling to keep things cold. He was fed up with its poor performance, which only added to the stresses of his workday. It was clear that a replacement was overdue.
I fondly recall how my trusty Upstreman BR321 became my dorm's cooling hero. I suggested to Dad, "It's time tlack FR-17 model. Confident in the brand's quality, it would be an excellent choice for his office needs.
old replace the old fridge in the office."
Based on my positive experience with the Upstreman BR321, I suggested to my father that he consider the Upstreman B
Sleek and space-efficient, the Upstreman 1.7 Cu.ft Mini Fridge shines in compactness and practicality. At 18.9" x 17.7" x 19.3", it tucks into small spaces easily, an excellent addition to dorms, offices, or bedrooms. The design includes a reversible door, maximizing convenience in snug layouts.
Its cooling prowess is adjustable between 33.8°F and 46.4°F, and it comes with a nifty freezer compartment for keeping edibles ice-cold. Operating at a whisper-quiet 38dB, it ensures a tranquil atmosphere.
Energy consumption is impressively low, about 0.5 kWh per day, using an eco-conscious R600a refrigerant. Upstreman backs this model with a one-year warranty, making the FR17 an intelligent, stress-free choice.
Pros:
1. Compact (18.9" x 17.7" x 19.3") - Fits well in tight spaces.
2. Adjustable thermostat (33.8°F to 46.4°F) - Suits varied storage needs.
3. Quiet (38dB) - Ensures a peaceful environment.
4. Energy-efficient - Only 0.5 kWh daily usage.
5. Eco-friendly - Uses R600a refrigerant, better for the planet.
Cons:
1. Requires manual defrosting, adding to maintenance tasks.
2. It offers minimal freezer space, which is unsuitable for more extensive storage needs.
Conclusion:
Dad's office space is complete with the Upstreman Black FR-17, offering a silent, energy-efficient cooling solution that's both space-saving and perfect for his daily needs, ensuring fresh snacks and drinks are always within reach.
—-----------------------------------------
"Chill in Compact Luxury:
Upstreman's Sleek 3.2 Cu.Ft Double Door Mini Fridge- BD-321"
Nestled amidst our salon's vibrant bustle and the rhythmic snip of scissors, the Upstreman BD321 Mini Double Door Fridge stands as a beacon of excellent efficiency. This sleek, space-conscious appliance, chosen by my mother for its style and functionality, ensures drinks and beauty products are refreshingly cold.
Its well-designed compartments, a 2.2 Cu.Ft cooler alongside a 1 Cu.Ft freezer, maintain our essentials at prime temperatures, from crisp face masks to frosty beverages. The adjustable thermostat and soft LED interior lighting cater to our after-hours operations. At the same time, the versatile shelving accommodates various product sizes.
Costing mere cents to run daily and operating in hushed tones, it's the salon's silent workhorse. With its energy-smart design and customizable options, the Upstreman Mini Double Door Fridge isn't just an appliance—it's a vital part of our daily routine, earning my recommendation for anyone searching for a stylish, reliable mini fridge for personal or professional spaces.
Pros:
1. Compact yet spacious with a 3.2 cubic feet capacity, perfect for small living spaces.
2. Offers five temperature settings and a constant -0.4 F freezer for precise cooling.
3. Features a crisper drawer and removable shelves to keep produce fresh.
4. Quiet (38 dB) operation and energy-efficient, costing roughly $0.1 daily.
5. Customizable with accessories like an ice tray and reversible doors for user convenience.
Cons:
1. Requires manual defrosting, a potential hassle for the time-strapped.
2. The 1 Cu.Ft freezer compartment may be too small for bulk freezing needs.
Conclusion:
My salon's service quality has soared with the Upstreman Mini Double Door Fridge —beverages stay chilled, products remain fresh, and the silent operation keeps the ambiance serene.
 Tile Doctor Ltd
This is a large 17.2 m2 Sandstone Floor installed throughout the living and kitchen areas of a property in the beautiful village of Disley close to Lyme Park which is run by the National Trust. The floor had been installed four years ago and my client was unhappy with the original sealer which hadn’t lasted very long. Without the protection of a sealer dirt had become ingrained in the pores of the stone which was now difficult to clean. Another issue was the rough nature of the Sandstone meant it was impossible to mop as it shreds the mop! As a result, the floor was mainly cleaned with a hoover which was not ideal, especially in a kitchen.
I went over to survey the floor and before quoting I ran a small test clean in the kitchen which took the floor back to its natural pale colour and really showed how dirty the floor had become. Test cleans are great as it helps me to formulate an effective cleaning plan and provide an accurate quote. My client was impressed with the result and so I was booked to come back and deep clean and then reseal the whole floor. Due to its size I estimated the floor would take two days to deep clean and a further day to apply a new sealer, so three days in total.
Working in large sections I started by cleaning the floor and stripping off the old sealer with a strong dilution of Tile Doctor Remove and Go which is a coatings remover that is safe to use on stone. The solution was left to soak into the pores of the Sandstone for ten minutes before being worked in with a 200-grit diamond pad fitted to a rotary floor machine. This action not only removed the old sealer and cleaned the floor but the 200-grit pad being vey coarse removed a lot of the roughness from the surface of the Sandstone so it shouldn’t shred any more mops.
After rinsing the floor with water and removing the slurry with a wet vacuum I set about cleaning the grout with Tile Doctor Pro-Clean worked into the grout line with a stiff brush and assisted with steam from a professional steam cleaner with a grout attachment. Once done the floor was rinsed and extracted again to remove the soil from the grouting. There was also an area near one of the doors where the grout had become loose and needed replacing so I made up a batch of matching grout and filled this in. The floor was then left overnight to dry with assistance from a couple of air movers.
I returned the next day to finish the floor by applying a sealer. First, I double checked the floor was dry with the damp meter. The readings confirmed the air movers had done a good job and that the floor was within the accepted parameters, so I was ready to seal. The sealer I chose was Tile Doctor Seal and Go which being water based doesn’t leave a smell as it dries, it really works well on Sandstone and adds a nice subtle sheen to the stone.
Once finished the floor looked much cleaner, lighter in colour overall more inviting, you could even see the fossils in some of the tiles.
The surface was also smoother so the customer should find cleaning with a mop much easier in future. On that subject its worth pointing out that owners of sealed floors should always use a neutral pH tile cleaner on their floors as most supermarket products are simply too strong and will prematurely strip the sealer off a tile if used repeatedly. Tile Doctor sell a product called Tile Doctor Neutral Cleaner which is ideal for cleaning sealed Sandstone floors like this one.
My client was really happy with the results and sent me a message later saying: “the floor looks amazing!”
Kamila Logonzy
East Cheshire Tile Doctor

 Landforms
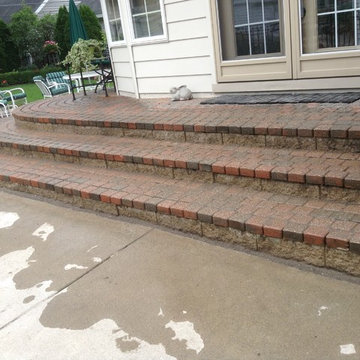
This homeowner contacted us to provide an estimate to replace the these failing steps at the front and rear entrances of his home. The issue was not in the product but in the installation. Removed both set of steps and their inferior base. Then installed new base and reused the existing pavers. They turned out great at a fraction of the cost. Landforms Inc.
 Allman Remodeling Contractors
Front Porch Transformation – From Failing Wood to Full Composite Upgrade ✨
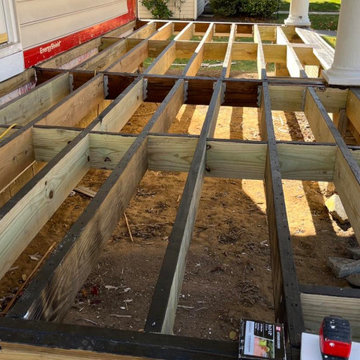
This porch had years of peeling paint, rot, water damage, and structural wear. We rebuilt it from the framing up and gave this home a clean, modern, low-maintenance upgrade that will last for decades.
What we did:
✔️ Removed all failing decking, treads, and trim
✔️ Repaired and reinforced the existing framing
✔️ Installed new composite decking in a beautiful wood-tone finish
✔️ Rebuilt the stair system with composite treads & white risers
✔️ Installed new vinyl railings and posts
✔️ Wrapped all exposed structure in PVC for a clean, maintenance-free finish
✔️ Sealed, repaired, and refinished column bases
✔️ Added all new fasteners, blocking, and waterproofing where needed
The result? A porch that’s safer, stronger, and absolutely elevates the curb appeal of this home.
If your porch or deck is showing signs of age — peeling paint, soft spots, loose rails, or rot — we can rebuild it the right way.
 Allman Remodeling Contractors
Front Porch Transformation – From Failing Wood to Full Composite Upgrade ✨
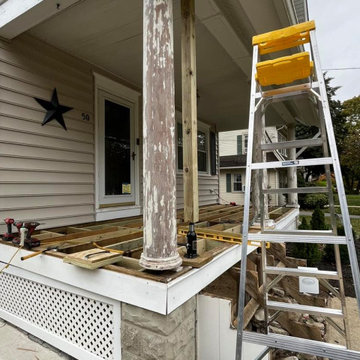
This porch had years of peeling paint, rot, water damage, and structural wear. We rebuilt it from the framing up and gave this home a clean, modern, low-maintenance upgrade that will last for decades.
What we did:
✔️ Removed all failing decking, treads, and trim
✔️ Repaired and reinforced the existing framing
✔️ Installed new composite decking in a beautiful wood-tone finish
✔️ Rebuilt the stair system with composite treads & white risers
✔️ Installed new vinyl railings and posts
✔️ Wrapped all exposed structure in PVC for a clean, maintenance-free finish
✔️ Sealed, repaired, and refinished column bases
✔️ Added all new fasteners, blocking, and waterproofing where needed
The result? A porch that’s safer, stronger, and absolutely elevates the curb appeal of this home.
If your porch or deck is showing signs of age — peeling paint, soft spots, loose rails, or rot — we can rebuild it the right way.
 Solid Base Construction
Concrete Patio & Under-Deck Storage Upgrade
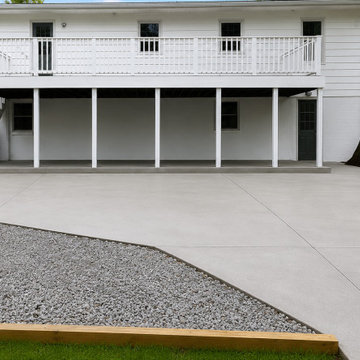
Removed severely cracked and failing concrete and installed a new reinforced concrete slab beneath the elevated deck to create a clean, functional storage area. The project also included a concrete retaining wall beneath the staircase to help manage water runoff and prevent erosion around the new slab. The completed installation transformed an unusable space into a durable, attractive extension of the property while improving drainage, accessibility, and long-term performance.
 McCabe By Design LLC
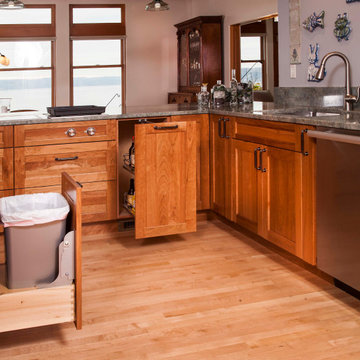
Failing appliances, poor quality cabinetry, poor lighting and less than ergonomic storage is what precipitated the remodel of this kitchen for a petite chef.
The appliances were selected based on the features that would provide maximum accessibility, safety and ergonomics, with a focus on health and wellness. This includes an induction cooktop, electric grill/griddle, side hinged wall oven, side hinged steam oven, warming drawer and counter depth refrigeration.
The cabinetry layout with internal convenience hardware (mixer lift, pull-out knife block, pull-out cutting board storage, tray dividers, roll-outs, tandem trash and recycling, and pull-out base pantry) along with a dropped counter on the end of the island with an electrical power strip ensures that the chef can cook and bake with ease with a minimum of bending or need of a step stool, especially when the kids and grandchildren are helping in the kitchen. The new coffee station, tall pantries and relocated island sink allow non-cooks to be in the kitchen without being underfoot.
Extending the open shelf soffits provides additional illuminated space to showcase the chef’s extensive collection of M.A. Hadley pottery as well as much needed targeted down lighting over the perimeter countertops. Under cabinet lights provide much needed task lighting.
The remodeled kitchen checks a lot of boxes for the chef. There is no doubt who will be hosting family holiday gatherings!
 Master Pavers
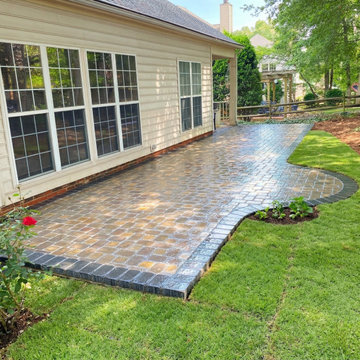
Most failed paver patios in the Charlotte area don't fail because of the pavers. They fail because of what was skipped underneath.
When you see a finished patio, you're looking at the final 2 inches of a 10-inch build. Here's the work that decides how long it lasts:
Excavation. 8 to 12 inches below the final surface, down to stable soil. A patio built on topsoil sinks. A patio built on compacted ground doesn't.
Base layer. 4 to 6 inches of crushed stone, compacted in lifts. This is the structural backbone — the deeper and denser it is, the straighter the surface stays.
Bedding sand. A 1-inch precisely screeded layer of sharp sand. Not decorative — it locks the pavers in place and allows micro-adjustments without disturbing the base.
Edge restraint + polymeric sand. The perimeter restraint keeps pavers from spreading sideways. Polymeric sand swept into the joints seals against weeds, insects, and water migration.
What you pay for is the 2 inches on top. What makes it last is the 10 inches underneath. That's the difference between a patio that holds up for two decades and one that sinks near the downspout in year three.
 Allman Remodeling Contractors
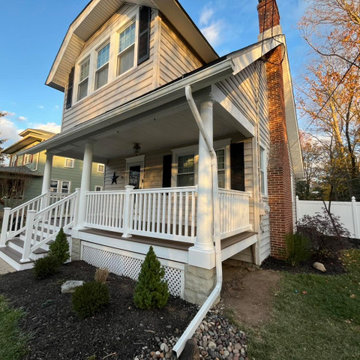
Front Porch Transformation – From Failing Wood to Full Composite Upgrade ✨
This porch had years of peeling paint, rot, water damage, and structural wear. We rebuilt it from the framing up and gave this home a clean, modern, low-maintenance upgrade that will last for decades.
What we did:
✔️ Removed all failing decking, treads, and trim
✔️ Repaired and reinforced the existing framing
✔️ Installed new composite decking in a beautiful wood-tone finish
✔️ Rebuilt the stair system with composite treads & white risers
✔️ Installed new vinyl railings and posts
✔️ Wrapped all exposed structure in PVC for a clean, maintenance-free finish
✔️ Sealed, repaired, and refinished column bases
✔️ Added all new fasteners, blocking, and waterproofing where needed
The result? A porch that’s safer, stronger, and absolutely elevates the curb appeal of this home.
If your porch or deck is showing signs of age — peeling paint, soft spots, loose rails, or rot — we can rebuild it the right way.
7