
Search results for "Bonus start up" in Home Design Ideas

 Tile Doctor Ltd
During an inspection for alteration work, this customer from Cheshunt discovered what appeared to be an original encaustic tiled floor under the hallway carpet. Keen to work out what it was, and have it restored, I was asked to pop round and look.
I went over as requested to survey the hallway floor and confirm their suspicions. The carpet had been secured with gripper rods glued onto the floor and that came away easily enough. Underneath, the tiles had been covered with self-levelling cement which had to be carefully scraped away to reveal the tiles.
I ran a test to see if the cement leveller could be easily removed and using a combination of a scraper with Tile Doctor Pro-Clean, I was able to confirm the tiled floor was indeed salvageable. The house was Edwardian, and the tiles had been laid in a classic black and white geometric pattern typical of the period so I suspect the floor was indeed original.
I worked out a quote to restore the whole floor including the removal of the cement, deep cleaning and then sealing the tiles. Without removing all the cement, it would be difficult to price for replacing broken tiles, but I suspected there may be a few as its quite usual for a floor of this age. Keen to have the floor restored we were given the go-ahead and a date scheduled for the work to start.
The first step was to remove all the carpet and gripper rod so we could see the full extent of the self-levelling screed. Once done it was a case of carefully chipping and scraping away to break up the cement until the tiled floor had been fully revealed. Its slow and detailed work but quite rewarding when the tiled floor is finally revealed. The tiles had survived well under the carpet and cement but as suspected a few repairs and replacement would be needed.
With all the cement brushed away work moved onto cleaning which started with a strong dilution of Tile Doctor Pro-Clean applied to the floor and left to soak in for fifteen minutes the scrubbed in with a rotary machine fitted with a Black pad. A lot of soiling is generated from this which is rinsed off with water and extracted with a wet vacuum. The floor was then inspected and the process repeated where required.
The next step was to treat the tiles to an acid wash using Tile Doctor Grout Clean-up. This is applied as before and has several benefits including dissolving the remaining cement residue and neutralising the pH of the floor after the use of Tile Doctor Pro-Clean which is a strong alkaline.
The floor was then inspected and the broken tiles carefully removed so they could be replaced. This is delicate work as lifting a tile can sometimes upset its neighbour and before you know it the size of the work has tripled. Replacement tiles were then cut to fit the existing geometric pattern and secured into place with a rapid set adhesive and grouted in.
Once the replacement tile and grout had set, the floor was given a light clean using Tile Doctor Neutral Tile Cleaner and then left to dry out overnight.
The next day the tiles were sealed using a single coat of Tile Doctor Colour Grow and the followed up with give coats of Tile Doctor Seal & Go. Colour Grow is an impregnator that soaks into the pores of the tile protecting it from within and improving colour, where as Seal and Go adds a nice subtle sheen to the tiles. Both products are breathable which is an important feature with old floors that don’t have a damp proof membrane.
For aftercare I recommended Neutral Tile Cleaner which is a gentle but effective tile cleaning product that won’t damage the sealer.
Robert Voyce
Hertfordshire TIle Doctor
 Kari P
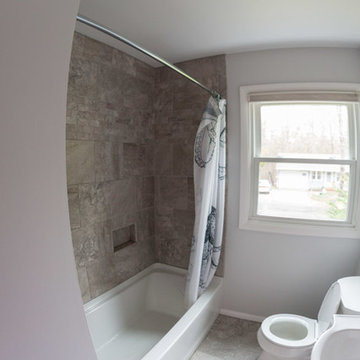
When I bought my house in May 2014, there was one thing I really didn’t like about it – the 1950s bathroom complete with pink tile and mismatched gaudy fixtures was absolutely hideous. I knew redoing the bathroom would be a big, expensive project, so I vowed to just live with it while I fixed up parts of the house that were easier to update, such as putting a fresh coat of paint on the walls and updating the curtains (which I still haven’t done, by the way). Well my first winter in the new house turned out to be a bad one, and in February 2015, I noticed water stains on the walls and ceiling of the second bedroom that only got worse and worse each day. The water damage quickly spread to other rooms, and when contractors came to the house to access and fix the damage, they discovered moisture behind the pink tiled walls of my bathroom. And so started the bathroom remodel.
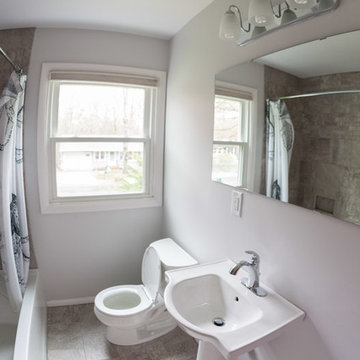
Start to finish, this project took close to six months, due to going back and forth with insurance and difficulty finding a contractor I liked. I lived without a shower for at least four of those months, showering at the gym where I worked or in a pop-up tent in my backyard once it was warm enough out. My friend Eric and I demoed the bathroom and for the remodel, I picked out all of the design components and had a local contractor, Fred Haas do the work. I kept the original layout – as my bathroom was small to begin with and it was both impractical and expensive to start moving things around – but just about everything else about the bathroom is new, except for maybe the window and door. New tub, sink, and toilet, new tile floor and shower surround, new walls and ceiling, fresh paint, new fixtures and mirror, updated lighting, and a better ventilation system were all added.
Tub – Sterling Vikrell
Toilet – Kohler Wellworth® two-piece round-front dual-flush toilet
Sink – Kohler Veer™ 21" pedestal bathroom sink
Fixtures – Kohler Alteo® line
Tile floor and shower surround – American Olean Laurel Heights ceramic tile in Summit Gray
Lighting – I don't remember... will have to see if I can find it
Ventilation system – NuTone
Mirror – Ikea
Paint – Behr
Here are photos of my project from start to finish. As you can see, I probably still need a thing or two (a toilet paper holder, mini storage shelf, and some art wouldn’t hurt, nor would replacing the door or painting it white), but overall I’m really happy with how my new bathroom came out. I LOVE it, which is the exact opposite of how I felt about the original bathroom.
Photos © Kari Post
 KITCHEN & BATH DESIGNERS OF TAMPA, LLC
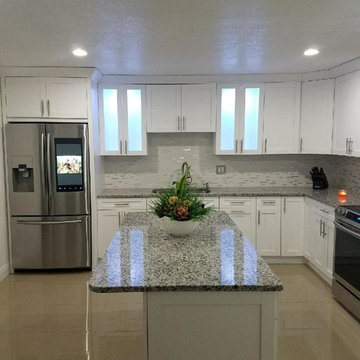
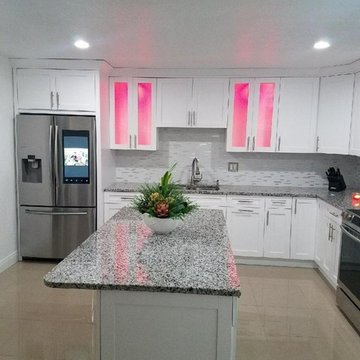
 Kitchen Remodeled in Tampa, Florida
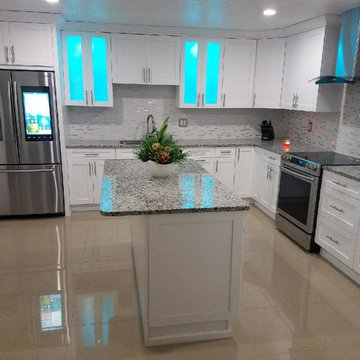
KITCHEN & BATH DESIGNERS OF TAMPA, LLC present, and share, step by step, the process of renovating the one big kitchen. Today we're taking a look back at the project, starting with their somewhat dated 'before' kitchen.
The owners had found their dream house, in Tampa, Florida, but they weren't super excited about the layout of the kitchen and family room (old model). They envisioned to create a big, family-friendly indoor-outdoor space, while also updating their old kitchen. After sharing with us their inspiration for their finished kitchen, and the projected budget for their project, the owners were ready to get started. (See video for before and after).
The Blog for take idea and REMODELING your "Kitchen and Bathroom".
by AMAURY RODRIGUEZ March 28, 2018
Kitchen Remodeled in Tampa, Florida
KITCHEN & BATH DESIGNERS OF TAMPA, LLC present, and share, step by step, the process of renovating the one big kitchen. Today we're taking a look back at the project, starting with their somewhat dated 'before' kitchen.
The owners had found their dream house, in Tampa, Florida, but they weren't super excited about the layout of the kitchen and family room (old model). They envisioned to create a big, family-friendly indoor-outdoor space, while also updating their old kitchen. After sharing with us their inspiration for their finished kitchen, and the projected budget for their project, the owners were ready to get started. (See video for before and after).
The KITCHEN & BATH DESIGNERS OF TAMPA working with our kitchen or bath cabinet and accessories installers are local (up to 200 miles from Tampa), licensed, insured, and undergo a thorough background-screening process to ensure your complete cabinet replacement satisfaction.
Call Today: 1-813-922-5998 for English or Spanish.
Email: info@kitchen-bath-designers-of-tampa.com
Licensed and Insured for service in areas up to 200 miles from Tampa, Florida.
Clearwater, Clearwater Beach, Safety Harbor, Dunedin, Palm Harbor, Tarpon Springs, Oldsmar, Largo, St Petersburg, St Pete Beach, Trinity, Holiday, New Port Richey, West Chase, and more.
Find the right local pro for your project
 Tile Doctor Ltd
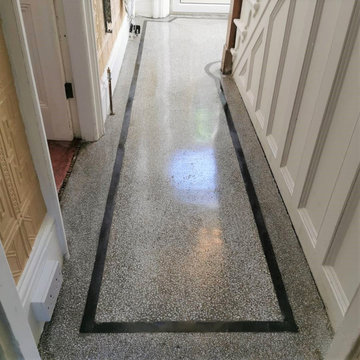
This beautiful Terrazzo floor was uncovered in the hallway of a house in Doncaster, as you can see it had taken a bit of a beating over the years, but the owners were keen on having it restored. Restoring period features like these are a great idea as they are very sought after and can add a lot of value to a property.
The floor had spent many years below carpet and nails had been hammered through the floor to hold carpet grippers in place. Along with this there was a lot of glue and paint to remove. However, I was confident that we could get the floor restored, I gave them a quotation for the work, and they were happy to proceed as soon as possible.
Doncaster is a hot spot for terrazzo floors, apparently there was a big Italian community there in the early part of the 1900s. Doncaster is also famous for its rich rail heritage; the main Doncaster train station is on the East Coast mainline and you find many original station buildings have Terrazzo floors in the public areas.
The first job was to remove as much of the paint, glue and other contaminates as possible. These were scraped off the floor by hand using a razor-sharp scraper.
We then moved onto using a set of five diamond burnishing pads of different grits to cut through the top layers and grime to eventually bring this floor back up to its’ former glory. Starting off with the most coarse pad first I started to go over the floor a pad at a time, each pad is fitted to a rotary machine which has extra weight added to it to make the pads work ever better. Each time a pad is changed, it is slightly less coarse, this starts to polish the floor up to a shine eventually ended with a very fine diamond pad. Water is added at each stage and removed with the wet vacuum before the next pad is used.
Gradually the original floor started to shine through, the colours were quite pronounced, and you could see the floor was a lovely example of terrazzo. After a final rinse to remove the soiling generated by burnishing, I turned my attention to filling the many holes where the nails had been.
The floor was left to dry off overnight and the following morning I returned to seal the floor with several coats of Tile Doctor Colour Grow. I choose this product as its designed to enhance the subtle colours in the floor and its fully breathable which is an important consideration when sealing floors in older properties. Damp proof membranes are a common feature these days but are a relatively recent invention. With older floors you need to allow the floor to breathe so the moisture in the sub floor can rise and evaporate at the surface, without this the moisture will reach out to the walls where it can cause rising damp.
The result was a highly polished floor just the way it would have looked when it was first installed 90 years ago. As you can imagine the owners were over the moon with the transformation.
Matthew Lovett
South Yorkshire TIle Doctor
 KITCHEN & BATH DESIGNERS OF TAMPA, LLC
 Kitchen Remodeled in Tampa, Florida
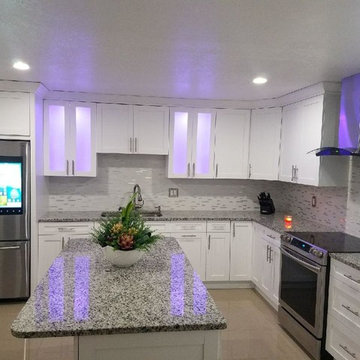
KITCHEN & BATH DESIGNERS OF TAMPA, LLC present, and share, step by step, the process of renovating the one big kitchen. Today we're taking a look back at the project, starting with their somewhat dated 'before' kitchen.
The owners had found their dream house, in Tampa, Florida, but they weren't super excited about the layout of the kitchen and family room (old model). They envisioned to create a big, family-friendly indoor-outdoor space, while also updating their old kitchen. After sharing with us their inspiration for their finished kitchen, and the projected budget for their project, the owners were ready to get started. (See video for before and after).
The Blog for take idea and REMODELING your "Kitchen and Bathroom".
by AMAURY RODRIGUEZ March 28, 2018
Kitchen Remodeled in Tampa, Florida
KITCHEN & BATH DESIGNERS OF TAMPA, LLC present, and share, step by step, the process of renovating the one big kitchen. Today we're taking a look back at the project, starting with their somewhat dated 'before' kitchen.
The owners had found their dream house, in Tampa, Florida, but they weren't super excited about the layout of the kitchen and family room (old model). They envisioned to create a big, family-friendly indoor-outdoor space, while also updating their old kitchen. After sharing with us their inspiration for their finished kitchen, and the projected budget for their project, the owners were ready to get started. (See video for before and after).
The KITCHEN & BATH DESIGNERS OF TAMPA working with our kitchen or bath cabinet and accessories installers are local (up to 200 miles from Tampa), licensed, insured, and undergo a thorough background-screening process to ensure your complete cabinet replacement satisfaction.
Call Today: 1-813-922-5998 for English or Spanish.
Email: info@kitchen-bath-designers-of-tampa.com
Licensed and Insured for service in areas up to 200 miles from Tampa, Florida.
Clearwater, Clearwater Beach, Safety Harbor, Dunedin, Palm Harbor, Tarpon Springs, Oldsmar, Largo, St Petersburg, St Pete Beach, Trinity, Holiday, New Port Richey, West Chase, and more.
 KITCHEN & BATH DESIGNERS OF TAMPA, LLC
 Kitchen Remodeled in Tampa, Florida
KITCHEN & BATH DESIGNERS OF TAMPA, LLC present, and share, step by step, the process of renovating the one big kitchen. Today we're taking a look back at the project, starting with their somewhat dated 'before' kitchen.
The owners had found their dream house, in Tampa, Florida, but they weren't super excited about the layout of the kitchen and family room (old model). They envisioned to create a big, family-friendly indoor-outdoor space, while also updating their old kitchen. After sharing with us their inspiration for their finished kitchen, and the projected budget for their project, the owners were ready to get started. (See video for before and after).
The Blog for take idea and REMODELING your "Kitchen and Bathroom".
by AMAURY RODRIGUEZ March 28, 2018
Kitchen Remodeled in Tampa, Florida
KITCHEN & BATH DESIGNERS OF TAMPA, LLC present, and share, step by step, the process of renovating the one big kitchen. Today we're taking a look back at the project, starting with their somewhat dated 'before' kitchen.
The owners had found their dream house, in Tampa, Florida, but they weren't super excited about the layout of the kitchen and family room (old model). They envisioned to create a big, family-friendly indoor-outdoor space, while also updating their old kitchen. After sharing with us their inspiration for their finished kitchen, and the projected budget for their project, the owners were ready to get started. (See video for before and after).
The KITCHEN & BATH DESIGNERS OF TAMPA working with our kitchen or bath cabinet and accessories installers are local (up to 200 miles from Tampa), licensed, insured, and undergo a thorough background-screening process to ensure your complete cabinet replacement satisfaction.
Call Today: 1-813-922-5998 for English or Spanish.
Email: info@kitchen-bath-designers-of-tampa.com
Licensed and Insured for service in areas up to 200 miles from Tampa, Florida.
Clearwater, Clearwater Beach, Safety Harbor, Dunedin, Palm Harbor, Tarpon Springs, Oldsmar, Largo, St Petersburg, St Pete Beach, Trinity, Holiday, New Port Richey, West Chase, and more.
 Kari P
When I bought my house in May 2014, there was one thing I really didn’t like about it – the 1950s bathroom complete with pink tile and mismatched gaudy fixtures was absolutely hideous. I knew redoing the bathroom would be a big, expensive project, so I vowed to just live with it while I fixed up parts of the house that were easier to update, such as putting a fresh coat of paint on the walls and updating the curtains (which I still haven’t done, by the way). Well my first winter in the new house turned out to be a bad one, and in February 2015, I noticed water stains on the walls and ceiling of the second bedroom that only got worse and worse each day. The water damage quickly spread to other rooms, and when contractors came to the house to access and fix the damage, they discovered moisture behind the pink tiled walls of my bathroom. And so started the bathroom remodel.
Start to finish, this project took close to six months, due to going back and forth with insurance and difficulty finding a contractor I liked. I lived without a shower for at least four of those months, showering at the gym where I worked or in a pop-up tent in my backyard once it was warm enough out. My friend Eric and I demoed the bathroom and for the remodel, I picked out all of the design components and had a local contractor, Fred Haas do the work. I kept the original layout – as my bathroom was small to begin with and it was both impractical and expensive to start moving things around – but just about everything else about the bathroom is new, except for maybe the window and door. New tub, sink, and toilet, new tile floor and shower surround, new walls and ceiling, fresh paint, new fixtures and mirror, updated lighting, and a better ventilation system were all added.
Tub – Sterling Vikrell
Toilet – Kohler Wellworth® two-piece round-front dual-flush toilet
Sink – Kohler Veer™ 21" pedestal bathroom sink
Fixtures – Kohler Alteo® line
Tile floor and shower surround – American Olean Laurel Heights ceramic tile in Summit Gray
Lighting – I don't remember... will have to see if I can find it
Ventilation system – NuTone
Mirror – Ikea
Paint – Behr
Shower Curtain – eBay
Here are photos of my project from start to finish. As you can see, I probably still need a thing or two (a toilet paper holder, mini storage shelf, and some art wouldn’t hurt, nor would replacing the door or painting it white), but overall I’m really happy with how my new bathroom came out. I LOVE it, which is the exact opposite of how I felt about the original bathroom.
Photos © Kari Post
Sponsored
Columbus, OH
Free consultation for landscape design!

Peabody Landscape Group
Franklin County's Reliable Landscape Design & Contracting
 Kari P
When I bought my house in May 2014, there was one thing I really didn’t like about it – the 1950s bathroom complete with pink tile and mismatched gaudy fixtures was absolutely hideous. I knew redoing the bathroom would be a big, expensive project, so I vowed to just live with it while I fixed up parts of the house that were easier to update, such as putting a fresh coat of paint on the walls and updating the curtains (which I still haven’t done, by the way). Well my first winter in the new house turned out to be a bad one, and in February 2015, I noticed water stains on the walls and ceiling of the second bedroom that only got worse and worse each day. The water damage quickly spread to other rooms, and when contractors came to the house to access and fix the damage, they discovered moisture behind the pink tiled walls of my bathroom. And so started the bathroom remodel.
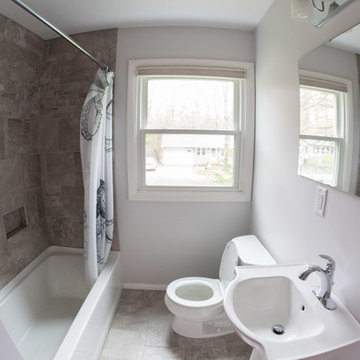
Start to finish, this project took close to six months, due to going back and forth with insurance and difficulty finding a contractor I liked. I lived without a shower for at least four of those months, showering at the gym where I worked or in a pop-up tent in my backyard once it was warm enough out. My friend Eric and I demoed the bathroom and for the remodel, I picked out all of the design components and had a local contractor, Fred Haas do the work. I kept the original layout – as my bathroom was small to begin with and it was both impractical and expensive to start moving things around – but just about everything else about the bathroom is new, except for maybe the window and door. New tub, sink, and toilet, new tile floor and shower surround, new walls and ceiling, fresh paint, new fixtures and mirror, updated lighting, and a better ventilation system were all added.
Tub – Sterling Vikrell
Toilet – Kohler Wellworth® two-piece round-front dual-flush toilet
Sink – Kohler Veer™ 21" pedestal bathroom sink
Fixtures – Kohler Alteo® line
Tile floor and shower surround – American Olean Laurel Heights ceramic tile in Summit Gray
Lighting – I don't remember... will have to see if I can find it
Ventilation system – NuTone
Mirror – Ikea
Paint – Behr
Shower Curtain – eBay
Here are photos of my project from start to finish. As you can see, I probably still need a thing or two (a toilet paper holder, mini storage shelf, and some art wouldn’t hurt, nor would replacing the door or painting it white), but overall I’m really happy with how my new bathroom came out. I LOVE it, which is the exact opposite of how I felt about the original bathroom.
Photos © Kari Post
 KITCHEN & BATH DESIGNERS OF TAMPA, LLC
 Kitchen Remodeled in Tampa, Florida
KITCHEN & BATH DESIGNERS OF TAMPA, LLC present, and share, step by step, the process of renovating the one big kitchen. Today we're taking a look back at the project, starting with their somewhat dated 'before' kitchen.
The owners had found their dream house, in Tampa, Florida, but they weren't super excited about the layout of the kitchen and family room (old model). They envisioned to create a big, family-friendly indoor-outdoor space, while also updating their old kitchen. After sharing with us their inspiration for their finished kitchen, and the projected budget for their project, the owners were ready to get started. (See video for before and after).
The Blog for take idea and REMODELING your "Kitchen and Bathroom".
by AMAURY RODRIGUEZ March 28, 2018
Kitchen Remodeled in Tampa, Florida
KITCHEN & BATH DESIGNERS OF TAMPA, LLC present, and share, step by step, the process of renovating the one big kitchen. Today we're taking a look back at the project, starting with their somewhat dated 'before' kitchen.
The owners had found their dream house, in Tampa, Florida, but they weren't super excited about the layout of the kitchen and family room (old model). They envisioned to create a big, family-friendly indoor-outdoor space, while also updating their old kitchen. After sharing with us their inspiration for their finished kitchen, and the projected budget for their project, the owners were ready to get started. (See video for before and after).
The KITCHEN & BATH DESIGNERS OF TAMPA working with our kitchen or bath cabinet and accessories installers are local (up to 200 miles from Tampa), licensed, insured, and undergo a thorough background-screening process to ensure your complete cabinet replacement satisfaction.
Call Today: 1-813-922-5998 for English or Spanish.
Email: info@kitchen-bath-designers-of-tampa.com
Licensed and Insured for service in areas up to 200 miles from Tampa, Florida.
Clearwater, Clearwater Beach, Safety Harbor, Dunedin, Palm Harbor, Tarpon Springs, Oldsmar, Largo, St Petersburg, St Pete Beach, Trinity, Holiday, New Port Richey, West Chase, and more.
 Designs by Cheryl
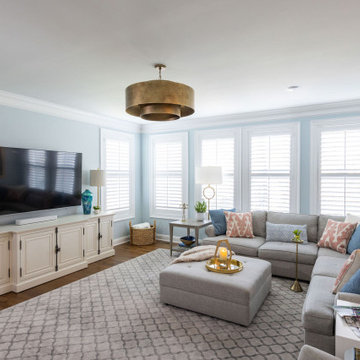
Transitional family room is tranquil and inviting The blue walls with luscious furnishings make it very cozy. The gold drum chandelier and gold accents makes this room very sophisticated. The decorative pillows adds pop of colors with the custom area rug. The patterns in the custom area rug and pillows, along with the blue walls makes it all balance. The off white rustic console adds flare and a perfect size for large Media wall T.V. The gold console lamps frames the Media center perfect. The gold floor lamps, and and gold chandelier brings a contemporary style into this space. The Large square ottoman in a neutral grey offsetting the carpet color makes it nice to prop up your feet. The gold drink tables in quite trendy and so functional and practical.
 Alair Homes Plano
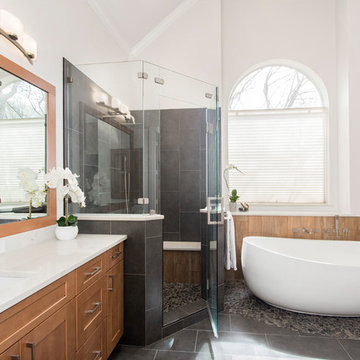
Our clients drastically needed to update this master suite from the original forest green floral wallpaper to something more clean and simple. They wanted to open up the dated cultured marble enclosed tub and shower and remove all soffits and plant ledges above the vanities. They wanted to explore the possibilities of opening up the shower with glass and look at installing a freestanding bathtub and they definitely wanted to keep the double sided fireplace but update the look of it.
First off, we did some minor changes to the bedroom. We replaced the carpet with a beautiful soft multi-color gray low pile carpet and painted the walls a soft white. The fireplace surround was replaced with Carrara 12×12 polished porcelain tile for a more elegant look. Finally, we tore out a corner built in desk and squared off and textured the wall, making it look as though it were never there.
We needed to strip this bathroom down and start from scratch. We demoed the cabinets, counter tops, all plumbing fixtures, ceiling fan, track lighting, tub and tub surround, fireplace surround, shower door, shower walls and ceiling above the shower, all flooring, soffits above vanity areas, saloon doors on the water closet and of course the wallpaper!
We changed the walls around the shower to pony walls with glass on the upper half, opening up the shower. The tile was lined with Premium Antasit 12×24 tile installed vertically in a 50/50 brick pattern. The shower floor and the floor below the tub is Solo River Grey Pebble mosaic tile. A contemporary Jaclo Collection shower system was installed including a contemporary handshower and square shower head. The large freestanding tub is a white Hydro Sytsems “Picasso” with “Steelnox” wall mounted tub filler and hardware from Graff.
All of the cabinets were replaced with Waypoint maple mocha glazed flat front doors and drawers. Quartzmasters Calacatta Grey countertops were installed with 2 Icera “Muse” undermount sinks for a clean modern look. The cabinet hardware the clients chose is ultra modern ”Sutton” from Hardware Resources and the faucet and other hardware is all from the Phylrich “Mix” collection.
Pulling it all together, Premium Antasit 12×14 installed floor tile was installed in a 50/50 brick pattern. The pebble tile that was installed in the shower floor was also installed in an oval shape under the bathtub for a great modern look and to break up the solid gray flooring.
Addison Oak Wood planks were installed vertically behind the bathtub, below the fireplace surround and behind the potty for a modern finished look. The fireplace was surrounded with Carrara 12×12 polished porcelain, as well as the wood planks. Finally, to add the finishing touches, Z-Lite brushed nickel vanity lights were installed above each vanity sink. The clients are so pleased to be able to enjoy and relax in their new contemporary bathroom!
 Susan Yeley Homes
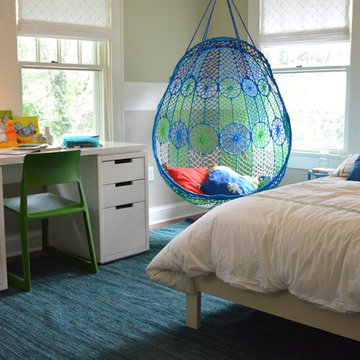
For an 11-year-old moving across the country and starting middle school, a great new room can mean a haven and hideout. She said she dug green, and we went with that and arrived here: a funky mix of old and new, lots of space for books, and a cozy place to read. She loves it, and we designed it to grow up with her.
 Schrader & Companies
Photo Credit Landmark Photography.
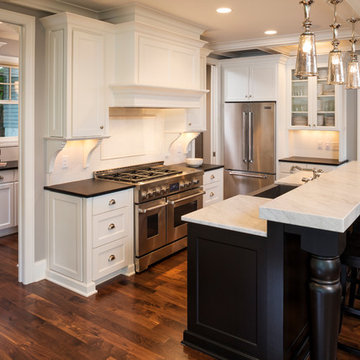
This house was designed to fit the shores of Lake Minnetonka’s Stubbs Bay. The exterior architecture has the feel of an old lake cottage home that’s been there for a century with modern day finishes. The interior has large Marvin windows with expansive views of the lake, walnut floors, extensive wood detailing in the custom cabinets, wainscot, beamed ceilings, and fireplace. Step out of the kitchen to a covered out door porch with phantom screens overlooking the lake. The master bedroom has a large private roof deck overlooking the lake as well. There is a private master bonus room accessed through the master closet. The four levels of the home are accessible by an elevator. The working butler’s pantry, which is accessible by both sides of the kitchen has a secondary sink, dishwasher, refrigerator, lots of storage, and yes windows for natural light, views of the lake, and air flow.
Sponsored
Sunbury, OH

J.Holderby - Renovations
Franklin County's Leading General Contractors - 2X Best of Houzz!

 CONTRACT SOURCE INTERIORS
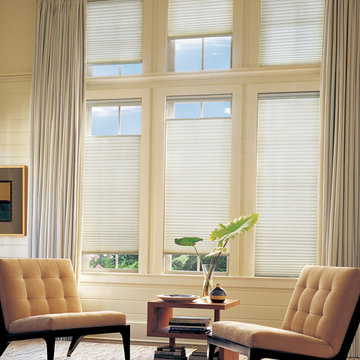
Featured here are Hunter Douglas Applause Honeycomb shades. Available in top down bottom up or standard bottom up shades, these energy saving shades are modestly priced for the budget conscience consumer.
 Alair Homes Plano
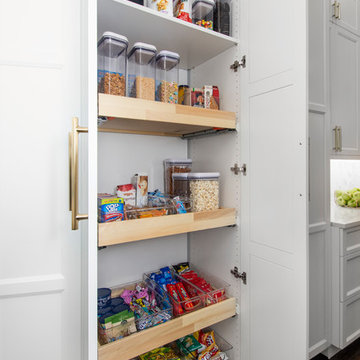
Our clients came to us wanting to update and open up their kitchen, breakfast nook, wet bar, and den. They wanted a cleaner look without clutter but didn’t want to go with an all-white kitchen, fearing it’s too trendy. Their kitchen was not utilized well and was not aesthetically appealing; it was very ornate and dark. The cooktop was too far back in the kitchen towards the butler’s pantry, making it awkward when cooking, so they knew they wanted that moved. The rest was left up to our designer to overcome these obstacles and give them their dream kitchen.
We gutted the kitchen cabinets, including the built-in china cabinet and all finishes. The pony wall that once separated the kitchen from the den (and also housed the sink, dishwasher, and ice maker) was removed, and those appliances were relocated to the new large island, which had a ton of storage and a 15” overhang for bar seating. Beautiful aged brass Quebec 6-light pendants were hung above the island.
All cabinets were replaced and drawers were designed to maximize storage. The Eclipse “Greensboro” cabinetry was painted gray with satin brass Emtek Mod Hex “Urban Modern” pulls. A large banquet seating area was added where the stand-alone kitchen table once sat. The main wall was covered with 20x20 white Golwoo tile. The backsplash in the kitchen and the banquette accent tile was a contemporary coordinating Tempesta Neve polished Wheaton mosaic marble.
In the wet bar, they wanted to completely gut and replace everything! The overhang was useless and it was closed off with a large bar that they wanted to be opened up, so we leveled out the ceilings and filled in the original doorway into the bar in order for the flow into the kitchen and living room more natural. We gutted all cabinets, plumbing, appliances, light fixtures, and the pass-through pony wall. A beautiful backsplash was installed using Nova Hex Graphite ceramic mosaic 5x5 tile. A 15” overhang was added at the counter for bar seating.
In the den, they hated the brick fireplace and wanted a less rustic look. The original mantel was very bulky and dark, whereas they preferred a more rectangular firebox opening, if possible. We removed the fireplace and surrounding hearth, brick, and trim, as well as the built-in cabinets. The new fireplace was flush with the wall and surrounded with Tempesta Neve Polished Marble 8x20 installed in a Herringbone pattern. The TV was hung above the fireplace and floating shelves were added to the surrounding walls for photographs and artwork.
They wanted to completely gut and replace everything in the powder bath, so we started by adding blocking in the wall for the new floating cabinet and a white vessel sink. Black Boardwalk Charcoal Hex Porcelain mosaic 2x2 tile was used on the bathroom floor; coordinating with a contemporary “Cleopatra Silver Amalfi” black glass 2x4 mosaic wall tile. Two Schoolhouse Electric “Isaac” short arm brass sconces were added above the aged brass metal framed hexagon mirror. The countertops used in here, as well as the kitchen and bar, were Elements quartz “White Lightning.” We refinished all existing wood floors downstairs with hand scraped with the grain. Our clients absolutely love their new space with its ease of organization and functionality.
 Green Mountain Builders
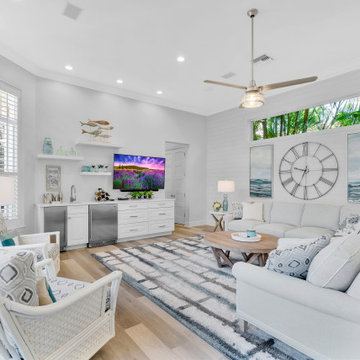
Green Mountain Builders has recently completed a luxury whole home remodel in Bonita Bay, a magnificent award-winning country club community in Bonita Springs, Florida. The remodel focused on opening up the interior space by removing walls that closed off rooms, restricting an open-concept layout. With the dining room wall removed, the home now is bathed in additional sunlight. Opening up the closed area, also makes the home seem much larger. New flooring and paint throughout and a beautiful Luxury Vinyl Plank (LVP) flooring enhance the beauty of this lovely golf course home. LVP is a wonderful wood-look flooring option that offers warmth and texture. The kitchen was completely renovated as were the bedrooms, including the master, and all bathrooms. Green Mountain creatively used shiplap boards in the family room effecting a stunning wall display. In addition, the lovely courtyard remodel has been updated to provide an outdoor space perfect for entertaining and family enjoyment.
Sponsored
Sunbury, OH
J.Holderby - Renovations
Franklin County's Leading General Contractors - 2X Best of Houzz!
 Robert Frank Interiors
Clark Dugger Photography
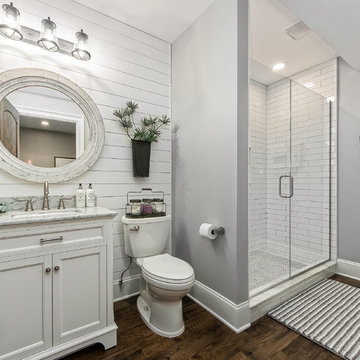
Example of a small classic kids' gray tile and mosaic tile mosaic tile floor bathroom design in Los Angeles with an undermount sink, recessed-panel cabinets, white cabinets, marble countertops, a two-piece toilet and gray walls
Example of a small classic kids' gray tile and mosaic tile mosaic tile floor bathroom design in Los Angeles with an undermount sink, recessed-panel cabinets, white cabinets, marble countertops, a two-piece toilet and gray walls
 Triangle Billiards, Inc
Watch the video at http://www.tribilliards.com/blog/ultimate-game-table-video/
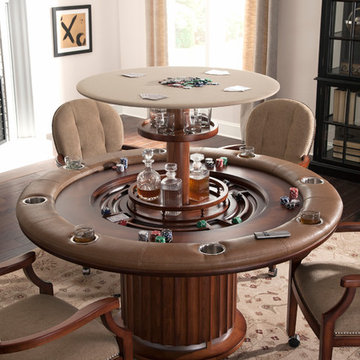
Triangle Billiards is proud to present the new California House Ultimate Game Table. The Ultimate Game Table is designed to be the center of the universe at parties and gatherings of all types.
The Ultimate Game Table is a magnet for gathering friends together for poker night, then sitting around and relaxing while sipping your favorite beverages after the game.
Beneath the luxurious poker top, your Ultimate Game Table features a whiskey and spirit bar that rises from the center of the table with the push of a button.
The bar rotates 360’ for easy sampling among friends and features discreet and secure storage for your favorite collection of whiskey and glasses.
A poker vault and card storage area also sits beneath the card playing surface to further enhance functionality.
The Ultimate Game Table is made from your choice of the finest hardwood and premium materials and features a virtually silent ultra-durable lift mechanism.
Customize your Ultimate Game Table to fit your room with your choice of finishes, fabrics, and options.
The Ultimate Game Table offered by Triangle Billiards is the pinnacle of luxury gameplay and entertainment.
For more information about the Ultimate Game Table contact the Triangle Stores at 866 941-2564 or visit triangle on the web at www.trianglebilliards.com
Order your Ultimate Game Table from Triangle Billiards Today and “Start Having Real Fun Now”
 Landforms
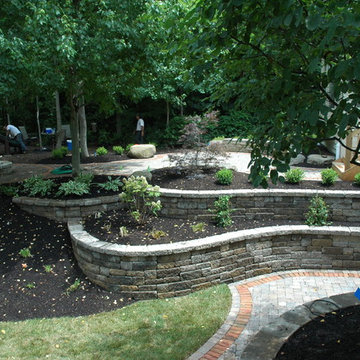
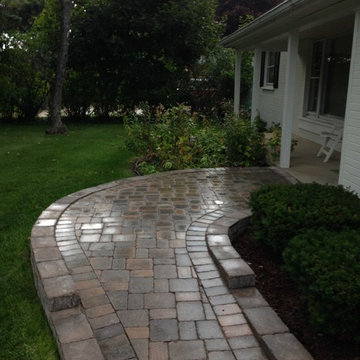
This existing client in Farmington Hills asked us to redesign and install a new front walkway for his home. It had to go compliment the style of the home and be barrier free. So his guest would not have to step up to the porch. We created this beautiful paver ramp. It starts flat at the driveway and gradually slopes up to the front porch. Landforms Inc.
50