
Search results for "Checklist" in Home Design Ideas
 Paradise Tiny Homes LLC
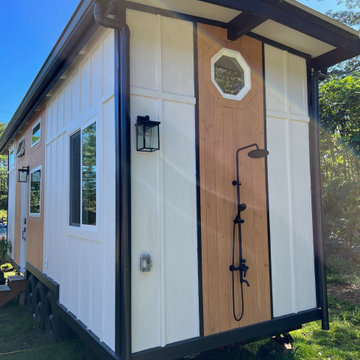
This was at an open house we had at Ola Brew!
This Paradise Model ATU is extra tall and grand! As you would in you have a couch for lounging, a 6 drawer dresser for clothing, and a seating area and closet that mirrors the kitchen. Quartz countertops waterfall over the side of the cabinets encasing them in stone. The custom kitchen cabinetry is sealed in a clear coat keeping the wood tone light. Black hardware accents with contrast to the light wood. A main-floor bedroom- no crawling in and out of bed. The wallpaper was an owner request; what do you think of their choice?
The bathroom has natural edge Hawaiian mango wood slabs spanning the length of the bump-out: the vanity countertop and the shelf beneath. The entire bump-out-side wall is tiled floor to ceiling with a diamond print pattern. The shower follows the high contrast trend with one white wall and one black wall in matching square pearl finish. The warmth of the terra cotta floor adds earthy warmth that gives life to the wood. 3 wall lights hang down illuminating the vanity, though durning the day, you likely wont need it with the natural light shining in from two perfect angled long windows.
This Paradise model was way customized. The biggest alterations were to remove the loft altogether and have one consistent roofline throughout. We were able to make the kitchen windows a bit taller because there was no loft we had to stay below over the kitchen. This ATU was perfect for an extra tall person. After editing out a loft, we had these big interior walls to work with and although we always have the high-up octagon windows on the interior walls to keep thing light and the flow coming through, we took it a step (or should I say foot) further and made the french pocket doors extra tall. This also made the shower wall tile and shower head extra tall. We added another ceiling fan above the kitchen and when all of those awning windows are opened up, all the hot air goes right up and out.
 Paradise Tiny Homes LLC
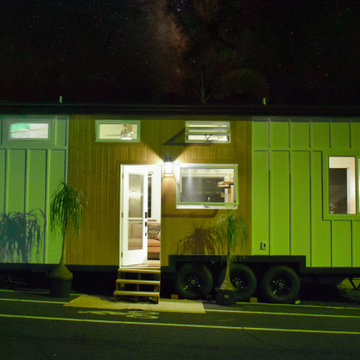
This was at an open house we had at Ola Brew!
This Paradise Model ATU is extra tall and grand! As you would in you have a couch for lounging, a 6 drawer dresser for clothing, and a seating area and closet that mirrors the kitchen. Quartz countertops waterfall over the side of the cabinets encasing them in stone. The custom kitchen cabinetry is sealed in a clear coat keeping the wood tone light. Black hardware accents with contrast to the light wood. A main-floor bedroom- no crawling in and out of bed. The wallpaper was an owner request; what do you think of their choice?
The bathroom has natural edge Hawaiian mango wood slabs spanning the length of the bump-out: the vanity countertop and the shelf beneath. The entire bump-out-side wall is tiled floor to ceiling with a diamond print pattern. The shower follows the high contrast trend with one white wall and one black wall in matching square pearl finish. The warmth of the terra cotta floor adds earthy warmth that gives life to the wood. 3 wall lights hang down illuminating the vanity, though durning the day, you likely wont need it with the natural light shining in from two perfect angled long windows.
This Paradise model was way customized. The biggest alterations were to remove the loft altogether and have one consistent roofline throughout. We were able to make the kitchen windows a bit taller because there was no loft we had to stay below over the kitchen. This ATU was perfect for an extra tall person. After editing out a loft, we had these big interior walls to work with and although we always have the high-up octagon windows on the interior walls to keep thing light and the flow coming through, we took it a step (or should I say foot) further and made the french pocket doors extra tall. This also made the shower wall tile and shower head extra tall. We added another ceiling fan above the kitchen and when all of those awning windows are opened up, all the hot air goes right up and out.
 Paradise Tiny Homes LLC
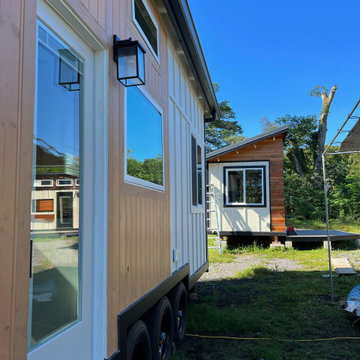
This was at an open house we had at Ola Brew!
This Paradise Model ATU is extra tall and grand! As you would in you have a couch for lounging, a 6 drawer dresser for clothing, and a seating area and closet that mirrors the kitchen. Quartz countertops waterfall over the side of the cabinets encasing them in stone. The custom kitchen cabinetry is sealed in a clear coat keeping the wood tone light. Black hardware accents with contrast to the light wood. A main-floor bedroom- no crawling in and out of bed. The wallpaper was an owner request; what do you think of their choice?
The bathroom has natural edge Hawaiian mango wood slabs spanning the length of the bump-out: the vanity countertop and the shelf beneath. The entire bump-out-side wall is tiled floor to ceiling with a diamond print pattern. The shower follows the high contrast trend with one white wall and one black wall in matching square pearl finish. The warmth of the terra cotta floor adds earthy warmth that gives life to the wood. 3 wall lights hang down illuminating the vanity, though durning the day, you likely wont need it with the natural light shining in from two perfect angled long windows.
This Paradise model was way customized. The biggest alterations were to remove the loft altogether and have one consistent roofline throughout. We were able to make the kitchen windows a bit taller because there was no loft we had to stay below over the kitchen. This ATU was perfect for an extra tall person. After editing out a loft, we had these big interior walls to work with and although we always have the high-up octagon windows on the interior walls to keep thing light and the flow coming through, we took it a step (or should I say foot) further and made the french pocket doors extra tall. This also made the shower wall tile and shower head extra tall. We added another ceiling fan above the kitchen and when all of those awning windows are opened up, all the hot air goes right up and out.
Find the right local pro for your project
 Paradise Tiny Homes LLC
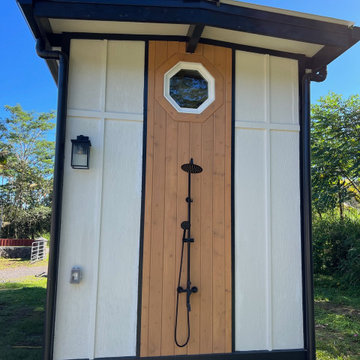
This was at an open house we had at Ola Brew!
This Paradise Model ATU is extra tall and grand! As you would in you have a couch for lounging, a 6 drawer dresser for clothing, and a seating area and closet that mirrors the kitchen. Quartz countertops waterfall over the side of the cabinets encasing them in stone. The custom kitchen cabinetry is sealed in a clear coat keeping the wood tone light. Black hardware accents with contrast to the light wood. A main-floor bedroom- no crawling in and out of bed. The wallpaper was an owner request; what do you think of their choice?
The bathroom has natural edge Hawaiian mango wood slabs spanning the length of the bump-out: the vanity countertop and the shelf beneath. The entire bump-out-side wall is tiled floor to ceiling with a diamond print pattern. The shower follows the high contrast trend with one white wall and one black wall in matching square pearl finish. The warmth of the terra cotta floor adds earthy warmth that gives life to the wood. 3 wall lights hang down illuminating the vanity, though durning the day, you likely wont need it with the natural light shining in from two perfect angled long windows.
This Paradise model was way customized. The biggest alterations were to remove the loft altogether and have one consistent roofline throughout. We were able to make the kitchen windows a bit taller because there was no loft we had to stay below over the kitchen. This ATU was perfect for an extra tall person. After editing out a loft, we had these big interior walls to work with and although we always have the high-up octagon windows on the interior walls to keep thing light and the flow coming through, we took it a step (or should I say foot) further and made the french pocket doors extra tall. This also made the shower wall tile and shower head extra tall. We added another ceiling fan above the kitchen and when all of those awning windows are opened up, all the hot air goes right up and out.
 Paradise Tiny Homes LLC
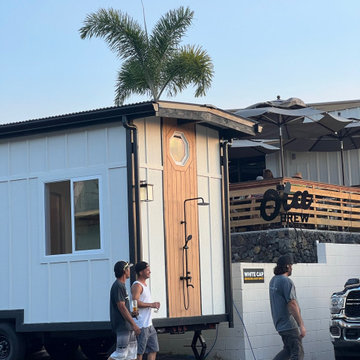
This was at an open house we had at Ola Brew!
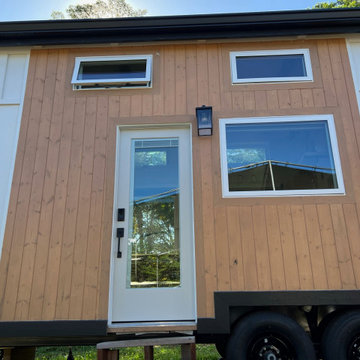
This Paradise Model ATU is extra tall and grand! As you would in you have a couch for lounging, a 6 drawer dresser for clothing, and a seating area and closet that mirrors the kitchen. Quartz countertops waterfall over the side of the cabinets encasing them in stone. The custom kitchen cabinetry is sealed in a clear coat keeping the wood tone light. Black hardware accents with contrast to the light wood. A main-floor bedroom- no crawling in and out of bed. The wallpaper was an owner request; what do you think of their choice?
The bathroom has natural edge Hawaiian mango wood slabs spanning the length of the bump-out: the vanity countertop and the shelf beneath. The entire bump-out-side wall is tiled floor to ceiling with a diamond print pattern. The shower follows the high contrast trend with one white wall and one black wall in matching square pearl finish. The warmth of the terra cotta floor adds earthy warmth that gives life to the wood. 3 wall lights hang down illuminating the vanity, though durning the day, you likely wont need it with the natural light shining in from two perfect angled long windows.
This Paradise model was way customized. The biggest alterations were to remove the loft altogether and have one consistent roofline throughout. We were able to make the kitchen windows a bit taller because there was no loft we had to stay below over the kitchen. This ATU was perfect for an extra tall person. After editing out a loft, we had these big interior walls to work with and although we always have the high-up octagon windows on the interior walls to keep thing light and the flow coming through, we took it a step (or should I say foot) further and made the french pocket doors extra tall. This also made the shower wall tile and shower head extra tall. We added another ceiling fan above the kitchen and when all of those awning windows are opened up, all the hot air goes right up and out.
 Paradise Tiny Homes LLC
This was at an open house we had at Ola Brew!
This Paradise Model ATU is extra tall and grand! As you would in you have a couch for lounging, a 6 drawer dresser for clothing, and a seating area and closet that mirrors the kitchen. Quartz countertops waterfall over the side of the cabinets encasing them in stone. The custom kitchen cabinetry is sealed in a clear coat keeping the wood tone light. Black hardware accents with contrast to the light wood. A main-floor bedroom- no crawling in and out of bed. The wallpaper was an owner request; what do you think of their choice?
The bathroom has natural edge Hawaiian mango wood slabs spanning the length of the bump-out: the vanity countertop and the shelf beneath. The entire bump-out-side wall is tiled floor to ceiling with a diamond print pattern. The shower follows the high contrast trend with one white wall and one black wall in matching square pearl finish. The warmth of the terra cotta floor adds earthy warmth that gives life to the wood. 3 wall lights hang down illuminating the vanity, though durning the day, you likely wont need it with the natural light shining in from two perfect angled long windows.
This Paradise model was way customized. The biggest alterations were to remove the loft altogether and have one consistent roofline throughout. We were able to make the kitchen windows a bit taller because there was no loft we had to stay below over the kitchen. This ATU was perfect for an extra tall person. After editing out a loft, we had these big interior walls to work with and although we always have the high-up octagon windows on the interior walls to keep thing light and the flow coming through, we took it a step (or should I say foot) further and made the french pocket doors extra tall. This also made the shower wall tile and shower head extra tall. We added another ceiling fan above the kitchen and when all of those awning windows are opened up, all the hot air goes right up and out.

 CairnsCraft Design & Remodel
Great spacious bathroom with lot of amenities.
Photographer: Jon Upson
Large elegant master beige tile and porcelain tile drop-in bathtub photo in San Diego with an undermount sink, raised-panel cabinets, medium tone wood cabinets, granite countertops, beige walls and a two-piece toilet
Large elegant master beige tile and porcelain tile drop-in bathtub photo in San Diego with an undermount sink, raised-panel cabinets, medium tone wood cabinets, granite countertops, beige walls and a two-piece toilet
 SabaRehman Abdulrehman
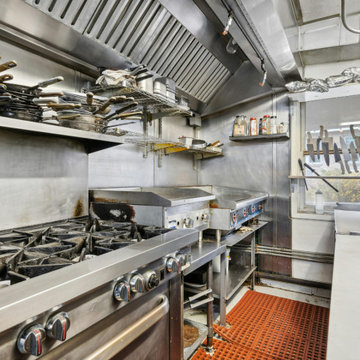
Phoenix's food scene is vibrant and thriving, but also one of the most closely watched in the country. Health inspectors in Maricopa County are strict, and customers expect spotless dining spaces.
To stay competitive, restaurant owners and food vendors must stay on top of evolving health codes, sanitation protocols, and food safety benchmarks. That starts with a firm grip on restaurant cleaning safety standards. Ignoring sanitation rules risks more than bad reviews. It invites citations, customer complaints, and operational shutdowns.
Whether you're operating a food truck or a restaurant, following these Phoenix cleaning standards helps you stay compliant, pass health inspections, and build customer trust.
Importance of a Clean Phoenix Restaurant that Follows Food Health and Safety Standards
The restaurant industry in Phoenix operates under strict oversight. The Maricopa County Environmental Services Department conducts regular inspections, and violations can result in fines or closures. In this climate, restaurant cleaning is not just a hygiene standard. It is a business-critical measure.
Proper food handling and establishment cleaning protocols reduce the risk of foodborne illnesses, control pests, protect equipment, and keep your staff safe. Inconsistent practices, on the other hand, can quickly become liabilities.
Start With the Food Code
Phoenix food vendors must comply with the 2017 FDA Food Code as adopted by Maricopa County. This includes rules on:
- Sanitizing food-contact surfaces after each use
- Maintaining proper water temperatures for dishwashing
- Cleaning restrooms frequently and keeping them stocked
- Storing cleaning chemicals away from prep areas
- Daily: Wipe prep tables, mop floors, clean grills, sanitize cutting boards
- Weekly: Deep clean kitchen hoods, polish cooking equipment, disinfect drains
- Monthly: Check pest control measures, clean freezer coils, and inspect HVAC filters
- Using the right sanitizers and PPE
- Logging cleaning times and who performed the task
- Identifying signs of mold, grease buildup, or rodent activity
- Conducting thorough surface cleaning to ensure all food-contact surfaces are sanitized regularly
- Food-safe and non-corrosive
- Effective against norovirus, salmonella, and E. coli
- Clearly labeled and stored in original containers
- Seal gaps around doors and pipes
- Store dry goods in sealed, elevated containers
- Keep outdoor waste bins locked and distanced from entry points
- Record cleaning completion in real time
- Alert managers when tasks are missed
- Keep a historical record for inspections
- Is certified and understands the Arizona food codes
- Provides documented service reports
- Offers customized cleaning plans
- Offers flexible scheduling around your operating hours
- Cross-contamination prevention: Regularly clean food prep surfaces and tools, and use separate equipment for raw meats, vegetables, and ready-to-eat foods. Proper cleaning prevents any contact with food that could lead to cross-contamination and affects food quality.
- Temperature monitoring: While not directly related to cleaning, maintaining proper food temperature is essential. Hot foods should be stored above 140°F, and cold foods below 40°F. Regularly monitor temperatures and clean temperature gauges to ensure accuracy.
- Proper storage: Use clean storage containers and shelving for food storage, keeping items off the floor. Ensure all food is sealed and labeled to avoid contamination risks and comply with food safety standards.

 Spire North
Tucked away in the backwoods of Torch Lake, this home marries “rustic” with the sleek elegance of modern. The combination of wood, stone and metal textures embrace the charm of a classic farmhouse. Although this is not your average farmhouse. The home is outfitted with a high performing system that seamlessly works with the design and architecture.
The tall ceilings and windows allow ample natural light into the main room. Spire Integrated Systems installed Lutron QS Wireless motorized shades paired with Hartmann & Forbes windowcovers to offer privacy and block harsh light. The custom 18′ windowcover’s woven natural fabric complements the organic esthetics of the room. The shades are artfully concealed in the millwork when not in use.
Spire installed B&W in-ceiling speakers and Sonance invisible in-wall speakers to deliver ambient music that emanates throughout the space with no visual footprint. Spire also installed a Sonance Landscape Audio System so the homeowner can enjoy music outside.
Each system is easily controlled using Savant. Spire personalized the settings to the homeowner’s preference making controlling the home efficient and convenient.


 McEssay
Regardless of the length of your trip abroad, you should know that packing is an essential step of your stay. This goes doubly so when it comes to students, so you must always keep a few things in mind when you’re getting ready, such as what you need to take. The following list from https://mcessay.com/write-my-essay/ will provide you with some useful tips on what you must do to have a trouble-free packing experience:
You should never be extra picky about your toiletries and personal hygiene products, but you should have a small supply of it if you have a favorite product. Face wash, shampoos and conditioners as well as other products may not be available as the same brands in the new place, so have a spare at least. Always make sure you have your liquids sealed in a plastic bag to avoid issues with airport security.
Make sure you pack some weather-appropriate clothing as part of your luggage. The last thing you’ll want to do is look for clothes in the new location if the climate is extreme, compared to your point of origin. You should look into the weather ahead of time so you can pack accordingly to avoid issues with it.
Use a backpack or a duffel bag that suits the airline requirements so you can haul your luggage with greater ease once you’re off the airport. This will help you be more mobile, while at the same time allowing you a choice between walking on foot without dragging luggage and using a cab or public transport.
Prepare a few international adapters, so you won’t have any issues powering your electronics at the new location. Different countries use different types of plugs, so you must make sure you have what you need. The last thing you’ll want to do is getting stuck in a foreign country without a chance to use your tech.
Prepare a list of things you must do during the semester so you won’t have to deal with the organizational aspects of it. You can start with a checklist, keeping it in a place where you’ll be able to see on a regular basis. You will need the preparation to ensure you do things right and on time.
Take at least two pairs of good walking shoes along, as well as your normal shoes. This will help you greatly if you need to walk around different towns or cities. Not all places have the same policy when it comes to sidewalks and public areas, so having a few pairs of good, comfortable shoes will go a long way.
Taking a cross-shoulder bag alongside your luggage will be a very comfortable option when it comes to urban exploration, travel and study. Its hard to rip off of you, easy to carry and also easy to use. Make sure you keep an eye on it from time to time though, as there’s always the possibility of meeting would-be thieves.

 Trilogy Construction Company
Great glass scallop tile detail. This tile is bordered by slabs of white marble.
Bathroom - modern bathroom idea in Miami
Bathroom - modern bathroom idea in Miami

 Jean Stoffer Design, Ltd
Stoffer Photography
Example of a small classic porcelain tile single front door design in Grand Rapids with white walls and a black front door
Example of a small classic porcelain tile single front door design in Grand Rapids with white walls and a black front door

 DISC Interiors
Inspiration for a modern kitchen remodel in Los Angeles with flat-panel cabinets and light wood cabinets
 Drury Design
There were some druthers with the kitchen and there was a desire to make certain rooms more grown-up again. Unlike some of our clients who get rid of their formal dining rooms, this family wanted to keep theirs. They saw it as good space for entertaining and doing work – why not make it more stylish and purposeful?
THE REMODEL
Design Objectives
Keep the craftsman style of the home but make it more modern
Update the dining room to be more formal for entertaining and provide storage for china, stemware, wine, etc.
Open up the kitchen to improve flow
Incorporate new decorative lighting throughout the home to accent the home’s style
Transform the staircase into a statement piece that greets visitors – redesign it with arts & crafts details in the balusters, newel posts and handrails
Design Challenges:
Open up the dining room window for more light and a better view of the backyard. The previous window felt closed in with heavy shutters.
Improve kitchen flow without making the footprint larger
Make the entire home feel updated and cohesive while staying true to the house’s style.
THE RENEWED SPACES
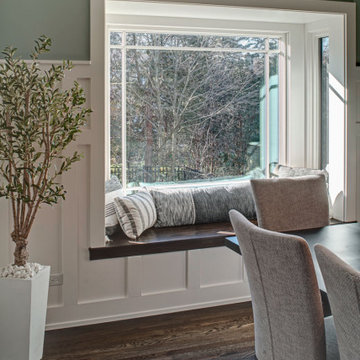
We bumped out the dining room window to make a new bay window. The glass mullion design mimics the craftsman style, setting the tone for the room while letting plenty of light in. It really opened up that end of the dining room. The view of the backyard is much bigger now, too. It’s also a great nook for playing board games, doing puzzles and playing with Legos.
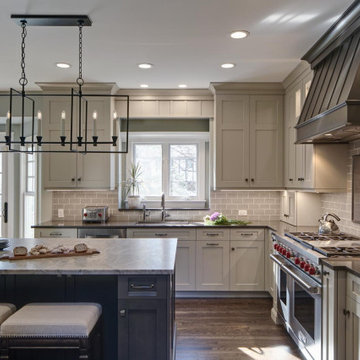
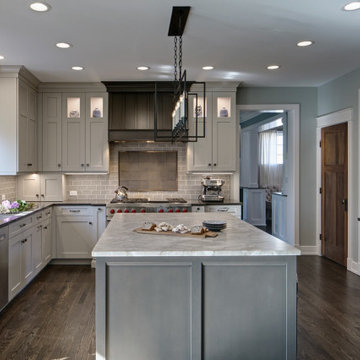
We actually got rid of a walk-in pantry that had cut off a corner of the kitchen, and were able to keep all the main walls intact. The old pantry room is where the fridge is now, as well as a tall pantry cabinet, some additional cabinets and a new countertop surface. The flow is much better and it’s roomy now, with a kitchen table that’s great for informal meals, homework and kids seating when adults are entertaining in the dining room.
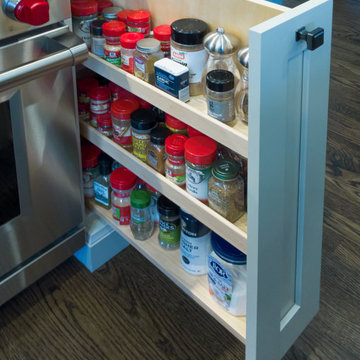
The cabinet, tile and countertop colors are still neutral but offer a more muted palette. To bring in the craftsman style, simple architectural details were added such as the hood and window valance, decorative furniture toes, a shaker door on the perimeter cabinets and a more modern cabinet door style on the island, pantry and refrigerator areas. New decorative lighting was added in the kitchen, dining room, living room, foyer and second-floor hallway to make the entire first floor feel updated. Also, the entire staircase was revamped. The existing hardwood was kept in place but stained medium brown to bring in some warmth.
“The Drury process made this project turn out better than we imagined,” one of the homeowners told us during the final photoshoot. “There were so many features we didn’t know about – like charging drawers – and ways of going about the remodel that didn’t come to us naturally. We’re so glad Alicia had so much experience and so many checklists. We got to think through everything and arrive at the best possible design for our family.”
 Drury Design
There were some druthers with the kitchen and there was a desire to make certain rooms more grown-up again. Unlike some of our clients who get rid of their formal dining rooms, this family wanted to keep theirs. They saw it as good space for entertaining and doing work – why not make it more stylish and purposeful?
THE REMODEL
Design Objectives
Keep the craftsman style of the home but make it more modern
Update the dining room to be more formal for entertaining and provide storage for china, stemware, wine, etc.
Open up the kitchen to improve flow
Incorporate new decorative lighting throughout the home to accent the home’s style
Transform the staircase into a statement piece that greets visitors – redesign it with arts & crafts details in the balusters, newel posts and handrails
Design Challenges:
Open up the dining room window for more light and a better view of the backyard. The previous window felt closed in with heavy shutters.
Improve kitchen flow without making the footprint larger
Make the entire home feel updated and cohesive while staying true to the house’s style.
THE RENEWED SPACES
We bumped out the dining room window to make a new bay window. The glass mullion design mimics the craftsman style, setting the tone for the room while letting plenty of light in. It really opened up that end of the dining room. The view of the backyard is much bigger now, too. It’s also a great nook for playing board games, doing puzzles and playing with Legos.
We actually got rid of a walk-in pantry that had cut off a corner of the kitchen, and were able to keep all the main walls intact. The old pantry room is where the fridge is now, as well as a tall pantry cabinet, some additional cabinets and a new countertop surface. The flow is much better and it’s roomy now, with a kitchen table that’s great for informal meals, homework and kids seating when adults are entertaining in the dining room.
The cabinet, tile and countertop colors are still neutral but offer a more muted palette. To bring in the craftsman style, simple architectural details were added such as the hood and window valance, decorative furniture toes, a shaker door on the perimeter cabinets and a more modern cabinet door style on the island, pantry and refrigerator areas. New decorative lighting was added in the kitchen, dining room, living room, foyer and second-floor hallway to make the entire first floor feel updated. Also, the entire staircase was revamped. The existing hardwood was kept in place but stained medium brown to bring in some warmth.
“The Drury process made this project turn out better than we imagined,” one of the homeowners told us during the final photoshoot. “There were so many features we didn’t know about – like charging drawers – and ways of going about the remodel that didn’t come to us naturally. We’re so glad Alicia had so much experience and so many checklists. We got to think through everything and arrive at the best possible design for our family.”
 Drury Design
There were some druthers with the kitchen and there was a desire to make certain rooms more grown-up again. Unlike some of our clients who get rid of their formal dining rooms, this family wanted to keep theirs. They saw it as good space for entertaining and doing work – why not make it more stylish and purposeful?
THE REMODEL
Design Objectives
Keep the craftsman style of the home but make it more modern
Update the dining room to be more formal for entertaining and provide storage for china, stemware, wine, etc.
Open up the kitchen to improve flow
Incorporate new decorative lighting throughout the home to accent the home’s style
Transform the staircase into a statement piece that greets visitors – redesign it with arts & crafts details in the balusters, newel posts and handrails
Design Challenges:
Open up the dining room window for more light and a better view of the backyard. The previous window felt closed in with heavy shutters.
Improve kitchen flow without making the footprint larger
Make the entire home feel updated and cohesive while staying true to the house’s style.
THE RENEWED SPACES
We bumped out the dining room window to make a new bay window. The glass mullion design mimics the craftsman style, setting the tone for the room while letting plenty of light in. It really opened up that end of the dining room. The view of the backyard is much bigger now, too. It’s also a great nook for playing board games, doing puzzles and playing with Legos.
We actually got rid of a walk-in pantry that had cut off a corner of the kitchen, and were able to keep all the main walls intact. The old pantry room is where the fridge is now, as well as a tall pantry cabinet, some additional cabinets and a new countertop surface. The flow is much better and it’s roomy now, with a kitchen table that’s great for informal meals, homework and kids seating when adults are entertaining in the dining room.
The cabinet, tile and countertop colors are still neutral but offer a more muted palette. To bring in the craftsman style, simple architectural details were added such as the hood and window valance, decorative furniture toes, a shaker door on the perimeter cabinets and a more modern cabinet door style on the island, pantry and refrigerator areas. New decorative lighting was added in the kitchen, dining room, living room, foyer and second-floor hallway to make the entire first floor feel updated. Also, the entire staircase was revamped. The existing hardwood was kept in place but stained medium brown to bring in some warmth.
“The Drury process made this project turn out better than we imagined,” one of the homeowners told us during the final photoshoot. “There were so many features we didn’t know about – like charging drawers – and ways of going about the remodel that didn’t come to us naturally. We’re so glad Alicia had so much experience and so many checklists. We got to think through everything and arrive at the best possible design for our family.”
 Drury Design
There were some druthers with the kitchen and there was a desire to make certain rooms more grown-up again. Unlike some of our clients who get rid of their formal dining rooms, this family wanted to keep theirs. They saw it as good space for entertaining and doing work – why not make it more stylish and purposeful?
THE REMODEL
Design Objectives
Keep the craftsman style of the home but make it more modern
Update the dining room to be more formal for entertaining and provide storage for china, stemware, wine, etc.
Open up the kitchen to improve flow
Incorporate new decorative lighting throughout the home to accent the home’s style
Transform the staircase into a statement piece that greets visitors – redesign it with arts & crafts details in the balusters, newel posts and handrails
Design Challenges:
Open up the dining room window for more light and a better view of the backyard. The previous window felt closed in with heavy shutters.
Improve kitchen flow without making the footprint larger
Make the entire home feel updated and cohesive while staying true to the house’s style.
THE RENEWED SPACES
We bumped out the dining room window to make a new bay window. The glass mullion design mimics the craftsman style, setting the tone for the room while letting plenty of light in. It really opened up that end of the dining room. The view of the backyard is much bigger now, too. It’s also a great nook for playing board games, doing puzzles and playing with Legos.
We actually got rid of a walk-in pantry that had cut off a corner of the kitchen, and were able to keep all the main walls intact. The old pantry room is where the fridge is now, as well as a tall pantry cabinet, some additional cabinets and a new countertop surface. The flow is much better and it’s roomy now, with a kitchen table that’s great for informal meals, homework and kids seating when adults are entertaining in the dining room.
The cabinet, tile and countertop colors are still neutral but offer a more muted palette. To bring in the craftsman style, simple architectural details were added such as the hood and window valance, decorative furniture toes, a shaker door on the perimeter cabinets and a more modern cabinet door style on the island, pantry and refrigerator areas. New decorative lighting was added in the kitchen, dining room, living room, foyer and second-floor hallway to make the entire first floor feel updated. Also, the entire staircase was revamped. The existing hardwood was kept in place but stained medium brown to bring in some warmth.
“The Drury process made this project turn out better than we imagined,” one of the homeowners told us during the final photoshoot. “There were so many features we didn’t know about – like charging drawers – and ways of going about the remodel that didn’t come to us naturally. We’re so glad Alicia had so much experience and so many checklists. We got to think through everything and arrive at the best possible design for our family.”
 Drury Design
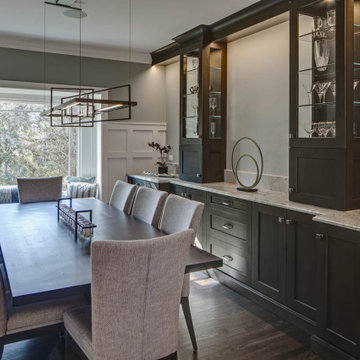
There were some druthers with the kitchen and there was a desire to make certain rooms more grown-up again. Unlike some of our clients who get rid of their formal dining rooms, this family wanted to keep theirs. They saw it as good space for entertaining and doing work – why not make it more stylish and purposeful?
THE REMODEL
Design Objectives
Keep the craftsman style of the home but make it more modern
Update the dining room to be more formal for entertaining and provide storage for china, stemware, wine, etc.
Open up the kitchen to improve flow
Incorporate new decorative lighting throughout the home to accent the home’s style
Transform the staircase into a statement piece that greets visitors – redesign it with arts & crafts details in the balusters, newel posts and handrails
Design Challenges:
Open up the dining room window for more light and a better view of the backyard. The previous window felt closed in with heavy shutters.
Improve kitchen flow without making the footprint larger
Make the entire home feel updated and cohesive while staying true to the house’s style.
THE RENEWED SPACES
We bumped out the dining room window to make a new bay window. The glass mullion design mimics the craftsman style, setting the tone for the room while letting plenty of light in. It really opened up that end of the dining room. The view of the backyard is much bigger now, too. It’s also a great nook for playing board games, doing puzzles and playing with Legos.
We actually got rid of a walk-in pantry that had cut off a corner of the kitchen, and were able to keep all the main walls intact. The old pantry room is where the fridge is now, as well as a tall pantry cabinet, some additional cabinets and a new countertop surface. The flow is much better and it’s roomy now, with a kitchen table that’s great for informal meals, homework and kids seating when adults are entertaining in the dining room.
The cabinet, tile and countertop colors are still neutral but offer a more muted palette. To bring in the craftsman style, simple architectural details were added such as the hood and window valance, decorative furniture toes, a shaker door on the perimeter cabinets and a more modern cabinet door style on the island, pantry and refrigerator areas. New decorative lighting was added in the kitchen, dining room, living room, foyer and second-floor hallway to make the entire first floor feel updated. Also, the entire staircase was revamped. The existing hardwood was kept in place but stained medium brown to bring in some warmth.
“The Drury process made this project turn out better than we imagined,” one of the homeowners told us during the final photoshoot. “There were so many features we didn’t know about – like charging drawers – and ways of going about the remodel that didn’t come to us naturally. We’re so glad Alicia had so much experience and so many checklists. We got to think through everything and arrive at the best possible design for our family.”
 Drury Design
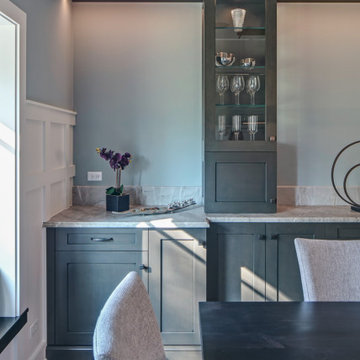
There were some druthers with the kitchen and there was a desire to make certain rooms more grown-up again. Unlike some of our clients who get rid of their formal dining rooms, this family wanted to keep theirs. They saw it as good space for entertaining and doing work – why not make it more stylish and purposeful?
THE REMODEL
Design Objectives
Keep the craftsman style of the home but make it more modern
Update the dining room to be more formal for entertaining and provide storage for china, stemware, wine, etc.
Open up the kitchen to improve flow
Incorporate new decorative lighting throughout the home to accent the home’s style
Transform the staircase into a statement piece that greets visitors – redesign it with arts & crafts details in the balusters, newel posts and handrails
Design Challenges:
Open up the dining room window for more light and a better view of the backyard. The previous window felt closed in with heavy shutters.
Improve kitchen flow without making the footprint larger
Make the entire home feel updated and cohesive while staying true to the house’s style.
THE RENEWED SPACES
We bumped out the dining room window to make a new bay window. The glass mullion design mimics the craftsman style, setting the tone for the room while letting plenty of light in. It really opened up that end of the dining room. The view of the backyard is much bigger now, too. It’s also a great nook for playing board games, doing puzzles and playing with Legos.
We actually got rid of a walk-in pantry that had cut off a corner of the kitchen, and were able to keep all the main walls intact. The old pantry room is where the fridge is now, as well as a tall pantry cabinet, some additional cabinets and a new countertop surface. The flow is much better and it’s roomy now, with a kitchen table that’s great for informal meals, homework and kids seating when adults are entertaining in the dining room.
The cabinet, tile and countertop colors are still neutral but offer a more muted palette. To bring in the craftsman style, simple architectural details were added such as the hood and window valance, decorative furniture toes, a shaker door on the perimeter cabinets and a more modern cabinet door style on the island, pantry and refrigerator areas. New decorative lighting was added in the kitchen, dining room, living room, foyer and second-floor hallway to make the entire first floor feel updated. Also, the entire staircase was revamped. The existing hardwood was kept in place but stained medium brown to bring in some warmth.
“The Drury process made this project turn out better than we imagined,” one of the homeowners told us during the final photoshoot. “There were so many features we didn’t know about – like charging drawers – and ways of going about the remodel that didn’t come to us naturally. We’re so glad Alicia had so much experience and so many checklists. We got to think through everything and arrive at the best possible design for our family.”
21