
Search results for "Chips hitting" in Home Design Ideas


 South Bay Grading
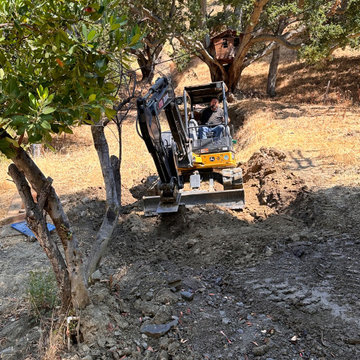
A fissure has developed on the hillside above this residence. This long narrow cleft in the ground directs water from up the hill right down into the yard of the house below. In a previous rain event, the retaining wall was overwhelmed, and the house was hit by a mudslide.
Find the right local pro for your project
 highland
Renovating a bathroom is one of the most rewarding home improvement projects you can undertake. It adds immediate value to your property and elevates your daily routine. However, designing the perfect space requires balancing aesthetics with practical utility. At the heart of this balance is the vanity — it is the functional hub where you get ready each morning, a vital storage unit, and the visual centerpiece of the room.
To ensure you make the right investment, here is an in-depth look at choosing a bathroom vanity that blends style, longevity, and everyday functionality.
1. Assessing the Layout and Space Constraints
Before you fall in love with a specific design or finish, you must determine what your bathroom can physically handle. Scale is everything. A vanity that is too large disrupts traffic flow, while one that is too small gets lost visually and lacks adequate storage.
The next major step is determining the scale of your plumbing fixtures. Understanding how to choose a bathroom sink and vanity setup comes down to a simple choice: single or double sinks. Your choice will depend on who uses the bathroom and the overall footprint of the space.
Single Sink Vanities
Typically ranging from 20 to 48 inches (50–120 cm) in width, single vanities are the ideal choice for powder rooms, guest bathrooms, or small master suites. For very compact spaces, you can find narrower options starting around 16 inches (40 cm). The major advantage of a single-sink layout is that it provides more usable countertop space for cosmetics, toiletries, and decorative items. If you want to skip the guesswork and invest in a premium, beautifully handcrafted fixture, explore the luxury collections at Willow Bath and Vanity. From elegant single vanities to spacious double setups, their masterfully built furniture combines solid wood construction with elite styling to transform any bathroom into a spa-like retreat.
Double Sink Vanities
Usually starting at 48 inches (120 cm) and extending up to 72 inches (180 cm) or more, double vanities are a lifesaver for shared master bathrooms. They allow two people to get ready simultaneously without fighting for sink space. Keep in mind that a double vanity naturally reduces both cabinet storage space and countertop real estate since a second sink basin and plumbing lines take up substantial interior room.
Sink Types to Consider
The countertop is the workhorse of the bathroom. It regularly comes into contact with running water, toothpaste, soapy residue, and high-heat styling tools. Knowing how to choose a bathroom vanity top requires evaluating how much maintenance you are willing to perform against the look you want to achieve. Material Pros Cons Maintenance Level Quartz Highly durable, non-porous, stain and scratch-resistant. Offers the look of stone without the hassle. Premium pricing; can show seams on very large custom layouts. Low (No sealing required) Marble Timeless, elegant, and luxurious. Every slab features a completely unique veining pattern. Porous; prone to scratching, etching from acids, and water stains. Requires careful daily use. High (Requires regular sealing) Granite Naturally strong, heat-resistant, and chemically stable. Unique earthy patterns. Porous; can chip if subjected to heavy impacts. Medium (Requires occasional sealing) When coordinating your countertop, ensure it complements your bathroom’s floor tiles, shower surround, and plumbing hardware to maintain visual harmony.
4. Selecting the Core Vanity Style and Finish
Once the functional components are locked in, you can focus on the architectural style of the vanity base. The base dictates the design theme of the entire room.
Conclusion
Choosing the perfect vanity is a step-by-step process that combines precise measurements with your personal design taste. By taking careful measurements, choosing between a single- or double-sink setup, and picking a durable counter material like quartz or granite, you can transform your bathroom into a beautiful, organized retreat. Prioritize high-quality materials and smart craftsmanship, and your new vanity will look spectacular and serve your household reliably for years to come.
1. Assessing the Layout and Space Constraints
Before you fall in love with a specific design or finish, you must determine what your bathroom can physically handle. Scale is everything. A vanity that is too large disrupts traffic flow, while one that is too small gets lost visually and lacks adequate storage.
- Take Precise Measurements: measure the available width, depth, and height. Remember to account for surrounding fixtures.
- Check Clearance Zones: ensure there is enough clearance for the bathroom door to swing open, for shower glass doors to clear the vanity, and for drawers and cabinet doors to extend fully without hitting the toilet or walls.
-
Locate Existing Plumbing: moving pipes can significantly increase renovation costs. If you want a seamless installation, look for a vanity configuration that aligns easily with your current plumbing setup.
The next major step is determining the scale of your plumbing fixtures. Understanding how to choose a bathroom sink and vanity setup comes down to a simple choice: single or double sinks. Your choice will depend on who uses the bathroom and the overall footprint of the space.
Single Sink Vanities
Typically ranging from 20 to 48 inches (50–120 cm) in width, single vanities are the ideal choice for powder rooms, guest bathrooms, or small master suites. For very compact spaces, you can find narrower options starting around 16 inches (40 cm). The major advantage of a single-sink layout is that it provides more usable countertop space for cosmetics, toiletries, and decorative items. If you want to skip the guesswork and invest in a premium, beautifully handcrafted fixture, explore the luxury collections at Willow Bath and Vanity. From elegant single vanities to spacious double setups, their masterfully built furniture combines solid wood construction with elite styling to transform any bathroom into a spa-like retreat.
Double Sink Vanities
Usually starting at 48 inches (120 cm) and extending up to 72 inches (180 cm) or more, double vanities are a lifesaver for shared master bathrooms. They allow two people to get ready simultaneously without fighting for sink space. Keep in mind that a double vanity naturally reduces both cabinet storage space and countertop real estate since a second sink basin and plumbing lines take up substantial interior room.
Sink Types to Consider
- Undermount: installed beneath the counter for a smooth, seamless surface that is incredibly easy to wipe down.
- Vessel: sits atop the counter like a decorative bowl. It makes a bold style statement but raises the overall height of the counter surface.
- Drop-In: features a lip that rests on the counter cutout. It is easier to install, but its edges can catch dirt.
-
The countertop is the workhorse of the bathroom. It regularly comes into contact with running water, toothpaste, soapy residue, and high-heat styling tools. Knowing how to choose a bathroom vanity top requires evaluating how much maintenance you are willing to perform against the look you want to achieve. Material Pros Cons Maintenance Level Quartz Highly durable, non-porous, stain and scratch-resistant. Offers the look of stone without the hassle. Premium pricing; can show seams on very large custom layouts. Low (No sealing required) Marble Timeless, elegant, and luxurious. Every slab features a completely unique veining pattern. Porous; prone to scratching, etching from acids, and water stains. Requires careful daily use. High (Requires regular sealing) Granite Naturally strong, heat-resistant, and chemically stable. Unique earthy patterns. Porous; can chip if subjected to heavy impacts. Medium (Requires occasional sealing) When coordinating your countertop, ensure it complements your bathroom’s floor tiles, shower surround, and plumbing hardware to maintain visual harmony.
4. Selecting the Core Vanity Style and Finish
Once the functional components are locked in, you can focus on the architectural style of the vanity base. The base dictates the design theme of the entire room.
- Freestanding vanities: sit directly on the floor, supported by legs or a solid kickboard base. This is a traditional, stable configuration that offers the maximum hidden cabinet and drawer storage space.
- Wall-Mounted (Floating) vanities: anchored directly onto the wall studs, leaving the floor underneath completely clear. Floating vanities are staples of modern, minimalist design. They create an illusion of space, making small rooms look larger, and make cleaning the bathroom floor incredibly easy.
- Console vanities: feature an open shelving design supported by a metal or wood frame. It offers a light, airy look reminiscent of a boutique hotel, though it sacrifices hidden storage.
Conclusion
Choosing the perfect vanity is a step-by-step process that combines precise measurements with your personal design taste. By taking careful measurements, choosing between a single- or double-sink setup, and picking a durable counter material like quartz or granite, you can transform your bathroom into a beautiful, organized retreat. Prioritize high-quality materials and smart craftsmanship, and your new vanity will look spectacular and serve your household reliably for years to come.
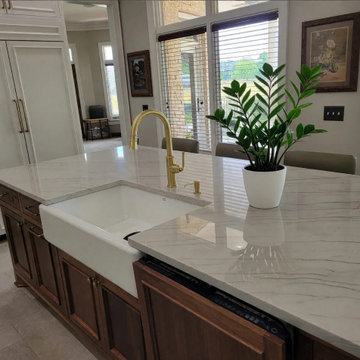
 Rocky Tops Granite & Marble LLC
This project in Northeast Columbia brought together three different stones across the house, and that's not something we get to do every day. Marble in one space, quartzite in another, dolomite doing its own quiet work somewhere else. It's the kind of job that makes you slow down and think about where each material actually belongs instead of just picking one slab and running it everywhere.
The kitchen called for something that could handle the daily grind while still looking like a piece of natural stone should look, full of movement and depth. Quartzite earns its keep here. It reads like marble with all that soft veining and cool background color, but it's far harder and more resistant to etching from citrus, wine, or vinegar splashing around a busy counter. We templated it carefully to keep the veining moving in a way that feels natural across the runs, not chopped up or mismatched at the seams. That takes patience on the slab yard picking the right book match before it ever hits a saw.
The bathroom vanity is where the marble gets to shine. Marble on a vanity top makes sense in a way it doesn't always in a kitchen. Less traffic, less acid exposure, and it gets to just look good day after day with the veining catching the light over the sink. We kept the edge eased throughout the project, a simple softened line that doesn't compete with the stone itself. An eased edge is subtle, it just takes the sharp corner off the top so it feels comfortable under your hand and doesn't chip as easy as a square edge would over the years.
Dolomite showed up in the other space, and it's one of our favorite stones to work with because it splits the difference. It looks a lot like marble, softer tones, that same classic veining, but it's a good bit tougher and more stain resistant, which makes it a smart call anywhere you want that marble look without babying it constantly. Sealing still matters with all three of these stones. A good penetrating sealer keeps them looking right for years and makes cleanup simple, no special stuff needed, just soap and water day to day.
Jobs like this are why we like working across the Midlands. Northeast Columbia homes run the gamut from new builds to older houses getting a real refresh, and getting to move between marble, quartzite, and dolomite in one project keeps the work honest. Every stone got fabricated and set the way it should be, tight seams, clean eased edges, and a finish that'll hold up to real life in that kitchen and that bath for a long time to come.
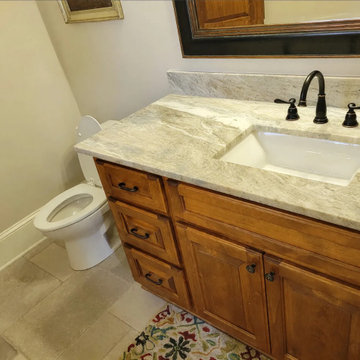 Rocky Tops Granite & Marble LLC
This project in Northeast Columbia brought together three different stones across the house, and that's not something we get to do every day. Marble in one space, quartzite in another, dolomite doing its own quiet work somewhere else. It's the kind of job that makes you slow down and think about where each material actually belongs instead of just picking one slab and running it everywhere.
The kitchen called for something that could handle the daily grind while still looking like a piece of natural stone should look, full of movement and depth. Quartzite earns its keep here. It reads like marble with all that soft veining and cool background color, but it's far harder and more resistant to etching from citrus, wine, or vinegar splashing around a busy counter. We templated it carefully to keep the veining moving in a way that feels natural across the runs, not chopped up or mismatched at the seams. That takes patience on the slab yard picking the right book match before it ever hits a saw.
The bathroom vanity is where the marble gets to shine. Marble on a vanity top makes sense in a way it doesn't always in a kitchen. Less traffic, less acid exposure, and it gets to just look good day after day with the veining catching the light over the sink. We kept the edge eased throughout the project, a simple softened line that doesn't compete with the stone itself. An eased edge is subtle, it just takes the sharp corner off the top so it feels comfortable under your hand and doesn't chip as easy as a square edge would over the years.
Dolomite showed up in the other space, and it's one of our favorite stones to work with because it splits the difference. It looks a lot like marble, softer tones, that same classic veining, but it's a good bit tougher and more stain resistant, which makes it a smart call anywhere you want that marble look without babying it constantly. Sealing still matters with all three of these stones. A good penetrating sealer keeps them looking right for years and makes cleanup simple, no special stuff needed, just soap and water day to day.
Jobs like this are why we like working across the Midlands. Northeast Columbia homes run the gamut from new builds to older houses getting a real refresh, and getting to move between marble, quartzite, and dolomite in one project keeps the work honest. Every stone got fabricated and set the way it should be, tight seams, clean eased edges, and a finish that'll hold up to real life in that kitchen and that bath for a long time to come.
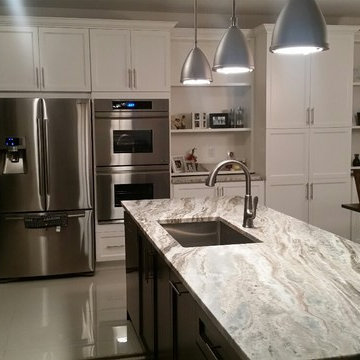

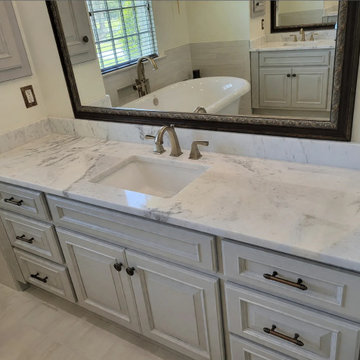 Rocky Tops Granite & Marble LLC
This project in Northeast Columbia brought together three different stones across the house, and that's not something we get to do every day. Marble in one space, quartzite in another, dolomite doing its own quiet work somewhere else. It's the kind of job that makes you slow down and think about where each material actually belongs instead of just picking one slab and running it everywhere.
The kitchen called for something that could handle the daily grind while still looking like a piece of natural stone should look, full of movement and depth. Quartzite earns its keep here. It reads like marble with all that soft veining and cool background color, but it's far harder and more resistant to etching from citrus, wine, or vinegar splashing around a busy counter. We templated it carefully to keep the veining moving in a way that feels natural across the runs, not chopped up or mismatched at the seams. That takes patience on the slab yard picking the right book match before it ever hits a saw.
The bathroom vanity is where the marble gets to shine. Marble on a vanity top makes sense in a way it doesn't always in a kitchen. Less traffic, less acid exposure, and it gets to just look good day after day with the veining catching the light over the sink. We kept the edge eased throughout the project, a simple softened line that doesn't compete with the stone itself. An eased edge is subtle, it just takes the sharp corner off the top so it feels comfortable under your hand and doesn't chip as easy as a square edge would over the years.
Dolomite showed up in the other space, and it's one of our favorite stones to work with because it splits the difference. It looks a lot like marble, softer tones, that same classic veining, but it's a good bit tougher and more stain resistant, which makes it a smart call anywhere you want that marble look without babying it constantly. Sealing still matters with all three of these stones. A good penetrating sealer keeps them looking right for years and makes cleanup simple, no special stuff needed, just soap and water day to day.
Jobs like this are why we like working across the Midlands. Northeast Columbia homes run the gamut from new builds to older houses getting a real refresh, and getting to move between marble, quartzite, and dolomite in one project keeps the work honest. Every stone got fabricated and set the way it should be, tight seams, clean eased edges, and a finish that'll hold up to real life in that kitchen and that bath for a long time to come.
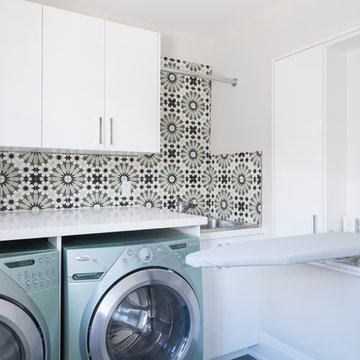
 Michelle Berwick Design
Design: Michelle Berwick
Photos: Sam Stock Photos
Dedicated laundry room - contemporary dedicated laundry room idea in Toronto with flat-panel cabinets, white cabinets, multicolored walls and white countertops
Dedicated laundry room - contemporary dedicated laundry room idea in Toronto with flat-panel cabinets, white cabinets, multicolored walls and white countertops
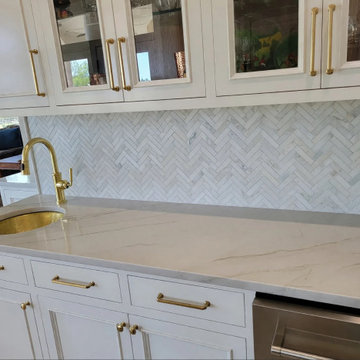 Rocky Tops Granite & Marble LLC
This project in Northeast Columbia brought together three different stones across the house, and that's not something we get to do every day. Marble in one space, quartzite in another, dolomite doing its own quiet work somewhere else. It's the kind of job that makes you slow down and think about where each material actually belongs instead of just picking one slab and running it everywhere.
The kitchen called for something that could handle the daily grind while still looking like a piece of natural stone should look, full of movement and depth. Quartzite earns its keep here. It reads like marble with all that soft veining and cool background color, but it's far harder and more resistant to etching from citrus, wine, or vinegar splashing around a busy counter. We templated it carefully to keep the veining moving in a way that feels natural across the runs, not chopped up or mismatched at the seams. That takes patience on the slab yard picking the right book match before it ever hits a saw.
The bathroom vanity is where the marble gets to shine. Marble on a vanity top makes sense in a way it doesn't always in a kitchen. Less traffic, less acid exposure, and it gets to just look good day after day with the veining catching the light over the sink. We kept the edge eased throughout the project, a simple softened line that doesn't compete with the stone itself. An eased edge is subtle, it just takes the sharp corner off the top so it feels comfortable under your hand and doesn't chip as easy as a square edge would over the years.
Dolomite showed up in the other space, and it's one of our favorite stones to work with because it splits the difference. It looks a lot like marble, softer tones, that same classic veining, but it's a good bit tougher and more stain resistant, which makes it a smart call anywhere you want that marble look without babying it constantly. Sealing still matters with all three of these stones. A good penetrating sealer keeps them looking right for years and makes cleanup simple, no special stuff needed, just soap and water day to day.
Jobs like this are why we like working across the Midlands. Northeast Columbia homes run the gamut from new builds to older houses getting a real refresh, and getting to move between marble, quartzite, and dolomite in one project keeps the work honest. Every stone got fabricated and set the way it should be, tight seams, clean eased edges, and a finish that'll hold up to real life in that kitchen and that bath for a long time to come.
 safe ZOnea
In 2026, DIY home design and renovation will become easier than ever. Free mobile apps like Houzz, Homestyler, and Planner 5D will put professional tools in everyone’s pocket, letting users visualize layouts, test colors, and estimate costs before buying materials. Experts predict that over 50% of homeowners will use apps to plan upgrades. It will save money and reduce costly mistakes. Even now, about 54% prefer mobile tools.
Why Mobile Apps are Changing Home Renovation
DIY renovation has changed a lot in recent years. Homeowners don’t have to rely on sketches or guesswork anymore. Thanks to AR, AI, and 3D renderings, apps can show exactly how furniture and cabinets will fit. By 2026, many of these tools will be free - and packed with features that rival expensive software. With just a smartphone, anyone can try out layouts, test colors, and even create detailed floor plans.
The Tech Behind Modern Design Apps
Most renovation apps now leverage AI to generate design suggestions. They are based on your space and preferences. Upload a photo of your room. The algorithms will check the sizes, lighting, and features. Then, they’ll suggest furniture layouts or color schemes. Some apps use your phone’s camera and sensor. They make accurate measurements, so you won’t need tape measures or notepads.
Top Free Apps Transforming DIY Projects
Houzz continues to lead the pack with its massive photo library and ability to connect users with local contractors. The platform now gives AI design suggestions. It looks at your style preferences across millions of professional spaces.
For anyone serious about planning their next project, exploring comprehensive resources helps narrow down what works. It’s just like in iGaming, where review platforms like Slotzilla help gamblers to find casinos with user-friendly tools, bonus rounds, and progressive jackpots that will work for them.
Planner 5D shines with realistic 3D renderings and a huge furniture catalog, letting you switch between 2D plans and 3D walkthroughs - even in VR. Room Planner helps you design practical layouts. You can easily arrange furniture and check dimensions. It offers real-time 3D views and features items from real brands.
Apps for Specific Renovation Tasks
Not every project needs full 3D renderings - sometimes you just want to try paint colors or test tile patterns. ColorSnap by Sherwin-Williams uses AR to show colors on your actual walls and even matches shades from photos. Magicplan makes creating floor plans easy by measuring rooms with your phone as you walk around. Both apps help plan renovations and communicate ideas without the guesswork.
Budget Tracking and Project Management
Renovation apps do more than make spaces look good - managing budgets and timelines is just as important. HomeZada even uses AI to predict your budget and track material prices, so DIYers don’t get hit with surprise costs. Trello is a lifesaver - set deadlines, track progress, and share updates with anyone helping on the project.
How Apps Reflect 2026 Design Trends
This year’s popular apps reflect the largest home design trends. Colorful rooms are on the rise. Zillow shows a 149% increase in listings. Plus, apps like Houzz let users test bold shades before making a choice. Cozy reading nooks are also on the rise, showing up in nearly half of listings. Renovation apps now provide templates. They include tips for shelves and lighting. This helps create cozy, thoughtful spaces.
Here’s a quick comparison of what different free apps offer:
App name
Best feature
Learning curve
Platform
Houzz
25M+ inspiration photos
Easy
iOS, Android
Planner 5D
Photorealistic 3D renders
Moderate
iOS, Android, Web
Room Planner
Accurate measurements
Easy
iOS, Android
Magicplan
Auto floor plan creation
Easy
iOS, Android
Natural materials and earthy tones will lead design trends in 2026. Warm neutrals will take over from the grey-and-white minimalism of the last ten years.
The AI Revolution in Home Design
AI is no longer just a gimmick in renovation apps. Chat features can suggest furniture layouts, color palettes, and materials for your budget. It’s like having a designer on call. Renovate AI turns photos of your room into multiple style ideas in seconds, from mid-century to rustic farmhouse. It’s great for brainstorming and getting past the “I don’t know what I want” stage.
Practical Tips for Using Renovation Apps
Getting the most from design apps requires a strategic approach. Here are essential steps every DIYer should follow:
Start by gathering inspiration. Look through photo libraries on Houzz or Pinterest. Then, dive into detailed planning.
Don’t rely solely on screen colors; get actual paint chips and fabric swatches.
Save multiple design versions. Create variations of your plan to compare options side-by-side.
This workflow helps you avoid common mistakes. It leads to better design choices before you buy anything.
When Apps Aren’t Enough
Digital tools can’t do everything. Big structural changes, electrical work, or plumbing always need a pro. Apps are great for planning and talking with contractors, but they can’t replace expertise. And always check textures in real life - that sofa might look perfect on screen, but feel different.
The Future of DIY Renovation
In 2026, renovation apps will become smarter. They’ll have voice control and better AR. Improved AI will make DIY design feel more like professional services. Creating beautiful, functional spaces is easier than ever. For homeowners, it’s important to use apps that match local materials and building codes. The biggest benefit is confidence - seeing your design in 3D makes projects far less intimidating.
2