
Search results for "Correcting" in Home Design Ideas
 Irene Designs
Kitchen — Project Description (Bolton, CT)
(Full Renovation • Reconfiguration • Architectural Corrections)
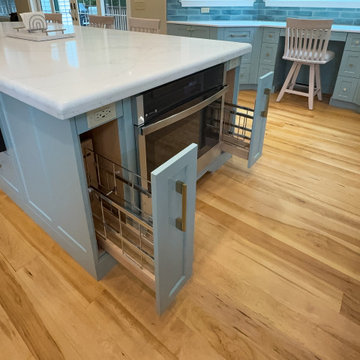
The original kitchen suffered from spatial imbalance and limited functionality: the right side was visually and physically heavy with cabinetry and appliances, the 135-degree angled walls lacked symmetry due to a missing window on the driveway side, and the small island could only seat two. Circulation was obstructed by a desk positioned in the main traffic flow, and the low French door felt disproportionate in scale compared to the large windows and adjacent two-story Great Room.
Major Structural & Functional Improvements
Repositioned window on the front elevation to the right, creating a long-desired view to the driveway while freeing space for a centered cooktop and statement hood — visually aligning with the Great Room’s redesigned fireplace focal wall.
Installed a new custom sliding door, significantly taller and wider than the original French door. This upgrade enhances natural light, visually opens the kitchen to the deck, and provides unobstructed traffic flow thanks to its sliding operation.
New Kitchen Layout & Enhanced Functionality
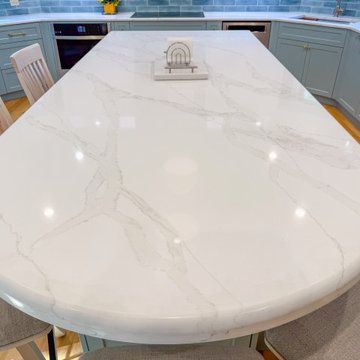
Designed an entirely new layout centered around a 10' double-slab island, providing expansive workspace and a natural gathering zone.
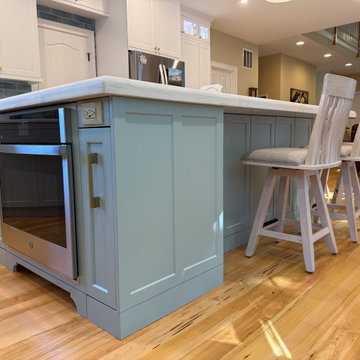
Added conversational seating for the whole family, allowing comfortable interaction on all sides of the island.
Introduced purpose-designed storage solutions, including pullouts, rollouts, spice towers, tray organizers, and deep drawers to maximize usability.
Reallocated the desk area to a dedicated window spot overlooking the backyard, removing it from traffic paths and improving both functionality and comfort.
Cabinetry & Architectural Detailing
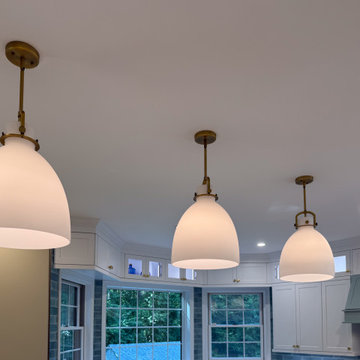
Custom two-tone cabinetry in soft white and a serene blue-green tone reflects the visual language of the adjacent Great Room, creating whole-home cohesion.
Installed lit upper glass cabinets along the entire perimeter, balancing vertical proportions and creating an elegant display band throughout the kitchen.
A custom range hood was designed and painted to match the base cabinetry, becoming a focal point framed by symmetrical windows.
Surfaces, Lighting & Finishes
The island features a double-thickness quartz slab with a soft ogee radius for a timeless, furniture-like feel.
A full-height, handcrafted aqua subway tile backsplash introduces depth, texture, and a gentle reflective quality.
New layered lighting concept, including recessed lights, pendants, task lighting, and integrated cabinet lighting, ensures a warm and functional workspace at any time of day.

 Five Star Tree Care
Adding woodchips underneath your trees has many benefits. Some of these benefits include:
-soil moisture retention
-nutrient leaching when decomposing over time
-smother weeds and invasive plants
But before you add any woodchips to your gardens and trees, it’s important to make sure you aerate the root zone. Doing so improves the oxygen supply and leaching to the roots. You will see more growth when there is more oxygen. Our team at Five Star Tree Services has come up with a guide on how you can use woodchips in your gardens.
Where To Place Woodchips
Even though there are many benefits for your trees, there is a right and wrong way to use them. If used incorrectly, you can actually end up hurting your tree instead of helping it. This can happen when there is an excessive amount piled up around a tree, its roots, and the trunk. Woodchips should never touch the trunk of a tree for extended periods of time. What happens is that moisture is retained in the chips and will eventually cause the tree to rot. The end result is death if not caught in time.
An indication of rot and decay is fruiting bodies or mushrooms. It is important to keep an eye out for these indicators by taking a good look at your trees. To avoid this situation, make sure to evenly and carefully spread out the chips around the root zone. Clear any chips away from the trunk by an inch or two.
When applied correctly; you will see your trees thrive and prosper. They will stay healthy and vivacious from the moisture retention and gradual organic leaching.
Soil Compaction
Soil compaction can dramatically affect your trees. This is often an overlooked issue for many landscapers. Due to things like foot traffic, large amounts of rain, construction, and the use of heavy machinery, are all factors that result in soil compaction. Things like water and nutrients can’t saturate through the soil when it becomes too compact. This results in soil that is without minerals and dry. When this happens, tree roots struggle to push through the soil, resulting in stressed trees.
Preventing Soil Compaction
If a tree is left in compacted soil, it will eventually die. One way to avoid this if you are having any construction done in your yard is to set up a Tree Protection Zone, or TPZ. Fences are used to create a barrier where heavy equipment and machinery can’t go in. When heavy machinery is used, this creates extremely compact soil and has been known to crush roots.
How Five Star Tree Services Can Help
Using woodchips is a great way to help your gardens thrive. But it is vitally important to use it properly, otherwise you will end up hurting your trees, instead of helping them. If you require any Richmond Hill Tree Care Services, don’t hesitate to give us at Five Star Tree Services a call at (416) 990-3355!

 Flores Artscape, Inc.
A close-up of part of a railroad tie retaining wall with decomposed granite in front along with one of the flowering drought-tolerant plant.
Inspiration for a traditional landscaping in Los Angeles.
Inspiration for a traditional landscaping in Los Angeles.
Find the right local pro for your project

 User
Modern compact design features full length concealed handles to open double doors. Constructed from solid hard maple and maple plywood (unit 40”w X 33”d X 93”h). Interior with single clothes rod and four pull out trays to hold up to 40 pairs of shoes and boots.
 Irene Designs
Kitchen — Project Description (Bolton, CT)
(Full Renovation • Reconfiguration • Architectural Corrections)
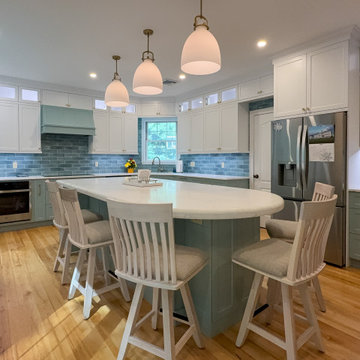
The original kitchen suffered from spatial imbalance and limited functionality: the right side was visually and physically heavy with cabinetry and appliances, the 135-degree angled walls lacked symmetry due to a missing window on the driveway side, and the small island could only seat two. Circulation was obstructed by a desk positioned in the main traffic flow, and the low French door felt disproportionate in scale compared to the large windows and adjacent two-story Great Room.
Major Structural & Functional Improvements
Repositioned window on the front elevation to the right, creating a long-desired view to the driveway while freeing space for a centered cooktop and statement hood — visually aligning with the Great Room’s redesigned fireplace focal wall.
Installed a new custom sliding door, significantly taller and wider than the original French door. This upgrade enhances natural light, visually opens the kitchen to the deck, and provides unobstructed traffic flow thanks to its sliding operation.
New Kitchen Layout & Enhanced Functionality
Designed an entirely new layout centered around a 10' double-slab island, providing expansive workspace and a natural gathering zone.
Added conversational seating for the whole family, allowing comfortable interaction on all sides of the island.
Introduced purpose-designed storage solutions, including pullouts, rollouts, spice towers, tray organizers, and deep drawers to maximize usability.
Reallocated the desk area to a dedicated window spot overlooking the backyard, removing it from traffic paths and improving both functionality and comfort.
Cabinetry & Architectural Detailing
Custom two-tone cabinetry in soft white and a serene blue-green tone reflects the visual language of the adjacent Great Room, creating whole-home cohesion.
Installed lit upper glass cabinets along the entire perimeter, balancing vertical proportions and creating an elegant display band throughout the kitchen.
A custom range hood was designed and painted to match the base cabinetry, becoming a focal point framed by symmetrical windows.
Surfaces, Lighting & Finishes
The island features a double-thickness quartz slab with a soft ogee radius for a timeless, furniture-like feel.
A full-height, handcrafted aqua subway tile backsplash introduces depth, texture, and a gentle reflective quality.
New layered lighting concept, including recessed lights, pendants, task lighting, and integrated cabinet lighting, ensures a warm and functional workspace at any time of day.

 VISTA TILES
The lead time of my products is between 4 and 6 weeks.
Our products are handmade products, the materials we use are of the highest quality, and our delivery time is between 4 and 6 weeks after placing the order. Since our products are special and high-end products, we carefully produce and prepare your products in this process and send them to you.
Production in desired color
100% Handmade
Made in Turkey
- Material made of ceramic material. Tiles are converted into water and cleaning materials.
- Decorating the leaf tile tile for many years. Color and pattern do not exist.
- Water and moisture clean thanks to the glossy glazed polished.
- It does not form mold.
- In places where Leaf Tile tiles are used, we breathe cool and warm in summer.
- Figure the days of sound waves taking advantage of the reflective feature of the days in the regions caused by Leafy Tiles.
It is used between countertops in kitchens.
Ceramic-based hexagons are suitable for use as wall tiles in bathrooms.
Production is made in pools, flooring, pool interior flooring, design design and design.
For floor tiles, it can be designed to be comprehensive in detail to floor tiles.
Leaf Tile Tile Application
First of all, the area to be applied should be flat, if not, it should be corrected. Thin plaster should be applied to the area. Cement-based adhesive mortar should be used as adhesive mortar. The adhesive mortar is applied to the surface to be applied regularly and evenly with a fine notched trowel. Kütahya and İznik patterned tile tiles are placed on the surface to be laid. For non-slip and a flat application, you can press on it using a spirit level or wedge. It is an important issue that the Kütahya and Iznik tiles with Ottoman and Seljuk motifs complement each other.
After bonding the tile tiles to the surface, the grouting is ready for application. Normally, tiles are laid without joints. After the grouting material is prepared in accordance with the instructions, it is applied on the tile tiles. We recommend that you prefer antibacterial grouts, especially for patterned tile ceramic tiles that you will apply in your kitchens and bathrooms. After the joint application, the excess joints remaining on the tiles whose flooring has been completed are removed by wiping them with a wet sponge.
Please note that international buyers are responsible for any duties/customs charges and import taxes associated with shipping to their respective countries. These fees are calculated and imposed by your country when the item arrives in the country.

 A.B. Edward Enterprises, Inc.
A.B. Edward Enterprises, Inc (847) 827-1605 | A+ BBB Rating & Angie's List Award Company. We give FREE Estimates, always!
For installations with new slate, we prefer to install only the highest quality time-tested slates. The combination of high quality slate, expert flashing design and installation, correct soldering, necessary underlayments for the conditions, and proper slate laying and fastening produces an aesthetic, long lasting roof that should have a serviceable life of 100+ years easily. Cutting corners on any one of these factors can shorten the life span of a slate roof from 100+ years to literally just a few years or less.
A.B. Edward Enterprises, Inc. provides high quality roofing slate material to the United States. Founded in 2003, based upon twelve years of experience in the roofing slate industry, we pride ourselves on detailed knowledge of our products and their application.
We focus exclusively on roofing slate together with the needs of home owners and contractors installing it. We have well-established and long-term relationships with many of the best slate producers all over the world. When it comes to any slate roofing project, A.B. Edward Enterprises, Inc. delivers unparalleled service and expertise. We look forward to working with you on your next project.
We offer the following roofing services:
• Roof Tear Offs
• Roof Repair
• Tile Roofs
• Shingle Roofs
• Flat Roofs
• Slate Roofs
• Gutters|Downspouts
• Gravel Roofs
• Energy Saving Roofs
• Fascia Board Replacements
• Torch-Ons
• Roof Coatings
• Plywood Installations
• Hot Mopping
• Solar Fans|Skylights
• Balconies and Decks
• Wood|Composite Shake Roofs
• Attic Ventilation
• Dry Rot Repairs
• Spanish|Mission Tile Specialist
• Inspections|Certifications
• Gutter|Downspout Cleaning
• Built-Up Roof Systems
• Preventive Maintenance
Please browse our website to find out what you need to know about our company, our services and our reputation. We’re sure you’ll agree…you can depend on A.B. Edward Enterprises, Inc. to build or repair your roof to last!
We want you to be completely satisfied with your new roof. That’s why we spend so much time with you before we even set foot on a ladder.
We have the quality and experience you can trust. We are licensed Illinois Roofing Contractors, bonded, and insured. Call us today at (847) 827-1605 for a free estimate!
Sponsored
Columbus, OH

Trish Takacs Design
Award Winning & Highly Skilled Kitchen & Bath Designer in Columbus
 Levite Construction Co
?✨ Transforming Dreams: From Damage to Elegance in Capitol Hill, Seattle ✨?
At Levite Construction, we believe in turning challenges into opportunities, and that's exactly what we did with this stunning project in Capitol Hill, Seattle, WA. Witness the incredible journey of restoring a beautiful town house that fell victim to water damage, as we share with you the remarkable transformation that showcases our expertise, dedication, and unwavering commitment to excellence.
? Repairing the Aftermath? The story began with a distress call, a plea for help from a water-damaged home in Capitol Hill. Our skilled team swiftly sprang into action, assessing the damage and devising a comprehensive plan for restoration. From minor repairs to major overhauls, we left no stone unturned in bringing this residence back to life.
? A Vision Takes Shape ?
Our creative design team envisioned a space that not only corrected the damage but also elevated the aesthetic to new heights. The challenge was accepted – to create a spa-like haven that exudes luxury and tranquility while maintaining a smart and functional layout.
? A Tranquil Retreat - Smart Bathroom Remodeling ?
Step into our world of ingenuity as you explore the images of the spa-inspired bathrooms. Every detail has been meticulously curated to evoke a sense of serenity. From innovative fixtures to thoughtfully chosen color palettes, this space is a testament to our dedication to crafting exceptional experiences.
? Every Inch Transformed?
Witness the metamorphosis as our skilled team undertook tasks that spanned the spectrum of construction artistry. Admire the seamless new floor installation, where every step taken is now on a canvas of elegance. The rich tapestry of paintwork dances in harmony with carefully crafted cabinetry, breathing life into this once-damaged dwelling.
?♂️ Expertise in Action ?♂️
Our project managers played a pivotal role in orchestrating this symphony of construction. Their meticulous planning, relentless dedication, and unwavering attention to detail ensured that every aspect of this project was executed flawlessly.
? Result: Elegance Redefined ?
As you scroll through the images, you'll witness the culmination of our endeavors – a home that has been resurrected from the ruins and reimagined with elegance. Levite Construction's commitment to quality, innovation, and customer satisfaction shines through every corner of this remodel.
? Capture the Journey?
Explore the photo gallery capturing the transition from devastation to breathtaking beauty. Every image is a testament to the passion and craftsmanship that define Levite Construction.
Thank you for joining us on this remarkable journey from adversity to triumph. We're proud to have turned a challenge into an opportunity and to have brought a smile back to this Capitol Hill home.
At Levite Construction, we don't just build structures; we build dreams.
#LeviteConstruction #FromDamageToElegance #CapitolHillRestoration #CraftingDreamHomes
 Irene Designs
Kitchen — Project Description (Bolton, CT)
(Full Renovation • Reconfiguration • Architectural Corrections)
The original kitchen suffered from spatial imbalance and limited functionality: the right side was visually and physically heavy with cabinetry and appliances, the 135-degree angled walls lacked symmetry due to a missing window on the driveway side, and the small island could only seat two. Circulation was obstructed by a desk positioned in the main traffic flow, and the low French door felt disproportionate in scale compared to the large windows and adjacent two-story Great Room.
Major Structural & Functional Improvements
Repositioned window on the front elevation to the right, creating a long-desired view to the driveway while freeing space for a centered cooktop and statement hood — visually aligning with the Great Room’s redesigned fireplace focal wall.
Installed a new custom sliding door, significantly taller and wider than the original French door. This upgrade enhances natural light, visually opens the kitchen to the deck, and provides unobstructed traffic flow thanks to its sliding operation.
New Kitchen Layout & Enhanced Functionality
Designed an entirely new layout centered around a 10' double-slab island, providing expansive workspace and a natural gathering zone.
Added conversational seating for the whole family, allowing comfortable interaction on all sides of the island.
Introduced purpose-designed storage solutions, including pullouts, rollouts, spice towers, tray organizers, and deep drawers to maximize usability.
Reallocated the desk area to a dedicated window spot overlooking the backyard, removing it from traffic paths and improving both functionality and comfort.
Cabinetry & Architectural Detailing
Custom two-tone cabinetry in soft white and a serene blue-green tone reflects the visual language of the adjacent Great Room, creating whole-home cohesion.
Installed lit upper glass cabinets along the entire perimeter, balancing vertical proportions and creating an elegant display band throughout the kitchen.
A custom range hood was designed and painted to match the base cabinetry, becoming a focal point framed by symmetrical windows.
Surfaces, Lighting & Finishes
The island features a double-thickness quartz slab with a soft ogee radius for a timeless, furniture-like feel.
A full-height, handcrafted aqua subway tile backsplash introduces depth, texture, and a gentle reflective quality.
New layered lighting concept, including recessed lights, pendants, task lighting, and integrated cabinet lighting, ensures a warm and functional workspace at any time of day.
 Irene Designs
Kitchen — Project Description (Bolton, CT)
(Full Renovation • Reconfiguration • Architectural Corrections)
The original kitchen suffered from spatial imbalance and limited functionality: the right side was visually and physically heavy with cabinetry and appliances, the 135-degree angled walls lacked symmetry due to a missing window on the driveway side, and the small island could only seat two. Circulation was obstructed by a desk positioned in the main traffic flow, and the low French door felt disproportionate in scale compared to the large windows and adjacent two-story Great Room.
Major Structural & Functional Improvements
Repositioned window on the front elevation to the right, creating a long-desired view to the driveway while freeing space for a centered cooktop and statement hood — visually aligning with the Great Room’s redesigned fireplace focal wall.
Installed a new custom sliding door, significantly taller and wider than the original French door. This upgrade enhances natural light, visually opens the kitchen to the deck, and provides unobstructed traffic flow thanks to its sliding operation.
New Kitchen Layout & Enhanced Functionality
Designed an entirely new layout centered around a 10' double-slab island, providing expansive workspace and a natural gathering zone.
Added conversational seating for the whole family, allowing comfortable interaction on all sides of the island.
Introduced purpose-designed storage solutions, including pullouts, rollouts, spice towers, tray organizers, and deep drawers to maximize usability.
Reallocated the desk area to a dedicated window spot overlooking the backyard, removing it from traffic paths and improving both functionality and comfort.
Cabinetry & Architectural Detailing
Custom two-tone cabinetry in soft white and a serene blue-green tone reflects the visual language of the adjacent Great Room, creating whole-home cohesion.
Installed lit upper glass cabinets along the entire perimeter, balancing vertical proportions and creating an elegant display band throughout the kitchen.
A custom range hood was designed and painted to match the base cabinetry, becoming a focal point framed by symmetrical windows.
Surfaces, Lighting & Finishes
The island features a double-thickness quartz slab with a soft ogee radius for a timeless, furniture-like feel.
A full-height, handcrafted aqua subway tile backsplash introduces depth, texture, and a gentle reflective quality.
New layered lighting concept, including recessed lights, pendants, task lighting, and integrated cabinet lighting, ensures a warm and functional workspace at any time of day.
 Irene Designs
Kitchen — Project Description (Bolton, CT)
(Full Renovation • Reconfiguration • Architectural Corrections)
The original kitchen suffered from spatial imbalance and limited functionality: the right side was visually and physically heavy with cabinetry and appliances, the 135-degree angled walls lacked symmetry due to a missing window on the driveway side, and the small island could only seat two. Circulation was obstructed by a desk positioned in the main traffic flow, and the low French door felt disproportionate in scale compared to the large windows and adjacent two-story Great Room.
Major Structural & Functional Improvements
Repositioned window on the front elevation to the right, creating a long-desired view to the driveway while freeing space for a centered cooktop and statement hood — visually aligning with the Great Room’s redesigned fireplace focal wall.
Installed a new custom sliding door, significantly taller and wider than the original French door. This upgrade enhances natural light, visually opens the kitchen to the deck, and provides unobstructed traffic flow thanks to its sliding operation.
New Kitchen Layout & Enhanced Functionality
Designed an entirely new layout centered around a 10' double-slab island, providing expansive workspace and a natural gathering zone.
Added conversational seating for the whole family, allowing comfortable interaction on all sides of the island.
Introduced purpose-designed storage solutions, including pullouts, rollouts, spice towers, tray organizers, and deep drawers to maximize usability.
Reallocated the desk area to a dedicated window spot overlooking the backyard, removing it from traffic paths and improving both functionality and comfort.
Cabinetry & Architectural Detailing
Custom two-tone cabinetry in soft white and a serene blue-green tone reflects the visual language of the adjacent Great Room, creating whole-home cohesion.
Installed lit upper glass cabinets along the entire perimeter, balancing vertical proportions and creating an elegant display band throughout the kitchen.
A custom range hood was designed and painted to match the base cabinetry, becoming a focal point framed by symmetrical windows.
Surfaces, Lighting & Finishes
The island features a double-thickness quartz slab with a soft ogee radius for a timeless, furniture-like feel.
A full-height, handcrafted aqua subway tile backsplash introduces depth, texture, and a gentle reflective quality.
New layered lighting concept, including recessed lights, pendants, task lighting, and integrated cabinet lighting, ensures a warm and functional workspace at any time of day.
 Farbica
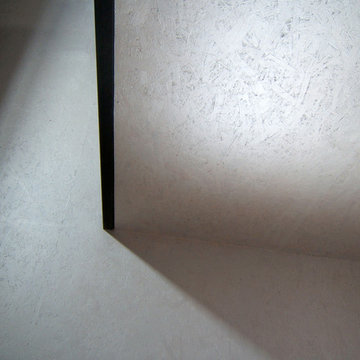
The transparent silver shimmer transforms the yellowish OSB-structure in cool and glamorous rooms.

 Pool & Hot Tub Alliance
One of the initial challenges for this project was the fact that I was asked to come in with a concept and design a after a number of other pool professionals. That can be an advantage in some situations where the people that preceded you all had a similar idea and concept and we go drastically in a different direction. Either way, that approach usually opens the eyes of the customer to the fact that there are other ways of seeing things and other ways of tackling a difficult site. In this case there was a more level area in a more remote part of the property which would've been easier to build on. Without question. What we offered was the ability to create something dramatic and unique and in the end became actually breathtaking. This involved doing a raised pool and spa combination built into an existing ledge that needed to be exposed and chopped out not only for the raised spa area but for the entire depth of the pool. A large amount of tree clearing was also going to be necessary as well as a plan to deal with the mountains of rock,ledge and granite that was going to come out of this excavation site. Another large challenge was that the choice of this location also made the proximity of the pool to the home extremely close. We needed to come up with a design that included planters and buffers so that the pool would not look and feel like it was too close to the house. By modifying the existing pressure-treated deck off the back of the house as well as raising what would be the final grade of the pool we were able to eliminate any railings that were present for that deck . What that achieved was a wide-open feel and look to the project . Now ,from anywhere in the back of the house the view of the pool the spa and the ledge rising up and around the entire area is a dramatic one, to say the least. The act of removing the ledge that was necessary to create this oasis closely resembled actually sculpting the ledge. We wanted and needed to preserve certain aspects of the exposed ledge areas as we wanted them to blend into the rest of the masonry that we were going to create. Steps and walkways etc. Besides aesthetics, practical solutions, for storm runoff, pockets for future planting and screening of the neighbors properties was a large part of our design and challenge. We were able to blend some of the larger ledge pieces that were excavated into the hard scape, the retaining walls the stone veneer surrounding the spa as well as unique coping pieces and the diving rock. We even used pieces of the ledge as grab rails for the custom swim out in the deep end. Matching granite was used to veneer all the underwater steps benches and swim outs. The spa was designed and constructed with party mode in mind. From the custom stone veneer entrance steps to the multilevel benches and our exclusive" deep soak" hydrotherapy well, it was all part of a custom concept. We actually measure as a tailor would, the dimensions of our hydrotherapy wells to the specific customer. which sometimes comically means that one spouse might be in over their head. In this case we were lucky as the dimensions seem to fit both spouses correctly. In other projects we have actually done his and hers deep wells so that everyone is happy!


 Baine Contracting, Inc.
Elegant bathroom creatively comes together to complete the space and make it efficient yet stylish.
Example of a large cottage chic 3/4 beige tile and ceramic tile ceramic tile bathroom design in New York with beaded inset cabinets, dark wood cabinets, a one-piece toilet, beige walls, a drop-in sink and marble countertops
Example of a large cottage chic 3/4 beige tile and ceramic tile ceramic tile bathroom design in New York with beaded inset cabinets, dark wood cabinets, a one-piece toilet, beige walls, a drop-in sink and marble countertops

 Daniel Scerri Periti
We were approached with a request to design the furnishings for an existing ‘finished’ apartment. The intention was to move in relatively fast, and the property already had an existing marble floor, kitchen and bathrooms which had to be kept. The property also boasted a fantastic 270 degree view, seen from most of the apartment. The clients had a very important role in the completion of the project. They were very involved during the design process and through various decoration choices. The final design was kept as a rigid guideline when faced with picking out all the different elements.
Once clear of all previous furniture, the space felt cold and bare; so we immediately felt the need for warmth, and raw, natural elements and textures to complement the cold marble floor while visually tying in the design of the whole apartment together.
Since the existing kitchen had a touch of dark walnut stain, we felt this material was one we should add to the palette of materials to contest the stark materials. A raw cement finish was another material we felt would add an interesting contrast and could be used in a variety of ways, from cabinets to walls and ceilings, to tie up the design of various areas of the apartment.
To warm up the living/dining area, keeping the existing marble floor but visually creating zones within the large living/dining area without hindering the flow, a dark timber custom-made soffit, continuous with a floor-to-ceiling drinks cabinet zones the dining area, giving it a degree of much-needed warmth.
The various windows with a stupendous 270 degree view needed to be visually tied together. This was done by introducing a continuous sheer [drape] which also doubled up as a sound-absorbing material along 2 of the 4 walls of the space.
A very large sofa was required to fill up the space correctly, also required for the size of the young family.
Services were integrated within the units and soffits, while a customized design in the corner between the kitchen and the living room took into consideration the viewpoints from the main areas to create a pantry without hindering the flow or views. A strategically placed floor-to-ceiling mirror doubles up the space and extends the view to the inner parts of the apartment.
The daughter’s bedroom was a small challenge in itself, and a fun task, where we wanted to achieve the perception of a cozy niche with its own enclosed reading nook [for reading fairy tales], behind see-through curtains and a custom-ordered wall print sporting the girl’s favorite colors.
The sons’ bedroom had double the requirements in terms of space needed: more wardrobe, more homework desk space, a tv/play station area… “We combined a raised platform area between the boys’ beds to become an area with cushions where the kids can lay down and play, and face a hidden screen behind the homework desk’s sliding back panel for their play station”. The color of the homework desk was chosen in relation to the boys’ ages. A more masculine material palette was chosen for this room, in contrast to the light pastel palette of the girl’s bedroom. Again, this colour can easily be changed over time for a more mature look.
PROJECT DATA:
St. Paul’s Bay, Malta
DESIGN TEAM:
Perit Rebecca Zammit, Perit Daniel Scerri, Elyse Tonna
OTHER CREDITS:
Photography: Tonio Lombardi
Styling : TKS


 Daniel Scerri Periti
We were approached with a request to design the furnishings for an existing ‘finished’ apartment. The intention was to move in relatively fast, and the property already had an existing marble floor, kitchen and bathrooms which had to be kept. The property also boasted a fantastic 270 degree view, seen from most of the apartment. The clients had a very important role in the completion of the project. They were very involved during the design process and through various decoration choices. The final design was kept as a rigid guideline when faced with picking out all the different elements.
Once clear of all previous furniture, the space felt cold and bare; so we immediately felt the need for warmth, and raw, natural elements and textures to complement the cold marble floor while visually tying in the design of the whole apartment together.
Since the existing kitchen had a touch of dark walnut stain, we felt this material was one we should add to the palette of materials to contest the stark materials. A raw cement finish was another material we felt would add an interesting contrast and could be used in a variety of ways, from cabinets to walls and ceilings, to tie up the design of various areas of the apartment.
To warm up the living/dining area, keeping the existing marble floor but visually creating zones within the large living/dining area without hindering the flow, a dark timber custom-made soffit, continuous with a floor-to-ceiling drinks cabinet zones the dining area, giving it a degree of much-needed warmth.
The various windows with a stupendous 270 degree view needed to be visually tied together. This was done by introducing a continuous sheer [drape] which also doubled up as a sound-absorbing material along 2 of the 4 walls of the space.
A very large sofa was required to fill up the space correctly, also required for the size of the young family.
Services were integrated within the units and soffits, while a customized design in the corner between the kitchen and the living room took into consideration the viewpoints from the main areas to create a pantry without hindering the flow or views. A strategically placed floor-to-ceiling mirror doubles up the space and extends the view to the inner parts of the apartment.
The daughter’s bedroom was a small challenge in itself, and a fun task, where we wanted to achieve the perception of a cozy niche with its own enclosed reading nook [for reading fairy tales], behind see-through curtains and a custom-ordered wall print sporting the girl’s favorite colors.
The sons’ bedroom had double the requirements in terms of space needed: more wardrobe, more homework desk space, a tv/play station area… “We combined a raised platform area between the boys’ beds to become an area with cushions where the kids can lay down and play, and face a hidden screen behind the homework desk’s sliding back panel for their play station”. The color of the homework desk was chosen in relation to the boys’ ages. A more masculine material palette was chosen for this room, in contrast to the light pastel palette of the girl’s bedroom. Again, this colour can easily be changed over time for a more mature look.
PROJECT DATA:
St. Paul’s Bay, Malta
DESIGN TEAM:
Perit Rebecca Zammit, Perit Daniel Scerri, Elyse Tonna
OTHER CREDITS:
Photography: Tonio Lombardi
Styling : TKS

 Pine Hall Brick Company
Spanish bond is modified to create this square with concentric rectangles. Pathway Red and Cocoa pavers.
by Pine Hall Brick Company
Patio - traditional patio idea
Patio - traditional patio idea
245