
Search results for "Decision viable" in Home Design Ideas
 Tonic Design + Tonic Construction
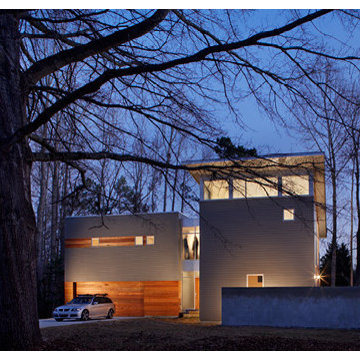
Designed for the lifestyle and budget of a young married couple and growing family, this home offers a viable alternative to the generic speculative home. Occupying a small leftover developer site, just under four tenths of an acre at the end of a suburban cul-de-sac, the Lanning Residence site is anchored by a one hundred year old oak tree. The parcel, once undesirable to developers and their speculative plans, became the inspiration for the project form.
Acting as both designers and builders, the decision was made early to utilize a strategy typical to most suburban construction; maximizing square footage while minimizing the building perimeter. An analysis of the surrounding suburban fabric revealed that the adjoining property lines were heavily planted. Views and window placement were organized to take advantage of the adjacent landscape while maximizing natural light.
The house program is distributed within two main volumes that are connected by a translucent circulation volume. The spacious interior volumes, large windows, plywood shear walls, sheetrock, and simple details allowed for a light construction budget. Spray foam insulation and well designed mechanical systems allowed the family to reduce their monthly utility bills by over half, creating a far more energy efficient lifestyle.
 Wood-Mode Fine Custom Cabinetry
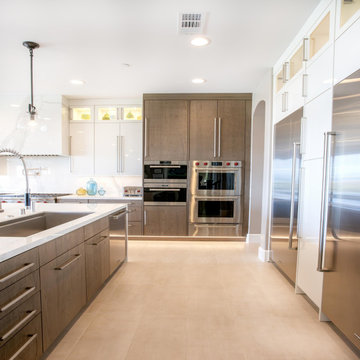
The homeowners asked the designer of this kitchen to create a larger, modern space that would “entertain a crowd.” A light color palette featuring Vanguard MDF in Nordic White was selected to brighten up the space and reflect the coastal view just outside the kitchen windows. The previous space underutilized the center of the room, and the decision to include two islands created a viable space for seating for guests. To create this space, however, the designer was challenged to remove a walk-in pantry and add a large steel beam. To offset the white and create dimension, Vanguard Plus in a Matte Foundry finish on rough sawn euro oak veneer was used for the island bases and then wrapped in the same porcelain material used on the backsplashes. And floor-to-ceiling wall cabinets more than made the storage space, packed with organizational extras like an appliance garage to keep countertops clear, swing-out spice rack within easy reach of the stove, and tall pull-out pantries to house cookware and cleaning supplies.
Designed by Alice Sin
Sierra Custom Kitchens, Baths & Designs
 Wood-Mode Fine Custom Cabinetry
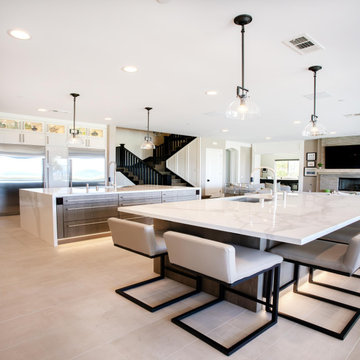
The homeowners asked the designer of this kitchen to create a larger, modern space that would “entertain a crowd.” A light color palette featuring Vanguard MDF in Nordic White was selected to brighten up the space and reflect the coastal view just outside the kitchen windows. The previous space underutilized the center of the room, and the decision to include two islands created a viable space for seating for guests. To create this space, however, the designer was challenged to remove a walk-in pantry and add a large steel beam. To offset the white and create dimension, Vanguard Plus in a Matte Foundry finish on rough sawn euro oak veneer was used for the island bases and then wrapped in the same porcelain material used on the backsplashes. And floor-to-ceiling wall cabinets more than made the storage space, packed with organizational extras like an appliance garage to keep countertops clear, swing-out spice rack within easy reach of the stove, and tall pull-out pantries to house cookware and cleaning supplies.
Designed by Alice Sin
Sierra Custom Kitchens, Baths & Designs
Find the right local pro for your project
 Tonic Design + Tonic Construction
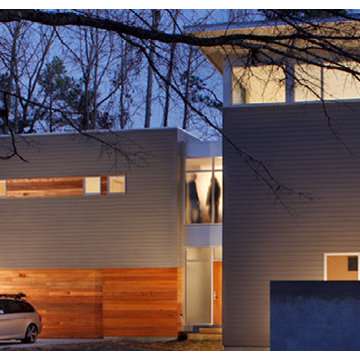
Designed for the lifestyle and budget of a young married couple and growing family, this home offers a viable alternative to the generic speculative home. Occupying a small leftover developer site, just under four tenths of an acre at the end of a suburban cul-de-sac, the Lanning Residence site is anchored by a one hundred year old oak tree. The parcel, once undesirable to developers and their speculative plans, became the inspiration for the project form.
Acting as both designers and builders, the decision was made early to utilize a strategy typical to most suburban construction; maximizing square footage while minimizing the building perimeter. An analysis of the surrounding suburban fabric revealed that the adjoining property lines were heavily planted. Views and window placement were organized to take advantage of the adjacent landscape while maximizing natural light.
The house program is distributed within two main volumes that are connected by a translucent circulation volume. The spacious interior volumes, large windows, plywood shear walls, sheetrock, and simple details allowed for a light construction budget. Spray foam insulation and well designed mechanical systems allowed the family to reduce their monthly utility bills by over half, creating a far more energy efficient lifestyle.
 Wood-Mode Fine Custom Cabinetry
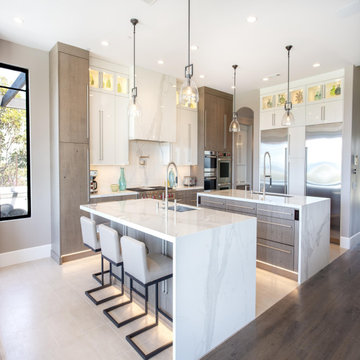
The homeowners asked the designer of this kitchen to create a larger, modern space that would “entertain a crowd.” A light color palette featuring Vanguard MDF in Nordic White was selected to brighten up the space and reflect the coastal view just outside the kitchen windows. The previous space underutilized the center of the room, and the decision to include two islands created a viable space for seating for guests. To create this space, however, the designer was challenged to remove a walk-in pantry and add a large steel beam. To offset the white and create dimension, Vanguard Plus in a Matte Foundry finish on rough sawn euro oak veneer was used for the island bases and then wrapped in the same porcelain material used on the backsplashes. And floor-to-ceiling wall cabinets more than made the storage space, packed with organizational extras like an appliance garage to keep countertops clear, swing-out spice rack within easy reach of the stove, and tall pull-out pantries to house cookware and cleaning supplies.
Designed by Alice Sin
Sierra Custom Kitchens, Baths & Designs
 Wood-Mode Fine Custom Cabinetry
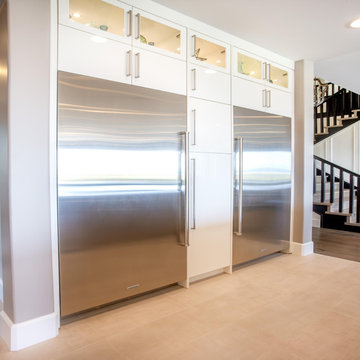
The homeowners asked the designer of this kitchen to create a larger, modern space that would “entertain a crowd.” A light color palette featuring Vanguard MDF in Nordic White was selected to brighten up the space and reflect the coastal view just outside the kitchen windows. The previous space underutilized the center of the room, and the decision to include two islands created a viable space for seating for guests. To create this space, however, the designer was challenged to remove a walk-in pantry and add a large steel beam. To offset the white and create dimension, Vanguard Plus in a Matte Foundry finish on rough sawn euro oak veneer was used for the island bases and then wrapped in the same porcelain material used on the backsplashes. And floor-to-ceiling wall cabinets more than made the storage space, packed with organizational extras like an appliance garage to keep countertops clear, swing-out spice rack within easy reach of the stove, and tall pull-out pantries to house cookware and cleaning supplies.
Designed by Alice Sin
Sierra Custom Kitchens, Baths & Designs
 Wood-Mode Fine Custom Cabinetry
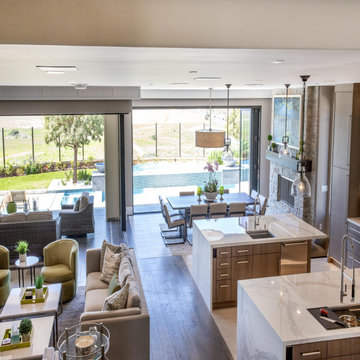
The homeowners asked the designer of this kitchen to create a larger, modern space that would “entertain a crowd.” A light color palette featuring Vanguard MDF in Nordic White was selected to brighten up the space and reflect the coastal view just outside the kitchen windows. The previous space underutilized the center of the room, and the decision to include two islands created a viable space for seating for guests. To create this space, however, the designer was challenged to remove a walk-in pantry and add a large steel beam. To offset the white and create dimension, Vanguard Plus in a Matte Foundry finish on rough sawn euro oak veneer was used for the island bases and then wrapped in the same porcelain material used on the backsplashes. And floor-to-ceiling wall cabinets more than made the storage space, packed with organizational extras like an appliance garage to keep countertops clear, swing-out spice rack within easy reach of the stove, and tall pull-out pantries to house cookware and cleaning supplies.
Designed by Alice Sin
Sierra Custom Kitchens, Baths & Designs
 Tonic Design + Tonic Construction
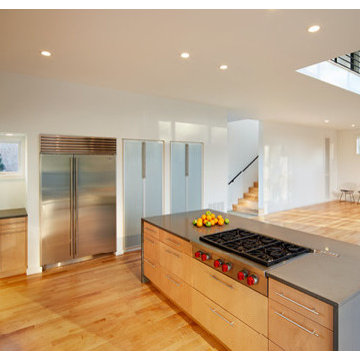
Designed for the lifestyle and budget of a young married couple and growing family, this home offers a viable alternative to the generic speculative home. Occupying a small leftover developer site, just under four tenths of an acre at the end of a suburban cul-de-sac, the Lanning Residence site is anchored by a one hundred year old oak tree. The parcel, once undesirable to developers and their speculative plans, became the inspiration for the project form.
Acting as both designers and builders, the decision was made early to utilize a strategy typical to most suburban construction; maximizing square footage while minimizing the building perimeter. An analysis of the surrounding suburban fabric revealed that the adjoining property lines were heavily planted. Views and window placement were organized to take advantage of the adjacent landscape while maximizing natural light.
The house program is distributed within two main volumes that are connected by a translucent circulation volume. The spacious interior volumes, large windows, plywood shear walls, sheetrock, and simple details allowed for a light construction budget. Spray foam insulation and well designed mechanical systems allowed the family to reduce their monthly utility bills by over half, creating a far more energy efficient lifestyle.
 Wood-Mode Fine Custom Cabinetry
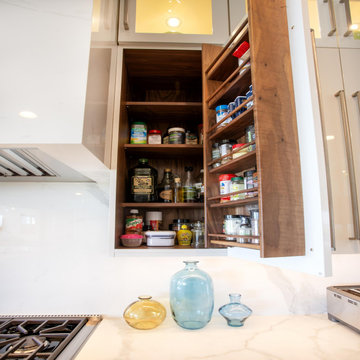
The homeowners asked the designer of this kitchen to create a larger, modern space that would “entertain a crowd.” A light color palette featuring Vanguard MDF in Nordic White was selected to brighten up the space and reflect the coastal view just outside the kitchen windows. The previous space underutilized the center of the room, and the decision to include two islands created a viable space for seating for guests. To create this space, however, the designer was challenged to remove a walk-in pantry and add a large steel beam. To offset the white and create dimension, Vanguard Plus in a Matte Foundry finish on rough sawn euro oak veneer was used for the island bases and then wrapped in the same porcelain material used on the backsplashes. And floor-to-ceiling wall cabinets more than made the storage space, packed with organizational extras like an appliance garage to keep countertops clear, swing-out spice rack within easy reach of the stove, and tall pull-out pantries to house cookware and cleaning supplies.
Designed by Alice Sin
Sierra Custom Kitchens, Baths & Designs
 Wood-Mode Fine Custom Cabinetry
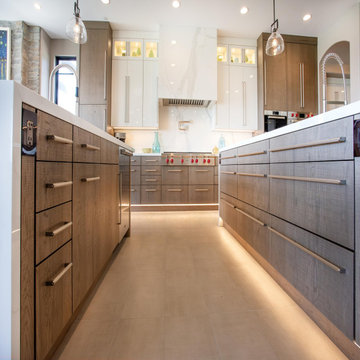
The homeowners asked the designer of this kitchen to create a larger, modern space that would “entertain a crowd.” A light color palette featuring Vanguard MDF in Nordic White was selected to brighten up the space and reflect the coastal view just outside the kitchen windows. The previous space underutilized the center of the room, and the decision to include two islands created a viable space for seating for guests. To create this space, however, the designer was challenged to remove a walk-in pantry and add a large steel beam. To offset the white and create dimension, Vanguard Plus in a Matte Foundry finish on rough sawn euro oak veneer was used for the island bases and then wrapped in the same porcelain material used on the backsplashes. And floor-to-ceiling wall cabinets more than made the storage space, packed with organizational extras like an appliance garage to keep countertops clear, swing-out spice rack within easy reach of the stove, and tall pull-out pantries to house cookware and cleaning supplies.
Designed by Alice Sin
Sierra Custom Kitchens, Baths & Designs
 Wood-Mode Fine Custom Cabinetry
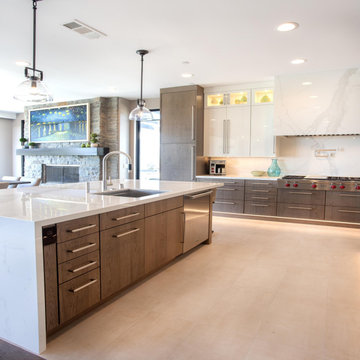
The homeowners asked the designer of this kitchen to create a larger, modern space that would “entertain a crowd.” A light color palette featuring Vanguard MDF in Nordic White was selected to brighten up the space and reflect the coastal view just outside the kitchen windows. The previous space underutilized the center of the room, and the decision to include two islands created a viable space for seating for guests. To create this space, however, the designer was challenged to remove a walk-in pantry and add a large steel beam. To offset the white and create dimension, Vanguard Plus in a Matte Foundry finish on rough sawn euro oak veneer was used for the island bases and then wrapped in the same porcelain material used on the backsplashes. And floor-to-ceiling wall cabinets more than made the storage space, packed with organizational extras like an appliance garage to keep countertops clear, swing-out spice rack within easy reach of the stove, and tall pull-out pantries to house cookware and cleaning supplies.
Designed by Alice Sin
Sierra Custom Kitchens, Baths & Designs
 Wood-Mode Fine Custom Cabinetry
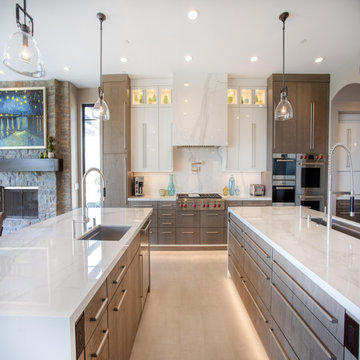
The homeowners asked the designer of this kitchen to create a larger, modern space that would “entertain a crowd.” A light color palette featuring Vanguard MDF in Nordic White was selected to brighten up the space and reflect the coastal view just outside the kitchen windows. The previous space underutilized the center of the room, and the decision to include two islands created a viable space for seating for guests. To create this space, however, the designer was challenged to remove a walk-in pantry and add a large steel beam. To offset the white and create dimension, Vanguard Plus in a Matte Foundry finish on rough sawn euro oak veneer was used for the island bases and then wrapped in the same porcelain material used on the backsplashes. And floor-to-ceiling wall cabinets more than made the storage space, packed with organizational extras like an appliance garage to keep countertops clear, swing-out spice rack within easy reach of the stove, and tall pull-out pantries to house cookware and cleaning supplies.
Designed by Alice Sin
Sierra Custom Kitchens, Baths & Designs
 Wood-Mode Fine Custom Cabinetry
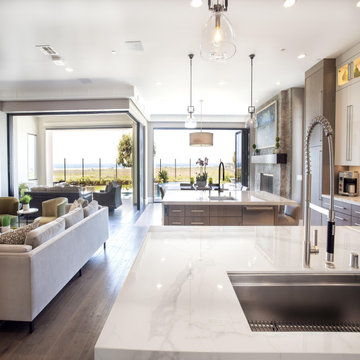
The homeowners asked the designer of this kitchen to create a larger, modern space that would “entertain a crowd.” A light color palette featuring Vanguard MDF in Nordic White was selected to brighten up the space and reflect the coastal view just outside the kitchen windows. The previous space underutilized the center of the room, and the decision to include two islands created a viable space for seating for guests. To create this space, however, the designer was challenged to remove a walk-in pantry and add a large steel beam. To offset the white and create dimension, Vanguard Plus in a Matte Foundry finish on rough sawn euro oak veneer was used for the island bases and then wrapped in the same porcelain material used on the backsplashes. And floor-to-ceiling wall cabinets more than made the storage space, packed with organizational extras like an appliance garage to keep countertops clear, swing-out spice rack within easy reach of the stove, and tall pull-out pantries to house cookware and cleaning supplies.
Designed by Alice Sin
Sierra Custom Kitchens, Baths & Designs

 Mittendorf Quality Construction
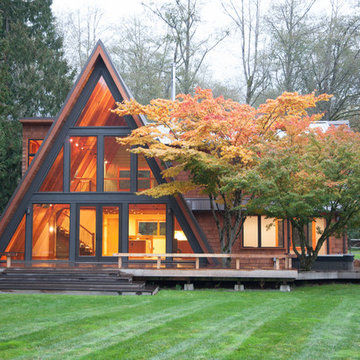
Inspiration for a rustic brown one-story wood gable roof remodel in Seattle
 User
UserPhoto: Ten Ten Creative
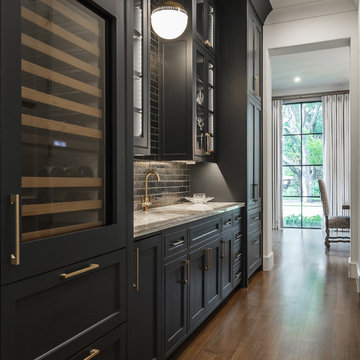
Wet bar - transitional single-wall dark wood floor and brown floor wet bar idea in Dallas with shaker cabinets, black cabinets, black backsplash, subway tile backsplash and gray countertops
Wet bar - transitional single-wall dark wood floor and brown floor wet bar idea in Dallas with shaker cabinets, black cabinets, black backsplash, subway tile backsplash and gray countertops

 William Hoffman Architect
4 Steps to Achieving a Rewarding Cost Effective Home Renovation
1 Home Renovation an Introduction
A home renovation due to changes in family needs and space requirements can be a challenging, but also a rewarding experience. As a homeowner, gathering and coordinating resources and possibly help from professional consultants are required. Once the construction phase has started, patience, endurance and commitment to follow through are necessary. Despite the challenges, the rewards of a well-planned and successfully completed project are meaningful, adding aesthetic and economic value, also providing the opportunity to personalize a home, encompassing the function, comfort and aesthetics to accommodate individual taste and lifestyle.
A renovation of an existing home is a viable alternative to moving or building a new home, assuming that a home is structurally sound, the expenditure to enlarge or improve can be a cost effective alternative. A home possessing charm, style, historical significance, established landscaping or an exceptional location could be a significant motivation to consider purchasing another home with the intent to renovate.
The complexity of a project could be relatively simple, changing the use of a room, consolidating two rooms into one, or opening up a room to the outdoors. It could also be a more involved task requiring planning, design and construction documents to build a second floor addition, the addition of a new wing or completely gutting the interior. Some projects could be completed in a weekend’s work or more complex projects, using a “Master Plan”, a plan which provides overall guidance; a renovation can be accomplished all at once or divided into manageable projects over a period of time. With the home evolving gradually allowing the renovation to be planned, timed and tailored to meet individual needs and circumstances.
The due diligence phase should precede the decision to renovate whether it’s an existing home or a home that is purchased with the intent to renovate. The due diligence phase will reveal the factors affecting the nature and scope of the project or if a renovation makes sense.
Every renovation project is unique relative to personal requirements, architectural style & construction type. This guide will be helpful in developing an understanding of the preliminary groundwork required to realize a successful project. If properly planned, a home renovation project can be a positive and rewarding experience resulting in a comfortable, practical and an attractive living environment.
The first step of the planning process is documenting the goals and long-range plans referred to as the “Project Program”. This will dictate the nature, scope and feasibility of the project. Providing a guide to achieving defined goals, the timing or phasing of the project and budget required to achieve the desired end result.
2 Documenting Existing Conditions
Once the “Project Program”, has been established, the next step is to determine what there is to work with. This requires documenting the home’s floor plan and site elements which includes drawing an “as built” floor & site plan consisting of the existing exterior walls, interior rooms, doors, windows, etc. and surrounding site elements, landscape and other significant exterior features. Additionally understanding and noting on the “as built” plan, the structural, mechanical and electrical systems as necessary. Gathering the “existing condition” information defines what there is to work with, creating the framework from which to facilitate and organize the decision making process and develop effective “project program” solutions.
3 Evaluating Existing Conditions
The goals and long-range plans have been established, and the existing floor plan and site elements have been documented. Before developing design solutions, the next step is to evaluate existing conditions. The evaluation includes: a detailed analysis of the structural, mechanical and electrical systems, determining the condition of the house, noting functional and aesthetic deficiencies. At the same time recognizing the home’s strengths, assets and evaluating its relationship to its site. The remaining parameters will be defined by the local jurisdiction’s zoning regulations, these regulations will define the “envelope”, within which the proposed project will be required to fit:
•required front, side & rear yard setbacks
•maximum allowable lot coverage & height
The previous three steps have provided the necessary foundation to start the design phase. The goals and long range plans have been established, existing conditions have been documented and the evaluation of what there is to work with are now in place. This will provide the framework from which to facilitate and organize design solutions. The consolidation of this information is manifested in the development of the “Master Plan” which will become the road map by which sound decision-making can be made as a home renovation evolves. Keeping the project, on a linear path, avoiding redundancies and back tracking, on time, within budget, concluding with a well crafted finished product. After all the “up front” research and documentation has been completed, the design phase of the project can now precede, with the creation of diagrammatic design drawings. Organizing interior spaces, taking into account the external elements, prevailing breezes, solar orientation, view, existing outdoor features, etc. Through the development of schematic sketches themes will emerge followed by design development drawings. Wise planning and renovation decisions can save money and time at the same time provide a well crafted finished project. The “Master Plan” provides a strategic path in the planning and decision making process leading to a successful and rewarding home renovation, which will add value and considerable enjoyment, for many years, living in a newly renovated home.
By virtue of having gone through these steps, frustrations sometimes encountered during a home renovation will be minimized, allowing the renovation to be a gratifying and rewarding experience. Being aware of the process allows one to become an “Educated Client,” which is worth quite a bit more than one might realize. The uneducated client may not realize the benefit of going through the planning, evaluation and documentation groundwork. He will only realize its benefits after having completed a prior renovation project. This rational approach keeps the design process on a direct path to achieving prescribed goals.
4 Exploring Design Solutions & Developing a Master Plan
The previous three steps have provided the necessary foundation to start the design phase. The goals and long range plans have been established, existing conditions have been documented and the evaluation of what there is to work with are now in place. This will provide the framework from which to facilitate and organize design solutions. The consolidation of this information is manifested in the development of the “Master Plan” which will become the road map by which sound decision-making can be made as a home renovation evolves. Keeping the project, on a linear path, avoiding redundancies and back tracking, on time, within budget, concluding with a well crafted finished product.
By virtue of having gone through these steps, frustrations sometimes encountered during a home renovation will be minimized, allowing the renovation to be a gratifying and rewarding experience. Being aware of the process allows one to become an “Educated Client,” which is worth quite a bit more than one might realize. The uneducated client may not realize the benefit of going through the planning, evaluation and documentation groundwork. He will only realize its benefits after having completed a prior renovation project. This rational approach keeps the design process on a direct path to achieving prescribed goals.
After all the “up front” research and documentation has been completed, the design phase of the project can now precede, with the creation of diagrammatic design drawings. Organizing interior spaces, taking into account the external elements, prevailing breezes, solar orientation, view, existing outdoor features, etc. Through the development of schematic sketches themes will emerge followed by design development drawings. Wise planning and renovation decisions can save money and time at the same time provide a well crafted finished project. The “Master Plan” provides a strategic path in the planning and decision making process leading to a successful and rewarding home renovation, which will add value and considerable enjoyment, for many years, living in a newly renovated home.
 Dianne Davant and Associates
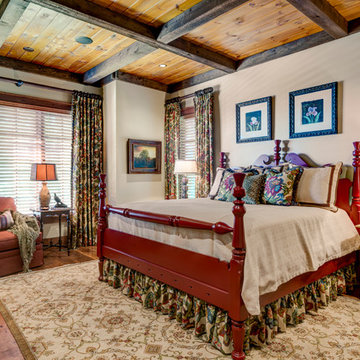
Master Bedroom with Red Bed Frame and custom drapery and bedding.
Bedroom - traditional master light wood floor bedroom idea in Charlotte
Bedroom - traditional master light wood floor bedroom idea in Charlotte

 Zelaya Properties LLC
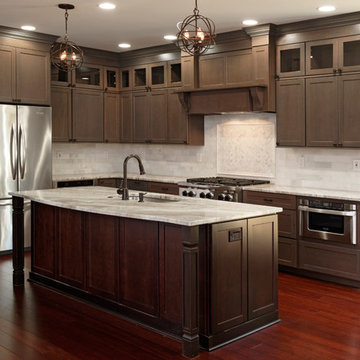
We used: Custom cherry cabinetry in Arts & Crafts Shaker style by Kabinart in Boulder and Espresso stains. Liberty Hardware Venetian bronze 1-1/2" cabinet knobs. KitchenAid Architect II Series 22 CF counter-depth French door refrigerator. KitchenAid Architect Series II 27" convection single wall oven. KitchenAid 36" 6-burner dual fuel freestanding commercial-style range. KitchenAid Architect II Series 24" dishwasher. Sharp Insight Pro Series 24" built-in microwave drawer (Model #KB6524PS). Crystorama Solaris 12" wide pendant lights in English bronze. Granite countertops in Brown Fantasy. 3"x6" polished marble backsplash.
Paint colors:
Walls: Glidden Silver Cloud 30YY 63/024
Ceilings/Trims/Doors: Glidden Swan White GLC23
Robert B. Narod Photography
1