
Search results for "Effective gel" in Home Design Ideas
 Tile Doctor Ltd
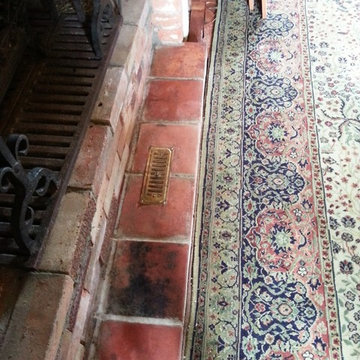
The oldest properties often have the most interesting tiled features and this Quarry Tiled Fireplace was a fine example. The customer lived in a quaint old cottage just outside the main town centre of Bedford and contacted us about restoring their fantastic Quarry tiled fireplace. While the customer knew that the cottage itself was over 200 years old, they had no idea whether or not the fireplace is an original feature.
However, it’s safe to say that the fireplace is very old in its own right, and that it had been a long time since it had experienced any kind of professional maintenance. It goes without saying that as any kind of tiles get older they will need more frequent care to keep them looking at their best. Here, the Quarry tiles desperately needed cleaning up as they were covered in old candle wax and what looked to be several years’ worth of general dirt. This had significant dulled the natural shades in the stone, leaving it looking lifeless and unappealing. The tiles would also require a fresh seal to ensure protection against muck in the future, and to help restore the colour to the stone.
Firstly, I applied Tile Doctor Oxy-Gel tile cleaner, which is particularly effective on tricky areas as being in a gel form it adheres better to non-horizontal areas. It was left it to dwell on the tiles for around twenty minutes so it could penetrate into the pores and get to work lifting out and dissolving the dirt that had been trapped in there over the years . Oxy-Gel is suitable for use on a wide range of natural stone tiles, including Quarry, Travertine and Slate. In this situation it cut through and removed most of the candlewax quite easily, and softened the stubborn residue to a point where I could easily remove the rest manually with handheld scrappers.
I then left area it to dry, with an air mover installed to reduce drying time. The advantage of using a gel product is that uses a smaller amount of moisture than a standard liquid cleaner, and therefore allows the tile to dry – and to be sealed – quicker; and in this case we were able to seal the same day where-as normally we would have to wait until the next day.
Once the tiles were completely dry, I sealed the fireplace with Tile Doctor Colour Grow which is an impregnating sealer that fills the pores of the stone to prevent dirt and general muck from becoming ingrained, making the tiles much easier to keep clean in the long-term.
The added benefit of Colour Grow is that – as its name suggests – it emphasises the natural colours in the stone. This was something that the Quarry fireplace was desperately in need of, and the Colour a Grow quickly got the job done!
The customer was very pleased with the finished results. The clean removed years’ worth of muck, while the fresh seal brought out the natural beauty in the Quarry tiles and, at the same time, will protect the tiles on future candle-lit evenings.
Andrew Evans
Bedfordshire Tile Doctor
 Tile Doctor Ltd
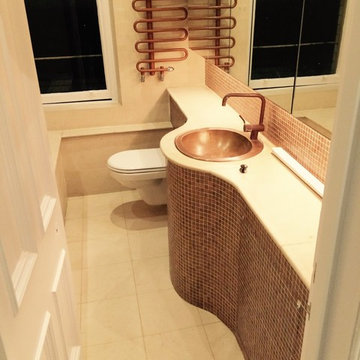
This was a substantial engagement at a luxury rental apartment in Brighton rejuvenating the Limestone tiles in two bathrooms and a hallway taking six days of hard work. In addition, I would be working around two decorators, making for even more testing work conditions.
I first set to work on the smallest bathroom, which featured limestone tiles from floor to ceiling, as well as a large bath, copper sink and a tiled surround. Limestone is a very popular choice for interior and exterior decoration, but the tiles in this bathroom were in need of some care to get them looking their best again. My initial task was to strip away any previous sealer by hand; this was done using a mixture of warm water and Tile Doctor Pro-Clean which, along with Limestone, is also suitable for use on other types of natural stone, such as Granite, Slate and Travertine. Pro-Clean serves both as an effective stripper and cleaner, meaning that once the sealer had been stripped away, the tiles also received a thorough clean. Once I had cleaned the tiles, I sucked up any excess water and residue using a Wet-Dry Vac machine.
Since the tiles would have to be left to dry for a couple of days, I offered to restore the copper sink for the customer, even though this was not actually part of my job description. After conducting some research into copper cleaning, I opted to use a combination of lemon juice, vinegar and salt. The research paid off as, once I began to apply the solution to the sink, the bright orange and brown colours of the copper quickly rose to the surface. Within the space of an hour, I had transformed what initially appeared to be a ruined sink into a lovely, shimmering copper feature for the bathroom. Both the decorators and I were truly amazed at the results – but all credit goes to Google!
The larger of the two bathrooms was a much stiffer test for the Tile Doctor products. It had not been left in great condition, as the shower area had clearly not been sealed correctly, and the tiles had been left in such a manner that soap scum from shampoos, soaps and shower gels had built up on the window sill. In fact, the damage was significant enough that I had to explain to the customer before starting the work that whilst I could greatly improve the appearance of the tiles, I would not be able to restore them to new. This is because many shampoo and body wash products are acidic and can cause permanent damage to stone work especially when left to dwell for a long time.
My choice of product was Tile Doctor Mould Away, a formula which, over time, seeps deeply into the pores of the stone, effectively lifting away the muck. In cases of particularly stubborn areas, it is necessary to apply another covering of Mould Away and leave it for an extended period of time. This is exactly what I did over the next few days, leaving the product overnight to work its magic. The change was certainly drastic, if not perfect.
As both bathrooms required extended periods of drying, I spent two days working on the hallway, which had been partially covered with a plastic sealing for the previous six months due to building work. Needless to say, the hallway was in need of a good clean. I set about cleaning the hallway with a solution of warm water and Tile Doctor Pro-Clean, before once again using a Wet-Dry Vac machine to remove any excess water to prepare the floor for sealing at a later point. It is very important to remove any residue of cleaning solution before sealing, as this may impact the performance of the sealer. Following this, I left the hallway to dry for two days, providing the builders with strict instructions to cover it with blankets for protection while they were working.
While the floor was drying, I sealed the bathrooms – both now fully dried – with Tile Doctor Colour Grow Sealer, a solvent-based sealer that was highly effective at enhancing the colour of the brown tiles around the sinks. The product will also provide durable surface protection. I spent the final of the six days sealing the hallway floor with Tile Doctor Seal & Go, which provides both a stain-resistant surface seal and a durable, low-sheen finish. This was an ideal choice of product, as the customer requested a hard-wearing, yet shiny finish.
The hard work really paid off, as both the customer and the decorators were very impressed with the final results in the two bathrooms and the hallway. I was extremely pleased that I was able to complete this big job to the highest possible standards.
 Tile Doctor Ltd
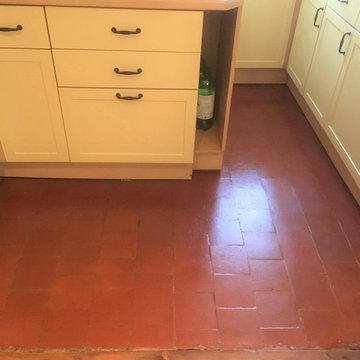
I received a call from this client in Old Marston around two miles north east of the centre of Oxford. They had lifted a lino floor in their kitchen and found an old Quarry Tiled floor underneath and decided to see if they could have it restored.
I went over to survey the floor and could see that the tiles had been covered with a thin layer of levelling screed to ensure the lino didn’t sink into the recesses. I ran some tests to demonstrate how the screed could be removed which worked well and it was apparent that the tiles underneath were intact and could be renovated. I submitted a quotation for removing all the screed, deep cleaning the Quarry tiles and then sealing the tiles to protect them. The client was really pleased that we could restore the floor and the quote was accepted, with a date booked to do the work.
To start the work, I applied undiluted Tile Doctor Grout Clean-up worked in with a small carbide brush attached to a hand-held rotary buffer. The combination of the acid in the Tile Doctor Grout Clean-up combined with the scrubbing action of the brush were effective at removing most of the screed. The small bits of remaining screed were carefully removed by hand, using a floor scraper. The floor was then rinsed with water and the soil removed with a wet vacuum.
For the second phase of the cleaning process I applied Tile Doctor Oxy-Gel which was scrubbed into the floor with a stiff brush rinsing after with water and the soil extracted again using the wet vacuum. After cleaning the floor to remove the dirt I could still see some evidence of the screed on the tiles, so I decided to give the floor an Acid Wash using Tile Doctor Acid Gel which was scrubbed into the floor and rinsed off as before. Tile Doctor Acid Gel is of course an acidic product so once it was removed, I decided to rinse the floor with Tile Doctor Neutral Cleaner to neutralise the pH levels in the floor. The wet vacuum was used again to remove as much moisture from the Quarry tiles as possible before leaving the now clean floor to dry off fully overnight.
I returned to seal this floor the next day. First, I checked the floor was fully dry with the damp meter, it was within the recommended range, so I was ready to complete the sealing process.
The client was not too sure if they wanted a matt or sheen finish, so I first put a coat of Tile Doctor Colour Grow on the floor to show them the matt finish. Colour Grow is an impregnating sealer that enhances natural colour and protects from within by occupying the pores in the tile. After reviewing the floor, they decided it was not for them, so I followed up by applying several coats of Tile Doctor Seal & Go which adds a nice sheen finish and is compatible with Colour Grow.
The combination of sealers worked very well together, and they were very satisfied with the final result and of course that we had been able to restore the Quarry tiles.
Barry Woodward
Oxfordshire Tile Doctor
Find the right local pro for your project
 Tile Doctor Ltd
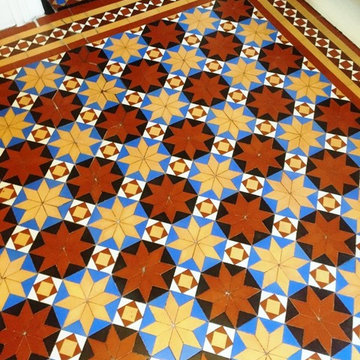
Victorian tiled floors are known for their interesting and unique mosaic patterns – and this one was no different. It was installed at a house in the historic West Midlands town of Stourbridge (famous for its glass industry). Unfortunately it was now looking worse for wear and was in dire need of not just cleaning and sealing, but also some minor repairs and the owner was keen to have it restored back to its former glory.
This particular Victorian tiled floor had been arranged in a fantastic pattern comprising tiles in shades of yellow, blue, red and white. There were, however, some missing tiles but fortunately I know a number of specialist suppliers where I can source replacements. I spent the first day making minor repairs and replacing the missing tiles, including the grouting, and then left the treated areas to set overnight.
On the second day I returned to the house to complete the cleaning process starting with a combination of Tile Doctor Remove & Go – a powerful sealer stripper – and Tile Doctor NanoTech HBU cleaner to lift out ingrained dirt and break down old layers of sealer. NanoTech HBU is particularly effective as it utilises tiny nano sized particles to penetrate deep into the stone and lift out the dirt. The resultant slurry was rinsed off the floor and removed using a wet vacuum.
The next step was to give the floor an acid wash using Tile Doctor Acid Gel, this product can remove old grout haze and other mineral deposits, additionally being in a gel form makes it easy to control and although primarily designed for use on walls it works really well on floors as well. Following this I gave the floor a thorough rinse, dried as much as possible with a wet vacuum and left it to dry overnight, ready to be sealed the next day.
Upon my return to the house on the third day I set about sealing the floor, checking first that the area was completely dried by running damp tests with damp meter, all was well so I able to start applying the sealer. The sealer chosen for this floor was Tile Doctor Seal and Go which is a water based product which is a popular choice as it gives the floor a nice sheen and doesn’t leave the smell that the solvent based sealers do; three thin coats were applied to provide a robust surface seal and to achieve a semi-shine finish, as per the client’s requested.
My client was extremely pleased with the results, with a lot achieved over the space of roughly two and a half days. They left the following feedback:
“Mick did a fantastic job. He was polite and friendly and kept us informed at every stage of the work. He is extremely professional and it is obvious that he takes a great deal of pride in his work. We are thrilled with our ‘new’ floor.”
Michael Leonard
Worcestershire Tile Doctor
 Tile Doctor Ltd
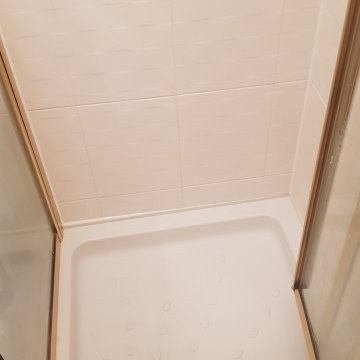
The pictures below detail the renovation of Ceramic Tiled Shower Cubicleat a property in Bolton Upon Dearne South Yorkshire. I was called in as the homeowners dreaded using the shower due to the state of the tiles, grout and cubicle in general.
As you can see from the photograph the grout was filthy, the silicone was mouldy, and the shower frame was caked in mouldy dirt. Over the years there had been a build-up of hard water and staining from products which leave a residue. They had used everyday cleaning products, but these had not been able to touch the problem as it had been left for too long.
I discussed with the clients how Tile Doctor could help, and how we would be able to deep clean the shower area and replace the mouldy silicone. I was confident we could get the renovate the cubicle and get it looking like new again. They were happy to accept my price and we arranged a time to complete the job. It would certainly be far cheaper than ripping out the shower cubicle and replacing with new.
Bolton Upon Dearne is a small village in the very middle of South Yorkshire, it is almost the same distance away from the centres of Barnsley, Rotherham and Doncaster. It has a rich history of coal mining but like many pit villages it has suffered since the pit closures of the 80’s and 90’s.
To start the shower was treated with Tile Doctor Oxy Gel, being a gel this product sticks well to the vertical surfaces giving it time to break down grease and grime, you’ll see from the picture just how much dirt was released.
This was followed with a strong dilution of Tile Doctor Duo Clean which is great for restoring lighter coloured grout back to its original state as well as removing mould. After scrubbing the soiled water was easily drained away using the shower hose. The transformation was amazing, the area already looked so much more inviting!
Next the old silicone that had gone mouldy was removed with a sharp knife, this is a slow work as you have avoid damaging the tile or the shower tray. Additionally, a clean and dry surface is required for the new silicone to adhere well.
The tiles were Ceramic which are given a glazed surface during manufacture, so they don’t need a specialist sealant like natural stone. However, the surface of grout is cementous and attracts dirt easily so the whole shower wall was sealed using a can of Tile Doctor Wall and Grout Sealer. This gives a layer which will protect the tiles and grout and will ensure the tiles are easier to keep clean.
For everyday cleaning I recommended they use Tile Doctor Aqua-Pro which is an effective, yet pH neutral tile and grout cleaner designed for everyday use in Bathrooms and Kitchens. The formula eliminates soap scum build-up and hard water deposits and its neutral formula won’t prematurely degrade the sealer. Used regularly this will prevent the build-up they had previously experienced and will keep the tiles looking good for some time to come.
As you can imagine my client was very happy with the completed work.
Matthew Lovett
South Yorkshire Tile Doctor
 Tile Doctor Ltd
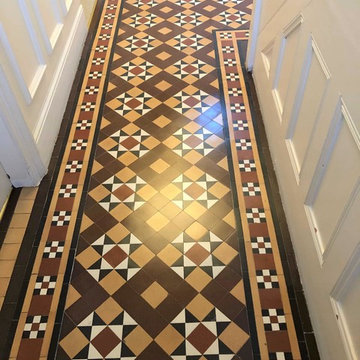
It’s not just major restoration work we do at Tile Doctor, sometimes a simple clean and seal is all that is required and that was the case at this property in Evesham. This medieval market town lies within the Vale of Evesham and is encompassed by the River Avon. It is located between the larger towns of Worcester, Cheltenham and Stratford-upon-Avon.
I was contacted by the owner and I arranged a visit to view their Victorian Hallway. The floor was in very good condition, but the previous sealer was now in-effective and the floor was dull and needed a good clean and seal. The colours were starting to fade, and it was due some attention. Sealers do wear off over time so if you have a similar floor to this it’s worth bearing that in mind. We discussed the work required and the cost involved, my quote was accepted, and the work scheduled.
On arrival I set up my equipment and covered any areas of carpet to protect from splashing during cleaning. I then used Tile Doctor Remove and Go spraying the product onto the floor allowing it to dwell for 10 minutes thus breaking down any sealers. This product is a non-flammable, multi-purpose stripper which works best when left to soak in for some time before scrubbing. This product is also great for drawing out ingrained stains and removing heavy grease build up.
The floor was then pasted with Tile Doctor Acid Gel which works to neutralise any alkaline salts in the tiles that can cause efflorescence later. This is a common issue with old floors which often do not have a damp proof membrane in place. I then went to work with my scrubbing machine and a black pad and worked the products into the tile. The resulting slurry was then rinsed off with water and removed with a wet vacuum.
I then went over the floor with microfibres and water to remove any remaining marks before leaving it to dry off overnight and ready for sealing.
I returned the following day and started by checking the floor was dry using a moisture meter. To seal the floor, I chose Tile Doctor Seal and Go Extra which is a fully breathable semi- gloss sealer which made a huge difference to the floor. Choosing a fully breathable sealer is important for floors that don’t have a damp proof membrane as you want to encourage any dampness to rise through the tile and not get trapped underneath where it might spread into the walls.
The deep clean and new seal brought out the vibrant colours in the tiles which were now shining through enhances by the lovely sheen which customer was very pleased with.
For aftercare I left the customer with a bottle of Tile Doctor Neutral Tile Cleaner which being concentrated goes a long way. Once diluted with water the product becomes completely pH neutral which unlike most household cleaners and washing up liquids which contain bleaches won’t prematurely degrade the sealer with use.
Mark Conway
Worcestershire Tile Doctor
 Tile Doctor Ltd
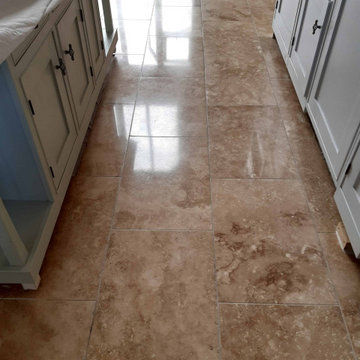
Located in Burgh Castle West of Great Yarmouth, this Travertine stone floor was a classic example of an incomplete installation. By incomplete I mean the tiler had done a fine job of laying and grouting the tiles but had left it at that and not sealed the stone. Natural stone like Travertine is porous and needs a sealer to stop dirt becoming ingrained in its pores, a sealer will also improve its appearance.
Without a sealer this floor now looked very dull, pale, rather damaged with pitting and heavily soiled with ingrained dirt. Pitting in stone like this is a natural feature of Travertine however it can be exacerbated with the use of acid cleaning products. This was a floor in urgent need of a face lift, and I was confident it could be transformed into a very beautiful floor.
I think it is true to say that most tilers will skilfully lay a floor for you but usually don’t have the knowledge, experience or equipment to finish the surface properly and when it comes to sealing many will recommend a product and suggest you take care of it yourself. Naturally if your find yourself in that position don’t insist the tiler does it, better to give us a call and have it done properly.
Our first job was to backfill the larger pits in the stone which as I mentioned are a natural feature of travertine material, but they can trap dirt and so its best if they are plugged with a suitably rigid filler. Also, if left alone the larger holes can quickly become larger as their edges crumble and break up leading to the entire tile becoming unstable. Replacing a tile in a floor like this is possible however its an extremely awkward job to do and it can be difficult to find an exact match for replacement.
Filling was done using a two-part, neutral cream-coloured polyester compound which gels in about fifteen minutes after addition of the catalyst. After this initial period, the excess product is trimmed off level with the surface of the tile before it sets harder than the stone itself in around sixty minutes. The fully cured compound can then be cut and machined as though it were part of the stone structure.
Our second job was to remove deep scratches caused by the unprotected feet of workmen’s ladders. This was done using Tile Doctor 50-grit and 100-grit diamond hand burnishing pads with a little water as a cutting medium. Shallower scratching present across the rest of the floor was removed using a Tile Doctor 200-grit soft milling pad driven by our Klindex 17″ rotary machine.
This abrasive action produces a fine slurry which was then rinsed with water and extracted using our 400psi Ninja machine in preparation for the next stage of the refinishing process. These machines were an expensive investment for our business however they are very robust and effective producing a good result that saves time.
Next task was to restore the polished appearance of the Travertine which was done using the application of a set of Tile Doctor burnishing pads. The process starts by applying a coarse 400-grit diamond pad, again fitted to the Klindex rotary machine. This cleans the tile and improves the matt finish left by the milling pad; again, the slurry was rinse-extracted before moving on to the next pad in the set. Next came the finer diamond polishing stages of 800 grit and 1500 grit, slurry being removed as before between the grades. By this time, all the scratches had been removed and the Travertine floor had visually pleasing even sheen across the whole surface. The last pad in the set is applied dry with a little water sprayed onto the tile so we left the area to dry out thoroughly overnight with the assistance of our large capacity dehumidifier.
Returning the following morning, we found that the floor had dried out perfectly and was ready to be vacuumed and spray burnished with the last pad in the set which is a 3000-grit very fine pad applied using a small amount of water sprayed from a trigger bottle resulting in a deep, rich shine across the floor surface.
Last step in the face lift was to seal the floor with a generous coat of Tile Doctor Ultra-Seal, a premium grade penetrating sealer recommended for use in Kitchens and food preparation areas. Having left the floor to soak up as much of the Tile Doctor Ultra-Seal as it could, the excess product was removed and the whole area allowed to dry completely with the assistance of our industrial air moving fan. Finally, the floor was spray buffed to a deep shine using a white maintenance pad.
The client was extremely pleased with our results and was amazed at the variation of colours within the stone which had never been visible previously.
Nick White
Norfolk Tile Doctor

Sponsored
Sunbury, OH

J.Holderby - Renovations
Franklin County's Leading General Contractors - 2X Best of Houzz!
 Tile Doctor Ltd
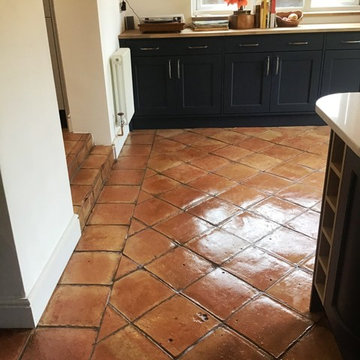
We were contacted by the owner of a property in Moulton with a problematic Terracotta tiled kitchen floor. She was seriously considering ripping up the entire area of tiling and replacing it as she was having a new kitchen installed. Both her and her husband were concerned that unless I could restore this floor to somewhere near to its original condition, they would need to replace it.
I went over to inspect the Terracotta tiles and could see the entire surface was deeply ingrained with soiling and the grout lines were filthy. After carrying out a test it became obvious that the previous sealer had been applied very sparingly and had mostly worn away, leaving the stone prone to staining. Terracotta is a very porous tile and dirt had become ingrained in the pores leaving it looking very dull and difficult to clean.
I completed the test on a small part of the floor and the customer could see the results which could be achieved. Happy with the result they agreed my quote and we set a date for my return to complete the floor.
The tiles turned out to be made of a fairly soft Terracotta which meant that we were able to deep clean them extremely effectively using a strong dilution of Tile Doctor Pro-Clean. We used Tile Doctor Remove and Go in particularly stubborn areas.
The process I use is to spray the Pro-Clean onto the floor and leave it to soak in for about ten minutes before being worked in using a heavy rotary machine fitted with a black scrubbing pad. The resulting slurry is removed using a wet pick up vacuum. All the dirt and virtually all of the old sealer was removed at this stage; the remaining patches around the edges of the area being finished by hand with a 200-grit burnishing block. The grout lines were then cleaned by hand with an angled grout brush.
Finally, the deep-seated oil stains in front of the cooker were brought out using Tile Doctor Oxy-Gel which was left to dwell on the marks for an hour before being agitated with a diamond burnishing pad and rinsed away with a wet pick up machine. The floor was rinsed with water and allowed to dry off overnight.
The following day I inspected the floor and checked it was ready to be sealed. All was well so I applied an initial coat of Tile Doctor Colour Grow which is an impregnating sealer that occupies the pores in the tile enhancing the natural colours of the Terracotta and provide a base layer of protection from staining.
I returned at a convenient time once the kitchen was completely installed to finish the job. This involves carrying out a light maintenance clean with Tile Doctor Neutral Cleaner and once the floor was dry, I applied 5 further coats of Tile Doctor Seal and Go which provides a pleasing satin finish which is really suited to this type of floor.
The customer was very happy with the results and has left the following feedback.
“We were really pleased with the results, thank you!”
Phil Vissian
Northamptonshire Tile Doctor
 Tile Doctor Ltd
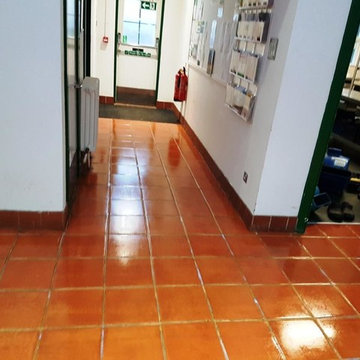
A local cleaning contractor called us in to work on the Terracotta tiled floors at a council building in Amersham. The Terracotta had not been deep cleaned and resealed for about ten years and the sealer had worn off leaving the tile vulnerable to dirt becoming ingrained in the pores of the tile. The grout had also suffered the same fate and had almost gone black in many areas.
This is a common problem with Terracotta which is quite porous and once those pores become ingrained with dirt the tile becomes difficult to clean effectively. The solution is to seal the tile however sealers wear off over time and this was basically the problem.
After discussing the issues we agreed on a plan of action to deep clean the Terracotta tile and grout and then re-seal to protect it. Due to the busy nature of the building we agreed to do the work between Christmas and New Year when we knew the building would be empty.
We started by applying a strong dilution of Tile Doctor Oxy-Gel which is a strong tile cleaning product that being in a gel form ensures it sits on the tile for longer, giving it a longer effective dwell time so it can really eat into and loose the dirt. After approximately twenty minutes the gel was scrubbed into the tile with a black scrubbing pad fitted to a rotary machine. This broke down most of the dirt and removed any remaining sealer. Once the whole floor had been treated in this manner it was rinsed thoroughly with water which was then extracted using a wet vacuum.
With the soiled cleaning solution removed I could see the next step would be to spot clean stubborn staining and clean the grout. For this task I used a strong dilution of Tile Doctor Pro-Clean scrubbing it in by hand using stiff brushes and aided with a hand-held steamer to help treat the stubborn staining. Once done the floor was given a final rinse and then as much moisture as possible removed with the wet vacuum.
We then left the floor to dry off completely and came back a couple of days later to seal the Terracotta tile.
I mentioned earlier that Terracotta is porous; in fact it’s probably the most porous material I deal with, so to fully seal the floor I had to apply eight coats of Tile Doctor Seal and Go which will provide complete and long lasting protection against staining and dirt. Seal and Go also adds an appealing satin sheen to the tile and the new seal will make it much easier to clean in future.
The floor tile and grout now look much healthier and I’m sure the council will be very impressed when they go back to work after the holidays.
Happy New Year…
Andrew Newstead
North Buckinghamshire Tile Doctor

 User
UserArt fireplaces are manufacture supplying insert ventless stainless steel fireplaces,they are rectangular shape fireplaces but very easy to install.Not Even a marble countertop or wall mounted tops,you only need to do is make a marble furnished box and dig a hole in the right size to hung the fireplace,and then connect the device with the adapter inside the box.Then press on the remote control,and you will enjoy your fires.
1. Automatic bioethanol fireplace extinction or ignition ordered by electric board and a Button ON/OFF and remote control.
2. Material in stainless and MDF.
3. Separately bio-ethanol tank and burning hearth
4. Co2 Safety infrared detector which stops the fire in the event of reaching un-authorized levels.
5. Automatic electric pump to fill the burner
6. With electronic heat detectors, it will automatice extinction when the temperature reaching the un-authorized levels.
7. AC charger or battery charger with battery loader.
8, With audio effect.
9, Easy install and operate.
10.OEM service provided


2