
Search results for "Effectively slow" in Home Design Ideas
 Pennsylvania Landscape & Nursery Association
Terren Landscapes http://www.terrenlandscapes.com
2014 PLNA Awards for Landscape Excellence Winner
Category: Residential $60,000-$120,000
Award Level: Silver
Project Description:
We were contracted by the family to create a master plan for the property. They
were experiencing extreme drainage and erosion problems due to the surrounding properties’
drastic grade changes. Erosion had caused the rear lawn to sink in various areas and the existing
rear patio spaces were failing. The client wanted to rebuild their patios and walkways, repave
their driveway and give their home more visual appeal. Most importantly, they wanted an
environmentally friendly solution.
Our design solution was to create a rain garden that would slow storm water runoff, allow
for percolation, and promote infiltration, while permitting excess clean water to enter the storm
drain at the street with slower velocity. The rain garden acts as a temporary holding space that
allows the earth to slowly absorb water, rather than overwhelm the nearby storm drain. Our first
objective was to conduct a percolation test to determine the amount of clay soil that needed to be
removed before reaching the sandy loam layer. A percolation test and storm water calculations
were generated to accommodate a 1” rain event. Based on our calculations and the small size of
the property, we determined a depth of 18” was necessary for optimal holding capacity. We
removed 18” of clay soil until a layer of sandy loam was encountered. Next, the soil was amended
with compost and sand to create a highly porous planting media for the basin of the garden. We
piped the three existing rear downspouts to the rain garden area to capture for infiltration and
alleviate runoff throughout the rear lawn and patio space. We installed an 18” wide over-flow
standpipe at a 24” depth into the ground that outlets to a stone swale that carries the water to the
property edge. As an added means of holding the maximum amount of water, we designed the
standpipe to sit 14” above grade. The height of this standpipe allows this rain garden to capture
14” of water before reaching the overflow capacity. We placed geotextile fabric to help reduce
migration of the stones into the soil and aid in the prevention of weeds and erosion. We heavily
planted the rain garden to further aid in absorption and to attract local wildlife. A native plant
palette of butterfly weed, Panicum, Joe-Pye weed, and asters form a colorful backdrop while the
basin was filled with obligate wetland plants such as royal ferns, irises and cardinal flowers. The
upper edges in the foreground are planted with Echinacea, Rudbeckia and Monarda, satisfying
the local bird community and adding bright seasonal colors. This garden effectively collects and
cleanses rainwater while creating a habitat for birds, frogs, and butterflies.
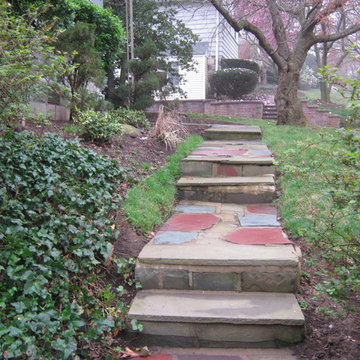
Our next challenge was to redesign the existing patios and walkways without increasing
impervious surfaces. According to township regulations this property was currently at its
maximum capacity, therefore we designed the front and rear patios with a slightly smaller
footprint to decrease their existing impervious surfaces.
New planting beds were designed throughout the entire property. Plants were chosen that
were tolerant of specific site conditions. For the rear yard, we choose a backdrop of witch hazel
and hollies to provide an evergreen screen as well as early spring color. We placed hydrangea
throughout to add summer color. We planted ostrich fern under the existing spruce tree to create
a lush floor. This area became an additional backdrop for the rain garden as well as a screen for
the neighboring property. We choose a combination of ‘Blue Star’ juniper and creeping jenny to
soften the existing rear wall with creepers. Around the rear patio areas we choose a combination
of Liatris, Rudbeckia and ‘Lo and Behold’ butterfly bush. This combination of plants works in
harmony with the rain garden and attracts additional butterflies.
For the front of the property we worked with an existing Japanese maple that provided
dense shade. We choose a shade-tolerant combination of Heuchera, Astilbe, ferns and hostas for
this area. We added more hydrangeas to the front foundation of the house to provide lush
layering of plant material and visual interest with additional summer blooms.
Overall, we were able to exceed the client’s needs and expectations in transforming their
property into a colorful paradise that attracts wildlife from season to season. The plant palette
provides seasonal interest and the rain garden has successfully decreased storm water runoff.
The new hardscape surfaces were designed and built with a slightly smaller footprint to decrease
impervious surfaces. This project is a positive example of how all properties, regardless of size,
can make an ecological difference by decreasing impervious surfaces and maintaining proper
storm water management.
Photo Credit:
Terren Landscapes
 Tom Brzoskwinia
One of the most popular hardwood floor finishing which offers Tom & Peter Flooring is provided by WOCA. If you’ve decided that you want a natural looking wooden floor that is lacquer-free, then the likelihood is that you’ve chosen oil as your way of protecting your wood and making your floor look great at the same time. WOCA for wood flooring comes in various forms and is a great way of making sure that your wood is protected, but at the same time looks natural. A highly popular as well as effective way of treating wood floors, oils effectively penetrate into the wood and in some cases harden into the surface of the floor to stop damage and to maintain the wood in its optimum condition.
WOCA Oil finish hardwood flooring has taken the United States market by in 2014 and shows no signs of slowing down in 2016 and now. Here are some of the most common questions we have regarding this type of finish which we will I’m to answer in today’s my blog:
Is oil finish as durable as traditional factory urethane finishes with aluminum oxide?
When it comes to durability, oil finish flooring tackles the issue with a completely different method. The penetrating oil serves as protection from moisture and wear while allowing the user to feel the wood grains in their bare feet. If compared directly to factory finished aluminum oxide finish, the oil finish flooring will not perform as well to abrasion and impact. However, the beauty of this finish is the fact that it will camouflage any scratches which will inevitably accumulate over time.
Will this finish evaporate over time and will this be harmful for indoor air quality?
Another concern for oil finished floors its effect on indoor air quality. For on-site applications, some varieties suggest several coats which typically require the residents to be out of the home due to mild odors. However, there are factory finished UV-cured or single coat applications which lessen the downtime. Despite the odors produced during the drying process, oil finish floors rank amongst the lowest for VOC (volatile organic compound) emissions. Certain brands even boast true zero VOC. This fact alone makes oil finished floors one of the best options for green building solutions.
“WOCA products are certified by independent laboratories, the German Institute for Biological Building Materials, and are in accordance with DIN–Norm 53–160. WOCA WoodCare Denmark products meet or exceed the most stringent U.S. standards for volatile organic compounds.” –WOCA Oil Finish Manufacture
Does this type of finish require additional maintenance which I am not familiar with?
For weekly cleaning, oiled floors use a special cleaner which contains an oil and soap mixture. After a period of 12-18 months some oil may evaporate causing the wood grains to appear dry. An additional layer of oil can be reapplied to keep the floor looking fresh. Although oil finished floors require more involvement in periodic maintenance in high traffic areas, this maintenance can be done much easier than the equivalent of an onsite sand and refinish.
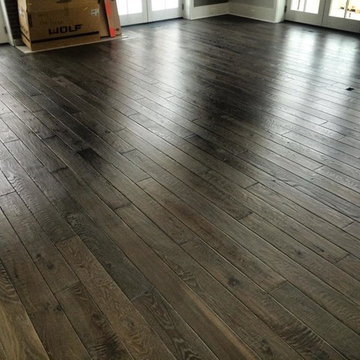
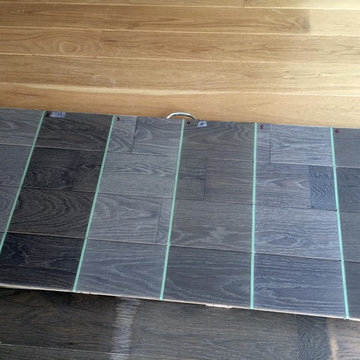
WOCA Master Color Oil contains pigment, which provides a single-step hardwood floor staining process. Laying down the stain and the finish in one step.
This product comes 14 different colors, from Black to Extra White, and you can mix them freely to create various color palettes that will meet the demands of any job.
Below are some pictures of the finished job…
 Tom Brzoskwinia
One of the most popular hardwood floor finishing which offers Tom & Peter Flooring is provided by WOCA. If you’ve decided that you want a natural looking wooden floor that is lacquer-free, then the likelihood is that you’ve chosen oil as your way of protecting your wood and making your floor look great at the same time. WOCA for wood flooring comes in various forms and is a great way of making sure that your wood is protected, but at the same time looks natural. A highly popular as well as effective way of treating wood floors, oils effectively penetrate into the wood and in some cases harden into the surface of the floor to stop damage and to maintain the wood in its optimum condition.
WOCA Oil finish hardwood flooring has taken the United States market by in 2014 and shows no signs of slowing down in 2016 and now. Here are some of the most common questions we have regarding this type of finish which we will I’m to answer in today’s my blog:
Is oil finish as durable as traditional factory urethane finishes with aluminum oxide?
When it comes to durability, oil finish flooring tackles the issue with a completely different method. The penetrating oil serves as protection from moisture and wear while allowing the user to feel the wood grains in their bare feet. If compared directly to factory finished aluminum oxide finish, the oil finish flooring will not perform as well to abrasion and impact. However, the beauty of this finish is the fact that it will camouflage any scratches which will inevitably accumulate over time.
Will this finish evaporate over time and will this be harmful for indoor air quality?
Another concern for oil finished floors its effect on indoor air quality. For on-site applications, some varieties suggest several coats which typically require the residents to be out of the home due to mild odors. However, there are factory finished UV-cured or single coat applications which lessen the downtime. Despite the odors produced during the drying process, oil finish floors rank amongst the lowest for VOC (volatile organic compound) emissions. Certain brands even boast true zero VOC. This fact alone makes oil finished floors one of the best options for green building solutions.
“WOCA products are certified by independent laboratories, the German Institute for Biological Building Materials, and are in accordance with DIN–Norm 53–160. WOCA WoodCare Denmark products meet or exceed the most stringent U.S. standards for volatile organic compounds.” –WOCA Oil Finish Manufacture
Does this type of finish require additional maintenance which I am not familiar with?
For weekly cleaning, oiled floors use a special cleaner which contains an oil and soap mixture. After a period of 12-18 months some oil may evaporate causing the wood grains to appear dry. An additional layer of oil can be reapplied to keep the floor looking fresh. Although oil finished floors require more involvement in periodic maintenance in high traffic areas, this maintenance can be done much easier than the equivalent of an onsite sand and refinish.
WOCA Master Color Oil contains pigment, which provides a single-step hardwood floor staining process. Laying down the stain and the finish in one step.
This product comes 14 different colors, from Black to Extra White, and you can mix them freely to create various color palettes that will meet the demands of any job.
Below are some pictures of the finished job…
Find the right local pro for your project
 Tom Brzoskwinia
One of the most popular hardwood floor finishing which offers Tom & Peter Flooring is provided by WOCA. If you’ve decided that you want a natural looking wooden floor that is lacquer-free, then the likelihood is that you’ve chosen oil as your way of protecting your wood and making your floor look great at the same time. WOCA for wood flooring comes in various forms and is a great way of making sure that your wood is protected, but at the same time looks natural. A highly popular as well as effective way of treating wood floors, oils effectively penetrate into the wood and in some cases harden into the surface of the floor to stop damage and to maintain the wood in its optimum condition.
WOCA Oil finish hardwood flooring has taken the United States market by in 2014 and shows no signs of slowing down in 2016 and now. Here are some of the most common questions we have regarding this type of finish which we will I’m to answer in today’s my blog:
Is oil finish as durable as traditional factory urethane finishes with aluminum oxide?
When it comes to durability, oil finish flooring tackles the issue with a completely different method. The penetrating oil serves as protection from moisture and wear while allowing the user to feel the wood grains in their bare feet. If compared directly to factory finished aluminum oxide finish, the oil finish flooring will not perform as well to abrasion and impact. However, the beauty of this finish is the fact that it will camouflage any scratches which will inevitably accumulate over time.
Will this finish evaporate over time and will this be harmful for indoor air quality?
Another concern for oil finished floors its effect on indoor air quality. For on-site applications, some varieties suggest several coats which typically require the residents to be out of the home due to mild odors. However, there are factory finished UV-cured or single coat applications which lessen the downtime. Despite the odors produced during the drying process, oil finish floors rank amongst the lowest for VOC (volatile organic compound) emissions. Certain brands even boast true zero VOC. This fact alone makes oil finished floors one of the best options for green building solutions.
“WOCA products are certified by independent laboratories, the German Institute for Biological Building Materials, and are in accordance with DIN–Norm 53–160. WOCA WoodCare Denmark products meet or exceed the most stringent U.S. standards for volatile organic compounds.” –WOCA Oil Finish Manufacture
Does this type of finish require additional maintenance which I am not familiar with?
For weekly cleaning, oiled floors use a special cleaner which contains an oil and soap mixture. After a period of 12-18 months some oil may evaporate causing the wood grains to appear dry. An additional layer of oil can be reapplied to keep the floor looking fresh. Although oil finished floors require more involvement in periodic maintenance in high traffic areas, this maintenance can be done much easier than the equivalent of an onsite sand and refinish.
WOCA Master Color Oil contains pigment, which provides a single-step hardwood floor staining process. Laying down the stain and the finish in one step.
This product comes 14 different colors, from Black to Extra White, and you can mix them freely to create various color palettes that will meet the demands of any job.
Below are some pictures of the finished job…

 Carolina Timberworks
Green (wet) timber shrinks as it dries. It shrinks roughly twice as much along the growth rings as it does across the rings–which is why timber develops drying checks.
These checks have almost no effect on the strength of the timber, and engineers take checking into account in their calculations.
Aesthetically, we like checks, and think of them like wrinkles in a cotton shirt–it proves the timber is real (and not a box beam).
Checking can be minimized to a certain extent. For example: specifying FOHC (Free of Heart Center), selecting a timber species with less shrinkage, slowing the drying process, or purchasing dry timber (reclaimed or radio frequency kiln dried) and orienting the checks in specific timbers so as to be less visible (i.e. toward an outside wall).
In the timber industry, a drying check is not the same thing as a split. A check almost always stops at the heart (the center of the tree) of the timber, whereas a split breaks the timber into 2 pieces.
© Carolina Timberworks

 Andrea Canedo Design
For the master suite, we created an elegant and chic heaven with a sense of style that is conductive to rest and relaxation.
We selected a specific color combination to create the perfect ambiance for this room. We mixed the quietness of a soothing neutral pallet with the sophistication and elegance of silver. We added drops of blue, which is considered beneficial to the mind and body. It slows human metabolism and produces a calming effect. We incorporated green, the color of life, renewal, nature, and energy.
Natural silk glimmer curtains, wave reflecting silver wall paper, a hand woven silk and wool rug from India, an original oil painting acquired in Paris 40 year ago, two elegant designer reupholstered chairs, were elements that spoke by themselves in this classic contemporary master bedroom.
The sitting room invites you to linger and enjoy the breathtaking vista of the Golf of Mexico. Sinking into the sofa allows you carve out restorative moments, to unwind, unplug and recharge.
 Taketo Shoten Co., Ltd.
Goro Fujii
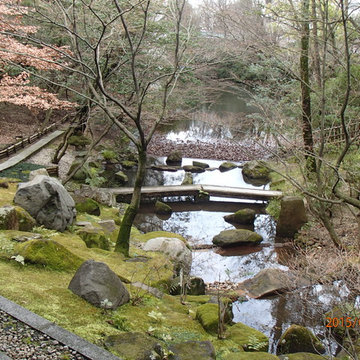
This is an example of a mid-sized traditional courtyard stone formal garden in Other for spring.
This is an example of a mid-sized traditional courtyard stone formal garden in Other for spring.

Sponsored
Sunbury, OH

J.Holderby - Renovations
Franklin County's Leading General Contractors - 2X Best of Houzz!
 Allegheny Mountain Hardwood Flooring
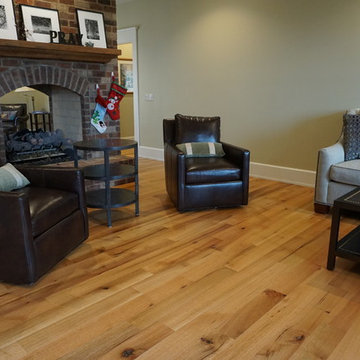
Rift & Quarter Sawn red oak is one of the best options for flooring. Red Oak is traditionally the most popular species in the US for hardwood, and the Rift & Quarter Sawn cut allows for a more unique look at a great price. We have beautiful color variation, slow growing season that make tight growth rings, Great Stability, perfect for above radiant heat.
If you don't like the color variation, and want a darker floor. Stain it. Much more cost effective than paying for white oak and staining it dark!
 Pennsylvania Landscape & Nursery Association
Terren Landscapes http://www.terrenlandscapes.com
Project Entry: Pembrooke Estate Rain Garden
2014 PLNA Awards for Landscape Excellence Winner
Category: Sustainable Landscape &60,000-$120,000
Award Level: Silver
Project Description:
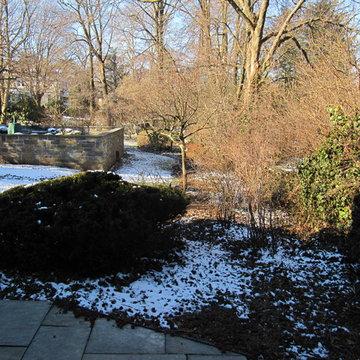
The client contracted our company to solve multiple existing drainage problems. In a heavy rain event the existing French drain system would overflow, causing water to pool in the driveway. After investigating the system we found that the capacity of the French drain was undersized for the amount of storm water from the large rain events received in recent years. As a result of our findings and at the request of the homeowner, we designed a storm water management system to capture all storm water from the structures on the property and regenerate the underground aquifers for the volume of a 5.8” rainstorm. In addition to the new drain system, the homeowners wanted a rain garden to provide a backdrop for an existing formal garden, provide a habitat for wildlife, and provide screening from an adjacent neighbor.
Throughout the design process many challenges were presented, including an existing gas line, which ran directly through the area that best suited the bioswale. The existence of the gas line caused us to alter the shape and depth of the bioswale in some areas. We also inspected the existing downspouts to make sure there were no obstructions that would impede the system’s efficiency, and then conducted a test pit dig to make sure we had sufficient percolation rates for disposal of storm water.
To effectively capture the storm water runoff, the existing downspouts were piped from the main house and the large detached garage to a large catch basin located at the low point in the driveway. The driveway catch basin contains two outlet pipes at different elevations within the basin allowing water from smaller rain events to enter the bioswale and rain garden area to percolate into the soil before excess water overflows into a sediment trap which filters out any debris and is then piped to an underground StormTech® pit to slowly percolate into the ground. The other outlet pipe in the driveway catch basin is used for larger storm water events, taking the water directly to the StormTech® pit.
Accepting and slowing the velocity of the storm water, mitigation of erosion, and filtering out pollutants contained in the “first flush” of rainfall are the primary functions of the bioswale and rain garden. Planting these areas with mostly native plant species helps carry out these functions while attracting and providing shelter for wildlife.
The ‘Niobe’ weeping willow is the centerpiece of the rain garden, connecting with the axis of the existing formal garden. To screen the neighboring property we chose Chamaecyparis nootkatensis ‘Pendula’ for its graceful evergreen habit and tolerance of wet sites. ‘Ivory Halo’ dogwood and Panicum ‘Cloud Nine’ were used for screening as well as winter interest. To provide deciduous structure to the garden Taxodium distichum and Magnolia virginiana were used in conjunction with witch hazel. Mostly native wetland perennials were used due to their tolerance of wet conditions and occasional drought.
The area above the StormTech® pit provides space for the client’s family to relax. The rain garden and bioswale provide screening, storm water management, a habitat for wildlife, and plants that enhance the adjacent formal garden.
Photo Credit: Terren Landscapes
 Penguin Basements, ltd.
Christian Saunders
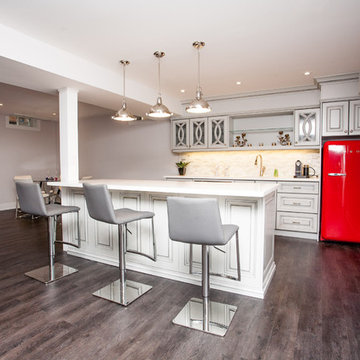
Inspiration for a mid-sized contemporary single-wall dark wood floor and brown floor wet bar remodel in Toronto with an undermount sink, raised-panel cabinets, white cabinets, quartz countertops, beige backsplash and mosaic tile backsplash
Inspiration for a mid-sized contemporary single-wall dark wood floor and brown floor wet bar remodel in Toronto with an undermount sink, raised-panel cabinets, white cabinets, quartz countertops, beige backsplash and mosaic tile backsplash

 McKinney York Architects
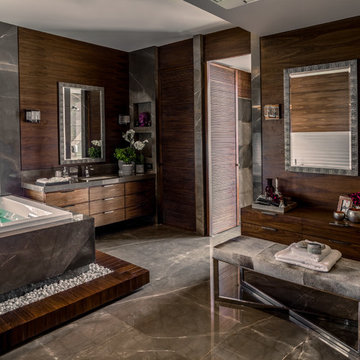
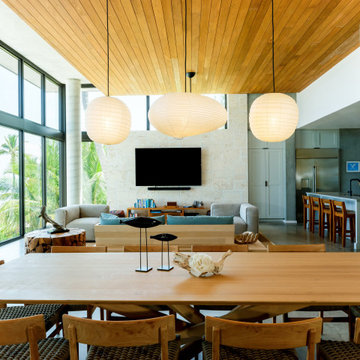
This vacation home was created for an avid saltwater fisherman and his family. As a coastal property, care was taken to capture breezes and views, encouraging inhabitants to slow down and soak in the ambiance. At the same time, the building is designed to withstand storms and the corrosive effects of salt air. Awareness of natural elements, including being kind to other inhabitants of the property, is evident in selections like turtle friendly exterior specialty LED lighting.
Careful compositions of color, material, opacity, and transparency create an exterior that is disciplined but playful. The building is layered in planes that accentuate shadow, forming a graceful backdrop to the palm trees, pool, and ocean beyond.
The local coral stone used on the exterior is also seen inside, thus reinforcing a sense of place. Pops of saturated color balance the soothing palette of materials, art, and furnishings, never distracting from the breathtaking setting. High light from clerestories washes across interior surfaces and opens up views to the sky. The luminous volumes are easy-going and simple, but contain a few surprises. In the primary bath, the architect and client created a unique pattern of custom handmade tile.
 McKinney York Architects
This vacation home was created for an avid saltwater fisherman and his family. As a coastal property, care was taken to capture breezes and views, encouraging inhabitants to slow down and soak in the ambiance. At the same time, the building is designed to withstand storms and the corrosive effects of salt air. Awareness of natural elements, including being kind to other inhabitants of the property, is evident in selections like turtle friendly exterior specialty LED lighting.
Careful compositions of color, material, opacity, and transparency create an exterior that is disciplined but playful. The building is layered in planes that accentuate shadow, forming a graceful backdrop to the palm trees, pool, and ocean beyond.
The local coral stone used on the exterior is also seen inside, thus reinforcing a sense of place. Pops of saturated color balance the soothing palette of materials, art, and furnishings, never distracting from the breathtaking setting. High light from clerestories washes across interior surfaces and opens up views to the sky. The luminous volumes are easy-going and simple, but contain a few surprises. In the primary bath, the architect and client created a unique pattern of custom handmade tile.
Sponsored
Sunbury, OH
J.Holderby - Renovations
Franklin County's Leading General Contractors - 2X Best of Houzz!

 kmjee
kmjeePepper plants are a delightful addition to any garden, offering a vibrant burst of color and spice to your culinary creations. However, even experienced gardeners can encounter challenges when growing pepper plants. In this blog, we'll explore some common issues you might face and provide practical solutions to help your pepper plants thrive.
1. Slow or Stunted Growth
Issue: Slow or stunted growth in pepper plants can be discouraging, but there are specific steps you can take to address this issue effectively.
Solution:
a. Soil Health:
- Well-Draining Soil: Ensure your pepper plants are in well-draining soil to prevent waterlogged roots, which can inhibit growth.
- Organic Matter: Incorporate plenty of organic matter, such as compost or well-rotted manure, into the soil to improve its texture and nutrient content.
- pH Level: Test the soil pH and adjust it to the ideal range between 6.0 and 6.8 using lime or sulfur as needed.
b. Fertilization:
- Balanced Fertilizer: Use a balanced, slow-release fertilizer designed for vegetables to provide essential nutrients steadily throughout the growing season.
- Compost: Amend the soil with compost to enhance nutrient availability and soil structure. This can promote healthier growth.
c. Watering:
- Consistent Moisture: Maintain consistent soil moisture levels by watering your pepper plants regularly but avoid waterlogging. Aim for 1-2 inches of water per week, adjusting based on your local climate and weather conditions.
- Mulching: Apply mulch around the base of the plants to retain soil moisture and regulate temperature.
2. Yellowing Leaves
Issue: Yellowing leaves can be a sign of various underlying problems, but addressing them promptly can restore the vibrancy of your pepper plants.
Solution:
a. Nutrient Deficiencies:
- Balanced Fertilization: Use a well-balanced fertilizer that includes micronutrients to address nutrient deficiencies.
- Specific Nutrients: If you suspect a particular deficiency, such as magnesium, iron, or nitrogen, apply the appropriate nutrient supplement following package instructions.
b. Pest and Disease Control:
- Pest Inspection: Regularly inspect the leaves and stems for common pests like aphids and mites. Remove affected leaves and treat with organic pesticides if necessary.
- Disease Management: Look out for signs of diseases like bacterial leaf spot or fungal issues. Apply organic fungicides or bactericides as recommended.
3. Blossom Drop
Issue: When pepper plants drop their blossoms prematurely, it can hinder fruit development and lead to disappointment.
Solution:
a. Temperature Control:
- Stable Temperatures: Ensure your pepper plants are exposed to consistent temperatures between 70°F and 80°F (21°C to 27°C) during flowering. Avoid sudden temperature fluctuations by providing shelter or using row covers.
b. Pollination:
- Assist with Pollination: If growing peppers indoors or in a greenhouse, help with pollination by gently shaking the plants or using a small brush to transfer pollen between flowers. Outdoor pepper plants are usually pollinated by insects.
4. Wilting Plants
Issue: Wilting or drooping pepper plants can be a sign of various problems, but proper care can revive them.
Solution:
a. Watering:
- Consistent Moisture: Adjust your watering routine to keep the soil consistently moist but not waterlogged. Water early in the day to prevent fungal issues.
- Drainage: Ensure proper soil drainage by amending the soil or using raised beds to prevent waterlogged roots.
b. Pest Control:
- Pest Inspection: Examine the undersides of leaves for signs of pests like aphids, spider mites, or whiteflies. Treat infestations promptly with biological insecticides.
5. Curling Leaves
Issue: Curling or misshapen leaves indicate stress in pepper plants, which can be caused by various factors.
Solution:
a. Environmental Stress:
- Stable Conditions: Ensure your pepper plants are in an environment with stable humidity, temperature, and adequate air circulation. Avoid sudden changes in conditions.
- Proper Ventilation: Adequate air circulation can reduce humidity and prevent fungal issues.
b. Pest and Disease Management:
- Pest Inspection: Regularly inspect your plants for pests and diseases, addressing them promptly with organic remedies as needed.
6. Sunscald
Issue: Sunscald can lead to discolored, leathery patches on pepper fruits when exposed to intense sunlight.
Solution:
a. Shade Cloth:
- Sun Protection: Shield your pepper plants from harsh sunlight during the hottest part of the day using shade cloth or by planting them where they receive some filtered sunlight.
b. Pruning:
- Fruit Shading: Prune excess foliage to allow better fruit shading, reducing the risk of sunscald. Ensure that there's a balance between foliage and fruit.
7. Pepper Plant Pests and Diseases
Issue: Aphids, mites, whiteflies, and various diseases can affect pepper plants, but you can manage them effectively.
Solution:
a. Regular Inspection:
- Vigilant Monitoring: Regularly inspect your pepper plants for signs of pests or diseases, paying close attention to the undersides of leaves and stems.
b. Organic Remedies:
- Pest Control: Use organic remedies like neem oil, insecticidal soap, or diatomaceous earth for pest control.
- Disease Management: Apply organic fungicides or bactericides as recommended to manage diseases like powdery mildew or bacterial spot.
While growing pepper plants can present various challenges, these common issues are manageable with the right knowledge and care. Regular monitoring, proper soil preparation, and timely intervention can help you enjoy a bountiful harvest of vibrant, spicy peppers. Remember that gardening is a learning experience, and each challenge you face is an opportunity to improve your skills and enjoy the rewards of homegrown peppers in your favorite dishes.
 Decra-Scape, Inc.
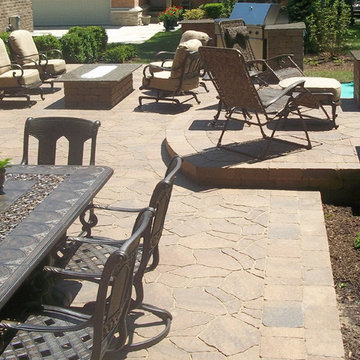
This modern fire and ice interpretation was designed to showcase the native environment and its integration with the distinctive neo-classic architecture of this new home. This property is located in a southeast suburb of Michigan, Canton. A natural ravine sits at the back of the home creating magnificent views of the Washtenaw watershed. The fall colors are amazing with Hickory golds and vibrant Maple reds ablaze.
The client had been to numerous design centers and displays to research what they wanted to create in their backyard. They were interested in an outdoor fireplace and cook center with a bar. Our initial consultation provided them with some other options that would not be obtrusive to their magnificent vistas. The cook center and bar evolved into a smaller counter space and fire feature coffee table.
The design process started with a clean canvas. It progressed into a formal design that provided modern conveniences and an outdoor living space. The client was presented with a concept drawing on the second visit as a starting off point and they agreed to proceed with a design fee to bring that concept into fruition. The formal landscape elements close to the residence contrast the natural surroundings. The result: tremendous interest created by the tension of the formal hardscape against dramatic vistas of the ravine which appears endless. We created four defined areas within the patio space: dining, cooking, coffee table conversation area and a fire wall relaxation terrace. The relaxation terrace was elevated so that it could be viewed and enjoyed from both inside and out. The cook center was installed around the owners existing grill with the potential for a future, more permanent unit. Area rug patterns were designed within the paver field to soften and define spaces.
During installation, clay loam soils were discovered. This slowed down he base preparation, drain tile installation, and running of utilities. These non native soils are common in new construction sites. The business development associate oversaw the entire process along with the team leader. Caution was also taken to preserve a Shagbark Hickory close to the newly installed walkway.
The largest challenge of this project was the fabrication of the burners to provide a dramatic flame. These burners were custom made and installed to provide the homeowners with the climactic effects they were looking for. An intensive drainage system was installed to accommodate a water issue in the rear yard but to also be cognizant of the native surroundings and ravine.
Overall, an environment was created that was reminiscent of the homeowner’s favorite après ski, sitting next to an open fire after a long descent to the base of the Rockies. The end result not only thrilled the owner but the Canton community as well. Since the installation, the Village of Canton has asked us to present these fire features at their home show.
 McKinney York Architects
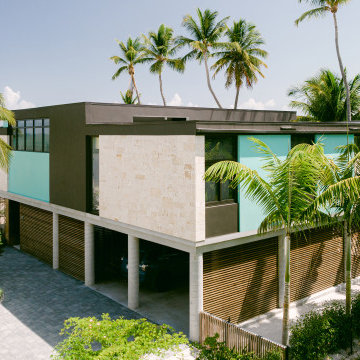
This vacation home was created for an avid saltwater fisherman and his family. As a coastal property, care was taken to capture breezes and views, encouraging inhabitants to slow down and soak in the ambiance. At the same time, the building is designed to withstand storms and the corrosive effects of salt air. Awareness of natural elements, including being kind to other inhabitants of the property, is evident in selections like turtle friendly exterior specialty LED lighting.
Careful compositions of color, material, opacity, and transparency create an exterior that is disciplined but playful. The building is layered in planes that accentuate shadow, forming a graceful backdrop to the palm trees, pool, and ocean beyond.
The local coral stone used on the exterior is also seen inside, thus reinforcing a sense of place. Pops of saturated color balance the soothing palette of materials, art, and furnishings, never distracting from the breathtaking setting. High light from clerestories washes across interior surfaces and opens up views to the sky. The luminous volumes are easy-going and simple, but contain a few surprises. In the primary bath, the architect and client created a unique pattern of custom handmade tile.
 McKinney York Architects
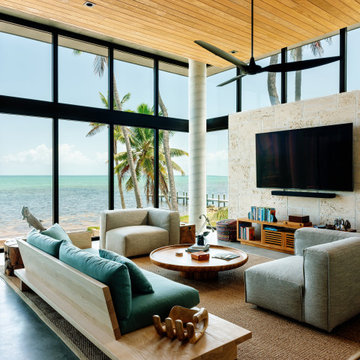
This vacation home was created for an avid saltwater fisherman and his family. As a coastal property, care was taken to capture breezes and views, encouraging inhabitants to slow down and soak in the ambiance. At the same time, the building is designed to withstand storms and the corrosive effects of salt air. Awareness of natural elements, including being kind to other inhabitants of the property, is evident in selections like turtle friendly exterior specialty LED lighting.
Careful compositions of color, material, opacity, and transparency create an exterior that is disciplined but playful. The building is layered in planes that accentuate shadow, forming a graceful backdrop to the palm trees, pool, and ocean beyond.
The local coral stone used on the exterior is also seen inside, thus reinforcing a sense of place. Pops of saturated color balance the soothing palette of materials, art, and furnishings, never distracting from the breathtaking setting. High light from clerestories washes across interior surfaces and opens up views to the sky. The luminous volumes are easy-going and simple, but contain a few surprises. In the primary bath, the architect and client created a unique pattern of custom handmade tile.


 McKinney York Architects
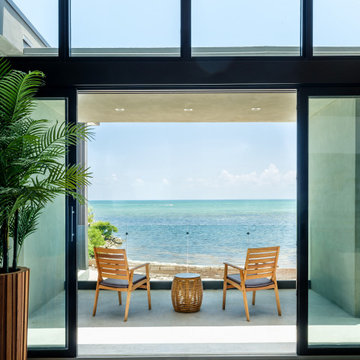
This vacation home was created for an avid saltwater fisherman and his family. As a coastal property, care was taken to capture breezes and views, encouraging inhabitants to slow down and soak in the ambiance. At the same time, the building is designed to withstand storms and the corrosive effects of salt air. Awareness of natural elements, including being kind to other inhabitants of the property, is evident in selections like turtle friendly exterior specialty LED lighting.
Careful compositions of color, material, opacity, and transparency create an exterior that is disciplined but playful. The building is layered in planes that accentuate shadow, forming a graceful backdrop to the palm trees, pool, and ocean beyond.
The local coral stone used on the exterior is also seen inside, thus reinforcing a sense of place. Pops of saturated color balance the soothing palette of materials, art, and furnishings, never distracting from the breathtaking setting. High light from clerestories washes across interior surfaces and opens up views to the sky. The luminous volumes are easy-going and simple, but contain a few surprises. In the primary bath, the architect and client created a unique pattern of custom handmade tile.

 Free Lancing
Effective residential construction project management is crucial in today’s fast-moving building industry. It means overseeing every step of building a home, from planning to finishing, to ensure projects are completed time, within budget, and with high quality. Unlike commercial projects, residential projects require special attention to meet homeowners' unique needs and wishes, requiring a customized approach from the beginning to the end.
In 2025, the construction sector will use advanced technologies like AI and integrated project delivery (IPD) to streamline processes and improve stakeholder collaboration. However, project managers face significant challenges, including managing risks, maintaining quality control, and ensuring effective communication among team members.
A WIP Report (Work-in-Progress Report) is a key tool that helps track a project's budget, progress, and resource use. It provides clear insights, making managing costs easier, avoiding delays, and making informed decisions.
By adopting best practices and using modern construction management tools, project managers can overcome these challenges and deliver successful residential construction projects that meet client expectations and contribute to a sustainable future.
This article provides a brief overview of residential construction project management, highlights its importance, and touches on the challenges faced by project managers while incorporating the latest trends and technologies in the field.
Types of Residential Construction Management
Here are the different types of Residential Construction Management:
Single-Family Homes: These are standalone houses built for individual families. Managing these projects involves overseeing construction from planning to completion, ensuring that the home meets the owner's preferences and budget.
Multi-Family Housing: This includes apartments, condominiums, and townhouses. Projects of this type require managing multiple units, often with shared facilities, and ensuring compliance with local building codes.
Custom Home Building: This involves constructing homes tailored to specific client needs. Close collaboration with architects and designers is required to ensure the house reflects the owner's personality and preferences.
Home Renovation and Remodeling: These projects focus on updating or expanding existing homes. They often involve working with subcontractors for specialized tasks like electrical or plumbing work.
Components of Residential Construction Project Management
Managing a residential construction project requires carefully coordinating people, materials, and timelines. A well-structured approach ensures efficiency, cost control, and high-quality results.
Roles and Responsibilities
A project manager plays a vital role in residential construction. They oversee every step from planning to completion and ensure the project stays on schedule, within budget, and meets quality standards.
Project Manager’s Role in Home Construction
The project manager is responsible for organizing tasks, managing resources, and solving problems that arise during construction. They coordinate between different teams, track progress, and ensure safety regulations are followed.
Collaboration with Contractors, Architects, and Stakeholders
Successful residential construction requires teamwork. Project managers work closely with architects to bring designs to new heights, coordinate with contractors to manage labor and materials, and keep stakeholders (such as homeowners and investors) informed about project updates.
Client Communication and Expectations Management
Clear communication with clients is essential. The project manager keeps homeowners updated on timelines, changes, and challenges. Setting realistic expectations and providing regular updates, they help avoid misunderstandings and keep the project running smoothly.
Project Scope & Planning
Practical project planning sets the foundation for a successful residential construction project. It ensures clear goals, minimizes risks, and keeps the project on track.
Defining Project Objectives and Deliverables:
Clearly outlining what needs to be done and what the final result should look like is essential. This involves setting specific, measurable goals that align with the homeowner's vision and budget.
Managing Homeowner Expectations and Scope Creep:
Homeowners often have changing needs or ideas. Effective project managers must manage these expectations to prevent "scope creep," which can delay projects and increase costs. This involves open communication and setting clear boundaries.
Ensuring Compliance with Zoning Laws and Permits:
Before construction begins, it's crucial to ensure that all necessary permits are obtained and that the project complies with local zoning laws. This step avoids costly fines and delays, ensuring the project moves forward smoothly.
Budgeting & Cost Control
Proper budgeting is essential for keeping residential construction projects financially viable. Effective cost management prevents overspending and ensures profitability.
Accurate Cost Estimation for Residential Projects
A precise cost estimate considers labor, materials, permits, and unexpected expenses. Using historical data and Sage 300 CRE for financial management improves accuracy and helps set realistic budgets.
Budget Allocation and Tracking
Allocating funds efficiently ensures that each phase of the project receives the necessary resources. Tracking expenses through Construction & Financial Dashboards allows for real-time monitoring and early detection of budget deviations.
Preventing Budget Overruns
Uncontrolled costs can derail a project. Regular financial reviews, automated alerts for overspending, and contingency planning help keep expenses in check and prevent financial strain.
Scheduling & Timeline Management
Timely project completion is crucial in residential construction. Effective scheduling minimizes delays and ensures a smooth workflow.
Creating Detailed Project Schedules
A structured schedule outlines all tasks, deadlines, and dependencies. Breaking down the project into phases, planning, execution, and finishing, helps maintain order and clarity.
Preventing Delays & Meeting Deadlines
Delays can result from labor shortages, weather conditions, or supply chain issues. To avoid problems, it’s good to check for risks ahead of time, add extra time to schedules, and keep everyone on the same page.
Using Gantt Charts and Critical Path Methods
CPM for Construction helps identify critical activities that directly impact project completion, while Gantt charts provide a visual timeline of tasks. Both tools optimize scheduling and improve efficiency.
Residential Construction Project Management Phases
Managing a residential construction project effectively requires a structured approach through various phases. Each phase plays a critical role in ensuring the project's success, from initial planning to completion.
Pre-Construction Phase
The pre-construction phase sets the foundation for a smooth and efficient building process. Proper planning at this stage helps prevent costly changes and delays later.
Site Analysis & Approvals: A thorough site analysis assesses soil conditions, topography, and environmental factors. Feasibility studies evaluate project viability, including costs and regulatory compliance. Obtaining zoning approvals, permits, and other legal clearances is crucial before breaking ground.
Selecting Materials and Procurement Strategies: Choosing the right materials impacts durability, sustainability, and cost efficiency. A well-planned procurement strategy, including bulk purchasing and reliable supplier partnerships, ensures timely delivery and cost savings. Using Sage 300 CRE for procurement management helps streamline material sourcing and financial planning.
Construction Phase
The construction phase transforms plans into reality. Effective coordination and strict quality control ensure a successful build.
Resource Allocation and Workflow Coordination: Efficiently managing labor, equipment, and materials is key to maintaining progress. Using CPM for Construction, project managers can allocate resources strategically, prevent bottlenecks, and optimize workflows for timely completion.
Project Closeout & Handover
The final phase of residential construction project management is crucial for ensuring a smooth transition from construction to occupancy. Proper closeout procedures guarantee quality, client satisfaction, and long-term project success.
Final Inspections and Quality Assurance: Before finishing the project, a final inspection checks that everything meets safety rules and quality standards. Any problems need to be fixed quickly. Using Procore helps make inspections and tracking issues easier, ensuring a high-quality final product.
Client Walkthrough and Support: A final check helps homeowners see the finished work, ask questions, and make sure it meets their expectations. This is also a chance to explain important home features and maintenance tips. Good communication here builds trust and strengthens relationships.
Warranty Management and Feedback: Efficient warranty management ensures clients get quick help for any issues after construction. A clear process for tracking requests and keeping in touch with homeowners boosts satisfaction. Collecting feedback helps improve future projects. Using S-Curve Forecasting tracks performance trends and refines management strategies.
Software for Residential Construction Project Management
The integration of technology in residential construction project management has revolutionized the way projects are planned, executed, and monitored. Digital tools streamline operations, reduce costs, and improve communication, making them essential for modern construction firms.
Importance of Digital Tools
Investing in digital tools is crucial for construction firms as it transforms the industry by enhancing efficiency, accuracy, and collaboration across the entire project lifecycle. They also improve project management by streamlining processes, automating tasks, and facilitating real-time stakeholder communication.
Top Construction Management Software for Residential Projects
Several software solutions are available for managing residential construction projects:
Procore: Known for its comprehensive project management features, including document management and collaboration tools.
Sage 300 CRE: Offers robust accounting and financial management capabilities, ideal for large-scale construction projects.
Buildertrend: Specializes in residential construction, providing tools for project scheduling, budgeting, and client communication.
CoConstruct: Focuses on custom home building and remodeling, offering features for estimating, scheduling, and project management.
WIP Reports: Useful for tracking work-in-progress and managing project finances effectively.
Features Comparison and Best Use Cases:
Procore: Best for large projects requiring extensive collaboration and document management.
Sage 300 CRE: Ideal for firms needing robust financial management.
Buildertrend: Suitable for residential builders focusing on client communication and project scheduling.
CoConstruct: Perfect for custom home builders who need detailed estimating and scheduling tools.
WIP Reports: Useful for firms needing to track project finances closely.
How Software Improves Project Efficiency
Construction management software significantly enhances project efficiency in several ways:
Automating Accounting and Job Costing: Software like Sage 300 CRE automates financial tasks, reducing manual errors and improving budget tracking.
Streamlining Document Management and Communication: Tools like Procore centralize documents and facilitate real-time communication among team members, reducing misunderstandings and delays.
Mobile-Friendly Solutions for Real-Time Tracking: Mobile apps from platforms like Buildertrend allow for on-site access to project data, enabling real-time tracking and decision-making.
These digital tools and software solutions are essential for modern residential construction project management, offering benefits such as improved efficiency, enhanced collaboration, and better financial control.
Challenges in Residential Construction Project Management
Residential construction projects face a variety of challenges that can impact their success. Here are some of the key issues project managers encounter:
Managing Subcontractors and Labor Shortages
One of the biggest challenges in residential construction is managing subcontractors and dealing with labor shortages. Subcontractors often have their own schedules and priorities, which can lead to delays if not coordinated properly. Additionally, labor shortages can slow down projects and increase costs due to the need for overtime or hiring temporary workers.
Budget Overruns and Unexpected Costs
Budget overruns are common in residential construction due to factors like material price fluctuations, unexpected site conditions, or changes in project scope. Effective budget management involves regularly monitoring expenses and having contingency plans for unexpected costs.
Changing Construction and Eco Rules
Construction and Eco Rules are always changing, so project managers need to keep up with the latest regulations. This involves following guidelines for saving energy, protecting the environment, and ensuring safety. Ignoring these rules can lead to fines, delays, or even stopping the project.
Best Practices
To ensure your residential construction projects run smoothly and successfully, follow these essential best practices:
Setting Clear Project Goals and Milestones
Clearly defining what you want to achieve is the first step to success. Set specific, measurable, achievable, relevant, and time-bound (SMART) goals. This helps everyone involved understand what needs to be done and by when. For example, instead of saying "build a house," say "build a house with three bedrooms and two bathrooms within the next nine months."
Stakeholder Collaboration
Good communication is key to keeping everyone on the same page. Regular meetings with contractors, suppliers, and homeowners help prevent misunderstandings and ensure that everyone knows what's happening and what's next. This open dialogue also helps resolve issues quickly, preventing small problems from becoming big delays.
Using Data-Driven Insights for Decision-Making
Making decisions based on facts rather than guesses is crucial. Use data and analytics to understand project progress, identify potential issues early, and make informed decisions. For instance, if data shows that a particular material is consistently causing delays, you can plan ahead to avoid those delays in the future.
Proactive Risk Management Strategies
Things don't always go as planned, so being prepared is essential. Identify potential risks early and have a plan to manage them. This might include having backup suppliers, planning for weather conditions, or setting aside extra funds for unexpected expenses. Being proactive can prevent small issues from turning into major problems.
Conclusion
Effective residential construction project management requires careful planning, clear communication, and the right digital tools. From single-family homes to multi-family housing and custom projects, managing timelines, budgets, and quality is essential for success.
By following best practices, using project management software, and staying ahead of industry trends, project managers can ensure smooth execution and client satisfaction despite challenges like labor shortages, budget overruns, and regulatory compliance; modern technology and strategic planning help mitigate risks.
Construction firms can improve efficiency, enhance collaboration, and maintain financial control by adopting advanced tools like Procore, Sage 300 CRE, and Buildertrend. A well-managed project delivers a quality home and builds trust and long-term success in the industry.
FAQs
What is residential construction project management?
It involves overseeing all aspects of building residential properties, from initial planning and design to construction and completion, ensuring projects are completed on time, within budget, and to the desired quality standards.
How can I prevent budget overruns in my construction project?
Accurate cost estimation, continuous budget tracking, and having contingency plans for unexpected expenses are key strategies to prevent budget overruns.
What are the main stages of a residential construction project?
The primary stages include design, pre-construction, procurement, and construction.
How does construction management software improve project efficiency?
It streamlines processes like scheduling, budgeting, and communication, providing real-time data access and collaboration among stakeholders, which enhances overall project efficiency.
How can I ensure my project complies with local building codes and regulations?
Engage professionals familiar with local laws, obtain all necessary permits before starting, and conduct regular inspections to ensure adherence to building codes and regulations.
 The Master's Finish Inc
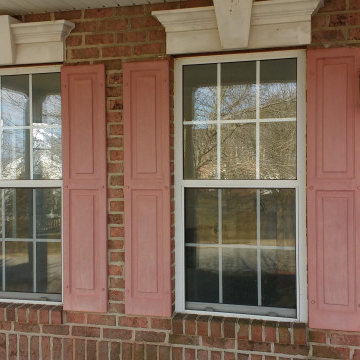
This home was being prepared for sale on the market. Much of the home needed to be brought up to date with fresh painting and minor repairs. The painting work brought a wonderful fresh and beautifying effect. In the middle of winter, in a slow market, the home sold in 2 weeks!
7