
Search results for "Extract cost" in Home Design Ideas

 Photolux Commercial Studio
PhotoluxStudio.com/commercial - Christian Lalonde / Kariouk & Associates
Inspiration for a mid-sized contemporary formal and open concept light wood floor living room remodel in Ottawa with beige walls
Inspiration for a mid-sized contemporary formal and open concept light wood floor living room remodel in Ottawa with beige walls
 Marie Flanigan Interiors
Julie Soefer Photography
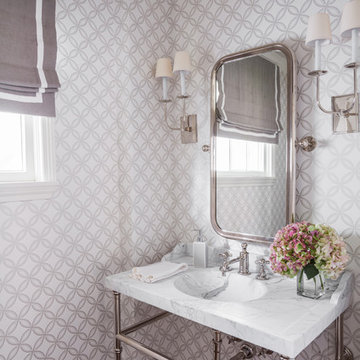
Example of a classic dark wood floor powder room design in Houston with gray walls, a console sink and marble countertops
Example of a classic dark wood floor powder room design in Houston with gray walls, a console sink and marble countertops

Find the right local pro for your project
 Dry-Tech Water Damage Flood Restoration Services
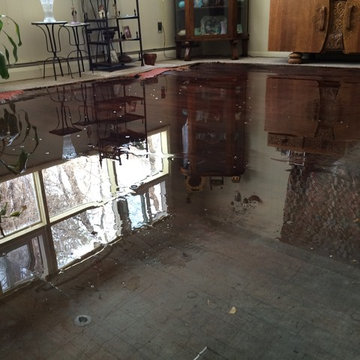
Contact Dry-Tech Water Damage Restoration Services for fast 24/7 emergency water damage restoration, mold remediation and smoke and fire damage in the western suburbs of Philadelphia and surrounding areas. Our IICRC trained restoration specialists are qualified and have the equipment to handle any size restoration job. At Dry-Tech Water Damage Restoration Services, we know water, mold and/or smoke and fire damage can be overwhelming for you and costly to your home or commercial building, so our restoration specialists will work with you step-by-step through the entire process.
Call 610-304-5117 to Contact Us Today! Dry-Tech Restoration Services 24 hr Service, Basement Flood, Basement Water Removal, Broken Pipes, Building Drying, Carpet Cleaning, Carpet Drying, Carpet Extraction, Carpet Repair, Carpet Restoration,
Carpet Water Extraction, Cleaning, Damage Repair, Damage Restoration, Dehumidification, Disaster Restoration, Disinfecting, Drying, Emergency Service, Extraction,
Fire, Fire Restoration, Flood, Flood Clean Up, Flood Damage, Flood Damage Repair, Flood Restoration, Flood Water Removal, Flooded Basement, Floor Drying, Free Estimates,
Leak Detection, Moisture, Odor Removal, Plumbing, Plumbing Repairs, Rain Damage, Remediation, Repairs, Restorations, Roof Leak, Sanitizing, Sewage Clean Up,
Sewage Extraction, Sewage Removal, Sewer Back Up, Sewer Damage Restoration,Smoke, Smoke Damage Repair, Smoke Removal, Steam Cleaning, Storm Damage Repair,
Structural Drying, Sump Pump Failure, Tile Cleaning, Toilet Overflow, Upholstery Cleaning, Wall Drying, Water Damage Clean Up, Water Damage Company,
Water Damage Repair, Water Damage Restoration, Water Drying, Water Extraction, Water Removal, Wind Damage, Wet Carpet, Wood Floor Drying, Wet Basement http://www.restore-911.com

 Birdseye Design
Open concept kitchen - small scandinavian galley medium tone wood floor and brown floor open concept kitchen idea in Burlington with a farmhouse sink, flat-panel cabinets, white cabinets, stainless steel appliances, a peninsula, gray countertops and quartz countertops

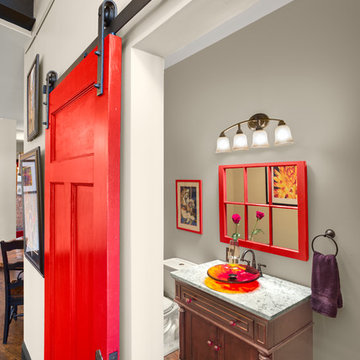
 Prime 1 Builders
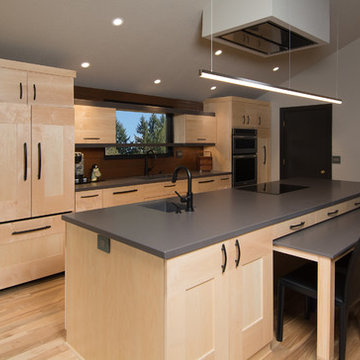
This project won in the 2013 Builders Association of Metropolitan Pittsburgh Housing Excellence Award for Best Urban Renewal Renovation Project. The glass bowl was made in the glass studio owned by the owner which is adjacent to the residence. The mirror is a repurposed window. The door is repurposed from a boarding house.
George Mendel

Sponsored
Delaware, OH

Buckeye Basements, Inc.
Central Ohio's Basement Finishing ExpertsBest Of Houzz '13-'21
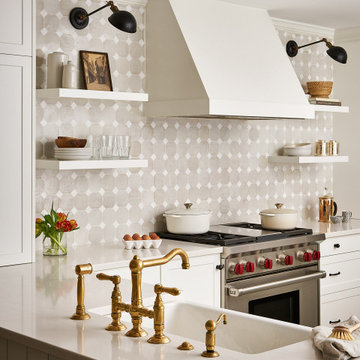
 AZL interiors
Mid-sized farmhouse l-shaped medium tone wood floor and brown floor kitchen photo in Chicago with a farmhouse sink, shaker cabinets, white cabinets, quartz countertops, multicolored backsplash, terra-cotta backsplash, stainless steel appliances, two islands and white countertops
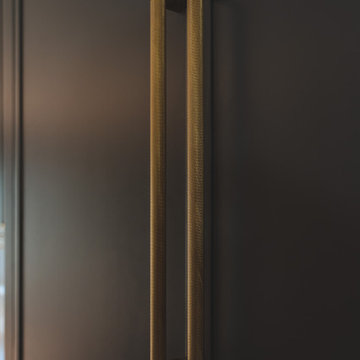
 FineLine Kitchens, Inc.
Our designer has achieved a stylish look by combining dark cabinets and light-colored marbles.

 AMLD INTERIOR INC
AM691079
DESCRIPTION:
“Alabastron” was the name of a village in Old Egypt, located near the city of Thebes, in which a calcareous-type translucent stone was extracted. It seems that the term also referred to objects (e.g. vessels, cups) originating from that place, which, originally, were made with this material. Eventually, the term began to refer only to the white translucent rock used in art and in the manufacturing of muchappreciated vessels.
SPECIFICATIONS:
Collection:
Size: Custom sizes also available)
Shape: Wall lamp
Metal Finished: (Different finish available at no additional cost)
Materials: Metal,Alabaster
Weight: N/A LBS.
Extension: Adjustable cord customizable up to 12 ft.
Bulbs: N/A
Assembly: Some assembly required.
Dimmer Switch Compatible: Optional
Shipping: Free Door-To-Door Shipping Worldwide!
Rush Order: 4-6 Weeks; 15% added to the total
Regular Lead Time: 6-10 Weeks
Warranty: 5 Years Full Coverage (includes replacement parts)
SIZE OPTIONS:
Custom Sizes, Finishes, Colors Available Upon Request

 Automotive Locksmith
321KeyCutting is a locksmith company with many years of experience offering services to commercial, residential and industrial. Did the key break in the lock? We know how hard for you to get into this situation. No need to worry because we are here to extract the key for you. Small or big lock issues, we got you covered. It is always our goal to provide outstanding services to all residential, automotive and industrial areas.
Our Working Time Availability
Issues with locks take place anywhere and anytime. We know that it is a situation where you need help. This is why we are available every day of the year.
Our Local Locksmith Technician
Our locksmith technicians have handled almost all kinds of locksmith problems that can occur with you We make sure that they know what they are doing.
Our Pricing
We understand it is not easy to earn money. We also know that you experienced a lot of things today and we want to make sure that you spend your money in valuable things. It is why we offer affordable cost on all our services.
Residential Garage Door
Commercial Garage Door
Garage Door Openers
Garage Door Parts
Garage Door Accessories
Garage Door Tuneup
Garage Door Maintenance
Emergency Garage Door
Call Us: (321) 234-9425
Visit Us: http://321keycutting.com/mims
 AMLD INTERIOR INC
AM70065
DESCRIPTION:
“Alabastron” was the name of a village in Old Egypt, located near the city of Thebes, in which a calcareous-type translucent stone was extracted. It seems that the term also referred to objects (e.g. vessels, cups) originating from that place, which, originally, were made with this material. Eventually, the term began to refer only to the white translucent rock used in art and in the manufacturing of muchappreciated vessels.
SPECIFICATIONS:
Collection:
Size: (Custom sizes also available)
Shape: Circular
Metal Finished: (Different finish available at no additional cost)
Materials: Alabaster
Weight: 4 LBS.
Extension: Adjustable cord customizable up to 12 ft.
Bulbs: N/A
Assembly: Some assembly required.
Dimmer Switch Compatible: Optional
Shipping: Free Door-To-Door Shipping Worldwide!
Rush Order: 4-6 Weeks; 15% added to the total
Regular Lead Time: 6-10 Weeks
Warranty: 5 Years Full Coverage (includes replacement parts)
Custom Sizes, Finishes, Colors Available Upon Request
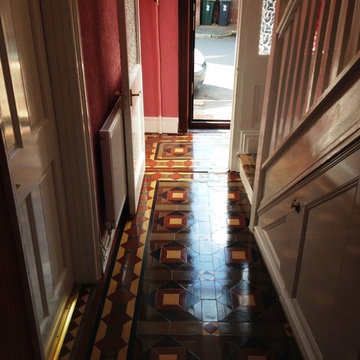
 Tile Doctor Ltd
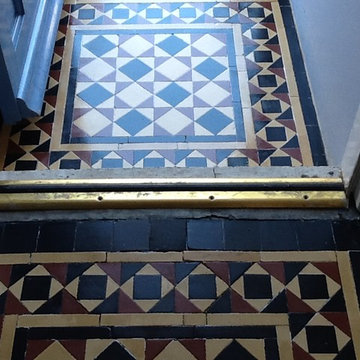
This Victorian tiled hallway at a house in the Forest of Dean had a very interesting pattern, consisting of an array of different colours, including shades of red, yellow and blue. Unfortunately, as you can see from the first photograph below, the tiles had lost all life, with the colours largely masked by months’ – or maybe even years’ – worth of ingrained dirt and muck. The floor as a whole was also suffering from a number of loose tiles that needed to be reset before it could be cleaned.
The property owner was keen to employ some professional assistance to restore the appearance of the floor and prevent it from getting in an even wrote state, and so contacted Tile Doctor who have a lot of experience working with Victorian tiled floors.
As mentioned, the loose tiles had to be repaired before the cleaning process could be started. I removed the tiles and extracted excess grout and old adhesive from the exposed concrete substrate using a vacuum, before putting the original tiles back into place and fixing them back into position carefully using fresh adhesive and matching grout.
Once happy the replaced tiles had set, I started the process of cleaning the entire area of hallway tiles using a combination of Tile Doctor Remove and Go to strip away the old sealer and Tile Doctor NanoTech HBU (formerly Ultra Clean) remover to get the tiles as clean as possible. The latter product contains nano-sized cleaning particles (hence the name) to reach difficult areas of trapped dirt, making it more effective than your run-of-the-mill tile cleaner. These two products were scrubbed into the tiles using a rotary machine fitted with a black scrubbing pad. The floor was then rinsed with water and the soiled residue was extracted with a wet vacuum.
I then paid particular attention to the grout, applying our alkaline-based multi-purpose cleaner Tile Doctor Pro-Clean to the grout lines, before scrubbing them with a narrow grout brush. This quickly had the grout looking clean again: I’d even go as far as to say that it matched it seamlessly with the fresh grout that had just been laid.
With the tile and grout as clean as it was possible to get it, I gave the whole floor a final rinse to neutralise the excess chemicals. I extracted as much water as possible with a wet vacuum and left the floor to dry overnight.
My first task upon returning to the property the next day was to check for any dampness. If you neglect to remove all excess moisture from the surface of the tiles before sealing it is more than likely going to cloud the sealer, rendering it less effective I’m protecting the stone against ingrained dirt and stains.
Once satisfied that the floor was completely dry, I proceeded to seal the tiles using multiple costs of Tile Doctor Seal and Go. Seal and Go is what we would classify as a topical sealer, meaning it rests on the surface of the tiles to act as a durable layer of protection against all kinds of muck. While providing surface protection, Seal and Go also adds a nice subtle sheen to the tiles, as per the customer’s request.
The customer was quite amazed at how quickly the appearance of the tiles had been restored. It was fantastic to see the colours we both knew were hidden in the tiles come to life once again. Another satisfied customer for sure!
Paul Wales
Monmouthshire Tile Doctor
 Tile Doctor Ltd
When you discover an old Victorian tiled floor underneath carpet, the first question that will probably pop into your mind is: can it be restored?
The answer, in the majority of cases, is yes. In fact, Tile Doctor has completed hundreds of Victorian tiled floor restorations. Victorian tiles have a timeless quality about them and are still popular for residential use even in the twenty first century.
What you can usually expect upon lifting your carpet is for the tiles to be covered in carpet adhesives and grippers, as was the case with this particular example of a Victorian Tiles hallway floor at a property in Bedford. Sometimes you might also find paint splashes or other staining left over from decoration work. And, of course, the tiles will be dirty and in much need of a deep clean. These issues spoil the original appearance of the tiles, but with the right methods and products, a complete restoration can be achieved quickly and cost-effectively.
My first task upon arriving at the proper was to carry out a site survey to address the condition of the tiles, before running a quick test clean on a small area of the floor. The result was good and so I was confident that I could achieve a high-quality restoration for the client.
A quote was issued and accepted, and the work was booked in at a date that was convenient for the customer.
Returning to the property, my first course of action was to mix a strong dilution of Tile Doctor Pro Clean, which is a powerful alkaline cleaner safe to use on natural stone, with hot water. This cleaning solution was sprayed along all edges of the floor loosen the glue securing the carpet grippers. I then successfully removed the adhesive carefully using handheld tools to avoid damaging any tiles.
Once this was done, I applied Tile Doctor Remove and Go, scrubbing it into the tiles with a rotary machine. This product is designed to remove heavy soiling, paint splashes and old waxes and sealers. The soiled solution was then extracted using a wet vacuum and stubborn areas re-treated until I was satisfied the floor was clean.
The entire floor was then given a thorough rinse with water to remove any trace of cleaning products and extracted using a wet vax machine.
The floor was allowed to dry for several days before I was able to return to seal the tiles. It’s always important to leave significant time for the floor to dry because any moisture left over can impact the performance of the sealer.
The choice of sealer was Tile Doctor Seal and Go Extra, which provides robust protection against dirt and stains, with a light sheen finish. I chose this sealer not only because the customer wanted a light sheen finish, but also because this particular sealer is fully breathable. Dampness can sometimes be an issue with old Victorian and Quarry tiles which were installed before damp proof membranes became standard.
The transformation achieved within the space of a week was quite incredible and the colours in the tile have really come through.
Another satisfied customer!
David Vissian
Bedfordshire Tile Doctor
 Tile Doctor Ltd
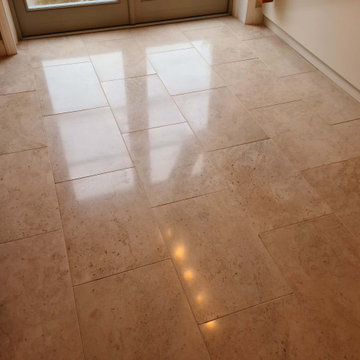
I recently went to survey a floor in Harrogate which I immediately recognised as beige Moleanos Limestone which comes from Portugal. If you have been reading my previous posts you will remember I am not a fan of this type of stone as it is very difficult to clean, polish or seal. This particular floor was laid around 5 years prior and was now looking quite dull and was in need of reviving.
The client didn’t want to spend much so l suggested l could spray burnish the floor to get her shine back again and remove the splash marks. We do this a lot for owners of polished stone floors as part of an annual maintenance package, it is a low cost option that uses a very fine 3,000 grit burnishing pad to renovate the stone and bring up the shine. However, I pointed out to her that this process wouldn’t clean her grout which was making her floor look scruffy.
I priced up the different options and after weighing up the quotes I’m pleased to say she decided to go for a full clean and seal. The full process involves the use of different grades of diamond encrusted burnishing pads from low to very fine grits to renovate the Limestone and also a chemical clean of the grout followed by a fresh seal.
I returned on the scheduled date and after preparing the floor I started cleaning the Limestone by running over the tiles with a 400-grit coarse burnishing pad lubricated with water. The soil was rinsed off with more water and extracted with a wet vacuum. This process was repeated with the 800 and 1500-grit pads which starts to build-up the polish on the stone.
I then turned my attention to the grout with a strong dilution of Tile Doctor Pro-Clean which was left to soak into the grout for ten minutes before scrubbing it by hand with a stiff brush. After a final rinse and extraction with the wet vacuum the tile and grout were looking much cleaner and was left to dry off overnight.
On Day 2 I stated with the application of the 3,000-grit pad which is the last step in the polishing processed and builds up a lovely satin finish on the stone floor. This is done using only a little water and is basically the spray burnish technique I referred to earlier. This process has the added advantage of leaving the floor dry.
With the stone tiles looking lovely and the grout clean the last step was to seal it all in and protect it from dirt and future staining with the application of a sealer. For this I used two coats of Tile Doctor Ultra Seal.
My client was very pleased she had spent the extra money to achieve the floor she had always wanted, apparently it had never looked this good even when new. We discussed the annual maintenance plan to ensure the floor remained looking this good.
Nigel Stoker
North West Yorkshire TIle Doctor

 Tile Doctor Ltd
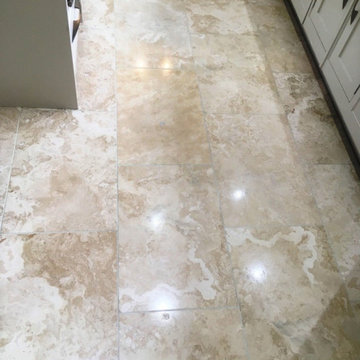
This is a Travertine tiled floor installed at a property in the popular Cheshire town of Wilmslow around 16 years prior. It had previously been maintained by a Tile Doctor colleague about three years ago and the owner was hoping the floor could be given a simple maintenance clean and seal. This is a service we provide as part of an annual maintenance plan, unfortunately after surveying the floor it was clear they had left it far too long, the floor had lost its shine and it would now need to be resurfaced with a set of diamond burnishing pads and then resealed.
Naturally burnishing the floor costs more than a simple seal and polish but if you are going to opt for the quicker maintenance plan route it does need to be done at least annually and possibly more frequently if it’s a floor in frequent use such as a kitchen. We agreed a price for the work, and I arranged a time with them to return and renovate the floor.
To restore the polished appearance of the Travertine I used a set of four burnishing pads which are applied to the floor with a rotary machine. You start with a coarse 400-grit pad using water to lubricate and running it over each tile at least three times. This first pad cleans up the stone and removes old sealers. This is then followed with the finer 800-grit, 1500-grit and finally a 3000-grit pad. Except for the 3000-grit, each pad is applied with water and the floor is rinsed and the soil extracted afterwards with the wet vacuum.
The Grout lines were also deep cleaned with a scrubbing brush and Tile Doctor Pro-Clean tile and grout cleaner. The product really gets to into deep seated dirt and grease which tends to accumulate in the grout. After a final rinse and extraction, the floor was then left to dry off overnight.
I returned on the second day and started by checking the floor was dry by taking several moisture readings with a damp meter. The readings were good, so I proceeded to seal the floor using a couple of coats of Tile Doctor Colour Grow. Colour Grow is an ideal sealer for Travertine as it seeps into the pores of the stone enhancing the natural brown colours in the process. It also offers great protection going forward.
Whilst I was there I had noticed that one of the doors had scratched the floor, fortunately the polishing process had got the scratches out of the stone but to prevent future scratching I helped them remove the door so a carpenter could shave off a few mm’s from the bottom.
My customer left the following feedback:
“Second time had Travertine floor restored, cleaned & sealed, the first time was 3 years ago. Great job done then by Simon Bywater. This time Kamila did a really professional job on the kitchen limestone floor. A bit more expensive this time, but a good job was done. Have left instructions for her to contact me in 12 months time for annual maintenance on the same floor, hopefully to prevent restoration being required! Highly recommend the service.”
The floor looked great and they should now be able to maintain it in between the maintenance visits, with day to day cleaning using Tile Doctor Neutral Tile Cleaner.
Kamila Logonzy
East Cheshire Tile Doctor
 Tile Doctor Ltd
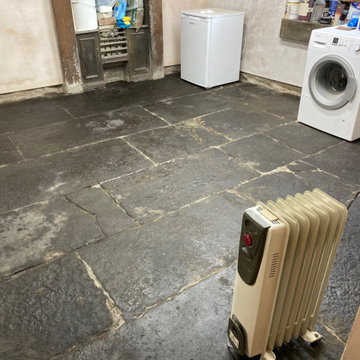
I was contacted by a client in Kendal to see if I could help with their Black Flagstone basement floor. As you can see from the photographs it was in a bit of a state and the stone looked mostly White rather than Black.
I carried out a site visit, to survey the floor and work out the best approach to restore its appearance. After testing a few different products and techniques I worked out an effective restoration plan and discussed this with the owner. Happy with my plan and costing’s we agreed a date to start the work. Being in the basement of the property had its challenges but it would mean we could work socially distanced from the owner.
To restore the floors appearance, I started with a set of coarse wire (60 and 120 grit) brushes lubricated with Tile Doctor Remove and Go which is a strong coatings remover. I had considered using milling pads on the tiles to reveal a new surface underneath but that does involve the use of an expensive set of coarse pads and given it was a basement the owners didn’t feel the extra expense would be justified.
The wire grits work well on rough stone floors when attached to a weighted buffing machine and we add some Tile Doctor Remove and Go to the mix. Once clean the floor was rinsed with water and the slurry extracted using an industrial wet vacuum. After cleaning the floor, it looked transformed, some pointing was required so we carried this out after the main clean.
The stone was left to dry out for a few days before returning to apply a sealer. For this floor I felt Tile Doctor X-Tra seal would be the best product and applied two coats. I chose X-Tra seal for this job as it ticks a lot of boxes, it’s a breathable oil-based resin sealer which being breathable will allow moisture to rise through the floor. Old floors like this don’t have a damp proof membrane so it is important to choose a sealer that can allow the floor to breath and not let damp build up under the floor where it can reach out to the walls and cause rising damp.
I also chose X-Tra Seal as it has a great ability to bring out the colour of the darker stone due to its high oil content, the oil will deter salts from forming if efflorescence is an issue. This is a unique property of this sealer as we never know if efflorescent salts are going to form or not so having this in place as a sealer is a great plus for a Tile Doctor, it is new to the market and is already proving popular on floors like this and for protecting external stone.
If the tiles are smooth Tile Doctor X-Tra Seal adds a bit of a sheen to the appearance of the stone however this stone was very rough, so we didn’t manage a shine, but the customer was happy with the matt finish and the slightly honed effect.
The floor looked great and much more appealing making the space more attractive and likely to be used. For aftercare I recommended Tile Doctor Neutral Tile Cleaner which will clean the floor without impacting the sealer which can be a problem with many of the stronger products you find in supermarkets.
Heidi Taylor
South Cumbria Tile Doctor
 Tile Doctor Ltd
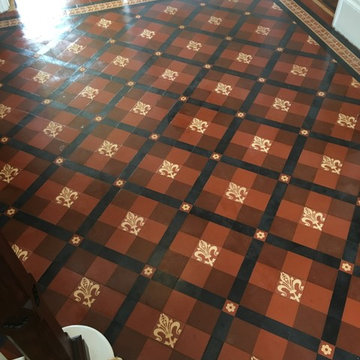
It’s always a great surprise to find old tiled flooring hidden underneath carpet or linoleum which appears especially common with 19th century properties where it’s not unusual for the owners to uncover fantastically patterned, original Victorian tiled floors and, naturally, they want to restore them to their former glory. If you have a property of this type you might want to look under the carpets.
The majority of the time, however, these tiles have been covered up for decades, allowing for thick layers of muck to build-up and are invariably damaged carpet grippers, surface glue and adhesive tape.
This was pretty much the case with this customer who lives in the town of Warminster and was keen to have her own newly discovered Victorian hallway brought back to life, and called me down to see what could be done. Upon arrival at the property, I determined that the tiles would definitely require a very deep clean, including the remove of numerous glue stains, followed by the application of a new seal.
Before I could begin the deep cleaning process, I needed to remove the carpet grippers and surface glue, attempting to remove as much as possible by hand using a scraper.
For the particularly stubborn areas, I applied Tile Doctor Remove & Go, a powerful stripper specially designed to break down adhesives and solvents, and left it to dwell for 20 minutes to eat through the glue deposits. I then attached a black pad to a rotary machine and scrubbed the area thoroughly to clean the affected areas, before removing the resulting slurry using a wet vacuum and rinsed with clean water.
Once I was satisfied that all of the glue had been removed, I proceeded to soak the floor using a solution of the high alkaline cleaner known as Tile Doctor Pro Clean. This is a versatile product that can be used on a wide range of natural stone floors to deal with heavy soil build-up.
I left the Pro-Clean to dwell for ten minutes, and then scrubbed it into the tiles to remove the ingrained dirt and also to break down any old and ineffectual seals. The floor was then once again rinsed thoroughly with clean water which was then extracted using a wet vacuum before being left to dry for a couple of days.
Upon our return to the property I immediately tested the floor for damp using a damp meter. This is an extremely important test to carry out before sealing any kind of tiled flooring, due to the fact that excess moisture left over from cleaning can cloud the sealer and damage its ability to protect against dirt and stains.
Thankfully, the damp test revealed no excess moisture, and I was able to proceed with sealing the tiles. My choice of sealer was Tile Doctor Seal and Go, a water-based topical sealer that simultaneously provides both a stain resistant surface seal and a durable and aesthetically pleasing low sheen finish, also being water based it doesn’t give off a smell as it dries.
This is a very cost effective product that is highly suitable for use on Victorian and Quarry tiles, I applied five costs to achieve the desired finish.
The customer was very pleased with the final results. It’s always satisfying to restore original Victorian tiled floors to looking their best once again – and this one was no exception.
Stuart Ford
Wiltshire Tile Doctor
 FMSProjects, Inc.
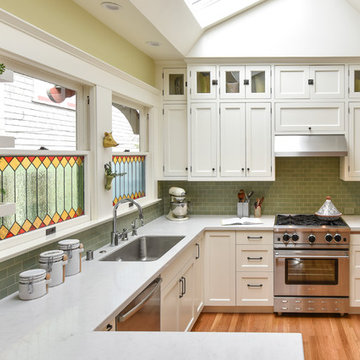
Latch hardware in upper cabinets.
Inspiration for a mid-sized craftsman u-shaped medium tone wood floor eat-in kitchen remodel in San Francisco with a single-bowl sink, shaker cabinets, white cabinets, quartz countertops, green backsplash, ceramic backsplash, stainless steel appliances and a peninsula
Inspiration for a mid-sized craftsman u-shaped medium tone wood floor eat-in kitchen remodel in San Francisco with a single-bowl sink, shaker cabinets, white cabinets, quartz countertops, green backsplash, ceramic backsplash, stainless steel appliances and a peninsula
1