
Search results for "Fair topic" in Home Design Ideas

 dRichards Interiors
This project combines high end earthy elements with elegant, modern furnishings. We wanted to re invent the beach house concept and create an home which is not your typical coastal retreat. By combining stronger colors and textures, we gave the spaces a bolder and more permanent feel. Yet, as you travel through each room, you can't help but feel invited and at home.

 Deck and Patio Company "Outdoor Living Experts"
Kniphofia (Red Hot Poker):
This frequently bi-colored flower makes a dramatic statement in the garden and is an ideal plant for those who are new to gardening. In fact, this plant is so easy to grow it has been described as “tough to kill.” It is fairly drought-resistant, plus hummingbirds and butterflies love it. It is best planted in early spring or late fall.
When in bloom, the blossoms appear a bit like a hot poker or torch and for those feeling a bit of sadness saying good-bye to some of their lawn, note that these plants boast very “grass-like” leaves. This photo is of Vultaggio’s own garden and is courtesy of Sandra Vultaggio.
(Note: the dramatic dark blue/black flowers in the foreground are Salvia ‘Black and Blue’ which bloom from late spring to early autumn.)
So here's to millennials and their commitment to sustainability. If you have any questions on this topic, feel free to contact our office for more ideas.
Monarda (Bee Balm)
1. Native to North America, this beautiful flowering plant is from the mint family. It’s easy to grow, is deer resistant, and attracts pollinators like butterflies, hummingbirds, and bees.
It’s tubular flowers come in a variety of colors (pink, white, violet, red) and bloom in high summer through early fall. Bee Balm takes to full sun or light shade, and prefers a well-drained fertile soil. It needs some protection from excess moisture in winter.

 Brandon Barré Architectural Interior Photographer
Brandon Barré
Trendy u-shaped medium tone wood floor kitchen photo in Toronto with an undermount sink, flat-panel cabinets, dark wood cabinets, white backsplash, stainless steel appliances and a peninsula
Trendy u-shaped medium tone wood floor kitchen photo in Toronto with an undermount sink, flat-panel cabinets, dark wood cabinets, white backsplash, stainless steel appliances and a peninsula
Find the right local pro for your project
 Tile Doctor Ltd
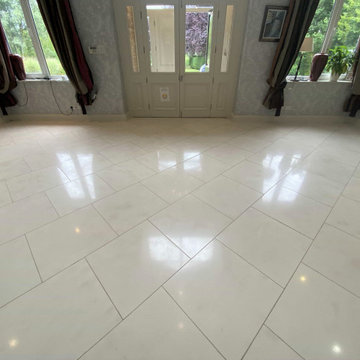
This job was for a repeat client in Toft near Cambridge who had aa stunning large hallway that was tiled in beautiful pale Limestone. My client had asked me back to work on the floor having previously completed the deep clean and seal of a Terracotta floor previously.
The Limestone tiling in the entrance hall had years of some type of topical sealer applied to it. This caused the stone to look slightly discoloured and from certain lights showed up hundreds of scratches and smudges embedded in the seal. I’ve tried to capture this problem in the photographs on this page, but it was very difficult.
A topical sealer sits on the surface of the tile where it is vulnerable to scratching, hallways are generally high traffic areas and so more likely to see this sort of problem. Ideally an impregnating sealer should have been applied, impregnators work by occupying the pores in the stone thus preventing soiling from becoming ingrained in the stone.
Before starting we protected the woodwork against splashing with blue film, I don’t usually make a great deal of mess, but you can never be too careful when working in someone’s property especially one as beautiful as this.
To strip off the old sealer I began by applying a strong dilution of Tile Doctor Remove and Go to the Limestone tiles. I split the floor into sections and used a 400-grit diamond burnishing pad to work the Tile Doctor Remove and Go into the tiles. The floor was then rinsed off using our high-pressure cleaning system that applies pressurised hot water to the floor whilst simultaneously extracting the soil with its built-in vacuum. The system is quite heavy, so it is built into my van, and I run a large flexible hose to a spinner tool that does the cleaning. It is an expensive tool, but it saves a lot of time and leaves the floor fairly dry afterwards.
The 400-grit pad had released a lot of the sealer but there were quite a few layers to get through, so I changed the burnishing pad to a coarse 200-grit pad and repeated the process. After another rinse and extract I would see it had the desired effect and I was able to carry on building up the finish on the Limestone by apply the 400-grit followed by the 800, 1500 grit pads. It was a large floor and so this took up much of the day so once complete I left for the day so it could dry off overnight.
The next day I finished the polishing process with the application of a 3000-grit burnishing pad which is applied with a little water sprayed onto the tile and really brings up the polish on the stone. This process has the added advantage of leaving the floor dry so not long afterwards I was able to move on to sealing.
For this floor two coats of Tile Doctor Ultra-Seal were applied, it is an impregnating sealer that won’t alter the colour of the tiles leaving a natural look.
My client was much happier with the new finish and has asked for another quotation on some more Terracotta flooring that needs attention. For aftercare I recommend using Tile Doctor stone soap, it’s a special formula that builds on the patina which will help maintain the polished appearance of the Limestone.
Tom Conlon
Cambridge Tile Doctor
1