
Search results for "Frequent repair" in Home Design Ideas
 highland
Renovating a home can completely transform the way a space looks, feels, and functions, but successful improvements require thoughtful planning rather than rushing into expensive changes. These renovation tips and tricks house ideas can help homeowners organize projects, control costs, select practical materials, and create rooms that remain useful for years. Start by identifying what genuinely needs improvement, such as outdated finishes, poor lighting, inefficient storage, damaged surfaces, or an inconvenient layout. Create a realistic budget that includes materials, labor, permits where applicable, and a contingency amount for unexpected issues. Taking measurements, collecting inspiration, and deciding priorities before work begins can prevent unnecessary purchases and make the renovation process much easier to manage.
One of the most useful renovation tips and tricks house projects can benefit from is improving the layout before focusing on decoration. A beautiful room will still feel inconvenient if furniture blocks walkways or storage is insufficient. Consider how people actually use each space and whether doors, windows, lighting, electrical outlets, and storage are positioned effectively. In kitchens, for example, practical work zones and accessible storage can make everyday tasks easier. In bedrooms and living rooms, built-in shelving, multifunctional furniture, and organized storage can reduce clutter without making the space feel crowded. Whenever possible, repair or improve the existing structure before replacing everything, because thoughtful upgrades can deliver significant results without creating unnecessary renovation costs.
Choosing materials carefully is another important part of renovation tips and tricks house planning. Look beyond appearance and consider durability, maintenance, safety, and suitability for the room. High-moisture areas require materials that can handle regular exposure to water, while frequently used floors and work surfaces should be selected for durability. Neutral foundations can also provide flexibility because wall colors, textiles, artwork, and accessories can be changed later without another major renovation. Lighting deserves equal attention: combine general illumination with task and accent lighting to make rooms more functional and visually comfortable. Energy-efficient lighting, improved insulation, weather sealing, and efficient fixtures may also contribute to better long-term household performance.
Before beginning major work, divide the project into manageable stages. A useful approach is to complete structural or repair work first, followed by electrical or plumbing updates when necessary, then walls, flooring, cabinetry, fixtures, and finally decorative details. This order can reduce the chance of damaging newly finished surfaces. Keep a record of measurements, product specifications, receipts, and important project decisions so replacements or future repairs are easier. For specialized work involving structural changes, electrical systems, plumbing, gas, or other regulated areas, consult appropriately qualified professionals and follow local requirements. Among the most practical renovation tips and tricks house owners can follow is to avoid changing too many things simultaneously; completing priority areas systematically makes budgets, timelines, and quality easier to control.
Finally, focus on improvements that combine appearance with everyday usefulness. Fresh paint, updated hardware, better organization, improved lighting, refreshed flooring, and carefully selected fixtures can make a noticeable difference without requiring a complete transformation. Outdoor areas can also benefit from simple maintenance, improved lighting, seating, planting, or repaired surfaces that extend the usable living space. Before declaring the project finished, inspect each room for functionality, storage, lighting, ventilation, safety, and finishing quality. The best renovation tips and tricks house approach is not necessarily about spending more it is about making informed choices that solve real problems and create a home that feels comfortable, practical, and personal.
One of the most useful renovation tips and tricks house projects can benefit from is improving the layout before focusing on decoration. A beautiful room will still feel inconvenient if furniture blocks walkways or storage is insufficient. Consider how people actually use each space and whether doors, windows, lighting, electrical outlets, and storage are positioned effectively. In kitchens, for example, practical work zones and accessible storage can make everyday tasks easier. In bedrooms and living rooms, built-in shelving, multifunctional furniture, and organized storage can reduce clutter without making the space feel crowded. Whenever possible, repair or improve the existing structure before replacing everything, because thoughtful upgrades can deliver significant results without creating unnecessary renovation costs.
Choosing materials carefully is another important part of renovation tips and tricks house planning. Look beyond appearance and consider durability, maintenance, safety, and suitability for the room. High-moisture areas require materials that can handle regular exposure to water, while frequently used floors and work surfaces should be selected for durability. Neutral foundations can also provide flexibility because wall colors, textiles, artwork, and accessories can be changed later without another major renovation. Lighting deserves equal attention: combine general illumination with task and accent lighting to make rooms more functional and visually comfortable. Energy-efficient lighting, improved insulation, weather sealing, and efficient fixtures may also contribute to better long-term household performance.
Before beginning major work, divide the project into manageable stages. A useful approach is to complete structural or repair work first, followed by electrical or plumbing updates when necessary, then walls, flooring, cabinetry, fixtures, and finally decorative details. This order can reduce the chance of damaging newly finished surfaces. Keep a record of measurements, product specifications, receipts, and important project decisions so replacements or future repairs are easier. For specialized work involving structural changes, electrical systems, plumbing, gas, or other regulated areas, consult appropriately qualified professionals and follow local requirements. Among the most practical renovation tips and tricks house owners can follow is to avoid changing too many things simultaneously; completing priority areas systematically makes budgets, timelines, and quality easier to control.
Finally, focus on improvements that combine appearance with everyday usefulness. Fresh paint, updated hardware, better organization, improved lighting, refreshed flooring, and carefully selected fixtures can make a noticeable difference without requiring a complete transformation. Outdoor areas can also benefit from simple maintenance, improved lighting, seating, planting, or repaired surfaces that extend the usable living space. Before declaring the project finished, inspect each room for functionality, storage, lighting, ventilation, safety, and finishing quality. The best renovation tips and tricks house approach is not necessarily about spending more it is about making informed choices that solve real problems and create a home that feels comfortable, practical, and personal.

 Mittendorf Quality Construction
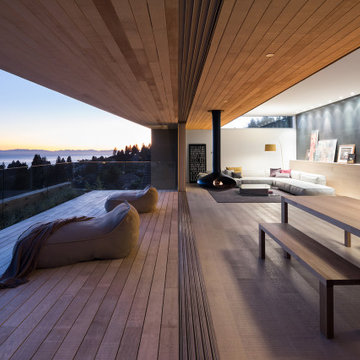
Inspiration for a rustic brown one-story wood gable roof remodel in Seattle

Find the right local pro for your project

 User
UserPhoto: Ten Ten Creative
Wet bar - transitional single-wall dark wood floor and brown floor wet bar idea in Dallas with shaker cabinets, black cabinets, black backsplash, subway tile backsplash and gray countertops
Wet bar - transitional single-wall dark wood floor and brown floor wet bar idea in Dallas with shaker cabinets, black cabinets, black backsplash, subway tile backsplash and gray countertops
 Windy City Painters
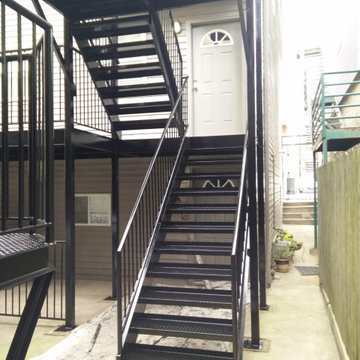
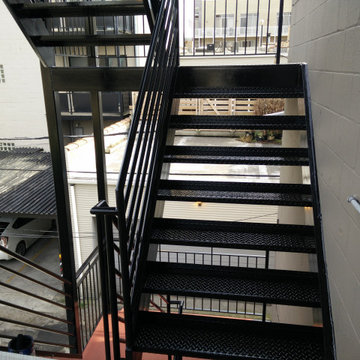
Title: Exterior Metal Porch & Staircase Restoration in West Town, Chicago
Project Overview:
In Chicago’s West Town and Near West Side neighborhoods, multi-unit two-flats, three-flats, and rear coach houses feature heavy-duty steel and iron porches, fire escapes, and railings. Over time, road salt, rain, and extreme freeze-thaw cycles strip away the protective finish, leading to unsightly rust and structural pitting.
Windy City Painters recently completed this multi-tier metal staircase and deck railing repainting project in West Town, Chicago. Here is how proper prep work extends the lifespan of Chicago metalwork by 5 to 8 years.
Why Exterior Metal Prep Matters in Chicago
Rust never stops at the surface. Once moisture penetrates a cracked paint film, oxidation spreads laterally underneath. By the time orange bleeding or paint bubbling is visible, damage is far more extensive.
Our 4-Step Metal Restoration Process:
Mechanical Rust Removal & Scraping: Stripping loose, flaking paint down to solid, bonded metal.
Chemical Rust Conversion: Applying Ospho or Corroseal to chemically convert active surface oxidation into a stable, paintable iron phosphate barrier.
Rust-Inhibitive Priming: Locking out moisture with industrial-grade DTM (Direct-To-Metal) primer.
Protective Topcoat: Finishing with a weather-resistant DTM enamel engineered to withstand heavy foot traffic and Chicago winter conditions.
4 Warning Signs Your Metal Railings or Porch Need Painting:
Orange Bleeding: Rust staining pushing through topcoat paint.
Bubbling or Blistering: Trapped moisture lifting paint from the base metal.
Pitting Metal: Soft, flaking areas when tested with a screwdriver.
Cracked Welds: Structural joints separating (requires welding repair before painting).
Frequently Asked Questions (FAQ)
Q: How much does exterior metal porch or railing painting cost in Chicago?
A: Residential metal railings and porch stairs typically range between $500–$2,500+ depending on linear footage, height, rust severity, and detail work. Windy City Painters offers free, transparent per-project estimates.
Q: Can rusty metal stairs and railings be saved?
A: Yes! Most iron and steel structures can be fully restored with proper mechanical prep and rust converters. Only severely pitted or structurally compromised sections require welding repair prior to painting.
Q: How long does a DTM paint job last on exterior metal?
A: A properly prepped and coated metal porch or railing holds up for 5 to 8 years in Chicago. Skipping rust conversion reduces paint life to just 2 to 3 years.
Q: Do you work with property managers and multi-unit buildings?
A: Yes, Windy City Painters works with homeowners, landlords, HOA boards, and property management companies across West Town, Ukrainian Village, Logan Square, and the North Side.
Work with West Town’s trusted local painting specialists.
? Windy City Painters | Chicago, IL
? windypainters.com | ? 773-818-6331
 Windy City Painters
First, we conducted thorough surface preparation including wall conditioning and primer application. Second, we precisely measured and calculated pattern repeats for perfect alignment. Third, we applied premium adhesive using professional techniques for long-lasting adhesion. Finally, we completed meticulous finishing work including seam treatment and detail trimming.
**Chicago-Specific Challenges**
River North high-rises present unique installation challenges including building access restrictions, climate-controlled environments, and coordination with building management. Furthermore, these luxury spaces demand the highest quality standards and minimal disruption to residents.
**Exceptional Results**
The completed wallpaper installation transformed this River North condo into a designer showcase, perfectly complementing the urban sophistication and architectural elegance of downtown Chicago living.
**Professional Tips**
Always choose experienced installers familiar with luxury building requirements. Additionally, select wallpaper designed for Chicago's climate variations and ensure proper surface preparation for lasting results.
See more work and request free estimate at windypainters.com.
**Frequently Asked Questions**
Q: Why choose wallpaper installation River North specialists? A: We understand luxury condo requirements and building management protocols essential for downtown projects.
Q: How do you handle pattern matching? A: Our experts use precision measuring and mathematical calculations for perfect wallpaper installation River North pattern alignment.
Q: Can you work in occupied condos? A: Yes, we coordinate schedules and minimize disruption during wallpaper installation River North residential projects.
Q: Do you remove existing wallpaper? A: Absolutely, we provide complete removal and surface preparation for new wallpaper installation River North applications.
Q: What about building restrictions? A: We coordinate with management and follow all protocols for wallpaper installation River North high-rise requirements.
Q: How long does installation take? A: Most wallpaper installation River North projects complete within one to two days depending on scope.
Q: Do you warranty your work? A: Yes, all wallpaper installation River North projects include comprehensive warranties for materials and workmanship.
Q: Can you install designer wallpaper? A: We specialize in premium materials and complex patterns for luxury wallpaper installation River North projects.
Q: Do you offer consultations? A: Yes, we provide design guidance and material selection for wallpaper installation River North residential spaces.
Q: What makes you different? A: Our wallpaper installation River North expertise combines luxury experience with downtown building management coordination skills.
 Windy City Painters
Iron Fence Painting Lincoln Park Chicago - Professional Metal Refinishing
Windy City Painters completed this comprehensive iron fence painting project for a beautiful Lincoln Park greystone property. Lincoln Park's historic architecture demands careful attention to detail, and furthermore, Chicago's harsh weather conditions require professional-grade materials and techniques for lasting protection.
We utilized premium Sherwin-Williams rust inhibiting primer and Benjamin Moore exterior metal paint for maximum durability. Additionally, our team employed specialized rust removal tools and surface preparation equipment to ensure optimal adhesion and longevity.
Our four-step process included complete rust removal and surface cleaning, minor repairs to damaged sections, premium primer application with proper curing time, and final topcoat application using spray and brush techniques for even coverage.
Chicago's unique challenges include extreme temperature fluctuations, salt exposure from winter treatments, and moisture from Lake Michigan. Moreover, older properties often have multiple paint layers requiring careful removal. Therefore, professional expertise ensures proper preparation and material selection.
The results exceeded client expectations with a smooth, durable finish that enhances the property's curb appeal. Subsequently, the fence now provides years of protection while complementing the neighborhood's architectural character perfectly.
Before starting similar projects, homeowners should understand that proper surface preparation accounts for 80% of project success. Additionally, weather conditions significantly impact application timing and results.
See more work and request free estimate at windypainters.com.
Frequently Asked Questions:
Q: How much does iron fence painting cost in Lincoln Park Chicago?
A: Iron fence painting costs vary based on fence size, existing condition, rust damage extent, and preparation requirements needed.
Q: What preparation is required for successful iron fence painting projects?
A: Iron fence painting requires thorough rust removal, surface cleaning, minor repairs, primer application, and proper weather conditions.
Q: How long does professional iron fence painting last in Chicago weather?
A: Professional iron fence painting typically lasts 8-12 years with quality materials, proper preparation, and regular maintenance.
Q: When is the best season for iron fence painting in Chicago?
A: Spring through early fall provides optimal conditions for iron fence painting with appropriate temperature and humidity levels.
Q: Can you match existing colors for iron fence painting restoration projects?
A: Yes, we provide custom color matching services for iron fence painting to complement existing architectural elements perfectly.
Q: Do you warranty iron fence painting work in Lincoln Park?
A: Windy City Painters provides comprehensive warranties on all iron fence painting projects ensuring quality and customer satisfaction.
Q: What makes professional iron fence painting worth the investment cost?
A: Professional iron fence painting ensures proper preparation, quality materials, expert application techniques, and significantly extended fence lifespan.
Q: How do you prevent rust from returning after iron fence painting?
A: Our iron fence painting process includes rust inhibiting primer, quality topcoats, and proper surface preparation for maximum protection.
Q: Can iron fence painting increase Lincoln Park property values significantly?
A: Professional iron fence painting enhances curb appeal, property aesthetics, and market value in desirable Lincoln Park neighborhood.
Q: What safety precautions are necessary during iron fence painting projects?
A: Iron fence painting requires proper ventilation, protective equipment, lead paint testing, and professional safety protocols throughout.
 SUPERIOR CHIMNEY SERVICES CORPORATION
As the temperatures continue to climb, and we finally get a chance to enjoy some warm weather, we start to walk around the neighborhood, or even our own homes, to find that lots of work needs to be done. Whether it be weed picking or changing bulbs in the light fixtures there’s always something that needs to be done. However, there’s one thing that can’t wait for your attention and that’s chimney tuckpointing. Why is it so important? Let’s take a look.
Weather and Tuckpointing, Not a Good Match
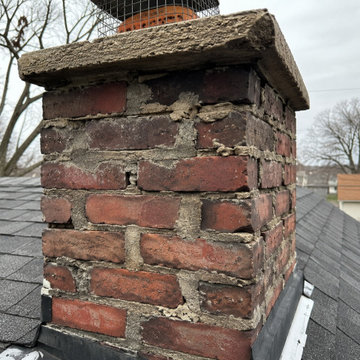
You might have guessed that Chicago and Chicagoland’s weather is brutal on masonry. The city and suburbs average around 35 freeze-thaw cycles every single winter. Every time the cycle occurs, it takes a toll on the chimney's mortar joints. When water gets in and temperatures drop, the water freezes & expands as ice with enough force to crack brick and stone. When Spring comes around, what once was a hairline crack, now gets bigger and allows rain to enter into your home.
This is why the yearly chimney inspection is not optional, according to the CSIA (Chimney Safety Institute of America).
A Little Chicago History
Most homes in neighborhoods like Beverly, Oak Park, Evanston and across the North Shore were built between the 1890s and 1950s. The mortar used in that era had a lifespan of roughly 25–30 years under normal conditions. Under Chicago and Chicagoland conditions? It is reduced. Homeowners buying older properties frequently inherit chimneys that haven't been maintained in a very long time.
When the chimney along with the flashing, bricks, chimney cap and chimney crown are not checked and maintained, loss of structural integrity begins. Water working its way through deteriorated joints reaches the interior of the chimney. This is where it can cause damage to the fire liner while it finds its way into the home. In some situations, compromised masonry near the fireplace can create fire safety concerns.
Getting a Chimney Inspection Early Makes All the Difference
The good news is that chimney tuckpointing, diagnosed early, is simply a repair. The bad news is that homeowners who wait too long can turn the issue into a partial rebuild, or a full chimney rebuild. By the time mortar is visibly crumbling from the street, the damage has already progressed deeper into the chimney structure.
A professional inspection every year is the most cost-effective way to keep the chimney and home heathy. It's often the difference between a few hundred dollars and several thousand.
Not All Tuckpointing Is Equal
One thing worth understanding is that proper tuckpointing requires removing the old mortar to a depth of approximately three-quarters of an inch before new mortar can be applied. Anything less and the new mortar won't bond with longevity / correctly. DIY or companies that just smear new mortar over old joints are doing what's sometimes called "skim coating," and it's essentially cosmetic work that won't hold up.
The type of mortar mix matters too. More modern cement mortars are actually harder than historic brick, which causes the brick itself to absorb, stress and crack rather than the mortar joint. A knowledgeable mason from Superior Chimney will match mortar composition to the brick, only something a real expert can get right.
Contact Superior Chimney today to get a chimney inspection which includes inspecting the exterior chimney today at 877-244-6349.
 Windy City Painters
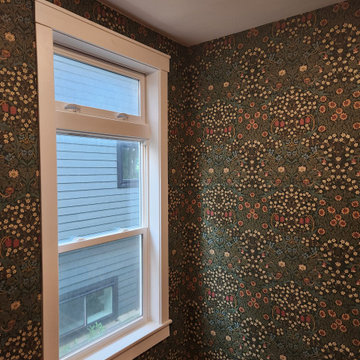
## Professional Wallpaper Installation Lincoln Park Project
Wallpaper installation Lincoln Park requires expert techniques for this stunning greystone renovation. Lincoln Park's architectural heritage includes beautiful greystones, vintage condos, and historic buildings that demand specialized installation approaches respecting original craftsmanship.
## Materials and Products Used
We utilized premium vinyl wallpaper with fabric backing for durability. Additionally, commercial-grade adhesives from Benjamin Moore ensure long-lasting application. Furthermore, we applied specialized primers designed for vintage plaster surfaces common in Lincoln Park homes.
## Four-Step Installation Process
First, complete removal of existing wallpaper and surface preparation. Second, repair any wall imperfections and apply appropriate primer. Third, precise measurement and cutting with careful pattern matching. Finally, professional installation with seamless application and detailed finishing.
## Chicago Home Challenges
Chicago's harsh winters create expansion and contraction issues requiring flexible adhesives. Moreover, older Lincoln Park buildings often have uneven plaster walls needing extensive preparation. Additionally, potential lead paint concerns in vintage homes require certified safe work practices.
## Results and Quality Standards
Perfect pattern alignment across all seams creates seamless appearance throughout the space. Furthermore, moisture-resistant materials ensure longevity against Chicago's humidity fluctuations. The finished installation enhances the home's architectural character while providing modern durability.
## Professional Tips
Always test adhesive compatibility on small areas first. Moreover, control room temperature and humidity during installation for optimal results. Additionally, choose wallpaper appropriate for Chicago's climate conditions.
See more work and request free estimate at windypainters.com.
## Frequently Asked Questions
Q: How long does wallpaper installation Lincoln Park typically take for one room?
A: Most single rooms completed within one to two days including preparation, removal, and professional wallpaper installation Lincoln Park application.
Q: What wallpaper types work best in Chicago's climate conditions?
A: Vinyl and fabric-backed wallpapers offer superior durability against humidity and temperature changes affecting wallpaper installation Lincoln Park projects.
Q: Can you install wallpaper over existing painted walls in older homes?
A: Yes, with proper surface preparation and primer application, wallpaper installation Lincoln Park works excellently over previously painted surfaces.
Q: Do you handle complete wallpaper removal before new installation?
A: Absolutely, comprehensive wallpaper removal and surface preparation included in all wallpaper installation Lincoln Park project estimates and services.
Q: What preparation is required for vintage Lincoln Park home wallpaper installation?
A: Surface cleaning, repairs, lead paint testing if applicable, and proper primer application essential for successful wallpaper installation Lincoln Park.
Q: How do you ensure perfect pattern matching across large walls?
A: Expert measuring, cutting, and installation techniques guarantee seamless pattern alignment throughout every wallpaper installation Lincoln Park project we complete.
Q: What warranty coverage do you provide for wallpaper installation work?
A: All wallpaper installation Lincoln Park projects include comprehensive warranty coverage protecting your investment and ensuring long-lasting beautiful results.
Q: Can wallpaper installation work in Lincoln Park condos and smaller spaces?
A: Yes, we specialize in all housing types including condos, requiring precise wallpaper installation Lincoln Park techniques for optimal results.
Q: How do Chicago weather conditions affect wallpaper installation timing and materials?
A: We schedule wallpaper installation Lincoln Park during optimal conditions and recommend climate-appropriate materials for Chicago's challenging weather patterns.
Q: What makes Windy City Painters different for wallpaper installation Lincoln Park projects?
A: Local Chicago expertise, understanding of neighborhood architecture, and proven wallpaper installation Lincoln Park experience delivering exceptional quality results.
 User
UserThis is an organic Lime Wash done with a true lime wash product as opposed to a brick mortar or concrete that is often seen on new houses. This product can be applied as a solid coating making the surface completely white, or can be applied and "washed off" in many artistic ways, as seen here. If you hate your brick or just want something unique this is a great option!
Photo credit: Jeff Murrey

 The Rinfret Group
Example of a mid-sized transitional freestanding desk dark wood floor and brown floor study room design in New York with beige walls and no fireplace
 MODIVO LIGHT
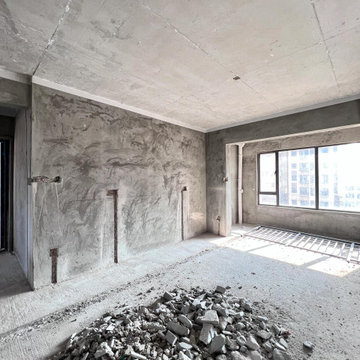
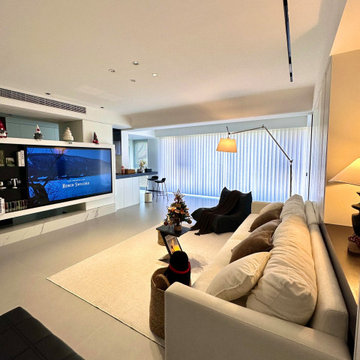
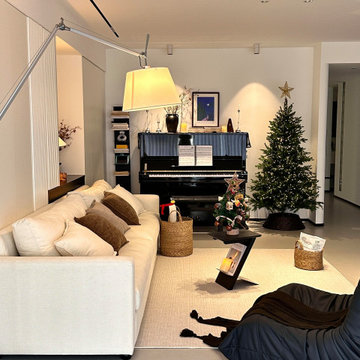
This is our first time decorating a house. Starting from knowing nothing at all to now having the hard decoration completed, we have experienced every emotion along the way—anxiety, doubt, tiredness, hesitation, joy, satisfaction, and touch. We learned and explored on our own, and bit by bit, we finished decorating our home. We’ve accumulated so much experience in this process, and now we want to share it, hoping it can be of a little help to all of you who are doing your own home decoration.
Preparations in Advance
1、Clarify your own ideas: Whether you are looking online, talking to designers, or copying ideas from friends' homes, you should have a clear vision of what your home should look like before designing—such as the style, color scheme, and elements to be used... It is crucial to avoid wanting to install everything that looks good in others' homes in your own. This way, you can clearly put forward your requirements during the design and decoration process, and also avoid frequent revisions to the plan, which may lead to unnecessary rework.
2、Understand your own needs: You need to first figure out the needs of your family, such as how many people live in the house permanently, how many rooms are needed, everyone's living habits, and daily preferences... A home is always for living in, so functionality is always the most important. It is best to list these needs and give priority to meeting them during the design and decoration. This way, you won't find out after decoration that many necessary things are missing, while a bunch of installed things are useless.
3、Determine your budget: There are ways to decorate with more money, and also ways to do it with less. No matter how much money you have, the decorated house can be both beautiful and practical. Therefore, it is essential to decide exactly how much you want to spend on decoration. In every link, such as designing the plan, making a budget table, selecting materials, and construction, you should act in accordance with your own budget.
4、Understand the advantages and disadvantages of your house: There is no perfect house in the world, and every house has its pros and cons. Your design plan should avoid its shortcomings and amplify its advantages. I once wrote an article about the drawbacks of my house ("My house is not perfect, but I still want to find ways to save it"), so we figured out solutions to these problems during the decoration.
5、Learn as much decoration knowledge as possible in advance: Although you can pick up this knowledge in the subsequent decoration process, it is better to learn more beforehand. This will make you much more calm when facing problems.
6、Know your strengths: Before decoration, you must be clear about what you are good at and what you are not. If you are good at design, do the design yourself; if you are skilled at bargaining, go buy building materials on your own; if you have strong hands-on ability, you can even do the decoration and repairs yourself... During the decoration process, you should focus on what you are good at, and leave what you are not good at to others.
 MODIVO LIGHT
This is our first time decorating a house. Starting from knowing nothing at all to now having the hard decoration completed, we have experienced every emotion along the way—anxiety, doubt, tiredness, hesitation, joy, satisfaction, and touch. We learned and explored on our own, and bit by bit, we finished decorating our home. We’ve accumulated so much experience in this process, and now we want to share it, hoping it can be of a little help to all of you who are doing your own home decoration.
Preparations in Advance
1、Clarify your own ideas: Whether you are looking online, talking to designers, or copying ideas from friends' homes, you should have a clear vision of what your home should look like before designing—such as the style, color scheme, and elements to be used... It is crucial to avoid wanting to install everything that looks good in others' homes in your own. This way, you can clearly put forward your requirements during the design and decoration process, and also avoid frequent revisions to the plan, which may lead to unnecessary rework.
2、Understand your own needs: You need to first figure out the needs of your family, such as how many people live in the house permanently, how many rooms are needed, everyone's living habits, and daily preferences... A home is always for living in, so functionality is always the most important. It is best to list these needs and give priority to meeting them during the design and decoration. This way, you won't find out after decoration that many necessary things are missing, while a bunch of installed things are useless.
3、Determine your budget: There are ways to decorate with more money, and also ways to do it with less. No matter how much money you have, the decorated house can be both beautiful and practical. Therefore, it is essential to decide exactly how much you want to spend on decoration. In every link, such as designing the plan, making a budget table, selecting materials, and construction, you should act in accordance with your own budget.
4、Understand the advantages and disadvantages of your house: There is no perfect house in the world, and every house has its pros and cons. Your design plan should avoid its shortcomings and amplify its advantages. I once wrote an article about the drawbacks of my house ("My house is not perfect, but I still want to find ways to save it"), so we figured out solutions to these problems during the decoration.
5、Learn as much decoration knowledge as possible in advance: Although you can pick up this knowledge in the subsequent decoration process, it is better to learn more beforehand. This will make you much more calm when facing problems.
6、Know your strengths: Before decoration, you must be clear about what you are good at and what you are not. If you are good at design, do the design yourself; if you are skilled at bargaining, go buy building materials on your own; if you have strong hands-on ability, you can even do the decoration and repairs yourself... During the decoration process, you should focus on what you are good at, and leave what you are not good at to others.
 MODIVO LIGHT
This is our first time decorating a house. Starting from knowing nothing at all to now having the hard decoration completed, we have experienced every emotion along the way—anxiety, doubt, tiredness, hesitation, joy, satisfaction, and touch. We learned and explored on our own, and bit by bit, we finished decorating our home. We’ve accumulated so much experience in this process, and now we want to share it, hoping it can be of a little help to all of you who are doing your own home decoration.
Preparations in Advance
1、Clarify your own ideas: Whether you are looking online, talking to designers, or copying ideas from friends' homes, you should have a clear vision of what your home should look like before designing—such as the style, color scheme, and elements to be used... It is crucial to avoid wanting to install everything that looks good in others' homes in your own. This way, you can clearly put forward your requirements during the design and decoration process, and also avoid frequent revisions to the plan, which may lead to unnecessary rework.
2、Understand your own needs: You need to first figure out the needs of your family, such as how many people live in the house permanently, how many rooms are needed, everyone's living habits, and daily preferences... A home is always for living in, so functionality is always the most important. It is best to list these needs and give priority to meeting them during the design and decoration. This way, you won't find out after decoration that many necessary things are missing, while a bunch of installed things are useless.
3、Determine your budget: There are ways to decorate with more money, and also ways to do it with less. No matter how much money you have, the decorated house can be both beautiful and practical. Therefore, it is essential to decide exactly how much you want to spend on decoration. In every link, such as designing the plan, making a budget table, selecting materials, and construction, you should act in accordance with your own budget.
4、Understand the advantages and disadvantages of your house: There is no perfect house in the world, and every house has its pros and cons. Your design plan should avoid its shortcomings and amplify its advantages. I once wrote an article about the drawbacks of my house ("My house is not perfect, but I still want to find ways to save it"), so we figured out solutions to these problems during the decoration.
5、Learn as much decoration knowledge as possible in advance: Although you can pick up this knowledge in the subsequent decoration process, it is better to learn more beforehand. This will make you much more calm when facing problems.
6、Know your strengths: Before decoration, you must be clear about what you are good at and what you are not. If you are good at design, do the design yourself; if you are skilled at bargaining, go buy building materials on your own; if you have strong hands-on ability, you can even do the decoration and repairs yourself... During the decoration process, you should focus on what you are good at, and leave what you are not good at to others.


 Artscape Garden Associates Ltd
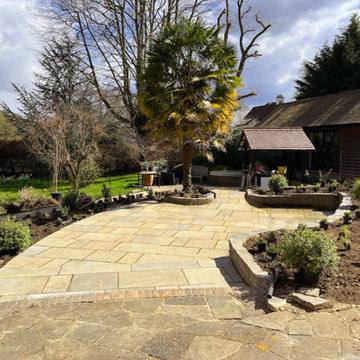
This paving and planting scheme features new hard landscaping elements and a new planting scheme. Artscape was initially briefed to extend and enhance the patio in the garden of a lovely home in the village of Cookham Dean in Berkshire. Our clients wanted to increase the size of the paved area so they could use it more frequently for relaxing and dining in the sun during the day. As well as increasing its size and practicality, they wanted the terrace to look and feel more inviting. The existing site was a mixture of brick paving, which was slippery underfoot, and tired concrete crazy paving. The patio also had stone retaining walls surrounded by sloped lawns and a few poorly maintained and mismatched shrubs.
Redesigned and repaved area
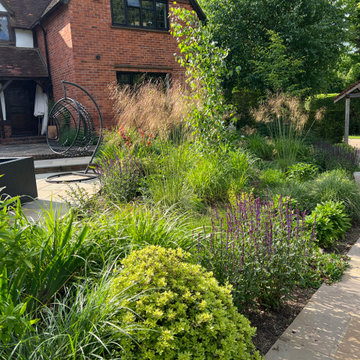
We first created a new, larger layout with a series of wider steps closer to the house, making a more inviting and welcoming area. Our landscapers paved the area with coursed sandstone, renowned for its incredible strength and durability. The earthy tones and unique texture of the sandstone gives it a natural timeless look which blends sympathetically with the garden setting. The worn finish of the paving also makes the surface safer to walk on. The edge of the paving curves in line from the end of the house to visually link the areas.
Bullnosed edges enhance looks and safety
Bullnosing provides the garden step edges with a smooth, luxury appearance, which also enhance safety. Safety is an important factor to consider when renovating or building new steps and paved areas. Smooth, rounded bullnosed steps or edges means there won’t be any harshly cut, sharp edges to injure someone should they trip or fall. Our Artscape paving experts can advise on the best bespoke, professionally profiled bullnose edges to suit the needs of your garden project.
Replacing sloped lawns with plants
Our initial brief was to create a new planted border just around the paved area. However, after various discussions and designs, our clients decided to follow our recommendation to expand the planting, so it included the whole sloping bank. The planting design also included the addition of small trees to create vertical interest.
New nature-friendly planting
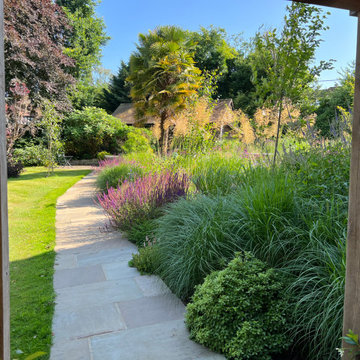
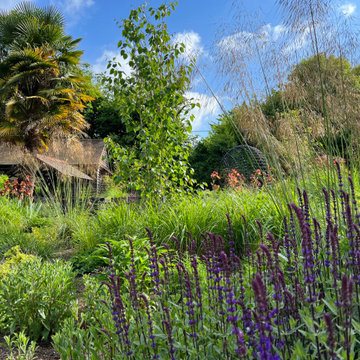
The planting features an easy-to-maintain mix of perennials, grasses, and shrubs. This adds softness to the seating area and brings an everchanging display of flowers, foliage, textures and colours to the garden. The plants will attract more birds and butterflies to the garden, and will be beneficial for insects too.
The lawn was doing very little to support a diversity of insects and birds. Replacing even a small section of lawn with perennial flowers, shrubs, grasses, wildflowers, or groundcovers will benefit nature and wildlife. As well as supporting greater biodiversity, plants are more environmentally friendly than maintaining a lawn. Lawns are drought tolerant and will recover even if the grass has turned brown and patchy in a heatwave. But to keep the lawn looking lush, green, and beautiful in a hot, dry spell will require constant and wasteful watering.
The planting is informal and includes grasses, taking inspiration from the fields opposite. Ornamental grasses soften the scheme and bring movement to the garden as they shimmer in the slightest of breezes. Grasses are easy to grow and require little ongoing care. The main maintenance task is to cut the planting back in spring ready for the new growth to come through.
To keep the whole project within our client’s budget, we retained the existing walls, simply carrying out some small repairs and modifications where necessary. We were also able to add stunning new atmospheric lighting to the older existing lighting circuit to illuminate the area at night.
 Artscape Garden Associates Ltd
This paving and planting scheme features new hard landscaping elements and a new planting scheme. Artscape was initially briefed to extend and enhance the patio in the garden of a lovely home in the village of Cookham Dean in Berkshire. Our clients wanted to increase the size of the paved area so they could use it more frequently for relaxing and dining in the sun during the day. As well as increasing its size and practicality, they wanted the terrace to look and feel more inviting. The existing site was a mixture of brick paving, which was slippery underfoot, and tired concrete crazy paving. The patio also had stone retaining walls surrounded by sloped lawns and a few poorly maintained and mismatched shrubs.
Redesigned and repaved area
We first created a new, larger layout with a series of wider steps closer to the house, making a more inviting and welcoming area. Our landscapers paved the area with coursed sandstone, renowned for its incredible strength and durability. The earthy tones and unique texture of the sandstone gives it a natural timeless look which blends sympathetically with the garden setting. The worn finish of the paving also makes the surface safer to walk on. The edge of the paving curves in line from the end of the house to visually link the areas.
Bullnosed edges enhance looks and safety
Bullnosing provides the garden step edges with a smooth, luxury appearance, which also enhance safety. Safety is an important factor to consider when renovating or building new steps and paved areas. Smooth, rounded bullnosed steps or edges means there won’t be any harshly cut, sharp edges to injure someone should they trip or fall. Our Artscape paving experts can advise on the best bespoke, professionally profiled bullnose edges to suit the needs of your garden project.
Replacing sloped lawns with plants
Our initial brief was to create a new planted border just around the paved area. However, after various discussions and designs, our clients decided to follow our recommendation to expand the planting, so it included the whole sloping bank. The planting design also included the addition of small trees to create vertical interest.
New nature-friendly planting
The planting features an easy-to-maintain mix of perennials, grasses, and shrubs. This adds softness to the seating area and brings an everchanging display of flowers, foliage, textures and colours to the garden. The plants will attract more birds and butterflies to the garden, and will be beneficial for insects too.
The lawn was doing very little to support a diversity of insects and birds. Replacing even a small section of lawn with perennial flowers, shrubs, grasses, wildflowers, or groundcovers will benefit nature and wildlife. As well as supporting greater biodiversity, plants are more environmentally friendly than maintaining a lawn. Lawns are drought tolerant and will recover even if the grass has turned brown and patchy in a heatwave. But to keep the lawn looking lush, green, and beautiful in a hot, dry spell will require constant and wasteful watering.
The planting is informal and includes grasses, taking inspiration from the fields opposite. Ornamental grasses soften the scheme and bring movement to the garden as they shimmer in the slightest of breezes. Grasses are easy to grow and require little ongoing care. The main maintenance task is to cut the planting back in spring ready for the new growth to come through.
To keep the whole project within our client’s budget, we retained the existing walls, simply carrying out some small repairs and modifications where necessary. We were also able to add stunning new atmospheric lighting to the older existing lighting circuit to illuminate the area at night.

 Highland Builders LLC
Powder room with glam geometric wallpaper complimented with a vessel sink rustic vanity with riveted hardware. Counter top is quartz Viatera - Truffle. Mirror framed wall mirror.
Ryan Hainey
 Artscape Garden Associates Ltd
This paving and planting scheme features new hard landscaping elements and a new planting scheme. Artscape was initially briefed to extend and enhance the patio in the garden of a lovely home in the village of Cookham Dean in Berkshire. Our clients wanted to increase the size of the paved area so they could use it more frequently for relaxing and dining in the sun during the day. As well as increasing its size and practicality, they wanted the terrace to look and feel more inviting. The existing site was a mixture of brick paving, which was slippery underfoot, and tired concrete crazy paving. The patio also had stone retaining walls surrounded by sloped lawns and a few poorly maintained and mismatched shrubs.
Redesigned and repaved area
We first created a new, larger layout with a series of wider steps closer to the house, making a more inviting and welcoming area. Our landscapers paved the area with coursed sandstone, renowned for its incredible strength and durability. The earthy tones and unique texture of the sandstone gives it a natural timeless look which blends sympathetically with the garden setting. The worn finish of the paving also makes the surface safer to walk on. The edge of the paving curves in line from the end of the house to visually link the areas.
Bullnosed edges enhance looks and safety
Bullnosing provides the garden step edges with a smooth, luxury appearance, which also enhance safety. Safety is an important factor to consider when renovating or building new steps and paved areas. Smooth, rounded bullnosed steps or edges means there won’t be any harshly cut, sharp edges to injure someone should they trip or fall. Our Artscape paving experts can advise on the best bespoke, professionally profiled bullnose edges to suit the needs of your garden project.
Replacing sloped lawns with plants
Our initial brief was to create a new planted border just around the paved area. However, after various discussions and designs, our clients decided to follow our recommendation to expand the planting, so it included the whole sloping bank. The planting design also included the addition of small trees to create vertical interest.
New nature-friendly planting
The planting features an easy-to-maintain mix of perennials, grasses, and shrubs. This adds softness to the seating area and brings an everchanging display of flowers, foliage, textures and colours to the garden. The plants will attract more birds and butterflies to the garden, and will be beneficial for insects too.
The lawn was doing very little to support a diversity of insects and birds. Replacing even a small section of lawn with perennial flowers, shrubs, grasses, wildflowers, or groundcovers will benefit nature and wildlife. As well as supporting greater biodiversity, plants are more environmentally friendly than maintaining a lawn. Lawns are drought tolerant and will recover even if the grass has turned brown and patchy in a heatwave. But to keep the lawn looking lush, green, and beautiful in a hot, dry spell will require constant and wasteful watering.
The planting is informal and includes grasses, taking inspiration from the fields opposite. Ornamental grasses soften the scheme and bring movement to the garden as they shimmer in the slightest of breezes. Grasses are easy to grow and require little ongoing care. The main maintenance task is to cut the planting back in spring ready for the new growth to come through.
To keep the whole project within our client’s budget, we retained the existing walls, simply carrying out some small repairs and modifications where necessary. We were also able to add stunning new atmospheric lighting to the older existing lighting circuit to illuminate the area at night.
 Artscape Garden Associates Ltd
This paving and planting scheme features new hard landscaping elements and a new planting scheme. Artscape was initially briefed to extend and enhance the patio in the garden of a lovely home in the village of Cookham Dean in Berkshire. Our clients wanted to increase the size of the paved area so they could use it more frequently for relaxing and dining in the sun during the day. As well as increasing its size and practicality, they wanted the terrace to look and feel more inviting. The existing site was a mixture of brick paving, which was slippery underfoot, and tired concrete crazy paving. The patio also had stone retaining walls surrounded by sloped lawns and a few poorly maintained and mismatched shrubs.
Redesigned and repaved area
We first created a new, larger layout with a series of wider steps closer to the house, making a more inviting and welcoming area. Our landscapers paved the area with coursed sandstone, renowned for its incredible strength and durability. The earthy tones and unique texture of the sandstone gives it a natural timeless look which blends sympathetically with the garden setting. The worn finish of the paving also makes the surface safer to walk on. The edge of the paving curves in line from the end of the house to visually link the areas.
Bullnosed edges enhance looks and safety
Bullnosing provides the garden step edges with a smooth, luxury appearance, which also enhance safety. Safety is an important factor to consider when renovating or building new steps and paved areas. Smooth, rounded bullnosed steps or edges means there won’t be any harshly cut, sharp edges to injure someone should they trip or fall. Our Artscape paving experts can advise on the best bespoke, professionally profiled bullnose edges to suit the needs of your garden project.
Replacing sloped lawns with plants
Our initial brief was to create a new planted border just around the paved area. However, after various discussions and designs, our clients decided to follow our recommendation to expand the planting, so it included the whole sloping bank. The planting design also included the addition of small trees to create vertical interest.
New nature-friendly planting
The planting features an easy-to-maintain mix of perennials, grasses, and shrubs. This adds softness to the seating area and brings an everchanging display of flowers, foliage, textures and colours to the garden. The plants will attract more birds and butterflies to the garden, and will be beneficial for insects too.
The lawn was doing very little to support a diversity of insects and birds. Replacing even a small section of lawn with perennial flowers, shrubs, grasses, wildflowers, or groundcovers will benefit nature and wildlife. As well as supporting greater biodiversity, plants are more environmentally friendly than maintaining a lawn. Lawns are drought tolerant and will recover even if the grass has turned brown and patchy in a heatwave. But to keep the lawn looking lush, green, and beautiful in a hot, dry spell will require constant and wasteful watering.
The planting is informal and includes grasses, taking inspiration from the fields opposite. Ornamental grasses soften the scheme and bring movement to the garden as they shimmer in the slightest of breezes. Grasses are easy to grow and require little ongoing care. The main maintenance task is to cut the planting back in spring ready for the new growth to come through.
To keep the whole project within our client’s budget, we retained the existing walls, simply carrying out some small repairs and modifications where necessary. We were also able to add stunning new atmospheric lighting to the older existing lighting circuit to illuminate the area at night.
3