
Search results for "Involves sanding" in Home Design Ideas
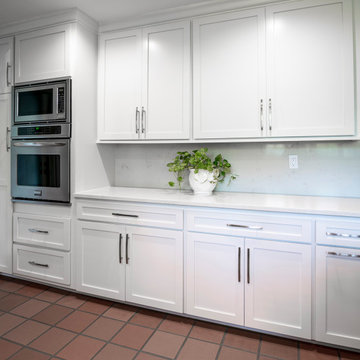
 Cabinet Cures of The Triangle
At Cabinet Cures of the Triangle, come to your home and remove all the doors, drawer fronts, molding, and hardware. We provide brand new solid wood doors and drawer fronts that we professionally finish at our shop. Style and color/stain are the client's preferences.
The new doors all come standard with new, hidden soft close hinges.
We also finish 1/4” wood, and all molding in the same color as your doors and drawers, so everything matches exactly.
At your home, we reface all exterior boxes with the finished 1/4” wood, replace all crown molding, light rail molding, and base (shoe) molding, and install the new doors, drawer fronts, and hardware.
To ensure the most professional finish, our finishing process for every item (doors, drawer fronts, molding, finish wood, etc.) involves multiple layers of stain/primer/top coat/finish and includes sanding before every coat.
In Addition to the standard refacing process, we did:
- Addition pull out for the trash bin.
- The refrigerator cabinet was extended from 12” to 24” depth, to cover and surround the fridge.
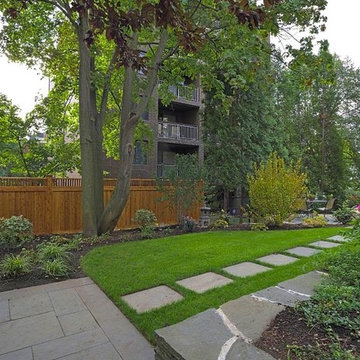
 Redmond Design Group Inc.
This project involved the design and install of a kid friendly, dog friendly living space complete with a natural sand box and edible garden.
We created a series of different outdoor rooms complete with a formal bluestone patio, a reclaimed brick patio and a natural flagging patio.
Fieldstone wall work throughout was crafted by our in staff masons.
The planting and low voltage lighting added the special touches at the end.
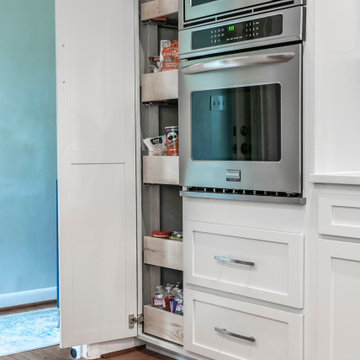 Cabinet Cures of The Triangle
At Cabinet Cures of the Triangle, come to your home and remove all the doors, drawer fronts, molding, and hardware. We provide brand new solid wood doors and drawer fronts that we professionally finish at our shop. Style and color/stain are the client's preferences.
The new doors all come standard with new, hidden soft close hinges.
We also finish 1/4” wood, and all molding in the same color as your doors and drawers, so everything matches exactly.
At your home, we reface all exterior boxes with the finished 1/4” wood, replace all crown molding, light rail molding, and base (shoe) molding, and install the new doors, drawer fronts, and hardware.
To ensure the most professional finish, our finishing process for every item (doors, drawer fronts, molding, finish wood, etc.) involves multiple layers of stain/primer/top coat/finish and includes sanding before every coat.
In Addition to the standard refacing process, we did:
- Addition pull out for the trash bin.
- The refrigerator cabinet was extended from 12” to 24” depth, to cover and surround the fridge.
Find the right local pro for your project
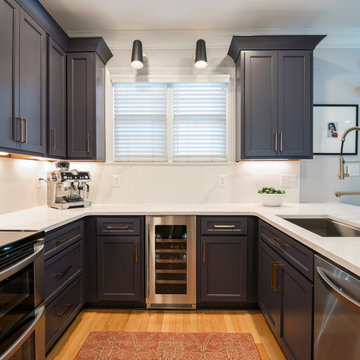 Cabinet Cures of The Triangle
At Cabinet Cures of the Triangle, we come to your home and remove all the doors, drawer fronts, molding, and hardware. We provide brand new solid wood doors and drawer fronts that we professionally finish at our shop. Style and color/stain are our client's preference.
The new doors all come standard with new, hidden soft close hinges.
We also finish 1/4” wood, and all molding in the same color as your doors and drawers, so everything matches exactly.
At your home, we reface all exterior boxes with the finished 1/4” wood, replace all crown molding, light rail molding, and base (shoe) molding, and install the new doors, drawer fronts, and hardware.
To ensure the most professional finish, our finishing process for every item (doors, drawer fronts, molding, finish wood, etc.) involves multiple layers of stain/primer/top coat/finish and includes sanding before every coat.
This project Includes Standard Refacing and some modifications:
- We added a new larger crown, it gives a more modern look.
- New pull-out trash.
- Convert the cabinets next to the range to a 3-drawer base
- The space under the window was modified to put a wine fridge.
 Homeowner Services of Michigan LLC
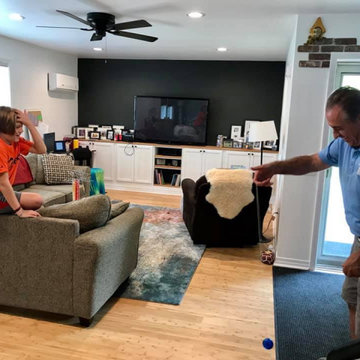
Homeowner Services of Michigan (HSM) is excited to share the details of a new 16' x 22' family room expansion in Ann Arbor, Michigan. This project reflects our dedication to meeting our clients' specific needs.
Our clients approached us needing more space for their growing family and wanted a seamless integration with their existing home. After thorough consultations, we developed a plan to bring their vision to life.
The project began with careful architectural planning. We worked with a local architect to create detailed plans and secured all necessary permits to ensure compliance with local building codes.
Site preparation involved demolishing an existing carport, grading, and excavation to prepare the building pad for the new foundation. This step was essential to ensure a stable base for the construction.
Our team then focused on structural framing, tying the new addition to the existing home. We ensured that the new structure matched the current architectural style for a seamless blend. The addition was then roofed and sheathed to provide a sturdy and weatherproof exterior.
Next, we addressed the electrical work, installing new circuits for lighting, HVAC, and receptacles, and adding smoke and carbon monoxide detectors to meet safety standards. A licensed journeyman electrician performed the electrical service to ensure high-quality and compliant installations.
Insulation and drywall installation followed. We installed batt insulation to meet or exceed Michigan Energy Code requirements. The interior surfaces were finished with drywall, taping, mudding, sanding, and priming to prepare for painting. Baseboard molding and trim around doors and windows added the finishing touches.
Exterior features were also important. We framed and installed new windows and a front entry door and added a front eyebrow vent feature to match the existing structure. Vinyl siding was installed to complete the exterior, ensuring a cohesive look and enhanced curb appeal.
Throughout the project, we maintained a clean and professional worksite, disposing of debris responsibly and minimizing disruption to the client's daily lives. Our focus was always on delivering quality and ensuring client satisfaction.
This home addition project highlights our commitment to understanding and fulfilling our clients' needs. We are proud to have added valuable space and enhanced the overall functionality and aesthetic of the home.
These folks had a vision, a budget, and a whole lot of patience. We got through this family room remodel during a global pandemic. What great people to work with!
 Tom Brzoskwinia
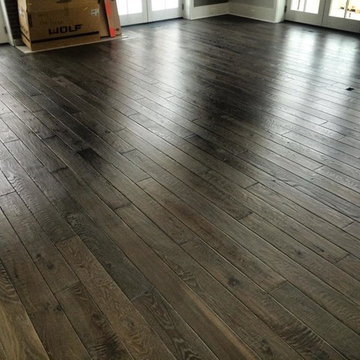
One of the most popular hardwood floor finishing which offers Tom & Peter Flooring is provided by WOCA. If you’ve decided that you want a natural looking wooden floor that is lacquer-free, then the likelihood is that you’ve chosen oil as your way of protecting your wood and making your floor look great at the same time. WOCA for wood flooring comes in various forms and is a great way of making sure that your wood is protected, but at the same time looks natural. A highly popular as well as effective way of treating wood floors, oils effectively penetrate into the wood and in some cases harden into the surface of the floor to stop damage and to maintain the wood in its optimum condition.
WOCA Oil finish hardwood flooring has taken the United States market by in 2014 and shows no signs of slowing down in 2016 and now. Here are some of the most common questions we have regarding this type of finish which we will I’m to answer in today’s my blog:
Is oil finish as durable as traditional factory urethane finishes with aluminum oxide?
When it comes to durability, oil finish flooring tackles the issue with a completely different method. The penetrating oil serves as protection from moisture and wear while allowing the user to feel the wood grains in their bare feet. If compared directly to factory finished aluminum oxide finish, the oil finish flooring will not perform as well to abrasion and impact. However, the beauty of this finish is the fact that it will camouflage any scratches which will inevitably accumulate over time.
Will this finish evaporate over time and will this be harmful for indoor air quality?
Another concern for oil finished floors its effect on indoor air quality. For on-site applications, some varieties suggest several coats which typically require the residents to be out of the home due to mild odors. However, there are factory finished UV-cured or single coat applications which lessen the downtime. Despite the odors produced during the drying process, oil finish floors rank amongst the lowest for VOC (volatile organic compound) emissions. Certain brands even boast true zero VOC. This fact alone makes oil finished floors one of the best options for green building solutions.
“WOCA products are certified by independent laboratories, the German Institute for Biological Building Materials, and are in accordance with DIN–Norm 53–160. WOCA WoodCare Denmark products meet or exceed the most stringent U.S. standards for volatile organic compounds.” –WOCA Oil Finish Manufacture
Does this type of finish require additional maintenance which I am not familiar with?
For weekly cleaning, oiled floors use a special cleaner which contains an oil and soap mixture. After a period of 12-18 months some oil may evaporate causing the wood grains to appear dry. An additional layer of oil can be reapplied to keep the floor looking fresh. Although oil finished floors require more involvement in periodic maintenance in high traffic areas, this maintenance can be done much easier than the equivalent of an onsite sand and refinish.
WOCA Master Color Oil contains pigment, which provides a single-step hardwood floor staining process. Laying down the stain and the finish in one step.
This product comes 14 different colors, from Black to Extra White, and you can mix them freely to create various color palettes that will meet the demands of any job.
Below are some pictures of the finished job…

 Ollin Stone
Mystery, elegance: this could be a possible description for the Seta Liquorice collection which combines the tactile experience of silk with ceramic technology. Inspired by the softness of fabric and the light reflected in its folds, Laminam slab in Liquorice tone conveys aesthetic and visual continuity when used for flooring and claddings that involve the use of intense and unconventional shades.

Sponsored
Delaware, OH

Buckeye Basements, Inc.
Central Ohio's Basement Finishing ExpertsBest Of Houzz '13-'21
 Redmond Design Group Inc.
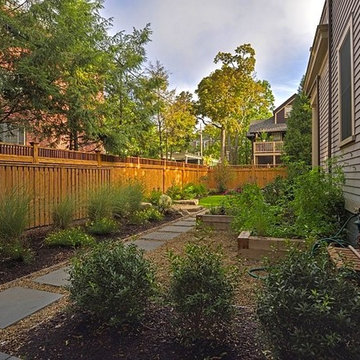
This project involved the design and install of a kid friendly, dog friendly living space complete with a natural sand box and edible garden.
We created a series of different outdoor rooms complete with a formal bluestone patio, a reclaimed brick patio and a natural flagging patio.
Fieldstone wall work throughout was crafted by our in staff masons.
The planting and low voltage lighting added the special touches at the end.
 Daniel Antes Marquetry
The flooring that was originally envisioned for this house wasn't Wood Floor of the Year-caliber. When Steve Brattin, president at SVB Wood Floors in Grandview, Mo., got involved in the project, the designers were discussing a simple machine-sanded heart pine or reclaimed wood floor. But once Brattin visited the site—an old world traditional estate set on acreage with its own private lake—he knew it deserved more than a typical floor. "I chatted with the designers and said I would love to meet with the homeowners and have them in our showroom," he recalls. "I said I would really like to do something artistic with it."
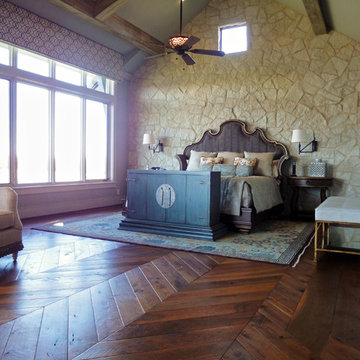
Brattin's mind was already envisioning the possibilities—something he says usually happens for him within a half hour of walking through a space. "I don't know how certain things come to me," he says, adding that often he draws things out and the designs don't end up being in the clients' budget. That wasn't the case here, however, and the final plans for the flooring called for five designs in various areas, including this Bordeaux parquet in the foyer.
With the designs finalized, Brattin turned to Distinctive Floors' (Nashville, Tenn.) Dan Antes to create the walnut flooring, which called for hand-beveling with a circle-sawn and wire-brushed surface; in some areas the flooring was 10-inch plank. The width presented a challenge for Antes, as he had planned to contract out the circle-sawing, but the company he had in mind could handle widths only up to 81⁄2 inches. He decided he would have to do it himself. "We spent maybe $1,500 modifying $20,000 worth of equipment to end up with this awesome distressed product," he says. Due to a tight time frame to complete the job, once the flooring was milled, it was shipped to WD Flooring (Laona, Wis.) to be finished with hardwax oil—a choice Antes says he loves for its maintainability.
The actual installation of all 3,000 square feet of flooring was uneventful, Brattin says, crediting his crew, experienced with high-end projects, for a great job. "They had a blast," he says. "They had so much fun out there on the project, and they do it quite frequently; it comes naturally for them at this point."
Given the complexity of this job, from scribing around stone to large-scale chevron and mixed media, that's high praise. Antes, himself a Wood Floor of the Year winner and supplier to many more winning projects, sums up the scope of this job: "I think he could have entered any room in this house, really, and won."—K.M.W.
 C.E. Pontz Sons
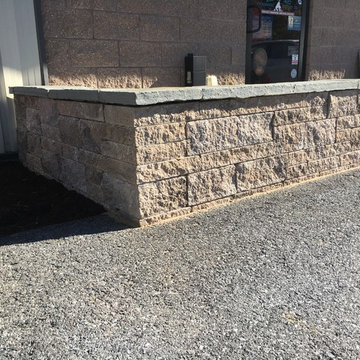
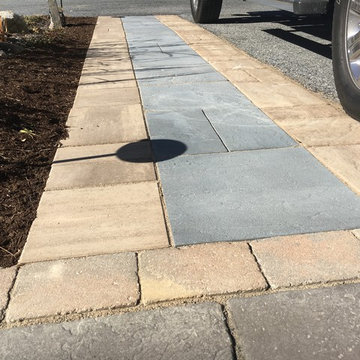
Parking lot pavers were installed throughout the display area at our creative center. A paver walkway was installed through the existing parking lot. The walkway connects our large outdoor living display area to the front entrance of our Creative Center. We saw cut and removed the desired section of asphalt in the parking lot. Once the asphalt was all removed we began to prep the stone and setting sand base for the concrete pavers. Techo Bloc pavers were used to create this walkway through the parking lot.
While the paver walkway was being installed, work was also being done on a small seating wall. The seating wall is located by the front entrance to the Creative Center. Again we had to saw cut and remove the existing asphalt and began to prep the base. The seating wall was installed using Techo Bloc wall block. Finishing off the wall, we used natural stone caps. The stone caps were blow torched to give a natural looking rough edge.
Also involved in this project was the removal of part on an existing paver walkway. A new walkway was installed also using Techo Bloc pavers in it’s place. The new walkway boarders one of our many pondless waterfalls on site, as well as the entrance to our creative center.
 Wood Floor Concepts
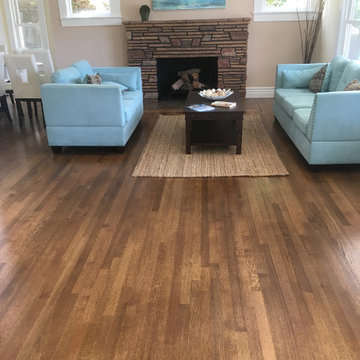
This project involved a hardwood floor repair and refinish in historic Mission Hills, San Diego. The floor is rift and quartered red oak, with a herringbone pattern, and a padauk feature strip border in the dining room. The floor is stained with Duraseal medium brown stain and finished with three coats of Basic Coatings satin water based finish.
The flooring was badly damaged from a second floor plumbing leak, and a fair amount of flooring was replaced with new rift and quartered red oak.
The results of the repair and refinish speak for themselves. We were able to save the majority of the floor, and the repairs blended seamlessly.
 Redmond Design Group Inc.
This project involved the design and install of a kid friendly, dog friendly living space complete with a natural sand box and edible garden.
We created a series of different outdoor rooms complete with a formal bluestone patio, a reclaimed brick patio and a natural flagging patio.
Fieldstone wall work throughout was crafted by our in staff masons.
The planting and low voltage lighting added the special touches at the end.
 Nautilus Architects
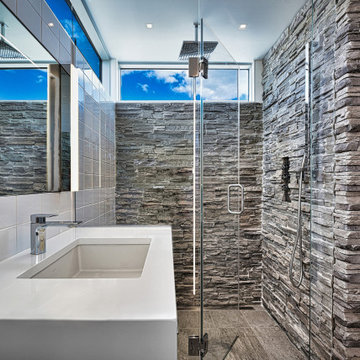
Waterfront design often involves specialized construction practices. Such was the case at this beachfront second home, which is elevated on concrete peers to sit above the floodplain, supported by helical stainless steel piles drilled through sand to reach bedrock, and moment-framed in steel to resist the later forces of hurricane winds. The building is actually two pieces linked by a stair and deck, with the rear portion serving as two stacked rental units and the front as the owner's summer getaway.
 Tom Brzoskwinia
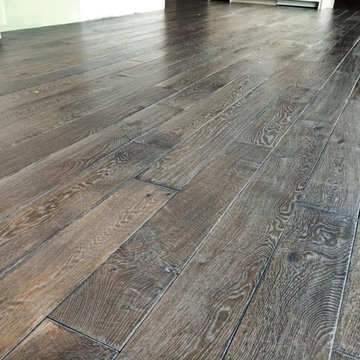
One of the most popular hardwood floor finishing which offers Tom & Peter Flooring is provided by WOCA. If you’ve decided that you want a natural looking wooden floor that is lacquer-free, then the likelihood is that you’ve chosen oil as your way of protecting your wood and making your floor look great at the same time. WOCA for wood flooring comes in various forms and is a great way of making sure that your wood is protected, but at the same time looks natural. A highly popular as well as effective way of treating wood floors, oils effectively penetrate into the wood and in some cases harden into the surface of the floor to stop damage and to maintain the wood in its optimum condition.
WOCA Oil finish hardwood flooring has taken the United States market by in 2014 and shows no signs of slowing down in 2016 and now. Here are some of the most common questions we have regarding this type of finish which we will I’m to answer in today’s my blog:
Is oil finish as durable as traditional factory urethane finishes with aluminum oxide?
When it comes to durability, oil finish flooring tackles the issue with a completely different method. The penetrating oil serves as protection from moisture and wear while allowing the user to feel the wood grains in their bare feet. If compared directly to factory finished aluminum oxide finish, the oil finish flooring will not perform as well to abrasion and impact. However, the beauty of this finish is the fact that it will camouflage any scratches which will inevitably accumulate over time.
Will this finish evaporate over time and will this be harmful for indoor air quality?
Another concern for oil finished floors its effect on indoor air quality. For on-site applications, some varieties suggest several coats which typically require the residents to be out of the home due to mild odors. However, there are factory finished UV-cured or single coat applications which lessen the downtime. Despite the odors produced during the drying process, oil finish floors rank amongst the lowest for VOC (volatile organic compound) emissions. Certain brands even boast true zero VOC. This fact alone makes oil finished floors one of the best options for green building solutions.
“WOCA products are certified by independent laboratories, the German Institute for Biological Building Materials, and are in accordance with DIN–Norm 53–160. WOCA WoodCare Denmark products meet or exceed the most stringent U.S. standards for volatile organic compounds.” –WOCA Oil Finish Manufacture
Does this type of finish require additional maintenance which I am not familiar with?
For weekly cleaning, oiled floors use a special cleaner which contains an oil and soap mixture. After a period of 12-18 months some oil may evaporate causing the wood grains to appear dry. An additional layer of oil can be reapplied to keep the floor looking fresh. Although oil finished floors require more involvement in periodic maintenance in high traffic areas, this maintenance can be done much easier than the equivalent of an onsite sand and refinish.
WOCA Master Color Oil contains pigment, which provides a single-step hardwood floor staining process. Laying down the stain and the finish in one step.
This product comes 14 different colors, from Black to Extra White, and you can mix them freely to create various color palettes that will meet the demands of any job.
Below are some pictures of the finished job…
 Riverside Construction, LLC
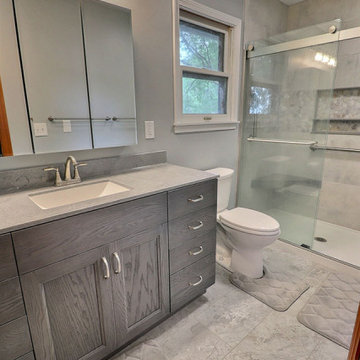
The collaborative team at Riverside designed a solution that involved removing the wall that divided the shower and toilet area, which immediately made the bathroom feel more open and spacious. The dark cave-like shower was transformed with a frameless Kohler wide sliding door and large gray matte porcelain tile. Special touches include a shower niche finished with a Sand River Pebble mosaic tile and a custom shower bench.
 Tom Brzoskwinia
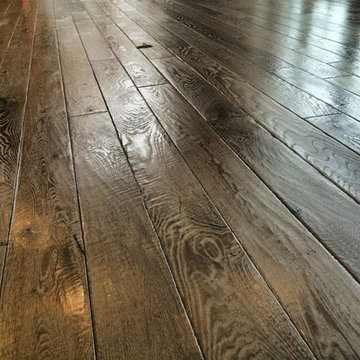
One of the most popular hardwood floor finishing which offers Tom & Peter Flooring is provided by WOCA. If you’ve decided that you want a natural looking wooden floor that is lacquer-free, then the likelihood is that you’ve chosen oil as your way of protecting your wood and making your floor look great at the same time. WOCA for wood flooring comes in various forms and is a great way of making sure that your wood is protected, but at the same time looks natural. A highly popular as well as effective way of treating wood floors, oils effectively penetrate into the wood and in some cases harden into the surface of the floor to stop damage and to maintain the wood in its optimum condition.
WOCA Oil finish hardwood flooring has taken the United States market by in 2014 and shows no signs of slowing down in 2016 and now. Here are some of the most common questions we have regarding this type of finish which we will I’m to answer in today’s my blog:
Is oil finish as durable as traditional factory urethane finishes with aluminum oxide?
When it comes to durability, oil finish flooring tackles the issue with a completely different method. The penetrating oil serves as protection from moisture and wear while allowing the user to feel the wood grains in their bare feet. If compared directly to factory finished aluminum oxide finish, the oil finish flooring will not perform as well to abrasion and impact. However, the beauty of this finish is the fact that it will camouflage any scratches which will inevitably accumulate over time.
Will this finish evaporate over time and will this be harmful for indoor air quality?
Another concern for oil finished floors its effect on indoor air quality. For on-site applications, some varieties suggest several coats which typically require the residents to be out of the home due to mild odors. However, there are factory finished UV-cured or single coat applications which lessen the downtime. Despite the odors produced during the drying process, oil finish floors rank amongst the lowest for VOC (volatile organic compound) emissions. Certain brands even boast true zero VOC. This fact alone makes oil finished floors one of the best options for green building solutions.
“WOCA products are certified by independent laboratories, the German Institute for Biological Building Materials, and are in accordance with DIN–Norm 53–160. WOCA WoodCare Denmark products meet or exceed the most stringent U.S. standards for volatile organic compounds.” –WOCA Oil Finish Manufacture
Does this type of finish require additional maintenance which I am not familiar with?
For weekly cleaning, oiled floors use a special cleaner which contains an oil and soap mixture. After a period of 12-18 months some oil may evaporate causing the wood grains to appear dry. An additional layer of oil can be reapplied to keep the floor looking fresh. Although oil finished floors require more involvement in periodic maintenance in high traffic areas, this maintenance can be done much easier than the equivalent of an onsite sand and refinish.
WOCA Master Color Oil contains pigment, which provides a single-step hardwood floor staining process. Laying down the stain and the finish in one step.
This product comes 14 different colors, from Black to Extra White, and you can mix them freely to create various color palettes that will meet the demands of any job.
Below are some pictures of the finished job…
 Homeowner Services of Michigan LLC
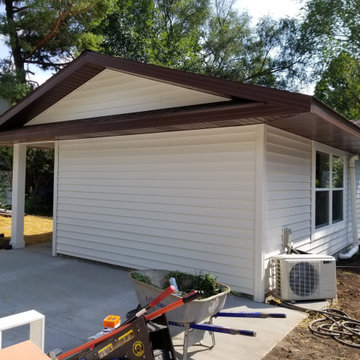
Homeowner Services of Michigan (HSM) is excited to share the details of a new 16' x 22' family room expansion in Ann Arbor, Michigan. This project reflects our dedication to meeting our clients' specific needs.
Our clients approached us needing more space for their growing family and wanted a seamless integration with their existing home. After thorough consultations, we developed a plan to bring their vision to life.
The project began with careful architectural planning. We worked with a local architect to create detailed plans and secured all necessary permits to ensure compliance with local building codes.
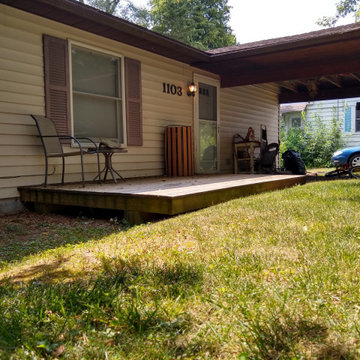
Site preparation involved demolishing an existing carport, grading, and excavation to prepare the building pad for the new foundation. This step was essential to ensure a stable base for the construction.
Our team then focused on structural framing, tying the new addition to the existing home. We ensured that the new structure matched the current architectural style for a seamless blend. The addition was then roofed and sheathed to provide a sturdy and weatherproof exterior.
Next, we addressed the electrical work, installing new circuits for lighting, HVAC, and receptacles, and adding smoke and carbon monoxide detectors to meet safety standards. A licensed journeyman electrician performed the electrical service to ensure high-quality and compliant installations.
Insulation and drywall installation followed. We installed batt insulation to meet or exceed Michigan Energy Code requirements. The interior surfaces were finished with drywall, taping, mudding, sanding, and priming to prepare for painting. Baseboard molding and trim around doors and windows added the finishing touches.
Exterior features were also important. We framed and installed new windows and a front entry door and added a front eyebrow vent feature to match the existing structure. Vinyl siding was installed to complete the exterior, ensuring a cohesive look and enhanced curb appeal.
Throughout the project, we maintained a clean and professional worksite, disposing of debris responsibly and minimizing disruption to the client's daily lives. Our focus was always on delivering quality and ensuring client satisfaction.
This home addition project highlights our commitment to understanding and fulfilling our clients' needs. We are proud to have added valuable space and enhanced the overall functionality and aesthetic of the home.
These folks had a vision, a budget, and a whole lot of patience. We got through this family room remodel during a global pandemic. What great people to work with!
 Homeowner Services of Michigan LLC
Homeowner Services of Michigan (HSM) is excited to share the details of a new 16' x 22' family room expansion in Ann Arbor, Michigan. This project reflects our dedication to meeting our clients' specific needs.
Our clients approached us needing more space for their growing family and wanted a seamless integration with their existing home. After thorough consultations, we developed a plan to bring their vision to life.
The project began with careful architectural planning. We worked with a local architect to create detailed plans and secured all necessary permits to ensure compliance with local building codes.
Site preparation involved demolishing an existing carport, grading, and excavation to prepare the building pad for the new foundation. This step was essential to ensure a stable base for the construction.
Our team then focused on structural framing, tying the new addition to the existing home. We ensured that the new structure matched the current architectural style for a seamless blend. The addition was then roofed and sheathed to provide a sturdy and weatherproof exterior.
Next, we addressed the electrical work, installing new circuits for lighting, HVAC, and receptacles, and adding smoke and carbon monoxide detectors to meet safety standards. A licensed journeyman electrician performed the electrical service to ensure high-quality and compliant installations.
Insulation and drywall installation followed. We installed batt insulation to meet or exceed Michigan Energy Code requirements. The interior surfaces were finished with drywall, taping, mudding, sanding, and priming to prepare for painting. Baseboard molding and trim around doors and windows added the finishing touches.
Exterior features were also important. We framed and installed new windows and a front entry door and added a front eyebrow vent feature to match the existing structure. Vinyl siding was installed to complete the exterior, ensuring a cohesive look and enhanced curb appeal.
Throughout the project, we maintained a clean and professional worksite, disposing of debris responsibly and minimizing disruption to the client's daily lives. Our focus was always on delivering quality and ensuring client satisfaction.
This home addition project highlights our commitment to understanding and fulfilling our clients' needs. We are proud to have added valuable space and enhanced the overall functionality and aesthetic of the home.
These folks had a vision, a budget, and a whole lot of patience. We got through this family room remodel during a global pandemic. What great people to work with!
 C.E. Pontz Sons
Parking lot pavers were installed throughout the display area at our creative center. A paver walkway was installed through the existing parking lot. The walkway connects our large outdoor living display area to the front entrance of our Creative Center. We saw cut and removed the desired section of asphalt in the parking lot. Once the asphalt was all removed we began to prep the stone and setting sand base for the concrete pavers. Techo Bloc pavers were used to create this walkway through the parking lot.
While the paver walkway was being installed, work was also being done on a small seating wall. The seating wall is located by the front entrance to the Creative Center. Again we had to saw cut and remove the existing asphalt and began to prep the base. The seating wall was installed using Techo Bloc wall block. Finishing off the wall, we used natural stone caps. The stone caps were blow torched to give a natural looking rough edge.
Also involved in this project was the removal of part on an existing paver walkway. A new walkway was installed also using Techo Bloc pavers in it’s place. The new walkway boarders one of our many pondless waterfalls on site, as well as the entrance to our creative center.
 Southern Dogface Properties, LLC
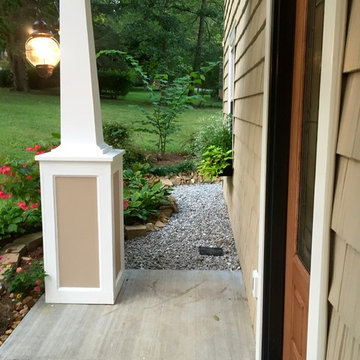
AFTER: Due to its two-story proportions, the porch has a presence that belies its 60-in-wide footprint.
A new drainage system, involving 15 tons of washed road gravel and over 300 feet of underground drain pipe, directs runoff away from the house. Surface gravel, edged with stone collected on site, does double-duty as both a French drain and a tidy walkway. / photo by Jo Kellum
10