
Search results for "Issues ahead" in Home Design Ideas
 Richmond Hill Design + Build
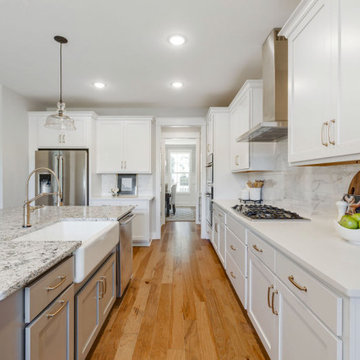
Richmond Hill Design + Build brings you this gorgeous American four-square home, crowned with a charming, black metal roof in Richmond’s historic Ginter Park neighborhood! Situated on a .46 acre lot, this craftsman-style home greets you with double, 8-lite front doors and a grand, wrap-around front porch. Upon entering the foyer, you’ll see the lovely dining room on the left, with crisp, white wainscoting and spacious sitting room/study with French doors to the right. Straight ahead is the large family room with a gas fireplace and flanking 48” tall built-in shelving. A panel of expansive 12’ sliding glass doors leads out to the 20’ x 14’ covered porch, creating an indoor/outdoor living and entertaining space. An amazing kitchen is to the left, featuring a 7’ island with farmhouse sink, stylish gold-toned, articulating faucet, two-toned cabinetry, soft close doors/drawers, quart countertops and premium Electrolux appliances. Incredibly useful butler’s pantry, between the kitchen and dining room, sports glass-front, upper cabinetry and a 46-bottle wine cooler. With 4 bedrooms, 3-1/2 baths and 5 walk-in closets, space will not be an issue. The owner’s suite has a freestanding, soaking tub, large frameless shower, water closet and 2 walk-in closets, as well a nice view of the backyard. Laundry room, with cabinetry and counter space, is conveniently located off of the classic central hall upstairs. Three additional bedrooms, all with walk-in closets, round out the second floor, with one bedroom having attached full bath and the other two bedrooms sharing a Jack and Jill bath. Lovely hickory wood floors, upgraded Craftsman trim package and custom details throughout!
 Terri Becker Designs
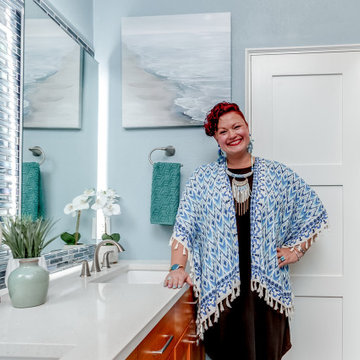
The soothing coastal vibes of this bathroom remodel are sure to take you to a place of calm. What a transformation this project underwent! Not only did we transform this bathroom into a spa-like sanctuary, but we also did it ahead of schedule. That's a rare occurrence in the construction and design industry.
We removed the tub and extended out the wall for the shower, which the homeowners chose to expand. This created a walk-in space, made to look even bigger by its frameless glass and large format, linen-look porcelain tile on the walls. For the shower floor, we selected a blue multicolored penny tile, and for the accent band, an opulent glass mosaic tile in dreamy ocean tones. The accent tile also graces the back of a new wall niche. This shower is now beautiful and functional.
To address the issues of storage, we removed a wall, freeing up space near the toilet, which was much-needed. Now there is a custom-built linen pantry crafted from alder wood stretching to the ceiling, adding to the visual height of the room and making the bathroom just work better.
A new vanity, also made of alder wood, and the linen closet were both stained a rich, warm tone to show off that gorgeous grain. For the walls, we chose a cool blue hue that is soothing and fresh.
The accent tile from the shower was carried behind the vanity's two LED mirrors for a bold visual impact. I love the reflection of the light on the tile! The LED mirrors are pretty high-tech, with a defogger and a dimmer to adjust the light levels.
Topping the vanity is a creamy quartz countertop, two under-mount sinks, and plumbing and cabinetry hardware in brushed nickel finishes. The cabinet knobs have a stunning iridescent shell that's hard to miss.
For the floors, we went with a large-format porcelain tile in dark grey that complements the coloring of the space as well as the look and feel.
As a final touch, floating shelves in the same rich wood-tone create additional space for décor items and storage. I styled the shelves with items to inspire and soothe this dreamy bathroom.
 Richmond Hill Design + Build
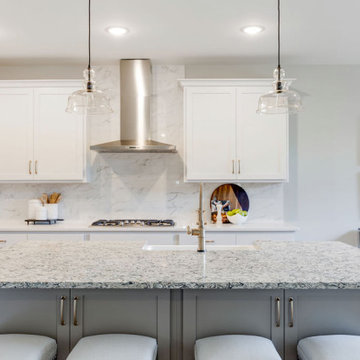
Richmond Hill Design + Build brings you this gorgeous American four-square home, crowned with a charming, black metal roof in Richmond’s historic Ginter Park neighborhood! Situated on a .46 acre lot, this craftsman-style home greets you with double, 8-lite front doors and a grand, wrap-around front porch. Upon entering the foyer, you’ll see the lovely dining room on the left, with crisp, white wainscoting and spacious sitting room/study with French doors to the right. Straight ahead is the large family room with a gas fireplace and flanking 48” tall built-in shelving. A panel of expansive 12’ sliding glass doors leads out to the 20’ x 14’ covered porch, creating an indoor/outdoor living and entertaining space. An amazing kitchen is to the left, featuring a 7’ island with farmhouse sink, stylish gold-toned, articulating faucet, two-toned cabinetry, soft close doors/drawers, quart countertops and premium Electrolux appliances. Incredibly useful butler’s pantry, between the kitchen and dining room, sports glass-front, upper cabinetry and a 46-bottle wine cooler. With 4 bedrooms, 3-1/2 baths and 5 walk-in closets, space will not be an issue. The owner’s suite has a freestanding, soaking tub, large frameless shower, water closet and 2 walk-in closets, as well a nice view of the backyard. Laundry room, with cabinetry and counter space, is conveniently located off of the classic central hall upstairs. Three additional bedrooms, all with walk-in closets, round out the second floor, with one bedroom having attached full bath and the other two bedrooms sharing a Jack and Jill bath. Lovely hickory wood floors, upgraded Craftsman trim package and custom details throughout!
Find the right local pro for your project
 Richmond Hill Design + Build
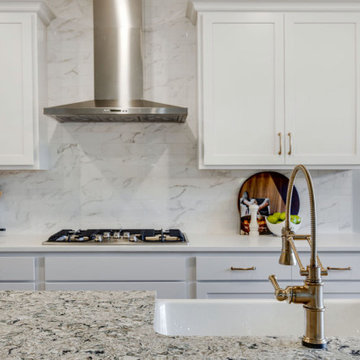
Richmond Hill Design + Build brings you this gorgeous American four-square home, crowned with a charming, black metal roof in Richmond’s historic Ginter Park neighborhood! Situated on a .46 acre lot, this craftsman-style home greets you with double, 8-lite front doors and a grand, wrap-around front porch. Upon entering the foyer, you’ll see the lovely dining room on the left, with crisp, white wainscoting and spacious sitting room/study with French doors to the right. Straight ahead is the large family room with a gas fireplace and flanking 48” tall built-in shelving. A panel of expansive 12’ sliding glass doors leads out to the 20’ x 14’ covered porch, creating an indoor/outdoor living and entertaining space. An amazing kitchen is to the left, featuring a 7’ island with farmhouse sink, stylish gold-toned, articulating faucet, two-toned cabinetry, soft close doors/drawers, quart countertops and premium Electrolux appliances. Incredibly useful butler’s pantry, between the kitchen and dining room, sports glass-front, upper cabinetry and a 46-bottle wine cooler. With 4 bedrooms, 3-1/2 baths and 5 walk-in closets, space will not be an issue. The owner’s suite has a freestanding, soaking tub, large frameless shower, water closet and 2 walk-in closets, as well a nice view of the backyard. Laundry room, with cabinetry and counter space, is conveniently located off of the classic central hall upstairs. Three additional bedrooms, all with walk-in closets, round out the second floor, with one bedroom having attached full bath and the other two bedrooms sharing a Jack and Jill bath. Lovely hickory wood floors, upgraded Craftsman trim package and custom details throughout!

 Total System Service
As a manager of a building or property, you quickly learn the art of mediation. One minute you may be working with a vendor to keep the building’s operating system running efficient and smooth; the next moment you may be calming a tenant down after finding the change in the system disrupted his office’s workflow. Give and take; it’s the only way to make sure every day runs perfectly.
Overall, you have two goals to strive for in everything you do.
1. Keep the building running properly, upgrading systems as appropriate, and striving to do all you can on a pre-established budget.
2. Keep the building occupants happy, with as little disruption as possible.
While some changes are minor, barely registering on a building occupant’s mind, with HVAC challenges, that’s rarely the case. If a HVAC contractor is replacing an air handler, for instance, and disconnects one and moves to the next unit, it may cause major disruptions to sensitive areas of a building. And if the occupant wasn’t prepared for the disruption, you can have a mighty unhappy customer on your hand.
Anytime you are working on HVAC projects throughout your building, there are strategies you can put into place to keep things running smooth.
Communicate with occupants
Communication is key to any good relationship, and as a property manager, this rule is a great place to start. If you will be working with the HVAC equipment, block out the timeframe for work to be done, and understand the potential consequences of the process. Then communicate this process with every point of contact you have throughout the building. The more detail you can provide, the less surprises you’ll have throughout the process. You can also work with your building’s occupants before the process begins, finding out if there are better timeframes than others.
Establish a realistic schedule
As a property manager, its easy to provide your expectations for the HVAC project at hand, and request that the proposal be written in such a way that work is completed on your timeframe. Unfortunately, many contractors want your business and will agree to anything upfront in order to win the bid, knowing full well the work will take longer than specified. Instead of projecting your timeframes into the proposal process, ask for HVAC project bids to establish realistic schedules of how long the process will take, and what areas of your property will be most effected throughout the schedule. This will help you avoid crises between you and the contractor, and you and your tenants.
Plan for the whole system
If one small piece of your HVAC system is weak, its easy to fix that one small piece. But how will that impact your overall system? Will it cause weak spots in different parts of the building – maybe a corner office will have reduced air flow, and therefore be colder in the winter and warmer in the summer? When retrofitting new pieces with older existing systems, its easy to reduce the efficiency of your entire system. Before agreeing to certain repairs, make sure you understand how it will impact your entire system overall. An easy way of handling this problem is by working with the same HVAC contractor again and again, He will understand your system’s potential, and know when to make repairs, and when to replace.
Have points of contact available for immediate assistance
In many cases, problems arise because connections can’t be made. Can the HVAC contractor get a hold or you or another person that can make decisions at a moments notice if a problem arises? Do you have access to decision makers throughout the building that may be impacted by this change? Many projects have been put on hold simply because a person in authority can’t be found to give the go-ahead to move forward. If you have access to these people during the time of the project, you’ll be able to complete the project in record time.
Test
Finally, if you can test things in stages, or test when the potential for problems is the smallest, you reduce the chances of bigger emergency issues falling into your lap. If you’ll be installing a new terminal unit, can you make the switch on a Saturday morning when the building is largely unoccupied? If you’re replacing a large system, can you replace and test in phases so the entire project isn’t released at once?
Most issues can be avoided with just a little strategy from the beginning. If you’ve never had a HVAC maintenance team to help you stay on track with your building’s heating and cooling, now may be the time to find out how easy a team approach makes the process.
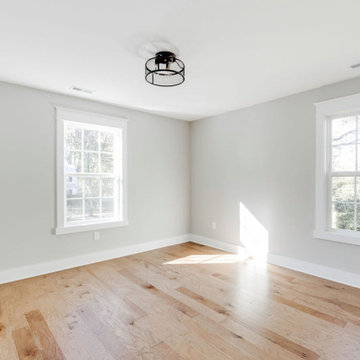 Richmond Hill Design + Build
Richmond Hill Design + Build brings you this gorgeous American four-square home, crowned with a charming, black metal roof in Richmond’s historic Ginter Park neighborhood! Situated on a .46 acre lot, this craftsman-style home greets you with double, 8-lite front doors and a grand, wrap-around front porch. Upon entering the foyer, you’ll see the lovely dining room on the left, with crisp, white wainscoting and spacious sitting room/study with French doors to the right. Straight ahead is the large family room with a gas fireplace and flanking 48” tall built-in shelving. A panel of expansive 12’ sliding glass doors leads out to the 20’ x 14’ covered porch, creating an indoor/outdoor living and entertaining space. An amazing kitchen is to the left, featuring a 7’ island with farmhouse sink, stylish gold-toned, articulating faucet, two-toned cabinetry, soft close doors/drawers, quart countertops and premium Electrolux appliances. Incredibly useful butler’s pantry, between the kitchen and dining room, sports glass-front, upper cabinetry and a 46-bottle wine cooler. With 4 bedrooms, 3-1/2 baths and 5 walk-in closets, space will not be an issue. The owner’s suite has a freestanding, soaking tub, large frameless shower, water closet and 2 walk-in closets, as well a nice view of the backyard. Laundry room, with cabinetry and counter space, is conveniently located off of the classic central hall upstairs. Three additional bedrooms, all with walk-in closets, round out the second floor, with one bedroom having attached full bath and the other two bedrooms sharing a Jack and Jill bath. Lovely hickory wood floors, upgraded Craftsman trim package and custom details throughout!

 highland
Selling your home can be stressful, particularly if you’re short on time. Many homeowners in Springfield, OH find themselves in situations when the traditional real estate process is too slow, too expensive, or too uncertain. Repairs, showings, agent commissions, buyer financing delays and inspection issues can make a simple sale a long and frustrating experience.
That’s why more homeowners are looking for a faster and easier way to sell. If you need a quick home sale in Springfield, OH, Sell House Now Columbus offers a practical solution for people who want to sell their house fast for cash without the usual problems of listing on the market.
A Quicker Way to Sell Your Springfield, OH Home
The old way of selling takes weeks or months. First, you may need to clean, repair and stage the home. Then you have to wait for buyers, schedule showings, negotiate offers and hope the buyer’s loan gets approved. Even after you’ve accepted an offer, the deal can still fall apart due to inspection results, appraisal problems, or financing issues. This process may not be ideal for homeowners who need speed and certainty. Sell House Now Columbus offers cash for homes in Springfield and the surrounding Ohio areas so homeowners can avoid these delays. Don't have to wait for the perfect buyer; you can work directly with a local cash home buyer who understands your situation and can close on your timeline.
Why Homeowners Prefer to Sell Their Homes for Cash
There are a number of reasons why someone might need to sell fast. Some homeowners are going through foreclosure, divorce, relocation, inherited property, problem tenants, expensive repairs or just a house they don’t want to sit vacant. Other people don’t want to spend money fixing up a property before they sell it; A cash sale can be helpful because it eliminates many common roadblocks. You don't have to wait for bank financing. You do not need to prep your home for open houses. You don’t have to keep paying for repairs, utilities, taxes or maintenance while your home is sitting on the market. Sell House Now Columbus allows homeowners to sell their house as-is. This means that you don’t have to repair the roof, update the kitchen, repaint the walls, replace the flooring or clean out every room before closing. The company buys homes as they are, saving time and money.
Sell Your House As-Is Springfield, OH
One of the biggest advantages to working with a cash buyer is the ability to sell as-is. Many houses need work, and that work can cost a lot of money. A typical buyer may seek repair credits, price reductions, or major upgrades before closing. Sometimes lenders won’t finance a home with serious issues in its condition. Selling as-is provides a simpler path for homeowners. You can still ask for a cash offer whether the property has old plumbing, roof damage, outdated rooms, foundation concerns, fire damage, water damage, or years of deferred maintenance. This is particularly helpful for homeowners who have inherited a property or own a house they no longer live in. Rather than sinking thousands of dollars into a property you don’t want to hold on to, you can sell it directly and move on.
No Listing or Agent Commissions Hassles
When you list a house with a real estate agent, commissions and fees can eat into the amount you take home. You’ll also have to pay for repairs, cleaning, staging, photography, inspections, and closing costs. These costs can add up quickly. Selling it for cash makes the math easier. Sell House Now, Columbus lets homeowners bypass the traditional listing process. No open houses, no weekend showings, no need to keep the place spotless for buyers. Skip the uncertainty of waiting for offers and the stress of strangers walking through your home. Privacy is another important advantage for many sellers. A direct sale might be more discreet than putting a house on the open market.
How It Works
Sell House Now, Columbus makes it easy. First you talk about your house. Next the company reviews the property and puts together a fair cash offer. If the offer sounds good to you, you can choose a completion date to suit your needs. This simple process is helpful for home owners that need to make decisions quickly. There is no pressure of a traditional sale and you don’t have to accept an offer. The goal is to provide you a clear choice to determine what works best for you.
When a Quick Sale is Beneficial
Often a quick home sale in Springfield, OH can come in handy. If you are behind on your mortgage, selling quickly can help you avoid more financial stress. If you’re relocating for work, you probably won’t have months to wait for a buyer. If you are going through a divorce, a quick sale can help both parties move on. A direct cash sale can also be a win for landlords. If you’re tired of working around the tenants, the late rent, the damage, and the constant maintenance calls, selling the property may be a better option than continuing to manage it. Another popular reason people search for cash buyers is inherited homes. Many inherited properties require repairs, have multiple decision-makers or come with emotional stress. A fast cash sale can make the process easier and help families close on the property faster.
Go ahead confidently
Selling a home doesn’t have to be hard. If you want to avoid uncertainty, repairs, commissions and delays, working with a local cash home buyer is a smart move. Selling a House Is Easy With Sell House Now Columbus for homeowners Springfield, OH who want a faster, easier way to sell.
If your house is vacant, old, damaged, rented, inherited or you just don’t need it anymore, you can ask for a fair cash offer and choose the closing timeline that best suits you. Sell House Now Columbus is a convenient solution for homeowners who want speed, convenience, and peace of mind. Selling your house fast in Springfield, OH can be a great way to save time, avoid stress, and move on without the headache of the traditional real estate market.
A Quicker Way to Sell Your Springfield, OH Home
The old way of selling takes weeks or months. First, you may need to clean, repair and stage the home. Then you have to wait for buyers, schedule showings, negotiate offers and hope the buyer’s loan gets approved. Even after you’ve accepted an offer, the deal can still fall apart due to inspection results, appraisal problems, or financing issues. This process may not be ideal for homeowners who need speed and certainty. Sell House Now Columbus offers cash for homes in Springfield and the surrounding Ohio areas so homeowners can avoid these delays. Don't have to wait for the perfect buyer; you can work directly with a local cash home buyer who understands your situation and can close on your timeline.
Why Homeowners Prefer to Sell Their Homes for Cash
There are a number of reasons why someone might need to sell fast. Some homeowners are going through foreclosure, divorce, relocation, inherited property, problem tenants, expensive repairs or just a house they don’t want to sit vacant. Other people don’t want to spend money fixing up a property before they sell it; A cash sale can be helpful because it eliminates many common roadblocks. You don't have to wait for bank financing. You do not need to prep your home for open houses. You don’t have to keep paying for repairs, utilities, taxes or maintenance while your home is sitting on the market. Sell House Now Columbus allows homeowners to sell their house as-is. This means that you don’t have to repair the roof, update the kitchen, repaint the walls, replace the flooring or clean out every room before closing. The company buys homes as they are, saving time and money.
Sell Your House As-Is Springfield, OH
One of the biggest advantages to working with a cash buyer is the ability to sell as-is. Many houses need work, and that work can cost a lot of money. A typical buyer may seek repair credits, price reductions, or major upgrades before closing. Sometimes lenders won’t finance a home with serious issues in its condition. Selling as-is provides a simpler path for homeowners. You can still ask for a cash offer whether the property has old plumbing, roof damage, outdated rooms, foundation concerns, fire damage, water damage, or years of deferred maintenance. This is particularly helpful for homeowners who have inherited a property or own a house they no longer live in. Rather than sinking thousands of dollars into a property you don’t want to hold on to, you can sell it directly and move on.
No Listing or Agent Commissions Hassles
When you list a house with a real estate agent, commissions and fees can eat into the amount you take home. You’ll also have to pay for repairs, cleaning, staging, photography, inspections, and closing costs. These costs can add up quickly. Selling it for cash makes the math easier. Sell House Now, Columbus lets homeowners bypass the traditional listing process. No open houses, no weekend showings, no need to keep the place spotless for buyers. Skip the uncertainty of waiting for offers and the stress of strangers walking through your home. Privacy is another important advantage for many sellers. A direct sale might be more discreet than putting a house on the open market.
How It Works
Sell House Now, Columbus makes it easy. First you talk about your house. Next the company reviews the property and puts together a fair cash offer. If the offer sounds good to you, you can choose a completion date to suit your needs. This simple process is helpful for home owners that need to make decisions quickly. There is no pressure of a traditional sale and you don’t have to accept an offer. The goal is to provide you a clear choice to determine what works best for you.
When a Quick Sale is Beneficial
Often a quick home sale in Springfield, OH can come in handy. If you are behind on your mortgage, selling quickly can help you avoid more financial stress. If you’re relocating for work, you probably won’t have months to wait for a buyer. If you are going through a divorce, a quick sale can help both parties move on. A direct cash sale can also be a win for landlords. If you’re tired of working around the tenants, the late rent, the damage, and the constant maintenance calls, selling the property may be a better option than continuing to manage it. Another popular reason people search for cash buyers is inherited homes. Many inherited properties require repairs, have multiple decision-makers or come with emotional stress. A fast cash sale can make the process easier and help families close on the property faster.
Go ahead confidently
Selling a home doesn’t have to be hard. If you want to avoid uncertainty, repairs, commissions and delays, working with a local cash home buyer is a smart move. Selling a House Is Easy With Sell House Now Columbus for homeowners Springfield, OH who want a faster, easier way to sell.
If your house is vacant, old, damaged, rented, inherited or you just don’t need it anymore, you can ask for a fair cash offer and choose the closing timeline that best suits you. Sell House Now Columbus is a convenient solution for homeowners who want speed, convenience, and peace of mind. Selling your house fast in Springfield, OH can be a great way to save time, avoid stress, and move on without the headache of the traditional real estate market.

 Adam Sherman & Nicholas Walker
Design and construction of kitchen and dining room addition with family room and fireplace. At our first meeting, Mark and Regina were working with an Architectural firm that was pressuring them to move ahead with a design that they felt did not meet their needs. It was a difficult and challenging problem to marry their family’s needs and budget to the quirky Architecture of their side set, Dutch Colonial home. We were able to identify the more subtle issues and developed a design that includes a new family entrance with Dutch door, mudroom, powder room, kitchen with soapstone counters, family room with fireplace and an open inviting family eating nook with large windows and a raised ceiling.
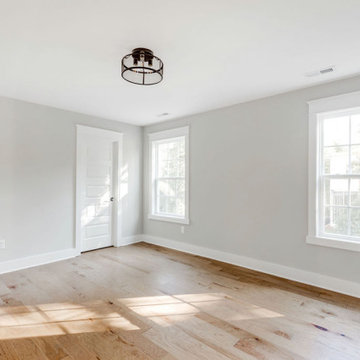 Richmond Hill Design + Build
Richmond Hill Design + Build brings you this gorgeous American four-square home, crowned with a charming, black metal roof in Richmond’s historic Ginter Park neighborhood! Situated on a .46 acre lot, this craftsman-style home greets you with double, 8-lite front doors and a grand, wrap-around front porch. Upon entering the foyer, you’ll see the lovely dining room on the left, with crisp, white wainscoting and spacious sitting room/study with French doors to the right. Straight ahead is the large family room with a gas fireplace and flanking 48” tall built-in shelving. A panel of expansive 12’ sliding glass doors leads out to the 20’ x 14’ covered porch, creating an indoor/outdoor living and entertaining space. An amazing kitchen is to the left, featuring a 7’ island with farmhouse sink, stylish gold-toned, articulating faucet, two-toned cabinetry, soft close doors/drawers, quart countertops and premium Electrolux appliances. Incredibly useful butler’s pantry, between the kitchen and dining room, sports glass-front, upper cabinetry and a 46-bottle wine cooler. With 4 bedrooms, 3-1/2 baths and 5 walk-in closets, space will not be an issue. The owner’s suite has a freestanding, soaking tub, large frameless shower, water closet and 2 walk-in closets, as well a nice view of the backyard. Laundry room, with cabinetry and counter space, is conveniently located off of the classic central hall upstairs. Three additional bedrooms, all with walk-in closets, round out the second floor, with one bedroom having attached full bath and the other two bedrooms sharing a Jack and Jill bath. Lovely hickory wood floors, upgraded Craftsman trim package and custom details throughout!
 Tile Doctor Ltd
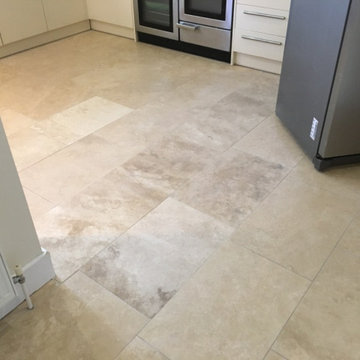
This client from Cobham contacted me in despair, she was quite concerned about her Travertine tiled floor which was cracking. She had the Kitchen and Dining room tiled with Travertine six years ago and recently several cracks had begun to appear in a long line crossing five tiles.
Several holes had also begun to appear and across the threshold to the kitchen from the dining area a serious lip had formed where a tile had risen above its neighbour causing a trip hazard.
After removing a tile from an unobtrusive area, I began to see where the issues lay. The tiler had dabbed the adhesive. This mean that instead of spreading the adhesive equally across the tile and floor they had splurged four lumps in each corner then set the tile down. This is poor working practice that will sooner or later become apparent. It means the areas were no adhesive was applied are eventually compromised resulting in cracking. This could take years or weeks to surface.
After some discussion we decided that I would remove and replace six tiles in total. The client was happy for me to go ahead and agreed a cost for the works to be done.
Returning the following week, firstly I had to remove the grout. This was done with a handheld Fein tool fitted with an oscillating blade. I thought this would be good experience from my son during the holidays, so I took him along and whilst I was working on the grout, he was able to gather the dust in a vacuum cleaner.
Next, I started to remove the cracked tiles with a chisel, starting from the cracks where the tiles would be weakest. This was noisy and messy work which required ear defenders and safety goggles. The process took several hours with the help of my son on general assistance duties. Once the tiles were removed this just left the remaining adhesive attached to the floor to get removed. This was the hardest part of the job, a lot of hammer and chisel work with as much dust gathered as possible to try and contain the mess. I had warned the customer that a considerable amount of mess would be produced and request that she should remove as much items as possible and to tape up her cupboards. Finally, I filled several holes in the sub floor so I would have a flat surface to lay the new tiles on. I left it there for the night to solidify.
Returning the next day, I began laying the replacement tiles down. Colour matching replacement tiles is a difficult task as Travertine is a natural product and colours vary greatly so these were a pretty good match.
Once the adhesive had set, I grouted in the newly laid tiles and once that was dry set about applying a sealer. For this I used two coats of Tile Doctor Ultra Seal which is an impregnating sealer that doesn’t alter the colour of the stone. This would ensure they were nicely protected and hopefully the client will not experience any further issues.
She was very happy with the result and was pleased the floor no long looked unsightly or posed a tripping hazard.
Rupert Mcleod
West Surrey Tile Doctor
 Tile Doctor Ltd
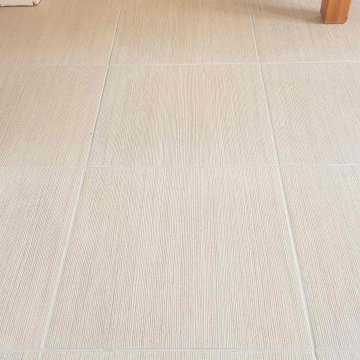
Recently it seems I am getting called out to an increasing number of new builds to sort out patchy grout issues. The reason why there have been so many issues arising is a bit of a mystery, but I put it down to a combination of things like poor quality grout, rushed installations, wet subfloors and the use of different batches.
This recently built house in the village of Darton is a great example and in this case, I suspect two different batches of the same grout had been applied. Darton by the way is a small village in the Borough of Barnsley.
Invariably these problems are picked up by the new owner on their snagging list, with the tiler long gone and the builder keen to get their final payment it is always a tricky situation to resolve. I find the best solution is to apply a Tile Doctor Grout Colourant, it’s a much quicker process than removing the old grout and replacing with new. Most new homeowners would not appreciate us ripping up their brand-new rooms and generating lots of dust in the process! Also, by using the Tile Doctor Grout Colourant it adds a barrier of the grout preventing dirt from discolouring it further down the line.
Even though the house was brand new, the Porcelain Tiled floor was not looking great. The client was happy for me to go ahead and would take up the bill with the housebuilder. I first pre-treated it with Tile Doctors Grout Colourant Pre-Treatment. This removes any contamination from the grout which might affect the adhesion of the colourant and being an acid, it also etches the surface of the grout to ensure a superior bond with the colourant.
The client chose our Light Grey colour which is one of 10 colours we offer. Once the pre-treatment had been applied, scrubbed, rinsed, and vacuumed away the floor was left to dry. Once dry we started applying the colourant, this is done with a small brush (a toothbrush is ideal) carefully scrubbing colourant into each grout joint and wiping off any excess that gets on the tiles before it is able to dry.
Once complete the newly coloured grout lines totally transformed the floor and because the grout colorant is epoxy based the grout lines will stay stain free and never get dirty.
The porcelain tiles were factory sealed so there is no need to apply a seal to the floor.
I recommended the use of Tile Doctor Neutral Tile Cleaner to keep the floor in the best condition. It is pH neutral so is far less harsh on the surface than the everyday household cleaners available. It has a minty fragrance and is mild enough to use daily. They were very happy that the floor now looked as it should have from the start and was the finishing touch to their beautiful new home.
Matthew Lovett
South Yorkshire Tile Doctor
 Tile Doctor Ltd
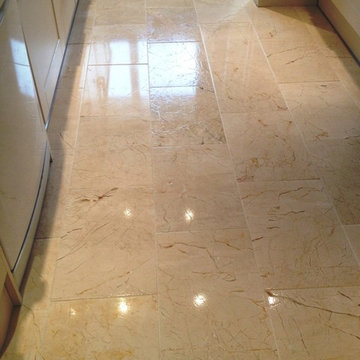
For this job I travelled to the town of Albrighton, which is actually the most easterly settlement in the whole of Shropshire. My client had an issue with their Marble tiled floor which was installed in the kitchen and hallway. They had dropped and broke a bottle of vinegar in the kitchen, and the substance unfortunately came in contact with the tiles. Since Marble is highly sensitive to acid, the vinegar (an acetic acid) had basically etched the surface of the tiles make it impossible clean chemically.
Although the tiles were a nice, expensive Marble, the person who had first installed them had done a poor job, leaving lippage of up to 5mm in some areas, which would make work trickier. Undeterred I could see it would be possible to restore the floor using a combination of burnishing for the tiles and cleaning with a high alkaline product for the grout lines. I demonstrated this to my client on one tile which went well and I was then given the go ahead to restore the entire floor.
My first task focused on cleaning the grout lines using a solution of Tile Doctor Pro-Clean worked in with a stiff grout brush. Pro-Clean is a high alkaline cleaner suitable for use on most types of natural stone floor. It helped to alleviate most of the grout staining caused by the vinegar, whilst also lifting out any ingrained dirt and muck, and this left the grout looking a lot cleaner.
After cleaning the grout lines I was able to move on to burnishing the tiles. As previously mentioned, no chemical product would be able to have an effect on the damaged tiles, so I resolved to burnish them using a system of four diamond encrusted burnishing pads fitted to a rotary machine. Working first with a coarse burnishing pad, and moving through to medium, fine and very fine pads, lubricated with a little water, I was able to significantly reduce the appearance of the acid stains, while also giving the tiles a nice polished finish.
Following the cleaning and burnishing processes I gave the tiles a good rinse to remove any remaining residue and then ensured the floor was completely dry before starting on the sealing.
To seal the floor and maximise the appearance I used Tile Doctor Colour Grow and Tile Doctor Shine powder. Colour Grow is an impregnating sealer that seeps into the pores of the stone intensifying and enhancing the natural shades and colours in the stone whilst also providing stain protection;
Shine Powder on the other hand is a crystallising powder that is ground directly into the tiles to provide a high shine finish and durable surface protection.
My client and her husband were really happy with the results and left the following message on the Tile Doctor Feedback system:
“Jozsef was a charming young man in every respect, who worked very hard and achieved an amazing result. The tiles look better than the day they were laid. We are absolutely delighted with the work he has done and will recommend him to all our acquaintances. Thank you, Jozsef!”
Jozsef Hoffmann
Shropshire Tile Doctor
 Tile Doctor Ltd
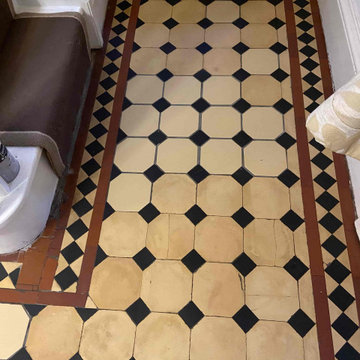
Detailed below is the restoration of a Victorian tiled hallway floor that we started back in June in Preston. Although we started in June there was so much damage to the subfloor and the tiles it took some time to complete, additionally, the client did not like the colour samples of the replacement tiles we had brought along and so decided to source their own which took some time.
Three months later with replacement tiles now sourced we were given the go ahead to start the restoration. The first day’s focus was cleaning the original floor using very coarse 100-grit and 200-grit Diamond pads fitted to a rotary buffer machine and applied to the floor using a strong dilution of Tile Doctor Remove and Go to add extra cleaning power. Tile edges were given special attention using a flex machine fitted with small diamond grit pads.
The floor was rinsed with water to remove the soil generated and this was followed up with an acid rinse using a 1:3 dilution of Tile Doctor Grout Clean Up. This last step in the cleaning process is especially recommend for old floors like this which don’t have a damp proof membrane and can suffer from efflorescence issues.
The next stage focused on repairing the floor and started by carefully knocking out all the broken and chipped tiles. We had previously estimated over 30 tiles needed replacing and so the client had bought two boxes, meaning I had plenty of spares to work with.
Before tiling however, the subfloor had suffered over the years and needed attention first. To deal with this the damaged areas were raked out, cleaned up and then back filled with rapid setting self-levelling screed from Mapie adhesives. Once the sub-base was fixed then we put the new tiles back in, they were not an exact match, about 5mm too short and lighter in tone, but the colour was pretty close.
Tiling an old Victorian floor like this can be a bit like dominoes as you move one out of place 2 decent ones come loose and then they also need refixing. Some of the tiles had hair line cracks in them and once they were loose, they just cracked in half. As such the 20 spare tiles that I thought were spare came into good use and I actually ended up using all of them. I could have done with a few more so it was decided to reset the last four broken tiles and grout them in. Luckily for me the client was very understanding about the nature of tile restoration and had accepted that there would be some imperfections and they were not expecting a new floor.
The Tiles were fixed down using Ultralite Rapid Flex (another product from Mapie) and then grouted using the same adhesive (not a grout, as they did not have grout back in the day, just cement and screed).
The floor was left this to cure overnight, and we came back the next day to finish the clean using a 200-grit diamond pad fitted to a buffing machine and lubricated with water, then one last acid rinse to get the tiles as clean as possible and remove any lingering grout haze. This last clean helps to blend the new tiles in with the original.
Before applying a protective sealer, the floor was left to dry for a couple of days, the tiles need to be thoroughly dry before sealing or you can end up with a patchy appearance.
For this floor with no damp proof membrane, it was important to use a fully breathable sealer that will allow moisture to rise through the tile and evaporate at the surface, so Tile Doctor Colour Grow was chosen. This is a good choice for old floors like this as its fully breathable, head wearing, and it contains a colour enhancer that improves the overall appearance of the tile.
Three coats of Tile Doctor Colour Grow which is a fully breathable, colour enhancing sealer hat works by soaking into the pores of the tile protecting it from within. It has a matt finish, and it works really well with all clay tiles and is ideal for these types of floors.
You can probably spot the lighter coloured tiles in the after photos on this page, however it’s a very subtle difference and I think they have blended in quite well with the original. Certainly, my client was very pleased with the newly restored floor, its completely transformed from when we first visited the client, and the floor has now gained character and history. For aftercare we recommend Tile Doctor Neutral Cleaner, its an effective pH neutral product that is compatible with the new sealer.
Russell Taylor
Lancashire Tile Doctor
 Tile Doctor Ltd
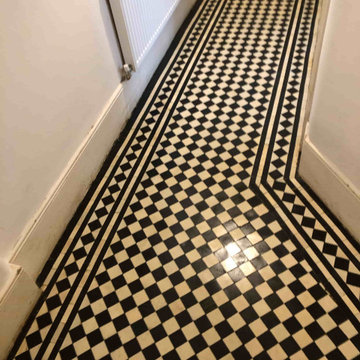
This property was in theLadbroke Grove area of West London near Kensington. The client had found an old and probably original black and white checkered pattern Victorian tiled floor under their cork tiled flooring. They also reported that it was badly damaged so I thought it would be best if I paid them a visit first to see how extensive the damage was and whether it was repairable. The floor was in a quite a state, the tiles were covered in glue from the cork and had several areas had been back filled with cement.
I reassured them that the damage could be rectified, and that it would be possible to completely restore the floor back to a good standard. I would have to remove the glue, remove the cement that had been used to level the floor and replace with reclaimed tiles to match. They were relieved to find out it could be done and happy with my quote I was instructed to go ahead with the work.
We started by taping up the skirting boards to protect the woodwork. With this done attention was turned to the glue which was softened using a strong dilution of Tile Doctor Remove and Go so it could be carefully scraped off. Multiple techniques and tools were needed to remove the glue including hand-held scrappers and a black pad fitted to a buffing machine. For the stubborn areas steam was applied to help lift the adhesive out the tile.
Once all the glue was removed the floor was rinsed and the alkaline cleaner neutralised with Tile Doctor Grout Clean Up which further cleaned the tiles and removed old traces of grout from the floor. Old floors like this generally don’t have a damp proof membrane underneath so the acids in the Grout Clean-up also counter any efflorescent salts trapped in the tile.
Once this was completed the slurry was removed with a wet vacuum and left to fully dry out overnight.
The following day focus turned to repairing the areas of the floor where the tiles were missing or broken. The main issue being the cemented areas, we see this a lot with Victorian Hallways and generally what happens is a heating engineer digs out the floor to install pipework. Not being tilers, your average plumber then repairs the floor with a self-levelling cement that brings the level up to the surface of the tile so it can be covered with lino, carpet of in this case cork.
The sub floor was then rebuilt with rapid setting self-levelling compound but this time to below the level of the tile.
Once the new base was dry it was a just a question of re-tiling with the replacement tiles to match the original checkered pattern. The replacement reproduction tiles were sourced from Original Features in Crouch End North London. After grouting we left the floor to dry out over the weekend.
When we returned to seal the floor our first step was to check the floor was dry using a moisture meter. This is critical as the sealant will not cure correctly if there is too much moisture in the floor. In this case the extra two days we had allowed had done its job and the test had confirmed it was ready to accept a sealer.
The client wanted the floor finish not to be too shiny once sealed so we opted to seal with two coats of Tile Doctor Seal and Go Extra. This is good choice for old Victorian floors such as this example as it’s special acrylic-based formula allows for moisture vapour transmission which as mentioned previously is a concern where no damp proof membrane has been installed.
I’m please to confirm my clients were delighted with the result, as you can see from the pictures the black and white floor restoration makes for a dramatic entrance well in keeping with the style of the property. For aftercare I recommended the use of Tile Doctor Neutral Tile Cleaner which will keep the tiles in good condition going forward without damaging the new sealer.
Jackson Davis
Central London Tile Doctor
 Tile Doctor Ltd
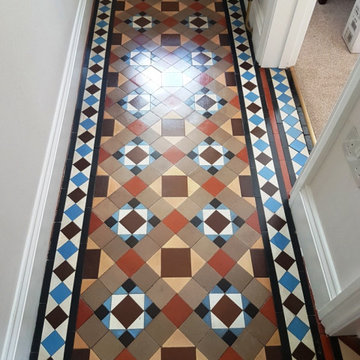
I was contacted by a homeowner who had moved into a property in the small Yorkshire market town of Masham and discovered a Victorian tiled floor under the hallway carpet. Realising this was a valuable period feature he was keen to see if it could be restored. As you can imagine he was delighted when I told him that it should be possible, and he was keen to get it uncovered and back on show.
After discussing the floor on the phone, I visited the property and removed the carpet so we could take a long look at the Victorian tile’s underneath. The carpet had protected the floor well and it was in good physical order, (i.e. no cracks etc.) it was just very dirty but was also marked with paint splashes from some untidy decorating work from the past. I confirmed none of these issues should present a problem and got the go ahead for the work to start.
There was no sealer on the floor, so I started the cleaning process using a medium dilution of Tile Doctor Pro-Clean which was worked into the tiles using a coarse 200-grit pad fitted to a rotary floor buffer. I then used a 400-grit hand-held diamond block to clean the edges which couldn’t be reached by the machine. This also removed the paint splashes which should have been on the skirting boards and not the floor!
The floor was then rinsed with water and the soil extracted with a wet vacuum. I was able to inspect the floor at this stage and spot treat areas that needed more work as they were a little stubborn. It wasn’t a large hallway and except for the paint it only needed a light clean. The result was I was able to complete the cleaning process by lunch time. I dried the floor as much as possible and left an air blower in the space for a couple of hours.
I returned later that afternoon and checked the floor for moisture using a damp meter. The floor was mostly dry, but some areas needed some more help with a heat gun. It was late summer and so still warm and so there was no need on this occasion to leave the floor overnight.
Once I was happy the floor was dry, I started sealing the tiles with the first of four coats of Tile Doctor Seal and Go. This is a specially formulated water-based blend of acrylic polymers that provides both a stain resistant surface seal and a durable low-sheen finish. It is perfect for a floor of this age as it allows moisture vapour to pass through, this is an important feature when considering a sealer for old floors which will not have a damp-proof membrane installed. If you were to apply a non-breathable sealer moisture can get trapped under the floor causing it to spread out to the walls resulting in rising damp.
The combination of the cleaning and new sealer brought the floor back to life and it now looked in keeping with the rest of the property which had numerous other period features. My client was over the moon with the difference and very happy to see the back of the grubby carpet.
Nigel Stoker
North West Yorkshire Tile Doctor

 Alfresco Homes, Designs and Lifestyles Ltd
The open concept for living room and dining room was designed to also open up onto the feature decks. The connection of outdoor space and views to the livingroom was achieved by using a folding wall of French doors, using Eclipse style fold away hardware. We thought ahead that we may have to use fold away insect screen as well, but in this circumstance, it has not been an issue at all. It has made a great family and entertainment open concept space.
 Tile Doctor Ltd
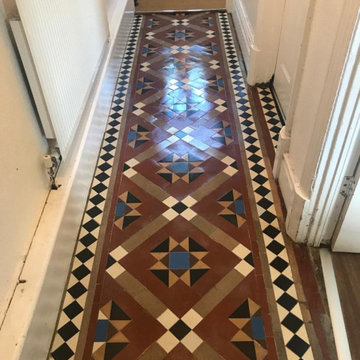
I recently worked on the restoration of a Victorian tiled hallway in Cwmbran Wales which is six miles North of Newport. As you can see from the photographs the floor was in quite a neglected dirty state and many of the the black and white border tiles needed removing and replacing. The worst part was the area by the front door where most of the tiles had been removed and then backfilled with concrete. I can only assume at some point in the past it was deemed to difficult or expensive to restore the floor, so they simply covered it up.
After visiting to survey the floor I did offer to source replacements for the concreted section and restore that as part of the work however my client’s budget would not stretch to that at the time. My quote was therefore focused on the main section of flooring and included replacing border tiles, deep cleaning the whole floor and then sealing the tiles to add protection. Although I did need to check that I could indeed source the replacement tiles before being able to provide the quote which as it turned out would not be an issue.
They were happy to go ahead and we arranged a suitable time to carry out the work which would enable me to work in the property whilst minimising contact with the owners due to the Covid-19 situation.
I spend the first day sorting out the black and white border tiles which needed to be gently prised out of position without upsetting the main part of the floor. The exposed subfloor was then cleaned up to remove old adhesive and replacements were fitted where required and secured into place. The floor would need to be solid before cleaning so that was left for day two so the new adhesive could go off overnight.
On day two I gave the floor an initial clean using a combination of Tile Doctor Pro-Clean and Remove and Go diluted with water. This produces a strong cleaner/stripper that will tackle dirt and remove coatings such as previous sealers. The old tiles had accumulated years of ingrained dirt, so I needed this extra power to remove the years of dirt and contaminates from the tile. It was sprayed onto the tiles and then left to soak in for ten minutes before being actively scrubbed into the tile using a rotary machine fitted with a black scrubbing pad. The soil was then rinsed off with water and extracted with a wet vacuum. The floor was inspected, and the process repeated on the tough stains until I was satisfied all the dirt had been removed.
Next the floor was treated to an acid wash using Tile Doctor Acid Gel using a similar method as before. This is an important treatment for these old Victorian floors that have no damp proof course as it neutralises efflorescent salts trapped in the tile which can appear as white salt deposits later. Once I was happy with the condition of the floor it was given a final rinse and left to dry off. I use a wet vacuum to remove liquids from the floor and on this last extraction I spent extra time to remove as much moisture from the tiles as possible.
I came back a few days later and after checking the tiles were dry using a damp meter, I started the application of the sealer. For this floor I applied seven coats of Tile Doctor Seal and Go for a satin finish. Tile Doctor Seal and Go is a specially formulated water-based sealer that provides both stain resistance and a durable low-sheen finish. It is perfect on a floor of this age where it leaves a lovely finish and will remain durable in what is a essentially a high traffic area.
Although we didn’t manage to sort out the area by the front door the client managed to fit a made to measure coir door mat along with carpet bar which was quite practical and looked fine so they were able to resolve that problem without blowing their budget.
The client was over the moon with results, the floor had a lovely pattern and the colours now shone through. I suggested the use of Tile Doctor Neutral Tile Cleaner to keep the floor clean and in good condition. It is neutral in pH so will ensure that the newly applied sealer stays in place and will ensure maintenance is nice and easy for them.
Paul Wales
Monmouthshire Tile Doctor
 Tile Doctor Ltd
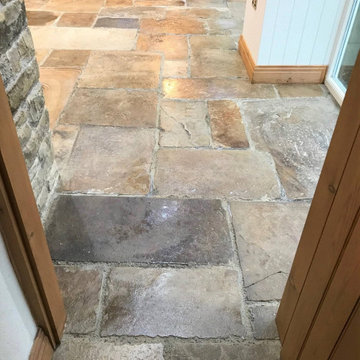
We had been to maintain this Sandstone floor about two years previously at a property in the pretty area of Windermere in the English Lake District. The client had run out of our Tile Doctor Neutral Tile Cleaner that we left after completing the job and had started using a standard cleaner instead (a well-known ecological cleaner). Unfortunately, this product has a 5% non-ionic surfactant in its chemical structure, which will strip a coat of stone sealer off the surface within 6 months, once that topcoat has been removed the sealed surface is only 50% as strong as it should be.
Readers of this article should be aware that even washing up liquid which is a degreaser will strip sealers although it will take many months of regular use before you will start to notice an issue. Stronger bleach-based cleaning products such as Flash and Domestos will cause instant damage to stone sealer which will often go an off-white colour as a result. So, the importance of using the right cleaner is imperative. Having used our services on this floor previously he client knew what to expect and was happy to go ahead with our quote.
My first task would be to clean the floor and completely remove what was left of the old sealer to ensure the floor would have a consistent appearance. On this occasion I used a strong 1:3 dilution of Tile Doctor Pro-Clean worked into the floor with a Black buffing pad fitted to a rotary buffing machine. The Sandstone floor was then rinsed with water, scrubbed again and then the waste extracted using a wet vacuum.
This was followed with acid rinse using a 1:5 dilution of Tile Doctor Grout Clean-Up, this is a Phosphoric Acid (not a Brick Acid). After being scrubbed into the tile it was rinsed off the floor as before using water and the wet vacuum. This process further cleans the stone and neutralises the floor after the use of the strong alkaline Pro-Clean used earlier.
Before leaving for the day I gave the floor one final rinse with water and then dried the floor as much as possible with the wet vacuum. The floor was now clean and free of sealer and left to fully dry off overnight.
I came back the following morning and started by testing the floor with the moisture meter. I always do this as I know from experience how important it is to ensure the floor is dry before applying a sealer.
Happy the Sandstone was dry I then proceed to apply the first of what would be four coats of sealer. For this I used Tile Doctor Seal and Go which leaves a nice low sheen finish. This product is specially formulated blend of acrylic polymers that provides will protect the floor from ingrained dirt and staining; it will make the floor easy to clean and has the added advantage of being water based so it doesn’t leave a solvent smell as it dries.
The client was left another complimentary bottle of Tile Doctor Neutral cleaner and hopefully the seal will last a long longer the 2nd time around. The client was pleased the floor had been restored and vowed to use nothing but Tile Doctor products on it in the future.
Heidi Taylor
South Cumbria Tile Doctor
 Tile Doctor Ltd
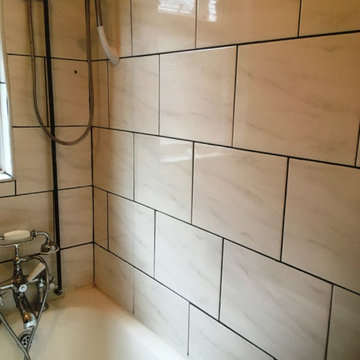
We were contacted by a client from the Levenshulme area of Greater Manchester who had just purchased a property there and hated the state of the grout which despite cleaning did not improve. The owner said she could not use the bathroom in this state as it looked disgusting and unclean and was keen to have it renovated. The rest of the house was being redecorated so whilst that was going on, I was called over to have a proper look at the grout and quote for sorting it out.
It didn’t take long to understand the issue, is seems the previous owner in an attempt to improve the appearance of the grout had touched it up by applying another thin layer of grout on top of the original. Now both the new and old was starting to flake off making a real mess.
I explained to the client we would need to scrape out the new layer, clean the original and then apply a grout colourant to improve the overall appearance. I gave her a price for the work, and she was happy for me to go ahead with the job.
My first task was to scrape off the new layer of grout, so I had a stable grout line to work from. I then started cleaning the grout up using a Tile Doctor Grout Colourant Pre-Treater cleaner, this cleans up the grout and being acidic it etches the surface to provide a better base for the grout colourant to adhere to. The dirt was rinsed off and then the area was dried using a heat gun.
Once dry I used a Tile Doctor Grout Colourant in Charcoal Grey (one bottle was sufficient). This product is equally effective for interior or exterior applications including bathrooms and kitchens and it is available in ten different colours. The client had requested to darken the grout and give it a completely new modern look. The colourant is painted onto the grout with a small brush and any excess which gets onto the tile is removed with a cloth before it dries.
The best thing about the grout colourant is it forms an easy to clean seal over the grout which ensures the grout is protected. Given Ceramic tiles are glazed and therefore don’t need sealing the new combination should ensure the tiles keep their appearance for a very long time with minimal cleaning. The silicone sealant between the bath and the wall tiles looked in good condition and had not discoloured so there was no need for this to be replaced.
The bathroom now looked clean and inviting and I’m pleased to report my client was very happy with the completed renovation and was finally happy to use the bathroom!
I recommended that for on-going cleaning that they use Tile Doctor Aqua-Pro, this is a pH neutral cleaner with a trigger action for easy application. It can be used in the bathroom every day. It helps to keep soap scum and limescale at bay and has a pleasant lemon smell so cleaning should not be too much of a chore.
Alex Logonzy
Greater Manchester Tile Doctor

 McEssay
Regardless of the length of your trip abroad, you should know that packing is an essential step of your stay. This goes doubly so when it comes to students, so you must always keep a few things in mind when you’re getting ready, such as what you need to take. The following list from https://mcessay.com/write-my-essay/ will provide you with some useful tips on what you must do to have a trouble-free packing experience:
You should never be extra picky about your toiletries and personal hygiene products, but you should have a small supply of it if you have a favorite product. Face wash, shampoos and conditioners as well as other products may not be available as the same brands in the new place, so have a spare at least. Always make sure you have your liquids sealed in a plastic bag to avoid issues with airport security.
Make sure you pack some weather-appropriate clothing as part of your luggage. The last thing you’ll want to do is look for clothes in the new location if the climate is extreme, compared to your point of origin. You should look into the weather ahead of time so you can pack accordingly to avoid issues with it.
Use a backpack or a duffel bag that suits the airline requirements so you can haul your luggage with greater ease once you’re off the airport. This will help you be more mobile, while at the same time allowing you a choice between walking on foot without dragging luggage and using a cab or public transport.
Prepare a few international adapters, so you won’t have any issues powering your electronics at the new location. Different countries use different types of plugs, so you must make sure you have what you need. The last thing you’ll want to do is getting stuck in a foreign country without a chance to use your tech.
Prepare a list of things you must do during the semester so you won’t have to deal with the organizational aspects of it. You can start with a checklist, keeping it in a place where you’ll be able to see on a regular basis. You will need the preparation to ensure you do things right and on time.
Take at least two pairs of good walking shoes along, as well as your normal shoes. This will help you greatly if you need to walk around different towns or cities. Not all places have the same policy when it comes to sidewalks and public areas, so having a few pairs of good, comfortable shoes will go a long way.
Taking a cross-shoulder bag alongside your luggage will be a very comfortable option when it comes to urban exploration, travel and study. Its hard to rip off of you, easy to carry and also easy to use. Make sure you keep an eye on it from time to time though, as there’s always the possibility of meeting would-be thieves.
7