
Search results for "Job regularly" in Home Design Ideas



 Siding Express (Maintenance Free Siding)
Close-up of Artisan by James Hardie Siding. Artisan 5/8" is thicker than regular Hardie Siding (7/16"). It also gives you distinctively deep shadow lines for premium aesthetics.


Find the right local pro for your project
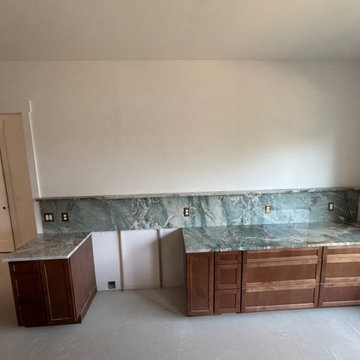
 Rocky Tops Granite & Marble LLC
Tiffany Crystal quartzite is one of those stones that earns its keep in a kitchen. It's got that cool, crystalline background, whites and grays moving quietly across the surface with enough sparkle in the light to keep it from feeling flat. It reads clean and bright without going stark, which is why it works so well in a kitchen where people actually cook and gather, not just admire counters from across the room.
Quartzite is real stone, not engineered, so it comes with natural hardness that holds up to daily kitchen abuse. It resists scratching and handles heat well, though we still tell folks to use a trivet, because no counter needs a hot pan set straight on it just to prove a point. Sealing it right after install and keeping up with it over the years keeps the surface performing the way it should, and Tiffany Crystal takes a seal well because of its tight, dense structure.
Fabricating a slab like this takes some care in the layout. We spend real time bookmatching and dry-fitting pieces so the movement in the stone flows across seams instead of fighting itself at the corners. On a kitchen island or a run of perimeter counters, getting that continuity right is what separates a good installation from one that just gets the measurements correct. We kept the edge eased here, which is the right call on a stone with this much personality. It doesn't need extra shaping to draw the eye, the stone's already doing that work.
Day to day, this is a kitchen counter that's going to live hard and look good doing it. Quartzite shrugs off knife marks, stands up to acidic spills, and cleans up with regular dish soap and water. It's the kind of surface you stop babying after the first few months because it simply holds up.
Jobs like this one in Lexington are what we like seeing come through the shop. It's a straightforward kitchen application done with a stone that's got real depth to it, installed by people who care about how the seams and the veining line up when the job's done. That's the kind of work that keeps the Midlands trade honest.

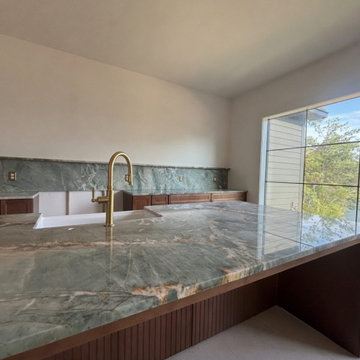 Rocky Tops Granite & Marble LLC
Tiffany Crystal quartzite is one of those stones that earns its keep in a kitchen. It's got that cool, crystalline background, whites and grays moving quietly across the surface with enough sparkle in the light to keep it from feeling flat. It reads clean and bright without going stark, which is why it works so well in a kitchen where people actually cook and gather, not just admire counters from across the room.
Quartzite is real stone, not engineered, so it comes with natural hardness that holds up to daily kitchen abuse. It resists scratching and handles heat well, though we still tell folks to use a trivet, because no counter needs a hot pan set straight on it just to prove a point. Sealing it right after install and keeping up with it over the years keeps the surface performing the way it should, and Tiffany Crystal takes a seal well because of its tight, dense structure.
Fabricating a slab like this takes some care in the layout. We spend real time bookmatching and dry-fitting pieces so the movement in the stone flows across seams instead of fighting itself at the corners. On a kitchen island or a run of perimeter counters, getting that continuity right is what separates a good installation from one that just gets the measurements correct. We kept the edge eased here, which is the right call on a stone with this much personality. It doesn't need extra shaping to draw the eye, the stone's already doing that work.
Day to day, this is a kitchen counter that's going to live hard and look good doing it. Quartzite shrugs off knife marks, stands up to acidic spills, and cleans up with regular dish soap and water. It's the kind of surface you stop babying after the first few months because it simply holds up.
Jobs like this one in Lexington are what we like seeing come through the shop. It's a straightforward kitchen application done with a stone that's got real depth to it, installed by people who care about how the seams and the veining line up when the job's done. That's the kind of work that keeps the Midlands trade honest.
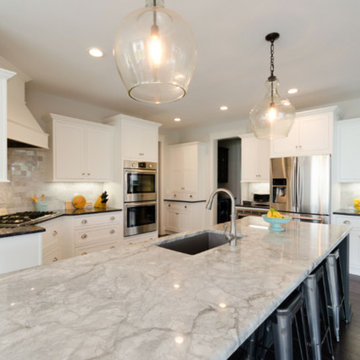
 Inde Kitchen Remodelers
“Indē helped us to understand the complexities of this seemingly simple job, and regularly, with a lot of enthusiasm and positive attitude. They supported their crew and made us comfortable about trusting their directives and recommendations.”
theindestudio.com // (585) 249-8100
#Roc #NY #RocHomes

Sponsored
Sunbury, OH

J.Holderby - Renovations
Franklin County's Leading General Contractors - 2X Best of Houzz!
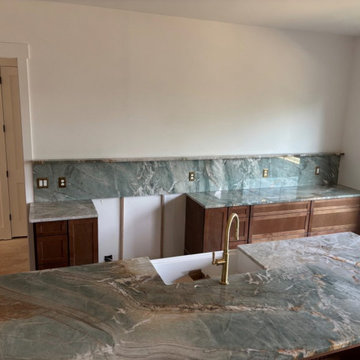 Rocky Tops Granite & Marble LLC
Tiffany Crystal quartzite is one of those stones that earns its keep in a kitchen. It's got that cool, crystalline background, whites and grays moving quietly across the surface with enough sparkle in the light to keep it from feeling flat. It reads clean and bright without going stark, which is why it works so well in a kitchen where people actually cook and gather, not just admire counters from across the room.
Quartzite is real stone, not engineered, so it comes with natural hardness that holds up to daily kitchen abuse. It resists scratching and handles heat well, though we still tell folks to use a trivet, because no counter needs a hot pan set straight on it just to prove a point. Sealing it right after install and keeping up with it over the years keeps the surface performing the way it should, and Tiffany Crystal takes a seal well because of its tight, dense structure.
Fabricating a slab like this takes some care in the layout. We spend real time bookmatching and dry-fitting pieces so the movement in the stone flows across seams instead of fighting itself at the corners. On a kitchen island or a run of perimeter counters, getting that continuity right is what separates a good installation from one that just gets the measurements correct. We kept the edge eased here, which is the right call on a stone with this much personality. It doesn't need extra shaping to draw the eye, the stone's already doing that work.
Day to day, this is a kitchen counter that's going to live hard and look good doing it. Quartzite shrugs off knife marks, stands up to acidic spills, and cleans up with regular dish soap and water. It's the kind of surface you stop babying after the first few months because it simply holds up.
Jobs like this one in Lexington are what we like seeing come through the shop. It's a straightforward kitchen application done with a stone that's got real depth to it, installed by people who care about how the seams and the veining line up when the job's done. That's the kind of work that keeps the Midlands trade honest.
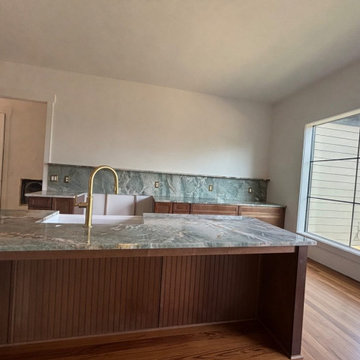 Rocky Tops Granite & Marble LLC
Tiffany Crystal quartzite is one of those stones that earns its keep in a kitchen. It's got that cool, crystalline background, whites and grays moving quietly across the surface with enough sparkle in the light to keep it from feeling flat. It reads clean and bright without going stark, which is why it works so well in a kitchen where people actually cook and gather, not just admire counters from across the room.
Quartzite is real stone, not engineered, so it comes with natural hardness that holds up to daily kitchen abuse. It resists scratching and handles heat well, though we still tell folks to use a trivet, because no counter needs a hot pan set straight on it just to prove a point. Sealing it right after install and keeping up with it over the years keeps the surface performing the way it should, and Tiffany Crystal takes a seal well because of its tight, dense structure.
Fabricating a slab like this takes some care in the layout. We spend real time bookmatching and dry-fitting pieces so the movement in the stone flows across seams instead of fighting itself at the corners. On a kitchen island or a run of perimeter counters, getting that continuity right is what separates a good installation from one that just gets the measurements correct. We kept the edge eased here, which is the right call on a stone with this much personality. It doesn't need extra shaping to draw the eye, the stone's already doing that work.
Day to day, this is a kitchen counter that's going to live hard and look good doing it. Quartzite shrugs off knife marks, stands up to acidic spills, and cleans up with regular dish soap and water. It's the kind of surface you stop babying after the first few months because it simply holds up.
Jobs like this one in Lexington are what we like seeing come through the shop. It's a straightforward kitchen application done with a stone that's got real depth to it, installed by people who care about how the seams and the veining line up when the job's done. That's the kind of work that keeps the Midlands trade honest.

 SabaRehman Abdulrehman
Phoenix's food scene is vibrant and thriving, but also one of the most closely watched in the country. Health inspectors in Maricopa County are strict, and customers expect spotless dining spaces.
To stay competitive, restaurant owners and food vendors must stay on top of evolving health codes, sanitation protocols, and food safety benchmarks. That starts with a firm grip on restaurant cleaning safety standards. Ignoring sanitation rules risks more than bad reviews. It invites citations, customer complaints, and operational shutdowns.
Whether you're operating a food truck or a restaurant, following these Phoenix cleaning standards helps you stay compliant, pass health inspections, and build customer trust.
Importance of a Clean Phoenix Restaurant that Follows Food Health and Safety Standards
The restaurant industry in Phoenix operates under strict oversight. The Maricopa County Environmental Services Department conducts regular inspections, and violations can result in fines or closures. In this climate, restaurant cleaning is not just a hygiene standard. It is a business-critical measure.
Proper food handling and establishment cleaning protocols reduce the risk of foodborne illnesses, control pests, protect equipment, and keep your staff safe. Inconsistent practices, on the other hand, can quickly become liabilities.
Start With the Food Code
Phoenix food vendors must comply with the 2017 FDA Food Code as adopted by Maricopa County. This includes rules on:
- Sanitizing food-contact surfaces after each use
- Maintaining proper water temperatures for dishwashing
- Cleaning restrooms frequently and keeping them stocked
- Storing cleaning chemicals away from prep areas
- Daily: Wipe prep tables, mop floors, clean grills, sanitize cutting boards
- Weekly: Deep clean kitchen hoods, polish cooking equipment, disinfect drains
- Monthly: Check pest control measures, clean freezer coils, and inspect HVAC filters
- Using the right sanitizers and PPE
- Logging cleaning times and who performed the task
- Identifying signs of mold, grease buildup, or rodent activity
- Conducting thorough surface cleaning to ensure all food-contact surfaces are sanitized regularly
- Food-safe and non-corrosive
- Effective against norovirus, salmonella, and E. coli
- Clearly labeled and stored in original containers
- Seal gaps around doors and pipes
- Store dry goods in sealed, elevated containers
- Keep outdoor waste bins locked and distanced from entry points
- Record cleaning completion in real time
- Alert managers when tasks are missed
- Keep a historical record for inspections
- Is certified and understands the Arizona food codes
- Provides documented service reports
- Offers customized cleaning plans
- Offers flexible scheduling around your operating hours
- Cross-contamination prevention: Regularly clean food prep surfaces and tools, and use separate equipment for raw meats, vegetables, and ready-to-eat foods. Proper cleaning prevents any contact with food that could lead to cross-contamination and affects food quality.
- Temperature monitoring: While not directly related to cleaning, maintaining proper food temperature is essential. Hot foods should be stored above 140°F, and cold foods below 40°F. Regularly monitor temperatures and clean temperature gauges to ensure accuracy.
- Proper storage: Use clean storage containers and shelving for food storage, keeping items off the floor. Ensure all food is sealed and labeled to avoid contamination risks and comply with food safety standards.
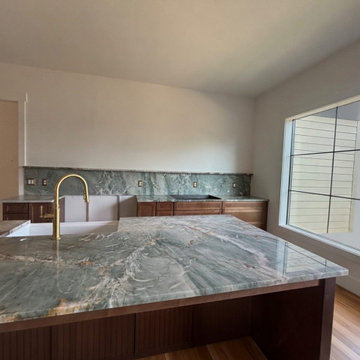 Rocky Tops Granite & Marble LLC
Tiffany Crystal quartzite is one of those stones that earns its keep in a kitchen. It's got that cool, crystalline background, whites and grays moving quietly across the surface with enough sparkle in the light to keep it from feeling flat. It reads clean and bright without going stark, which is why it works so well in a kitchen where people actually cook and gather, not just admire counters from across the room.
Quartzite is real stone, not engineered, so it comes with natural hardness that holds up to daily kitchen abuse. It resists scratching and handles heat well, though we still tell folks to use a trivet, because no counter needs a hot pan set straight on it just to prove a point. Sealing it right after install and keeping up with it over the years keeps the surface performing the way it should, and Tiffany Crystal takes a seal well because of its tight, dense structure.
Fabricating a slab like this takes some care in the layout. We spend real time bookmatching and dry-fitting pieces so the movement in the stone flows across seams instead of fighting itself at the corners. On a kitchen island or a run of perimeter counters, getting that continuity right is what separates a good installation from one that just gets the measurements correct. We kept the edge eased here, which is the right call on a stone with this much personality. It doesn't need extra shaping to draw the eye, the stone's already doing that work.
Day to day, this is a kitchen counter that's going to live hard and look good doing it. Quartzite shrugs off knife marks, stands up to acidic spills, and cleans up with regular dish soap and water. It's the kind of surface you stop babying after the first few months because it simply holds up.
Jobs like this one in Lexington are what we like seeing come through the shop. It's a straightforward kitchen application done with a stone that's got real depth to it, installed by people who care about how the seams and the veining line up when the job's done. That's the kind of work that keeps the Midlands trade honest.

 Free Lancing
Effective residential construction project management is crucial in today’s fast-moving building industry. It means overseeing every step of building a home, from planning to finishing, to ensure projects are completed time, within budget, and with high quality. Unlike commercial projects, residential projects require special attention to meet homeowners' unique needs and wishes, requiring a customized approach from the beginning to the end.
In 2025, the construction sector will use advanced technologies like AI and integrated project delivery (IPD) to streamline processes and improve stakeholder collaboration. However, project managers face significant challenges, including managing risks, maintaining quality control, and ensuring effective communication among team members.
A WIP Report (Work-in-Progress Report) is a key tool that helps track a project's budget, progress, and resource use. It provides clear insights, making managing costs easier, avoiding delays, and making informed decisions.
By adopting best practices and using modern construction management tools, project managers can overcome these challenges and deliver successful residential construction projects that meet client expectations and contribute to a sustainable future.
This article provides a brief overview of residential construction project management, highlights its importance, and touches on the challenges faced by project managers while incorporating the latest trends and technologies in the field.
Types of Residential Construction Management
Here are the different types of Residential Construction Management:
Single-Family Homes: These are standalone houses built for individual families. Managing these projects involves overseeing construction from planning to completion, ensuring that the home meets the owner's preferences and budget.
Multi-Family Housing: This includes apartments, condominiums, and townhouses. Projects of this type require managing multiple units, often with shared facilities, and ensuring compliance with local building codes.
Custom Home Building: This involves constructing homes tailored to specific client needs. Close collaboration with architects and designers is required to ensure the house reflects the owner's personality and preferences.
Home Renovation and Remodeling: These projects focus on updating or expanding existing homes. They often involve working with subcontractors for specialized tasks like electrical or plumbing work.
Components of Residential Construction Project Management
Managing a residential construction project requires carefully coordinating people, materials, and timelines. A well-structured approach ensures efficiency, cost control, and high-quality results.
Roles and Responsibilities
A project manager plays a vital role in residential construction. They oversee every step from planning to completion and ensure the project stays on schedule, within budget, and meets quality standards.
Project Manager’s Role in Home Construction
The project manager is responsible for organizing tasks, managing resources, and solving problems that arise during construction. They coordinate between different teams, track progress, and ensure safety regulations are followed.
Collaboration with Contractors, Architects, and Stakeholders
Successful residential construction requires teamwork. Project managers work closely with architects to bring designs to new heights, coordinate with contractors to manage labor and materials, and keep stakeholders (such as homeowners and investors) informed about project updates.
Client Communication and Expectations Management
Clear communication with clients is essential. The project manager keeps homeowners updated on timelines, changes, and challenges. Setting realistic expectations and providing regular updates, they help avoid misunderstandings and keep the project running smoothly.
Project Scope & Planning
Practical project planning sets the foundation for a successful residential construction project. It ensures clear goals, minimizes risks, and keeps the project on track.
Defining Project Objectives and Deliverables:
Clearly outlining what needs to be done and what the final result should look like is essential. This involves setting specific, measurable goals that align with the homeowner's vision and budget.
Managing Homeowner Expectations and Scope Creep:
Homeowners often have changing needs or ideas. Effective project managers must manage these expectations to prevent "scope creep," which can delay projects and increase costs. This involves open communication and setting clear boundaries.
Ensuring Compliance with Zoning Laws and Permits:
Before construction begins, it's crucial to ensure that all necessary permits are obtained and that the project complies with local zoning laws. This step avoids costly fines and delays, ensuring the project moves forward smoothly.
Budgeting & Cost Control
Proper budgeting is essential for keeping residential construction projects financially viable. Effective cost management prevents overspending and ensures profitability.
Accurate Cost Estimation for Residential Projects
A precise cost estimate considers labor, materials, permits, and unexpected expenses. Using historical data and Sage 300 CRE for financial management improves accuracy and helps set realistic budgets.
Budget Allocation and Tracking
Allocating funds efficiently ensures that each phase of the project receives the necessary resources. Tracking expenses through Construction & Financial Dashboards allows for real-time monitoring and early detection of budget deviations.
Preventing Budget Overruns
Uncontrolled costs can derail a project. Regular financial reviews, automated alerts for overspending, and contingency planning help keep expenses in check and prevent financial strain.
Scheduling & Timeline Management
Timely project completion is crucial in residential construction. Effective scheduling minimizes delays and ensures a smooth workflow.
Creating Detailed Project Schedules
A structured schedule outlines all tasks, deadlines, and dependencies. Breaking down the project into phases, planning, execution, and finishing, helps maintain order and clarity.
Preventing Delays & Meeting Deadlines
Delays can result from labor shortages, weather conditions, or supply chain issues. To avoid problems, it’s good to check for risks ahead of time, add extra time to schedules, and keep everyone on the same page.
Using Gantt Charts and Critical Path Methods
CPM for Construction helps identify critical activities that directly impact project completion, while Gantt charts provide a visual timeline of tasks. Both tools optimize scheduling and improve efficiency.
Residential Construction Project Management Phases
Managing a residential construction project effectively requires a structured approach through various phases. Each phase plays a critical role in ensuring the project's success, from initial planning to completion.
Pre-Construction Phase
The pre-construction phase sets the foundation for a smooth and efficient building process. Proper planning at this stage helps prevent costly changes and delays later.
Site Analysis & Approvals: A thorough site analysis assesses soil conditions, topography, and environmental factors. Feasibility studies evaluate project viability, including costs and regulatory compliance. Obtaining zoning approvals, permits, and other legal clearances is crucial before breaking ground.
Selecting Materials and Procurement Strategies: Choosing the right materials impacts durability, sustainability, and cost efficiency. A well-planned procurement strategy, including bulk purchasing and reliable supplier partnerships, ensures timely delivery and cost savings. Using Sage 300 CRE for procurement management helps streamline material sourcing and financial planning.
Construction Phase
The construction phase transforms plans into reality. Effective coordination and strict quality control ensure a successful build.
Resource Allocation and Workflow Coordination: Efficiently managing labor, equipment, and materials is key to maintaining progress. Using CPM for Construction, project managers can allocate resources strategically, prevent bottlenecks, and optimize workflows for timely completion.
Project Closeout & Handover
The final phase of residential construction project management is crucial for ensuring a smooth transition from construction to occupancy. Proper closeout procedures guarantee quality, client satisfaction, and long-term project success.
Final Inspections and Quality Assurance: Before finishing the project, a final inspection checks that everything meets safety rules and quality standards. Any problems need to be fixed quickly. Using Procore helps make inspections and tracking issues easier, ensuring a high-quality final product.
Client Walkthrough and Support: A final check helps homeowners see the finished work, ask questions, and make sure it meets their expectations. This is also a chance to explain important home features and maintenance tips. Good communication here builds trust and strengthens relationships.
Warranty Management and Feedback: Efficient warranty management ensures clients get quick help for any issues after construction. A clear process for tracking requests and keeping in touch with homeowners boosts satisfaction. Collecting feedback helps improve future projects. Using S-Curve Forecasting tracks performance trends and refines management strategies.
Software for Residential Construction Project Management
The integration of technology in residential construction project management has revolutionized the way projects are planned, executed, and monitored. Digital tools streamline operations, reduce costs, and improve communication, making them essential for modern construction firms.
Importance of Digital Tools
Investing in digital tools is crucial for construction firms as it transforms the industry by enhancing efficiency, accuracy, and collaboration across the entire project lifecycle. They also improve project management by streamlining processes, automating tasks, and facilitating real-time stakeholder communication.
Top Construction Management Software for Residential Projects
Several software solutions are available for managing residential construction projects:
Procore: Known for its comprehensive project management features, including document management and collaboration tools.
Sage 300 CRE: Offers robust accounting and financial management capabilities, ideal for large-scale construction projects.
Buildertrend: Specializes in residential construction, providing tools for project scheduling, budgeting, and client communication.
CoConstruct: Focuses on custom home building and remodeling, offering features for estimating, scheduling, and project management.
WIP Reports: Useful for tracking work-in-progress and managing project finances effectively.
Features Comparison and Best Use Cases:
Procore: Best for large projects requiring extensive collaboration and document management.
Sage 300 CRE: Ideal for firms needing robust financial management.
Buildertrend: Suitable for residential builders focusing on client communication and project scheduling.
CoConstruct: Perfect for custom home builders who need detailed estimating and scheduling tools.
WIP Reports: Useful for firms needing to track project finances closely.
How Software Improves Project Efficiency
Construction management software significantly enhances project efficiency in several ways:
Automating Accounting and Job Costing: Software like Sage 300 CRE automates financial tasks, reducing manual errors and improving budget tracking.
Streamlining Document Management and Communication: Tools like Procore centralize documents and facilitate real-time communication among team members, reducing misunderstandings and delays.
Mobile-Friendly Solutions for Real-Time Tracking: Mobile apps from platforms like Buildertrend allow for on-site access to project data, enabling real-time tracking and decision-making.
These digital tools and software solutions are essential for modern residential construction project management, offering benefits such as improved efficiency, enhanced collaboration, and better financial control.
Challenges in Residential Construction Project Management
Residential construction projects face a variety of challenges that can impact their success. Here are some of the key issues project managers encounter:
Managing Subcontractors and Labor Shortages
One of the biggest challenges in residential construction is managing subcontractors and dealing with labor shortages. Subcontractors often have their own schedules and priorities, which can lead to delays if not coordinated properly. Additionally, labor shortages can slow down projects and increase costs due to the need for overtime or hiring temporary workers.
Budget Overruns and Unexpected Costs
Budget overruns are common in residential construction due to factors like material price fluctuations, unexpected site conditions, or changes in project scope. Effective budget management involves regularly monitoring expenses and having contingency plans for unexpected costs.
Changing Construction and Eco Rules
Construction and Eco Rules are always changing, so project managers need to keep up with the latest regulations. This involves following guidelines for saving energy, protecting the environment, and ensuring safety. Ignoring these rules can lead to fines, delays, or even stopping the project.
Best Practices
To ensure your residential construction projects run smoothly and successfully, follow these essential best practices:
Setting Clear Project Goals and Milestones
Clearly defining what you want to achieve is the first step to success. Set specific, measurable, achievable, relevant, and time-bound (SMART) goals. This helps everyone involved understand what needs to be done and by when. For example, instead of saying "build a house," say "build a house with three bedrooms and two bathrooms within the next nine months."
Stakeholder Collaboration
Good communication is key to keeping everyone on the same page. Regular meetings with contractors, suppliers, and homeowners help prevent misunderstandings and ensure that everyone knows what's happening and what's next. This open dialogue also helps resolve issues quickly, preventing small problems from becoming big delays.
Using Data-Driven Insights for Decision-Making
Making decisions based on facts rather than guesses is crucial. Use data and analytics to understand project progress, identify potential issues early, and make informed decisions. For instance, if data shows that a particular material is consistently causing delays, you can plan ahead to avoid those delays in the future.
Proactive Risk Management Strategies
Things don't always go as planned, so being prepared is essential. Identify potential risks early and have a plan to manage them. This might include having backup suppliers, planning for weather conditions, or setting aside extra funds for unexpected expenses. Being proactive can prevent small issues from turning into major problems.
Conclusion
Effective residential construction project management requires careful planning, clear communication, and the right digital tools. From single-family homes to multi-family housing and custom projects, managing timelines, budgets, and quality is essential for success.
By following best practices, using project management software, and staying ahead of industry trends, project managers can ensure smooth execution and client satisfaction despite challenges like labor shortages, budget overruns, and regulatory compliance; modern technology and strategic planning help mitigate risks.
Construction firms can improve efficiency, enhance collaboration, and maintain financial control by adopting advanced tools like Procore, Sage 300 CRE, and Buildertrend. A well-managed project delivers a quality home and builds trust and long-term success in the industry.
FAQs
What is residential construction project management?
It involves overseeing all aspects of building residential properties, from initial planning and design to construction and completion, ensuring projects are completed on time, within budget, and to the desired quality standards.
How can I prevent budget overruns in my construction project?
Accurate cost estimation, continuous budget tracking, and having contingency plans for unexpected expenses are key strategies to prevent budget overruns.
What are the main stages of a residential construction project?
The primary stages include design, pre-construction, procurement, and construction.
How does construction management software improve project efficiency?
It streamlines processes like scheduling, budgeting, and communication, providing real-time data access and collaboration among stakeholders, which enhances overall project efficiency.
How can I ensure my project complies with local building codes and regulations?
Engage professionals familiar with local laws, obtain all necessary permits before starting, and conduct regular inspections to ensure adherence to building codes and regulations.
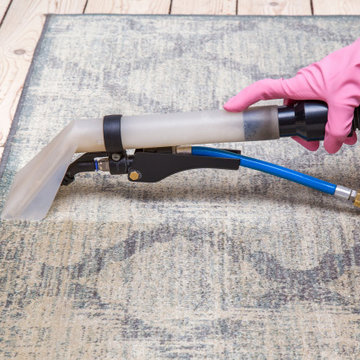
 Kaoud Carpet & Rugs
Area rug cleaning is important for several reasons. We believe maintaining proper care of your rug by regular washing will remove dirt, stains and dust that can build up over time and lay in the foundation of your rug. Regular rug cleaning will help maintain a healthy living environment, preventing dust mites, bacteria and other allergens from living in your rug. At Kaoud Carpet & Rugs in Wilton, all rug washing is performed by hand and on premise. Special attention is given solely to your rug by one of our cleaning team. There are no large tubs of liquids that will merge from other rug cleaning jobs. We use a hand washing technique and are able to closely monitor the washing process step by step. Regular washing will also help maintain the value of your rug.
Sponsored
Sunbury, OH
J.Holderby - Renovations
Franklin County's Leading General Contractors - 2X Best of Houzz!
 Tile Doctor Ltd
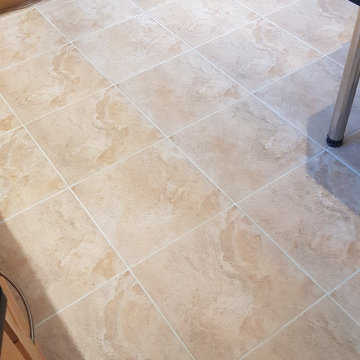
This Ceramic Tiled kitchen floor at a property in Wickersley was proving to be a pain for our clients, whatever they did the grout just looked dark, dirty, and unsightly. No amount of scrubbing would make a difference and eager to find a solution they wasted a lot of money on various products trying to clean the grout lines, but nothing had worked. Ceramic tiles are glazed which makes them very easy to clean, grout however is a different story.
Wickersley is in Rotherham close to the 3 main motorways in South Yorkshire, the M1, M18 and A1. The village took its’ name from the Wickersley family who eventually moved to Sheffield and built the famous Broom Hall, incredibly we restored 100sqm of stone flooring in that very house not too long back. It was a beautiful restoration.
On the first visit we tried a few of our products to clean the grout lines up but sometimes grout just can’t be cleaned, if the staining has penetrated the surface layer and gone right down into the grout it is stained forever. Grinding the grout out and putting in new grout is a big messy expensive job. For this reason, our grout recolouring service is an ideal option and the best thing about it is once it is recoloured the grout is protected and stain resistant.
Tile Doctor have a range of ten grout colours to choose from and in this case our client chose the light grey colour. They were happy to go ahead with our quote and just thankful that we were able to do it relatively inexpensively and without making a huge mess!
Work started by treating the grout lines with an acidic pre-treater that comes with the Grout Colourant kit that Tile Doctor sell, Tile Doctor Grout Colourant Pre-Treat cleaner, this gets rid of any contamination and prepares the grout for the colourant, so you get a superior bond.
Once dry the Light Grey Grout Colourant was applied the grout lines with a small brush. A steady hand is required, and you need to ensure any excess is immediately wiped away before it dries. It is quite a slow job, but very satisfying when you see the difference it makes. Glazed tiles are sealed during manufacture, so we do not need to apply a sealer like we do on most of our jobs.
The customer was over the moon with the transformation, the grubby grout lines had been irradicated and because the grout colourant forms a barrier over the grout, they will remain looking good for a long time to come. For aftercare cleaning I recommended using Tile Doctor Neutral Tile Cleaner which is pH neutral and gentle enough to use on a regular basis, it also has a nice fresh smell.
Matthew Lovett
South Yorkshire TIle Doctor
 Tile Doctor Ltd
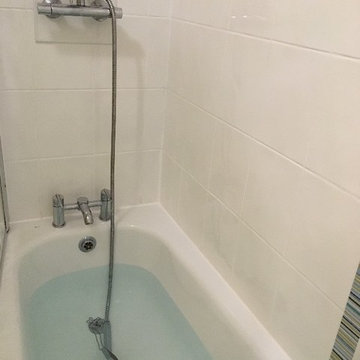
A client with a high-rise apartment in Manchester city centre contacted us in relation to the look of their bathroom tiles. The grout had become grubby and black with mould and it was clear from their message that they were considering have the grout replaced in order to freshen up the bathroom.
We discussed the problem over the telephone, and they emailed a picture of the bathroom across so I could get a better idea of what needed doing. It turns out that the apartment had been rented out previously and they needed the bathroom renovating so they could start letting it again. Clearly, they were keen to have the work completed as soon as possible. Fortunately, we are sometimes able to come out on short notice, especially for small jobs like this and so were able to do the work the following week
Re-grouting is a lot of work and very time consuming so I explained the benefits of Grout Colouring which is much quicker and results in a more practical finish as I will explain. There was a small issue with parking as one would expect from the city centre, but we were able to use one of the parking spaces of a neighbour in the basement of the building.
My first task was to get the grout as clean as possible before applying the colourant and given the amount of mould I decided to apply Tile Doctor Duo-Clean which is a Tile Cleaner/Mould Remover and ideal for use on ceramic tile and grout. The product was sprayed onto the tiles and grout and then scrubbed in by hand to get the grout as clean as possible. I also used a powerful steam cleaner to get the grout as clean as possible before rinsing the soil off with water. This process went well, and the grout looked much cleaner afterwards but was now a little patchy in places due to deep staining.
It’s worth noting that mould thrives in damp warm conditions and can easily be controlled by ensuring the bathroom has adequate ventilation. Some modern showers have a function that cool the bathroom down after use by running the shower on a cold setting. Improving cross-ventilation by leaving the bathroom door and a window open can also improve the situation and of course you can always apply Tile Doctor Duo-Clean on a regular basis.
Once the grout was dry and as clean as it could be, I applied a White Tile Doctor Grout Colourant along the grout lines with a small brush taking care to wipe off any excess from the tiles as I went. Only one bottle of colourant was needed, and I have found baby wipes work well when wiping off the excess.
The last step in the bathroom renovation was to strip out all the old mouldy silicone between the bath and the tiles and replace with new mould resistant silicone.
The cleaning and grout colour completely transformed the look of the bathroom leaving it looking fresh. The grout which was previously dark and patchy was now a consistent white colour giving the impression it had only been recently tiled. The colourant also forms an epoxy barrier over the grout that will prevent dirt from becoming ingrained in the grouts surface going forward, it’s also much easier to clean.
The customer was most impressed with the result and has informed us since that they will back in touch about renovating the grout in their own home! They left the following comment on the Tile Doctor website.
“Kamila made a wonderful job cleaning my grout and silicone. The bathroom looks like new. She was also easy to deal, very friendly and professional. Thank you!”
Alex Logozny
Greater Manchester Tile Doctor
 Tile Doctor Ltd
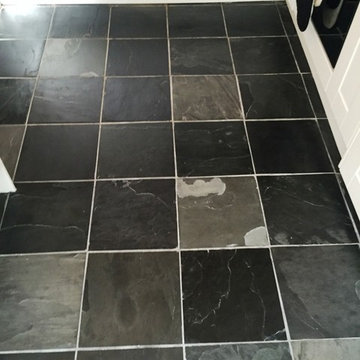
These Slate kitchen floor tiles at a property in Oxford were in good physical condition, but had become dull over time due to heavy usage, and upon close inspection the grout was stained. The customer contacted me as she was keen to get the tiles back to looking their best. This would require a thorough clean and the application of a fresh sealer.
While Slate floor tiles are reputed to be hard wearing and damage resistant – and are therefore a popular choice for high traffic areas like kitchens – this does not exclude them from needing regular maintenance.
To begin, I mixed a strong solution of Tile Doctor Pro Clean and water. Pro-Clean is a versatile cleaner that when used in a weak dilution can be used as a regular cleaner for most types of natural stone floor, including more sensitive stones such as Limestone and Marble.
The cleaning was then spread across the surface area of the floor, and left it to dwell for ten minutes to allow the solution to seep into the pores of the stone and lift the ingrained dirt to the surface. Pro-Clean in a strong dilution also functions as a stripping product, meaning it works to strip away any old and ineffectual sealer.
I then scrubbed the solution into the floor using a stiff scrubbing brush, paying particular attention to the grout in order to break down the visible staining. The tiles and grout lines came up really well during the cleaning process – this became clear once I had rinsed the floor and removed the residue using a wet vacuum.
With the customer eager to have the job completed quickly, I installed portable room dryers and utilised a heat gun to dry the floor, allowing me to seal it on the same day.
Once I had ensured the floor was completely dry, I commenced the sealing process by firstly applying a coat of Tile Doctor Stone Oil, a product which is designed to bring out all of the natural dark shades in the Slate.
When this was dry, I applied a single coat of Tile Doctor Colour Grow. This is an impregnating sealer, meaning that it soaks into pores of the stone to provide durable protection from within against ingrained dirt and stains. Colour Grow also enhances the natural colours in the stone even further.
The customer was amazed by just how big a difference could be made to the tiles in the space of just a day. Although the tiles were generally in very good nick, my main task was to be liven them up – judging by the before and after photos, I think this was achieved. And, now that they have been treated to a fresh seal, the tiles will be prevented from quickly becoming dull again.
Barry Woodward
Oxfordshire Tile Doctor
 Tile Doctor Ltd
Roundhay is an affluent area of North Leeds which is well-known for the fantastic Roundhay Park. The park is large enough to contain two lakes, extensive woodland, formal gardens and even golf courses! It’s the premier attraction for anyone fortunate enough to live in the area, or anyone visiting from nearby.
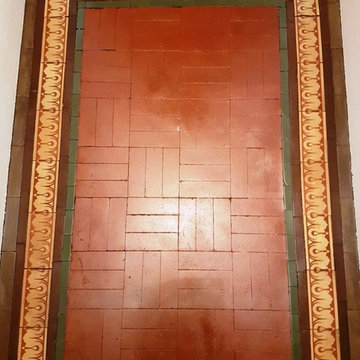
I recently visited a customer who lives in Roundhay and was looking for help in restoring the small Victorian tiled entranceway at the front of her house. The tiles were in a shocking state, but it’s not hard to imagine why – the entrance to a house receives a lot of foot traffic and is not typically taken care of regularly. These tiles were also marked with paint splashes left over from decoration work, making them look even worse.
The appearance of the entranceway did not set the right standard for the rest of the house, so the property owner was keen to have it restored professionally.
The appearance of the entranceway did not set the right standard for the rest of the house, so the property owner was keen to have it restored professionally.
The appearance of the entranceway did not set the right standard for the rest of the house, so the property owner was keen to have it restored professionally.
The appearance of the entranceway did not set the right standard for the rest of the house, so the property owner was keen to have it restored professionally.
I informed the customer that I could have the tiles rejuvenated within a day’s work. To begin, I used a scrapper and wire wool brush to manually remove some of the most stubborn paint marks.
Following this, I applied a strong solution of Tile Doctor Remove and Go, before leaving the product to dwell for about an hour. Remove and Go is multi-purpose stripping agent that can remove any adhesive and paint deposits, as well as many types of old coatings and sealers.
To work the product deep into the tiles, I agitated with an abrasive cleaning pad and then rinsed the area with fresh water. This had the desired affect and all the unsightly paint marks were removed.
Next, I gave the floor another thorough clean to remove any general muck and ingrained dirt. This was done using our high-alkaline cleaner, which we typically use on Victorian tiles, known as Tile Doctor Pro-Clean. In fact, Pro-Clean is a very reliable cleaner for all types of tile and grout including natural stone, Limestone, Slate and Travertine, amongst others.
Since I told the customer I would able to finish the job within a day, I dried the floor quickly using a heat gun so it could be sealed there and then. To seal the floor, I applied four coats of Tile Doctor Seal and Go, which is a topical sealer formulated to provide maximum protection along with a high-quality, low sheen finish.
As you can see from the photos above, the entranceway was absolutely transformed. These tiles are now a true asset to the rest of the property, rather than looking out of place! I’m please to say my customer was amazed by how quickly such a big difference could be made and left the following glowing feedback.
I can’t believe the before and after pictures. The restoration of the tiles is top quality, they are so much brighter and richer in colour – especially without the garage paint hiding the detail! Nigel did an amazing job, even better than I could have hoped for, and is a lovely guy as well. Would definitely recommend.
Nigel Stoker
North West Yorkshire Tile Doctor
 Tile Doctor Ltd
This Tumbled Travertine tiled floor at a beautiful house in Horley had been poorly maintained through the years using the wrong type of sealer which quickly wore down allowing dirt to become ingrained in the stone. The owner had become concerned about the state of the tiles and decided it was time to call in an expert that could restore the tiles to a condition that complimented the environment in which it was situated.
Travertine is known for being very distinctive in character and very durable, making it a very popular choice for tiled flooring in properties worldwide. However, the stone does require regular professional maintenance and polishing to keep it looking it top shape and home owners rarely realise this when they decide to have it installed. Fortunately, in the UK at least you can rely on your local tile doctor to maintain it for you.
The first part of the job involved giving the floor a thorough clean to remove what was left of old sealers and any polishing compounds that remained on the floor. Before beginning that however I brought in all my equipment and products into the house and then prepped the area by taping up the woodwork to protect it during the renovation process.
To remove what was left of the old sealers and other coatings still present on the floor a strong solution of Tile Doctor Remove and Go was applied to the floor and left to soak in for about ten minutes before being actively worked in with a rotary machine fitted with a black scrubbing pad. The solution turned black with the soil as it was lifted out of the pores of the stone and it was then rinsed off with water and extracted with a wet vacuum.
Following this, we moved on to a process we know as burnishing that hones the stone and brings up the polished appearance. Working in sections due to the size of the floor It involves the application of a series of diamond encrusted burnishing pads from coarse through to very fine.
The coarse 400-grit pad fitted to the rotary floor buffer and run over the floor using only water for lubrication. The water turns into a slurry as the pad does its job removing dirt and this has to be rinsed off the floor and extracted with the wet vacuum before applying the next pad. The process was then repeated with medium 800 grit pad for an initial polish followed by the Fine 1500 grit pad for the second polish using water for lubrication and rinsing and extracting in between each pad.
The last pad is a very fine 3000 grit pad for the final polish and is applied with only a little water sprayed onto the floor using a technique we call a Spray Burnish. This last pad really brings up the polished appearance of the stone.
To bring up the appearance of the stone even further and add a really durable polish Tile Doctor Shine Powder was applied. This is a crystallising powder sealer that ensures a very high shine and a tough, durable finish. This powder is applied directly to the tiles in combination with approximately ½ a litre of water and a soft white buffing pad.
Last step was to add to the protection provided by the Shine Powder with two coats of Tile Doctor Ultra-Seal which is a natural look sealer that doesn’t change the look of the stone and is applied to the stone and grout. This sealer works by seeping into the stone, occupying the pores and preventing dirt from becoming ingrained.
The customer was ecstatic with the results, being particularly pleased that she got the floor looking the way she originally wanted without significant expense, not to mention stress.
Michael Conlon
East Surrey Tile Doctor
 Tile Doctor Ltd
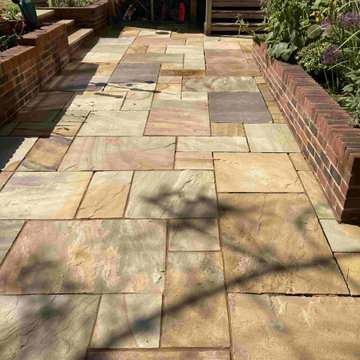
A customer from the Tunbridge Wells borough of Southborough got in touch with me regarding the renovation of their Sandstone Paved Drive and Patio. The paving surrounded the property and since all the facias had recently been renewed on the house the stone was letting the overall appearance of the property down.
It had been sometime since the Sandstone had been cleaned and as you can see from the photos what was once a beautiful stone had now darkened and lost much of its natural colour. I went to the property to do a quick site visit to check what needed to be done. I worked out a quote for cleaning to the stone which was accepted and a convenient time to carry out the work was agreed.
I have a very powerful high pressure cleaning system installed in my van which makes short work of cleaning stone and brick. Not only is it very effective at cleaning its designed as a closed system, so all the waste is extracted back to a large grey water tank in the van. Now you can use an everyday power washer to clean up external stone however they are not as powerful and so take much longer, also the result does not tend to be as good.
It was a large area, so I approached the job in sections and started by pre-wetting the stone with water. Then I applied Tile Doctor Patio & Brick Driveway Cleaner which is a powerful outdoor cleaning solution formulated to power through patio blackspots, lichen, moss, and stains. This is a commercial product designed for professional use so if you are looking at using it yourself, please take care and use the right protection.
The cleaner was left to soak into the really dirty areas whilst I focused on the cleaning the other parts of the drive and patio with the van mounted pressure washer. I was then able to return to the deeper stains later. Using a combination of the Tile Doctor Brick and Patio Cleaner along with our van mounted pressure cleaning system we were able to completely transform the properties kerb appeal.
Applying a sealer now the Sandstone was clean would have improved the look of the stone further and made the patio easier to keep clean going forward; however, it was a very large area which would require a lot of sealer. Keen to keep the cost down it was agreed not to apply a sealer and instead they intend to do more regular cleaning. The patio did look in great condition following the deep cleaning and so difficult to justify at this stage.
My customer was very happy with the transformed patio and the look of delight was clearly visible. It’s a great feeling when you have a happy customer and this was one of those jobs where their satisfaction was so uplifting, especially during these times.
Michael Conlon
South Kent TIle Doctor

 Lux4home™
Where are you from? What is your idea of paradise?
Most of people reading this are likely not to come from Antigua and Barbuda, but after seeing the recent project, which we had a pleasure to handle, you may end up redefining your personal paradise!
FAR FAR AWAY
It was surely one of the most remote locations where our products were delivered. We were comissioned to produce hundreds of square meters of Flat Pebble Tiles and Standing Pebble Tiles which for us and for the client really do the job.
Not only we were taking care of the production, but also we were taking care of the shipping and organized it entirely. Not that it was any problem for us! We are well experienced in the field of export from Indonesia, which makes us probably one of the most professional supplier of Indonesian natural stone sinks, bathtubs and mosaics.
STONE IS OUR PASSION
Why we have been chosen for this project? It's simple:
We are communicative - our team is always ready to discuss your ideas, give advice and provide service that will greatly contribute to your project. With each project we are moving forward, gaining new experience and solving new problems. We never let our clients down - every dispute and inconsistency is solved as quickly as possible, and the project is always finished flawlessly.
We are experts - the numbers are speaking for themselves. Dozens of Stone Bathtubs, thousands of Stone Sinks, or tens of thousands of Pebble Tiles - this is what we produced in the period of just 3 years! All in the greatest achievable quality, thanks to our strict quality control. But quality control would require another article to exhaustively elaborate on...
We cater for all tastes - we encourage you to see our website www.Lux4home.com, where you will find out the diversity of our catalogue. And this is just our regular regular offer! Mind you, each year we produce dozens of customized products for the ones with special taste.
WE ARE WAITING FOR YOUR PROJECT
Take a moment to admire the beautiful project in Antigua. See the gallery and get amazed! We were truly blessed to handle this project, and we are looking forward to handling many more. Perhaps we would find more than a single paradise?
8