
Search results for "Job test" in Home Design Ideas

 E. F. San Juan
Riad Zasha: Middle Eastern Beauty at the Beach
Private Residence / Alys Beach, Florida
Architect: Khoury & Vogt Architects
Builder: Alys Beach Construction
---
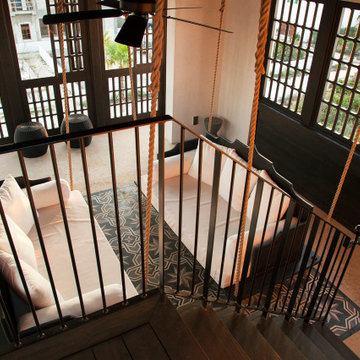
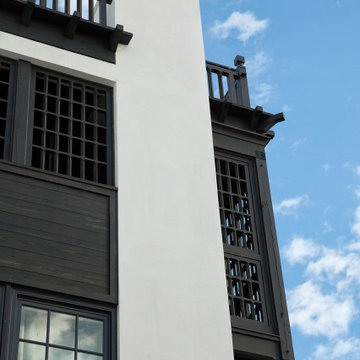
“Riad Zasha resides in Alys Beach, a New Urbanist community along Scenic Highway 30-A in the Florida Panhandle,” says the design team at Khoury & Vogt Architects (KVA), the town architects of Alys Beach. “So named by the homeowner, who came with an explicit preference for something more exotic and Middle Eastern, the house evokes Moroccan and Egyptian influences spatially and decoratively while maintaining continuity with its surrounding architecture, all of which is tightly coded.” E. F. San Juan furnished Weather Shield impact-rated windows and doors, a mahogany impact-rated front door, and all of the custom exterior millwork, including shutters, screens, trim, handrails, and gates. The distinctive tower boasts indoor-outdoor “Florida room” living spaces caged in beautiful wooden mashrabiya grilles created by our team. The execution of this incredible home by the professionals at Alys Beach Construction and KVA resulted in a landmark residence for the town.
Challenges:
“Part of [the Alys Beach] coding, along with the master plan itself, dictated that a tower mark the corner of the lot,” says KVA. “Aligning this with the adjoining park to the south reinforces the axiality of each and locks the house into a greater urban whole.” The sheer amount of custom millwork created for this house made it a challenge, but a welcome one. The unique exterior called for wooden details everywhere, from the shutters to the handrails, mouldings and trim, roof decking, courtyard gates, ceiling panels for the Florida rooms, loggia screen panels, and more—but the tower was the standout element. The homeowners’ desire for Middle Eastern influences was met through the wooden mashrabiya (or moucharaby) oriel-style wooden latticework enclosing the third-story tower living space. Creating this focal point was some of our team’s most unique work to date, requiring the ultimate attention to detail, precision, and planning.
The location close to the Gulf of Mexico also dictated that we partner with our friends at Weather Shield on the impact-rated exterior windows and doors, and their Lifeguard line was perfect for the job. The mahogany impact-rated front door also combines safety and security with beauty and style.
Solution:
Working closely with KVA and Alys Beach Construction on the timeline and planning for our custom wood products, windows, and doors was monumental to the success of this build. The amount of millwork produced meant our team had to carefully manage their time while ensuring we provided the highest quality of detail and work. The location south of Scenic Highway 30-A, steps from the beach, also meant deciding with KVA and Alys Beach Construction what materials should be used for the best possible production quality and looks while adhering to coding and standing the test of time in the harsh Gulfside elements such as high winds, humidity, and salt.
The tower elements alone required the utmost care for building and installation. It was truly a test of skill for our team and Alys Beach Construction to create the corbels and other support pieces that would hold up the wooden oriel windows and latticework screens. We couldn’t be happier with the result and are genuinely honored to have been part of the talented team on such a cornerstone residence in the Alys Beach townscape.
---
Photography courtesy of Alys Beach
 E. F. San Juan
Riad Zasha: Middle Eastern Beauty at the Beach
Private Residence / Alys Beach, Florida
Architect: Khoury & Vogt Architects
Builder: Alys Beach Construction
---
“Riad Zasha resides in Alys Beach, a New Urbanist community along Scenic Highway 30-A in the Florida Panhandle,” says the design team at Khoury & Vogt Architects (KVA), the town architects of Alys Beach. “So named by the homeowner, who came with an explicit preference for something more exotic and Middle Eastern, the house evokes Moroccan and Egyptian influences spatially and decoratively while maintaining continuity with its surrounding architecture, all of which is tightly coded.” E. F. San Juan furnished Weather Shield impact-rated windows and doors, a mahogany impact-rated front door, and all of the custom exterior millwork, including shutters, screens, trim, handrails, and gates. The distinctive tower boasts indoor-outdoor “Florida room” living spaces caged in beautiful wooden mashrabiya grilles created by our team. The execution of this incredible home by the professionals at Alys Beach Construction and KVA resulted in a landmark residence for the town.
Challenges:
“Part of [the Alys Beach] coding, along with the master plan itself, dictated that a tower mark the corner of the lot,” says KVA. “Aligning this with the adjoining park to the south reinforces the axiality of each and locks the house into a greater urban whole.” The sheer amount of custom millwork created for this house made it a challenge, but a welcome one. The unique exterior called for wooden details everywhere, from the shutters to the handrails, mouldings and trim, roof decking, courtyard gates, ceiling panels for the Florida rooms, loggia screen panels, and more—but the tower was the standout element. The homeowners’ desire for Middle Eastern influences was met through the wooden mashrabiya (or moucharaby) oriel-style wooden latticework enclosing the third-story tower living space. Creating this focal point was some of our team’s most unique work to date, requiring the ultimate attention to detail, precision, and planning.
The location close to the Gulf of Mexico also dictated that we partner with our friends at Weather Shield on the impact-rated exterior windows and doors, and their Lifeguard line was perfect for the job. The mahogany impact-rated front door also combines safety and security with beauty and style.
Solution:
Working closely with KVA and Alys Beach Construction on the timeline and planning for our custom wood products, windows, and doors was monumental to the success of this build. The amount of millwork produced meant our team had to carefully manage their time while ensuring we provided the highest quality of detail and work. The location south of Scenic Highway 30-A, steps from the beach, also meant deciding with KVA and Alys Beach Construction what materials should be used for the best possible production quality and looks while adhering to coding and standing the test of time in the harsh Gulfside elements such as high winds, humidity, and salt.
The tower elements alone required the utmost care for building and installation. It was truly a test of skill for our team and Alys Beach Construction to create the corbels and other support pieces that would hold up the wooden oriel windows and latticework screens. We couldn’t be happier with the result and are genuinely honored to have been part of the talented team on such a cornerstone residence in the Alys Beach townscape.
---
Photography courtesy of Alys Beach
 E. F. San Juan
Riad Zasha: Middle Eastern Beauty at the Beach
Private Residence / Alys Beach, Florida
Architect: Khoury & Vogt Architects
Builder: Alys Beach Construction
---
“Riad Zasha resides in Alys Beach, a New Urbanist community along Scenic Highway 30-A in the Florida Panhandle,” says the design team at Khoury & Vogt Architects (KVA), the town architects of Alys Beach. “So named by the homeowner, who came with an explicit preference for something more exotic and Middle Eastern, the house evokes Moroccan and Egyptian influences spatially and decoratively while maintaining continuity with its surrounding architecture, all of which is tightly coded.” E. F. San Juan furnished Weather Shield impact-rated windows and doors, a mahogany impact-rated front door, and all of the custom exterior millwork, including shutters, screens, trim, handrails, and gates. The distinctive tower boasts indoor-outdoor “Florida room” living spaces caged in beautiful wooden mashrabiya grilles created by our team. The execution of this incredible home by the professionals at Alys Beach Construction and KVA resulted in a landmark residence for the town.
Challenges:
“Part of [the Alys Beach] coding, along with the master plan itself, dictated that a tower mark the corner of the lot,” says KVA. “Aligning this with the adjoining park to the south reinforces the axiality of each and locks the house into a greater urban whole.” The sheer amount of custom millwork created for this house made it a challenge, but a welcome one. The unique exterior called for wooden details everywhere, from the shutters to the handrails, mouldings and trim, roof decking, courtyard gates, ceiling panels for the Florida rooms, loggia screen panels, and more—but the tower was the standout element. The homeowners’ desire for Middle Eastern influences was met through the wooden mashrabiya (or moucharaby) oriel-style wooden latticework enclosing the third-story tower living space. Creating this focal point was some of our team’s most unique work to date, requiring the ultimate attention to detail, precision, and planning.
The location close to the Gulf of Mexico also dictated that we partner with our friends at Weather Shield on the impact-rated exterior windows and doors, and their Lifeguard line was perfect for the job. The mahogany impact-rated front door also combines safety and security with beauty and style.
Solution:
Working closely with KVA and Alys Beach Construction on the timeline and planning for our custom wood products, windows, and doors was monumental to the success of this build. The amount of millwork produced meant our team had to carefully manage their time while ensuring we provided the highest quality of detail and work. The location south of Scenic Highway 30-A, steps from the beach, also meant deciding with KVA and Alys Beach Construction what materials should be used for the best possible production quality and looks while adhering to coding and standing the test of time in the harsh Gulfside elements such as high winds, humidity, and salt.
The tower elements alone required the utmost care for building and installation. It was truly a test of skill for our team and Alys Beach Construction to create the corbels and other support pieces that would hold up the wooden oriel windows and latticework screens. We couldn’t be happier with the result and are genuinely honored to have been part of the talented team on such a cornerstone residence in the Alys Beach townscape.
---
Photography courtesy of Alys Beach
Find the right local pro for your project
 E. F. San Juan
Riad Zasha: Middle Eastern Beauty at the Beach
Private Residence / Alys Beach, Florida
Architect: Khoury & Vogt Architects
Builder: Alys Beach Construction
---
“Riad Zasha resides in Alys Beach, a New Urbanist community along Scenic Highway 30-A in the Florida Panhandle,” says the design team at Khoury & Vogt Architects (KVA), the town architects of Alys Beach. “So named by the homeowner, who came with an explicit preference for something more exotic and Middle Eastern, the house evokes Moroccan and Egyptian influences spatially and decoratively while maintaining continuity with its surrounding architecture, all of which is tightly coded.” E. F. San Juan furnished Weather Shield impact-rated windows and doors, a mahogany impact-rated front door, and all of the custom exterior millwork, including shutters, screens, trim, handrails, and gates. The distinctive tower boasts indoor-outdoor “Florida room” living spaces caged in beautiful wooden mashrabiya grilles created by our team. The execution of this incredible home by the professionals at Alys Beach Construction and KVA resulted in a landmark residence for the town.
Challenges:
“Part of [the Alys Beach] coding, along with the master plan itself, dictated that a tower mark the corner of the lot,” says KVA. “Aligning this with the adjoining park to the south reinforces the axiality of each and locks the house into a greater urban whole.” The sheer amount of custom millwork created for this house made it a challenge, but a welcome one. The unique exterior called for wooden details everywhere, from the shutters to the handrails, mouldings and trim, roof decking, courtyard gates, ceiling panels for the Florida rooms, loggia screen panels, and more—but the tower was the standout element. The homeowners’ desire for Middle Eastern influences was met through the wooden mashrabiya (or moucharaby) oriel-style wooden latticework enclosing the third-story tower living space. Creating this focal point was some of our team’s most unique work to date, requiring the ultimate attention to detail, precision, and planning.
The location close to the Gulf of Mexico also dictated that we partner with our friends at Weather Shield on the impact-rated exterior windows and doors, and their Lifeguard line was perfect for the job. The mahogany impact-rated front door also combines safety and security with beauty and style.
Solution:
Working closely with KVA and Alys Beach Construction on the timeline and planning for our custom wood products, windows, and doors was monumental to the success of this build. The amount of millwork produced meant our team had to carefully manage their time while ensuring we provided the highest quality of detail and work. The location south of Scenic Highway 30-A, steps from the beach, also meant deciding with KVA and Alys Beach Construction what materials should be used for the best possible production quality and looks while adhering to coding and standing the test of time in the harsh Gulfside elements such as high winds, humidity, and salt.
The tower elements alone required the utmost care for building and installation. It was truly a test of skill for our team and Alys Beach Construction to create the corbels and other support pieces that would hold up the wooden oriel windows and latticework screens. We couldn’t be happier with the result and are genuinely honored to have been part of the talented team on such a cornerstone residence in the Alys Beach townscape.
---
Photography courtesy of Alys Beach


 Windy City Painters
Iron Fence Painting in Wicker Park: A Windy City Painters Case Study
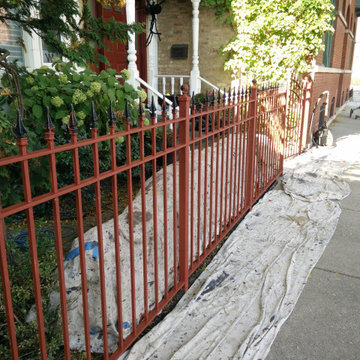
Iron fence painting in Wicker Park is one of the most requested exterior services Windy City Painters performs each season, and this recent project shows exactly why. Set behind an ornate 1890s greystone two-flat, the client's wrought iron fence had endured years of Chicago winters without professional attention. Rust had spread across the pickets, the original black enamel was flaking away in sheets, and the fence's structural hardware had begun to loosen at several joints.
As the trusted local expert for Chicago's North Side and Near West Side, Windy City Painters approached this project the same way we approach every iron fence painting job in Wicker Park: with a methodical, multi-step process designed to outlast Midwest weather rather than simply mask the damage.
The Process, Step by Step
Step 1 — Rust Removal and Surface Preparation. Our crew wire-brushed and mechanically ground every rusted section down to clean, stable metal. For pitted or heavily corroded areas, we applied a chemical rust converter to neutralize corrosion at the molecular level before any coating touched the surface. Furthermore, because this greystone was built well before 1978, Windy City Painters tested the existing paint layers for lead and followed strict containment protocols throughout the removal process.
Step 2 — Spot Repairs. Loose pickets were re-secured, small pits were filled, and hardware at the gate hinges was tightened. In contrast to a quick spray-paint refresh, this stage ensures the fence is structurally sound before a single drop of primer goes on.
Step 3 — Priming. A full coat of rust-inhibiting primer, engineered specifically for ferrous metal, was applied by brush to every surface — with particular attention to welds and joints where moisture tends to collect and restart the corrosion cycle.
Step 4 — Topcoat Application. Two finish coats of industrial-grade, direct-to-metal enamel were applied by brush and roller. This built a durable, uniform barrier in classic gloss black, the most popular finish among Wicker Park's historic properties. Finally, our team inspected every inch of the fence for thin spots or missed sections before calling the job complete.
Project Specs
Surface: Ornamental wrought iron fence, posts, and gate hardware
Products used: Rust-inhibiting DTM primer, chemical rust converter, industrial-grade direct-to-metal enamel
Coats applied: 1 primer coat, 2 finish coats
Finish: Gloss black
Timeline: Completed in under two days
Advice for Wicker Park Homeowners
Before starting a similar iron fence painting project in Wicker Park, homeowners should keep a few things in mind. Notably, never paint directly over active rust — trapped moisture underneath will cause the new coat to fail within a season. Additionally, always ask whether a contractor tests for lead paint on pre-1978 homes, since many Wicker Park greystones fall into that category. Meanwhile, hand brushwork matters: the intricate scrollwork common on Wicker Park ironwork requires careful, detailed application that spray equipment simply cannot replicate. Therefore, hiring a crew experienced specifically in historic Chicago ironwork, like Windy City Painters, makes a measurable difference in the finished result.
Windy City Painters also handles related exterior and interior work for Wicker Park properties, including interior painting, drywall and plaster repair, and additional metal refinishing for porches and railings.
Iron fence painting in Wicker Park protects one of the neighborhood's most defining architectural features while restoring curb appeal instantly. As a result, this greystone now has a fence that matches the quality of the home behind it — and will hold up through many more Chicago winters.
See more of our work and request a free estimate at www.windypainters.com.
Ready to transform your Wicker Park home? Contact Windy City Painters for a free estimate — visit www.windypainters.com today. Proudly serving Wicker Park, West Town, Lincoln Park, Roscoe Village, Lakeview, Ukrainian Village, River North, and all of Chicago.

 Catrina's Ranch Interiors
Just recently I had the pleasure of working on a remarkable ranch in the Texas Hill Country. The ranch belongs to John and Betty Martin, two extraordinary people with impeccable taste. The Martins live in the hustle and bustle of Katy, enjoying life with children and grandchildren. One thing that they share as a family is their appreciation of nature. In addition to raising trophy deer and exotic animals, they love to hunt and fish. They also take long nature walks in search of arrowheads, fossils and other treasures which they often incorporate into their own designs on walls, walkways and patios.
Having found this remote corner of God’s country, it would not be easy to find a builder who could be on site daily and truly listen to the specific directions, details and overall vision of how this “San Miguel de Allende” style ranchero was to be constructed. Would it prove to be impossible? Not with a little luck, and a whole lot of Girl Power! The amazing Betty Martin ended up with an equally amazing builder named Judy Ramsey. This woman rancher, who raises exotic animals and trophy deer, is involved in real estate, leases her ranch for hunting and builds high end “casas” for the most discerning clients! Heck, she builds great little cabins too!
When Catrina’s Ranch Interiors became involved with the ambitious project, and I first viewed the blue prints and renderings, I was speechless. The plans were for a 17,000 square foot home built around a central courtyard. The courtyard had a bell tower over the front entrance gate; a real one. The main house had an observation tower that overlooked the dammed up river and a picturesque view of Heaven on Earth. There was a magnificent outdoor kitchen off of an enormous porch. The plans showed a large, ornate, fountain in the middle of the central courtyard.
This home was to have all the bells and whistles, with unimaginable details, while sparing no expense. It would take two years to build and finish. Judy, Betty and I had many meetings over the next two years. We designed and built 58 chandeliers and sconces, indoors and out. We designed and built custom doors, custom cabinets, custom kitchens and candle holders.
“If you can dream it, we can build it” is Catrina’s Ranch Interiors’ motto and, as always, we delivered on this promise. I like to think of myself as a “Can Do” kind of girl, but this job tested my abilities on a regular basis. Antler chandeliers measuring 7 ft. by 7 ft. would be no problem! Hammered copper panels in the cabinet doors? Not a problem! I have much to tell you about this experience, but nothing says it better than the stunning color photographs taken by San Antonio’s most famous magazine photographer, for Urban Home Magazine’s next issue. See for yourself. When Urban Home Magazine owner Louis Doucette went with me to photograph the ranch, Louis told me that it was my best work and then corrected himself to tell me that it was the best work he had ever seen.
Take a close look at the details of the Martin Ranch project in the January 2014 issue and come see us at Catrina’s Ranch Interiors in Boerne. No job is too big or too small. No idea is too far outside the box when making dreams come true.

Sponsored
Sunbury, OH

J.Holderby - Renovations
Franklin County's Leading General Contractors - 2X Best of Houzz!
 Tile Doctor Ltd
For this job, I had the pleasure of visiting the historic Salts Mill, a former textile mill turned art gallery, shopping centre, and restaurant complex near Bingley, West Yorkshire. It was built in 1853 by the famous manufacturer and philanthropist, Sir Titus Salt, and was at one point the largest industrial building in the world by total floor area.
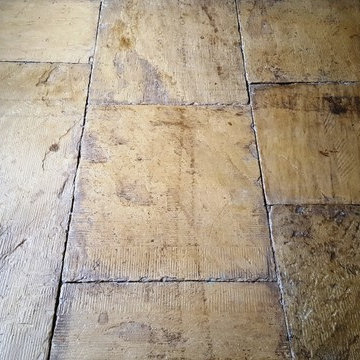
As you can imagine, a lot of the rooms at Salts Mill are over a century and a half old. Most of them also contained stone flooring made from Yorkstone – a type of Sandstone unique to Yorkshire, and easily distinguishable due to its rich, natural yellow colouring. Unfortunately, one such floor in the Salts Mill was in quite a bad state. It has completely lost its vibrance – appearing more grey than yellow – and was evidentially in need of a very deep clean and fresh seal.
I started the Yorkstone tile restoration by soaking the floor in a strong dilution of our reliable alkaline-based tile cleaner, Tile Doctor Pro Clean, and scrubbing it in using a rotary machine fitted with a scrubbing pad. This quickly removed the initial layers of muck and, in the process, revealed oil-based paint and glue stains all over the floor.
To break down the oil and paint I applied Tile Doctor Remove & Go, which is our heavy duty stripper, remover and degreaser. This quickly ate through the paint and glue, and I followed by giving the floor another thorough clean with Pro Clean. Finally, I rinsed the floor with clean water before leaving it to dry for a full two days due to the amount of chemical cleaning product and water applied.
Upon my return to the Salts Mill two days later, I ran some quick damp tests to check for any excess moisture which could’ve prevented me from sealing the floor. Thankfully, the floor was dry and ready to be sealed, but it is always recommended, especially with older floors, to be aware of damp issues as these can be very troublesome.
My choice of sealer was Tile Doctor Seal and Go, a topical sealer which provides a robust, stain resistant seal and a durable low sheen finish all in one product. Multiple coats of Seal and Go were applied, bringing the life and character back to these classic tiles.
Nigel Stoker
North West Yorkshire Tile Doctor
 Blue Contracts LLC
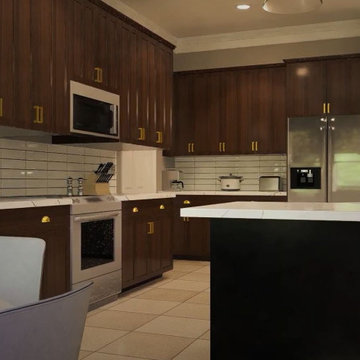
At Blue Contracts, we pride ourselves on transforming ordinary spaces into extraordinary experiences. Our latest kitchen remodel is a testament to our commitment to quality, innovation, and client satisfaction.
Project Highlights:
Design & Construction: From concept to completion, we managed every aspect of this kitchen remodel, ensuring seamless integration of design and functionality.
New Countertops: The centerpiece of this kitchen is the exquisite new countertops. We installed high-quality quartz countertops, known for their durability and elegance, providing a sleek and modern look.
Kitchen Cabinet Paint: The cabinets were given a fresh new look with a custom paint job, creating a bright and welcoming atmosphere. We used premium paint for a flawless finish that stands the test of time.
Flooring: We replaced the old flooring with beautiful hardwood, adding warmth and sophistication to the kitchen. Our flooring solutions are designed for both beauty and durability.
New Appliances: The kitchen features state-of-the-art, energy-efficient appliances that combine style and performance. From the stainless steel refrigerator to the smart oven, every detail was carefully selected.
Interior Design: Our expert interior designers worked meticulously to create a cohesive and inviting space. The design includes a stunning backsplash, modern lighting fixtures, and elegant hardware that complements the overall aesthetic.
3D Rendering Video: We provided a 3D rendering video to our clients, offering a virtual tour of the remodeled kitchen before construction began. This tool ensured that every detail was perfect and aligned with our client's vision.
Satisfied Client: Our top priority is client satisfaction. We are proud to have exceeded our client’s expectations, leaving them thrilled with their new kitchen. Their positive feedback and testimonials are a testament to our dedication and craftsmanship.
Transform your kitchen with Blue Contracts, where every project is a masterpiece. Whether you are looking for a complete renovation or just a few updates, we have the expertise and passion to bring your dream kitchen to life.

 Alan B. Cohen, Architect
David Wakely
Inspiration for an eclectic exterior home remodel in San Francisco
Inspiration for an eclectic exterior home remodel in San Francisco
 Echohousepainting
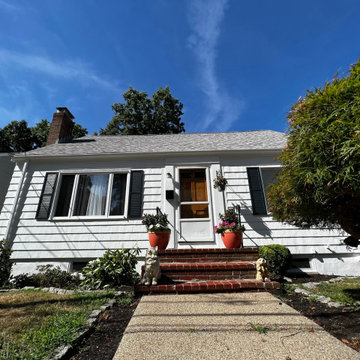
Revitalizing Homes in Dover, Massachusetts: A Stunning Exterior Transformation by Echohousepainting.
Discover the breathtaking exterior makeover Echohousepainting delivered in Dover, Massachusetts. From power washing to replacing rotted trim and applying Sherwin Williams Woodscapes solid stain, our team brought new life to this home. Read on to see how this project turned heads and garnered compliments from impressed neighbors.
Echohousepainting recently completed an extraordinary exterior job in Dover, Massachusetts, showcasing our commitment to transforming homes into stunning masterpieces. From revitalizing the surfaces through power washing to replacing rotted trim, every detail was meticulously handled. The final touch? Two coats of Sherwin Williams Woodscapes solid stain that not only protects but also enhances the beauty of the house.
Recognizing the importance of structural integrity, Echohousepainting addressed any compromised areas by expertly replacing rotted trim. Our dedication to quality ensures that not only does the home look amazing, but it also stands the test of time.
The crowning glory of this exterior makeover is the application of Sherwin Williams Woodscapes solid stain. Renowned for its durability and rich color palette, this premium product not only protects the home from the elements but also imparts a timeless charm. The choice of Woodscapes adds depth and character to the exterior, leaving a lasting impression.
The final result is nothing short of spectacular. The house radiates a renewed vibrancy and charm, catching the eyes of everyone in the neighborhood. Echohousepainting's commitment to excellence was not only evident in the visual appeal but also echoed by the compliments from impressed neighbors who couldn't help but admire the transformation.
Echohousepainting's exterior transformation in Dover, Massachusetts, stands as a testament to our unwavering commitment to quality craftsmanship. From power washing to the application of Sherwin Williams Woodscapes solid stain, every step was taken with precision and care. If you're looking to breathe new life into your home's exterior, trust Echohousepainting to deliver remarkable results that go beyond expectations.
 Alan B. Cohen, Architect
David Wakely
Inspiration for an eclectic home office remodel in San Francisco
Inspiration for an eclectic home office remodel in San Francisco

 Ehrlich Yanai Rhee Chaney Architects
The ground floor volumes wrapped in an elongated hand-fired brick, emphasizing the horizontality of the architecture that lays solidly on the land.
(Photography by: Matthew Millman)
Sponsored
Sunbury, OH
J.Holderby - Renovations
Franklin County's Leading General Contractors - 2X Best of Houzz!

 Pristine Renovations, Inc.
The interior of this home features wood textured concrete walls, giving it a clean modern look.
We are responsible for all concrete work seen. This includes the entire concrete structure of the home, including the interior walls, stairs and fire places. We are also responsible for the structural concrete and the installation of custom concrete caissons into bed rock to ensure a solid foundation as this home sits over the water. All interior furnishing was done by a professional after we completed the construction of the home.
 Tile Doctor Ltd
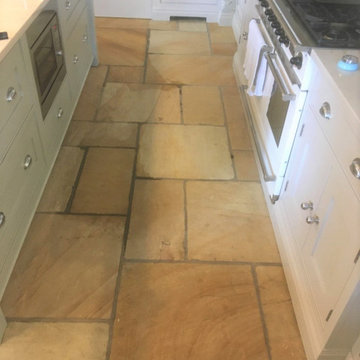
This is a large 17.2 m2 Sandstone Floor installed throughout the living and kitchen areas of a property in the beautiful village of Disley close to Lyme Park which is run by the National Trust. The floor had been installed four years ago and my client was unhappy with the original sealer which hadn’t lasted very long. Without the protection of a sealer dirt had become ingrained in the pores of the stone which was now difficult to clean. Another issue was the rough nature of the Sandstone meant it was impossible to mop as it shreds the mop! As a result, the floor was mainly cleaned with a hoover which was not ideal, especially in a kitchen.
I went over to survey the floor and before quoting I ran a small test clean in the kitchen which took the floor back to its natural pale colour and really showed how dirty the floor had become. Test cleans are great as it helps me to formulate an effective cleaning plan and provide an accurate quote. My client was impressed with the result and so I was booked to come back and deep clean and then reseal the whole floor. Due to its size I estimated the floor would take two days to deep clean and a further day to apply a new sealer, so three days in total.
Working in large sections I started by cleaning the floor and stripping off the old sealer with a strong dilution of Tile Doctor Remove and Go which is a coatings remover that is safe to use on stone. The solution was left to soak into the pores of the Sandstone for ten minutes before being worked in with a 200-grit diamond pad fitted to a rotary floor machine. This action not only removed the old sealer and cleaned the floor but the 200-grit pad being vey coarse removed a lot of the roughness from the surface of the Sandstone so it shouldn’t shred any more mops.
After rinsing the floor with water and removing the slurry with a wet vacuum I set about cleaning the grout with Tile Doctor Pro-Clean worked into the grout line with a stiff brush and assisted with steam from a professional steam cleaner with a grout attachment. Once done the floor was rinsed and extracted again to remove the soil from the grouting. There was also an area near one of the doors where the grout had become loose and needed replacing so I made up a batch of matching grout and filled this in. The floor was then left overnight to dry with assistance from a couple of air movers.
I returned the next day to finish the floor by applying a sealer. First, I double checked the floor was dry with the damp meter. The readings confirmed the air movers had done a good job and that the floor was within the accepted parameters, so I was ready to seal. The sealer I chose was Tile Doctor Seal and Go which being water based doesn’t leave a smell as it dries, it really works well on Sandstone and adds a nice subtle sheen to the stone.
Once finished the floor looked much cleaner, lighter in colour overall more inviting, you could even see the fossils in some of the tiles.
The surface was also smoother so the customer should find cleaning with a mop much easier in future. On that subject its worth pointing out that owners of sealed floors should always use a neutral pH tile cleaner on their floors as most supermarket products are simply too strong and will prematurely strip the sealer off a tile if used repeatedly. Tile Doctor sell a product called Tile Doctor Neutral Cleaner which is ideal for cleaning sealed Sandstone floors like this one.
My client was really happy with the results and sent me a message later saying: “the floor looks amazing!”
Kamila Logonzy
East Cheshire Tile Doctor
 Tile Doctor Ltd
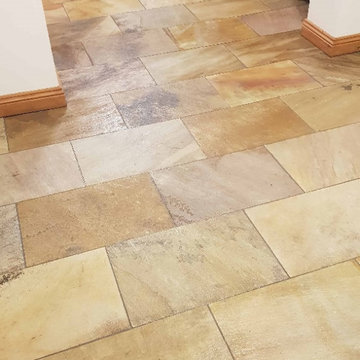
The photos on this page are of a Sandstone Kitchen floor at a house in the High Green suburb of Sheffield. The Sandstone tiles looked grubby and needed some love and attention. Our client was getting fed up trying to keep the stone clean, particularly around the kitchen area where cleaning didn’t seem to make much. You can see how dirty it had become on the before picture below, this is stark contrast to the middle of the of the kitchen where the portable kitchen island normally sits.
I went to the property to get a better look at the problem floor and carried out a small test clean to see which products and methods would have the best impact. The patch came up really clean without much difficulty, so I was confident on being able to restore its appearance.
It was clear to me the original protective sealer had worn off and dirt had become ingrained in the pores of the stone where it was proving difficult to remove. My client was very encouraged by the test clean initial result and agreed to go ahead with the quote. We arranged a suitable time to carry out the work on a day when the family would be out of the way.
I started by taping up the area to make sure the skirting and woodwork were protected from splashing. Once done a strong dilution of Tile Doctor Pro-Clean was sprayed onto Sandstone tile and grout. It was left to dwell for approximately ten minutes to help break down all the grime and dirt and was then worked into the stone using a rotary floor machine fitted with a stiff bristled brush.
This method totally transformed the dull sandstone, the stunning sandstone colours started to leap out and I could see the stone was well on its way to being transformed. The floor was then rinsed several times with water and the now soiled cleaning solution carefully removed with an industrial wet vacuum.
With the floor clean I inspected all the tiles and repeated the process until I was happy the floor was total clean. I should mention It’s not always this easy to clean a stone floor and quite often I find myself having to utilise all sorts of products and methods before I’m totally satisfied it’s as clean as it could possibly be.
With the cleaning done I left the floor to dry out overnight aided with heaters and air blowers.
I returned to seal the floor the next day checking first that the stone was dry with a damp meter. Leaving the blowers on overnight had helped and the readings I took from the floor confirmed it was now ready for sealing.
Earlier I had discussed the different types of sealer available with my clients and they had chosen to have the floor sealed with Tile Doctor Seal & Go. This works really well on Sandstone, enhancing its appearance, improving colour and of course adding protection to the stone to prevent grime and dirt stuck in the pores of the stone. Several coats were applied until I could see if was fully sealed and the right level of finish had been achieved. Sealing a floor can take some time as you need to allow each coat to dry before applying the next.
Once done the floor looked meticulously clean and the new sealer had added a lovely subtle sheen to the stone. My client was very please with the transformation and left the following feedback.
‘Very professional approach, friendly, and offered great advice throughout the job. Very pleased with the finish Cheers Matt we will see you again’
One of the problems we find with many homeowners is that for cleaning they use strong bleach-based cleaning product on their sealed tiles, and this actually strips off the sealer leaving the stone vulnerable to ingrained dirt. As a result, Tile Doctor has developed Tile Doctor Neutral Tile Cleaner, it is pH neutral and gentle enough for everyday use without affecting the sealer.
Matthew Lovett
South Yorkshire Tile Doctor
 Tile Doctor Ltd
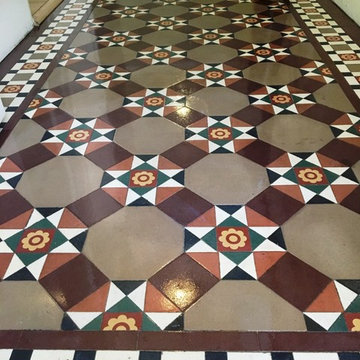
Esher is a small suburb in Surrey, situated just outside London. It was a fashionable area to live in amongst royalty and the aristocracy in the Victorian period, and during this time many buildings were built.
One such building has since been turned into a block of separate flats, and some of the flats still contain the original Victorian tiles in the hallway. I was contacted by one of these flat owners about restoring their tiles back to the best possible condition. Interestingly this customer’s tiles were part of a larger floor that had been divided between two flats.
I began the restoration by spreading Tile Doctor Remove and Go across the entire set of tiles. Remove and Go is a heavy-duty stripper that helped to loosen and remove old glue deposits where carpet had been laid over the tile, it will also strip off old sealers and release ingrained muck.
The Remove and Go was worked into the tile and grout with a stiff brush and then the soiled solution rinsed off and extracted using a wet vacuum. I followed by this applying a coarse 200-grit diamond encrusted burnishing pad, fitted to a handheld buffer, to grind away the particularly stubborn dirt and stains to restore the appearance of the stone. Afterwards, I rinsed the tiles again with water and soaked up the resultant slurry with a wet vacuum.
I noticed that there remained several ingrained stains dotted across the floor, so to remove these I aggressively burnished the affected areas with a very coarse 50-grit handheld diamond block. This essentially removed the very top layer of the stone, taking with it the ingrained marks.
Next, I dried the area with a large blower and heat gun. Under normal circumstances, 48 hours needs to pass before the tiles can be sealed, but as this was a small area I was able to dry it very quickly. After carrying out a damp test, I determined the tiles were ready to be sealed.
To seal the Victorian Tiles, I applied six coats of Tile Doctor Seal and Go sealer, which provides a high-quality sheen finish, as well as plenty of protection for the future. Tile Doctor have a range of suitable sealers available including Colour Grow which provides a matte finish – it’s just a matter of personal choice for the customer.
The outcome of the restoration was fantastic and the customer was very pleased, leaving the following testimonial.
“Promptly organised, delivered when promised. Good looking job when complete. Well done.”
Rupert Mcleod
West Surrey Tile Doctor
 Tile Doctor Ltd
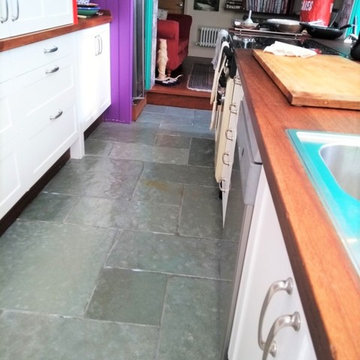
I recently helped a homeowner from my home town of Dursley who got in touch about her kitchen Flagstone floor. The problem revolved around an accident she had with raspberries which had stained the flagstones and the problem became compounded when a house hold clearing product was applied neat to clean up the mess. If you follow any of our Tile Doctor blogs, you will know that using strong household cleaning products can damage the sealer and, in this case, it had left white marks on the floor.
I called round to the property to survey the floor as was surprised to find out that the floor had been cleaned and sealed only four months prior by another company. I don’t like to comment on other people’s work, but I found the grout lines and flagstones were still badly ingrained with dirt, so it wasn’t a through job.
I completed by survey and demonstrated the process I would follow to resolve the issues on one of the flagstone tiles. She could not believe the difference I was able to make and booked me in straight away to restore the entire floor.
My first task was to protect the wooden kitchen units from splashing that can happen when cleaning the floor. Once that was done, I set about stripping the sealer from the floor and deep cleaning the tile and grout with a strong dilution of Tile Doctor Pro-Clean. Pro-Clean is a concentrated, multi-purpose high-alkaline cleaner, stripper and degreaser which is safe to use on all types of tile, stone and grout including natural stone.
Working in sections across the Kitchen and adjacent dining room I diluted one part Pro-Clean to two parts water and mopped it onto the flagstones and grout where I left it to soak in for roughly fifteen minutes. Then using a rotary floor buffer fitted with a black scrubbing pad I scrubbed the solution into the floor into the old sealer and trapped dirt came away turning the cleaning fluid black in the process. The soil was then rinsed off with water and then extracted with a powerful 3,000 watt wet and dry vacuum. This process was repeated until I was satisfied the floor was clean and I ran a stiff grout brush along the grout lines to ensure they also received a good scrub. After I was satisfied the section was clean it was rinsed thoroughly with water to neutralise the floor and remove any trace of product and then dried with the wet and dry vacuum.
The cleaning process took up the whole day, but the flagstones would need to be dry before sealing so after giving the owner an update I left the floor for two days, so it could dry out thoroughly.
On my return I tested the floor was dry in multiple places with a damp meter to ensure it was ready to be sealed. The readings showed that the wet and dry vacuum had done a good job in removing the moisture, so all was well. To seal I applied several coats of Tile Doctor Seal and Go allowing each coat to dry before applying the next however with such a large area to cover I was able to work in sections around the floor.
Seal and Go works really well on Flagstones and leaves a very appealing sheen finish, also being water based it doesn’t leave a smell as it dries.
The results were amazing, and the customer thanked me for making such a massive improvement on her floor. Before leaving I made sure to discuss after-care and to avoid the use of hash cleaning products.
Malcolm Crowther
Gloucester Tile Doctor


 Tile Doctor Ltd
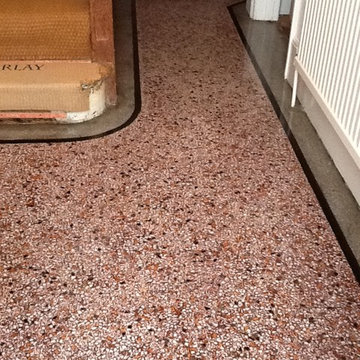
This Terrazzo tiled hallway at a property in Northampton was in a really bad state. It was heavily soiled and suffered from glue marks where the original carpet covering it had been removed. Additionally, there was some damage to the edges of the doorway, and a large crack in the floor running across the width of the hallway.
Terrazzo is an interesting material, originally produced in Italy, that consists mainly of concrete with segments of marble and other stone interspersed and held together with a resin. Since Terrazzo is formed in this way, I explained to the customer that I would fill the crack along the floor and the small holes around the edges with concrete, before then using tile paint to match in the colours as best as possible. This would be the most cost-effective solution, which was ideal since the customer had a limited budget for the repairs.
Before beginning the restoration, I tested a small area using a diamond encrusted burnishing pad, thereby giving the customer an indication of the type of results that could be achieved. With the customer pleased by the results, the job was booked in for the following week.
To begin, Tile Doctor Remove & Go was applied to the floor and was left to dwell for ten minutes to soften the carpet glue and break down any old sealer. This was then scrubbed in to the tiles with a pad fitted to a rotary machine. To remove the remaining residue and marks in the particularly stubborn areas, I used a manual hand scraper. The entire floor was then wet vaxed to soak up the soiled cleaner and leave the area clean for burnishing.
This was followed by the use of Tile Doctor diamond encrusted burnishing pads to polish the tiles, starting with a coarse grit pad, followed by wet vaxing and repeating the process with a medium grit pad and finally the fine grit pad to achieve the desired effect. I then installed a turbo dryer to dry the floor.
I returned to the property once the floor was dry and carried out the repairs which had been discussed earlier with the customer (filling the holes and cracks in the floor with concrete), cleaning off any concrete residue before I finished for the day.
Upon my return to the property the next day, I refined the polish on the floor even further by applying the extra fine grit burnishing pad.
To finish off the three day restoration, I sealed the Terrazzo tiles using two coats of Tile Doctor Colour Grow sealer. As an impregnating sealer, Colour Grow soaks into the pores of the stone, protecting it from ingrained dirt. Colour Grow also contains colour intensifying properties, allowing it to enhance the naturally occurring shades in the stone, and therefore stopping it from appearing dull.
This floor certainly was in a bad state, with damage as well as dirt to deal with, but I’m pleased to say that the work went a long way in transforming its appearance, leaving a very happy customer.
Phil Vissian
Northamptonshire Tile Doctor
8