
Search results for "Knee deep" in Home Design Ideas
 Rick's Cabinet Tree
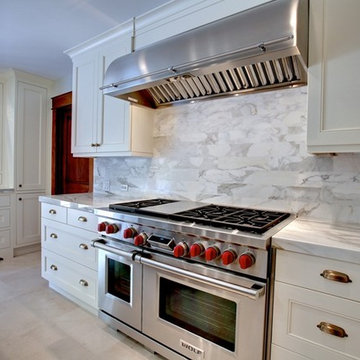
Cover photo- Drawers are increasing in popularity as a result of consumer preference for the more modern, dresser/furniture look. Customers no longer want to get down on their hands and knees to see what is in back of their bottom shelves. Pull out shelves are convenient; but still one or two doors need to be opened to get the shelves out. Organizing large drawers becomes simple with the use if pegboard systems to keep dinnerware in place, Silverware, cutlery trays and spice racks are also very popular organizers. Deep drawers can accommodate large pots and pans and small appliances.
 T-Square Company
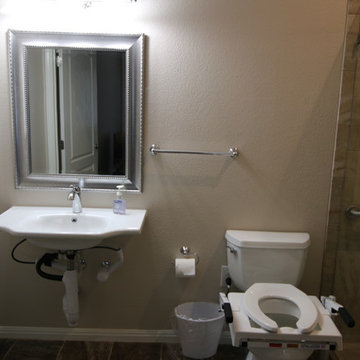
With both doors open, both the toilet and lavatory can be approached straight on. The toilet here has an electrical toilet lift to aid the user and keep from having to do deep knee bending. The wall hung sink has the pipes wrapped to prevent knee scalding.
 Reico Kitchen & Bath
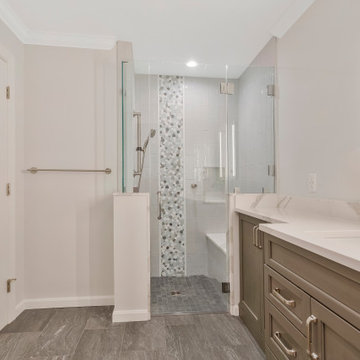
Katherine Dashiell of Reico Kitchen and Bath in Annapolis, MD collaborated with Lauer Construction on this multi-room project to create a transitional style inspired kitchen, bathroom and mudroom remodel featuring Merillat Masterpiece cabinetry.
The kitchen perimeter cabinets are the Rockwell full overlay door style in a Moonshine finish, paired with kitchen island cabinets in the Mineral Grey finish. The kitchen also includes Jefferey Alexander Marlo Knobs and Sullivan Pulls in Polished Chrome.
The mudroom cabinets are the Rockwell full overlay door style in a Mineral Grey finish. The flooring is Pacific Caramel 8x8 tile.
The bathroom cabinets are the Rockwell full overlay door style in a Mineral Grey finish with a Nickel Linen Glaze. The bathroom also includes Picadilly Gloss Perla 4x12 tile with Thassos Bar Liner and Deep Ocean Stone Mosaic for the shower wall and Stateworks Lugnez 12x24 and 2x2 for the shower floor.
Throughout these spaces, the countertops, knee wall toppers, shower curb and bench are Cambria Brittanicca quartz.
Photos courtesy of BTW Images.
Find the right local pro for your project
 Reico Kitchen & Bath
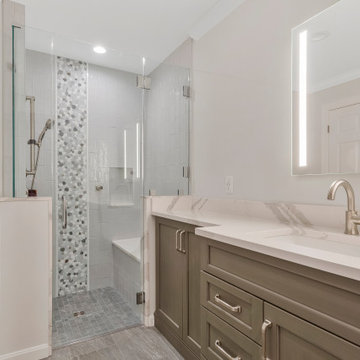
Katherine Dashiell of Reico Kitchen and Bath in Annapolis, MD collaborated with Lauer Construction on this multi-room project to create a transitional style inspired kitchen, bathroom and mudroom remodel featuring Merillat Masterpiece cabinetry.
The kitchen perimeter cabinets are the Rockwell full overlay door style in a Moonshine finish, paired with kitchen island cabinets in the Mineral Grey finish. The kitchen also includes Jefferey Alexander Marlo Knobs and Sullivan Pulls in Polished Chrome.
The mudroom cabinets are the Rockwell full overlay door style in a Mineral Grey finish. The flooring is Pacific Caramel 8x8 tile.
The bathroom cabinets are the Rockwell full overlay door style in a Mineral Grey finish with a Nickel Linen Glaze. The bathroom also includes Picadilly Gloss Perla 4x12 tile with Thassos Bar Liner and Deep Ocean Stone Mosaic for the shower wall and Stateworks Lugnez 12x24 and 2x2 for the shower floor.
Throughout these spaces, the countertops, knee wall toppers, shower curb and bench are Cambria Brittanicca quartz.
Photos courtesy of BTW Images.

 Kitchen Solvers of Spring Hill
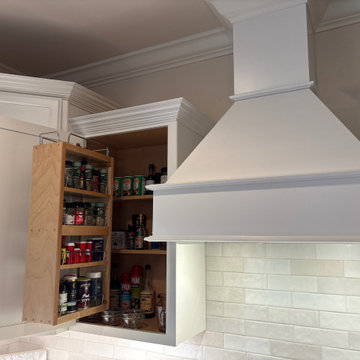
These homeowners didn’t feel the need for a whole remodel and liked the color of their cabinets but really wanted a few upgrades… and then ended up doing a little more once we showed them how we can improve efficiency and storage in their kitchen!
Their biggest issue is having a microwave over their stove since they tend to an elderly parent and that the exhaust is not vented outside. Andy figured out the perfect solution to vent out their new matching range hood and since they never liked their countertops or backsplash, they added that to the mix. With standard cabinet that have deep or half shelves it is hard to maximize storage and accessibility so Marty suggested roll-out trays in 3 cabinets, a pull-out trash so they don’t have to walk around the one at the end of their island, a blind corner pull-out so they don’t have to get down on their hands and knees to access things, and then their favorite… hinge out spice rack! Let’s be honest, it’s EVERYONE’s favorite!
Needless to say, we more than solved this kitchen for these homeowners. Where is the microwave now? Well, he is a handy guy so he decided to tackle a simple cabinet modification and is installing it himself in a base cabinet!
 Alair Homes North York
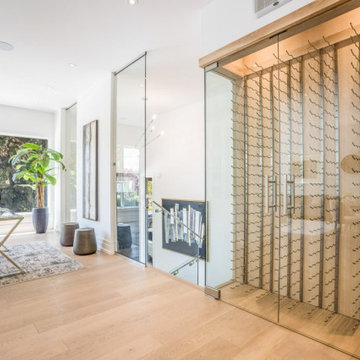
We might be hard at work or knee deep in the wine cellar ;)
Inspiration for a contemporary home design remodel in Toronto
Inspiration for a contemporary home design remodel in Toronto
Sponsored
Columbus, OH

Hope Restoration & General Contracting
Columbus Design-Build, Kitchen & Bath Remodeling, Historic Renovations
 Reico Kitchen & Bath
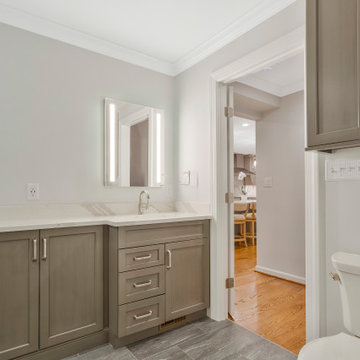
Katherine Dashiell of Reico Kitchen and Bath in Annapolis, MD collaborated with Lauer Construction on this multi-room project to create a transitional style inspired kitchen, bathroom and mudroom remodel featuring Merillat Masterpiece cabinetry.
The kitchen perimeter cabinets are the Rockwell full overlay door style in a Moonshine finish, paired with kitchen island cabinets in the Mineral Grey finish. The kitchen also includes Jefferey Alexander Marlo Knobs and Sullivan Pulls in Polished Chrome.
The mudroom cabinets are the Rockwell full overlay door style in a Mineral Grey finish. The flooring is Pacific Caramel 8x8 tile.
The bathroom cabinets are the Rockwell full overlay door style in a Mineral Grey finish with a Nickel Linen Glaze. The bathroom also includes Picadilly Gloss Perla 4x12 tile with Thassos Bar Liner and Deep Ocean Stone Mosaic for the shower wall and Stateworks Lugnez 12x24 and 2x2 for the shower floor.
Throughout these spaces, the countertops, knee wall toppers, shower curb and bench are Cambria Brittanicca quartz.
Photos courtesy of BTW Images.
 Kitchen Solvers of Spring Hill
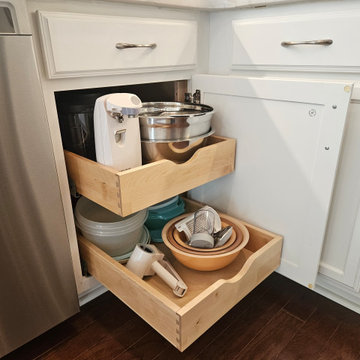
These homeowners didn’t feel the need for a whole remodel and liked the color of their cabinets but really wanted a few upgrades… and then ended up doing a little more once we showed them how we can improve efficiency and storage in their kitchen!
Their biggest issue is having a microwave over their stove since they tend to an elderly parent and that the exhaust is not vented outside. Andy figured out the perfect solution to vent out their new matching range hood and since they never liked their countertops or backsplash, they added that to the mix. With standard cabinet that have deep or half shelves it is hard to maximize storage and accessibility so Marty suggested roll-out trays in 3 cabinets, a pull-out trash so they don’t have to walk around the one at the end of their island, a blind corner pull-out so they don’t have to get down on their hands and knees to access things, and then their favorite… hinge out spice rack! Let’s be honest, it’s EVERYONE’s favorite!
Needless to say, we more than solved this kitchen for these homeowners. Where is the microwave now? Well, he is a handy guy so he decided to tackle a simple cabinet modification and is installing it himself in a base cabinet!
 Wanda Ely Architect Inc.
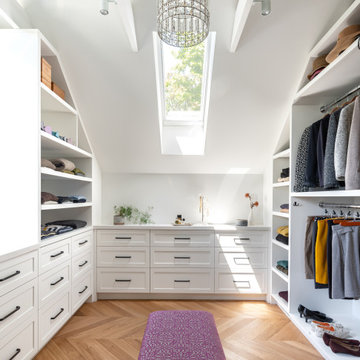
The large dressing room and walk-in closet also features a vaulted ceiling, skylight, and large window. Every corner of space is maximized for storage, including deep dresser drawers that make use of the remaining space behind the knee walls.
 Tile Doctor Ltd
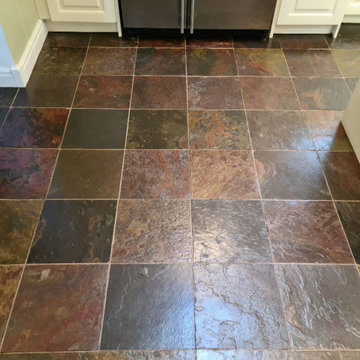
The pictures above are of a 12 metre squared Chinese slate floor in the kitchen of a property in Harrogate which had been laid ten years prior. You can see from the photographs that the grout had darkened and the slate itself had lost a lot of its character and colour.
Sealers typically last between three to five years so by now there was little protection left and so dirt had become trapped in the pores of the stone and grout making it difficult to keep clean. It was now overdue a deep clean and the application of a fresh seal.
I went over to survey the floor and provide a quote for stripping off what was left of the original sealer, cleaning the floor, and then resealing. I had been recommended by a previous customer so happy with my track record and the price I quoted, they asked me to do the work. They had received a quote from another firm which as it turned out was a lot more expensive than mine.
Given there was little sealer left to remove I decided to start by scrubbing the floor with a strong concentration of Tile Doctor Pro-Clean which was left to soak into the slate for ten minutes. Then I worked the solution in with a rotary machine fitted with a black scrubbing pad. Pro-Clean is a very versatile product that will strip the sealer off a floor when used in a strong dilution with water, it will also remove deep seated dirt too.
Due to the riven nature of the tiles however I found the black pad was struggling to reach into the crevices of the tile so to achieve the desired result I resorted to scrubbing the floor on my hands and knees with a scrubbing brush. Its important that the floor is as clean as it possibly can be before sealing otherwise you simply lock the dirt in and it will never look clean.
The floor was left to dry off overnight and I returned the next day to apply the new sealer. First, I checked to ensure that the floor was fully dry using a damp meter. The sealer would not cure properly if the floor damp and this can detract from the finished appearance.
I was happy with the readings, so I started to apply the first coat of Tile Doctor Seal and Go which I felt was the best product sealing Slate. The stone needed four coats; each one being left to dry before applying the next. Seal and Go is a stain resistant sealer which results in a low sheen silky appearance, it is good on surfaces such as the Chinese Slate which tend to be more porous and being water based it does not leave a smell as it dries.
The client was very happy with the result and mentioned to me that it had never looked that good even when new.
For aftercare cleaning I recommended the use of Tile Doctor Neutral Tile Cleaner which will keep the floor in the best condition. This is a pH neutral cleaner which can be used daily and won’t compromise the newly laid sealer like many of the stronger products you find in supermarkets.
Nigel Stoker
North West Yorkshire Tile Doctor
 CLOSET FURNISHINGS & CABINETRY
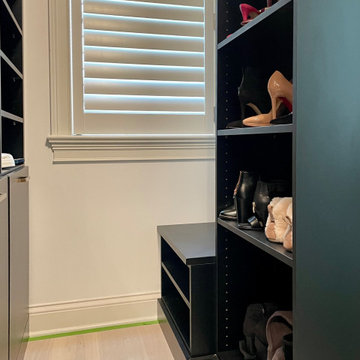
Attic space with 70" high knee walls, to short for double hanging on the walls, gains height with deep cabinets. Black with matt gold hardware, mirrors, hampers and lard birch drawer boxes.
 Oz Homes, LLC
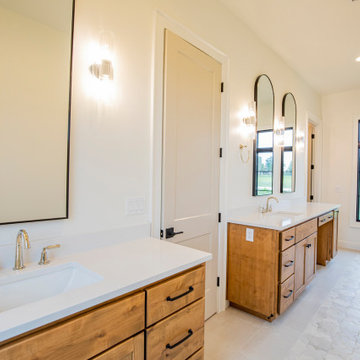
This custom master bath offers the ultimate in luxury and relaxation, with a freestanding, deep soaking tub, a spa-like walk-in shower complete with a rainfall showerhead and custom-tiled walls, custom stained cabinets including a knee space for her and expansive closets.
Sponsored
Columbus, OH

Wannemacher Interiors
Customized Award-Winning Interior Design Solutions in Franklin Cnty OH
 Patrick A. Finn, Ltd
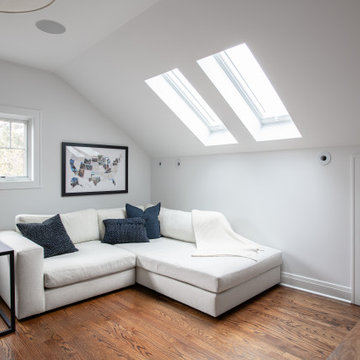
Flooded with natural light from a pair of large overhead skylights, this side of the attic primary suite sitting room showcases a bright, clean Scandinavian aesthetic. The sloped, vaulted ceiling enhances the open atmosphere of the 1920s bungalow conversion, while crisp white walls offer a stark, modern contrast to the warm, dark-stained oak hardwood floors.
A plush, off-white sectional sofa anchors the lounge area, styled comfortably with deep navy blue textured accent pillows and a cozy cream knit throw blanket. A minimalist black metal C-table rests at the end of the sofa for streamlined functionality. Tucked into the knee wall, a small access door maintains clean lines, while a rustic wood-framed map adds a personal touch to the wall, perfectly blending Nordic minimalism with cozy comfort.
 Horizon Builders, Inc.
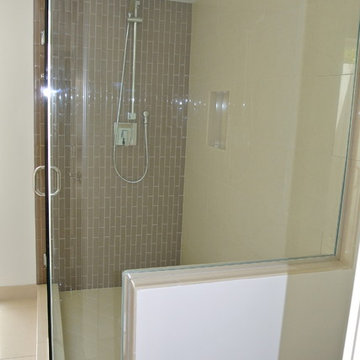
Master bathroom had a very deep sunken tub. Concrete was poured to raise the floor. Wall was removed between shower and toilet to create a knee wall. Euro glass was installed on two sides of shower. Full height tile was installed to create a tall feeling in this Master Bathroom.
 Kitchen Solvers of Spring Hill
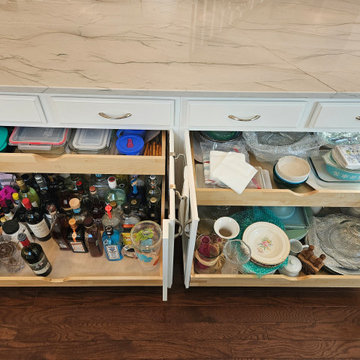
These homeowners didn’t feel the need for a whole remodel and liked the color of their cabinets but really wanted a few upgrades… and then ended up doing a little more once we showed them how we can improve efficiency and storage in their kitchen!
Their biggest issue is having a microwave over their stove since they tend to an elderly parent and that the exhaust is not vented outside. Andy figured out the perfect solution to vent out their new matching range hood and since they never liked their countertops or backsplash, they added that to the mix. With standard cabinet that have deep or half shelves it is hard to maximize storage and accessibility so Marty suggested roll-out trays in 3 cabinets, a pull-out trash so they don’t have to walk around the one at the end of their island, a blind corner pull-out so they don’t have to get down on their hands and knees to access things, and then their favorite… hinge out spice rack! Let’s be honest, it’s EVERYONE’s favorite!
Needless to say, we more than solved this kitchen for these homeowners. Where is the microwave now? Well, he is a handy guy so he decided to tackle a simple cabinet modification and is installing it himself in a base cabinet!
 Connolly's Bath & Tile Works
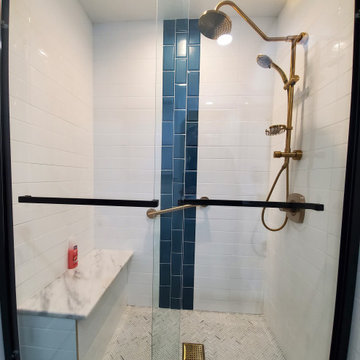
The beauty really is in the details with this bathroom remodel. The deep blue at the center with golden fixtures like the toilet knob, faucet, and shower head. With a knee bench and shower doors I don’t know how you could possibly ask for more!
Sponsored
Galena, OH

Buckeye Restoration & Remodeling Inc.
Central Ohio's Premier Home Remodelers Since 1996
 RAJ Kitchen and Bath, LLC
**Check out the video of this transformation on our website**
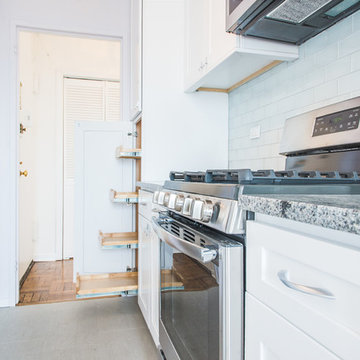
This small kitchen was way too small for this 2 bedrooms, 2 bathrooms apartment. Not only was it a very small kitchen, but the physical location of it made it very difficult to make it any bigger. There wasn't much that could have been done without incurring astronomical cost, which would get little or no return on the investment. The client wanted a kitchen that can be optimized in its current location to add a ton of value for resale.
This was difficult to do, because there was no moving of any mechanical around in the kitchen and even if we wanted to, the management of the building would not allow. For those of you who live in condos, co-ops or apartment building, you know how difficult it is to rework these foot prints. When we showed up, we saw the problems, but we also saw a huge opportunity where we can achieve those goals in the small space. This was accomplished by making some key changes and to incorporate some new things that was not possible when this kitchen was built years ago.
The crucial part of the design that would drive the entire new layout, was selecting the only appliance; that was the Refrigerator. Once we nailed down that refrigerator, we then proceeded to design the kitchen around it. We moved it to the other side of the wall where the sink was so that we can tap into the water line from the sink plumbing. It was crucial that it stays exactly 24" deep, not an inch more because we had to keep the entry as open as possible. Also, it was going to be directly in front of another big storage unit - The pantry. It is not ideal in most cases, but we needed the rest of the space to ramp up the design and open feel towards the side where all of the activities would take place, which happend to be the dining room and the view.
Once all that was figured out, we re-positioned the sink, dishwasher and the range and proceeded to wrap the cabinets around the columns to integrate them into the space. Thirty- six inches cabinets height was used so that they can be installed higher towards the ceiling height to give more room rather than the standard 18" required height between the counter tops. This was done to make the room feel a lot bigger than it really was. Not to mention, we also didn't want the faucet to be buried under the cabinets so that was also a necessary design detail for the space.
We then lowered both knee walls so that the counter top can sit on top of them, by removing that stop point that would have otherwise defined the kitchen area. This allowed us to pick up that extra footprint into the room for added prep space and enabled us to create the illusion of a kitchen that is looking longer than it really is. Every inch mattered when designing this kitchen and we made a conscious decision to use every one of that inch.
White cabinets were selected to do just what white cabinets are design to do; make a small or dark room appear bigger, brighter and more open. In this kitchen, this was amplified the more because of the kitchen location. It was perfect! We knew we did justice to the space because while we were there taking some photos, a few potential buyers walked in and went straight for the kitchen! They said its design just to fit the apartment.
Pantry roll out shelving, Double recycle bin, fancy handles, LED lighting, Quartz counter top, beautiful backslash tiles and grey linen floors finished off the kitchen which looked over a beautiful view of the George Washington Bridge from the top of this lovely 4th floor apartment.
Credit to Masterpiece Tile and Marble (Annmarie on the selection of Tiles and countertop and Val on the Construction to complete this project).
Davor Kokic Photography
 Patrick A. Finn, Ltd
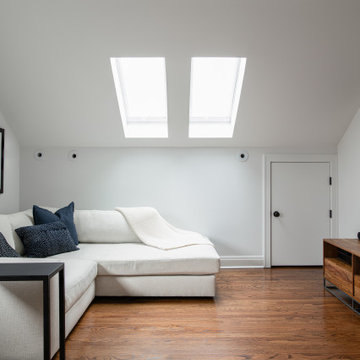
Flooded with natural light from a pair of large overhead skylights, this side of the attic primary suite sitting room showcases a bright, clean Scandinavian aesthetic. The sloped, vaulted ceiling enhances the open atmosphere of the 1920s bungalow conversion, while crisp white walls offer a stark, modern contrast to the warm, dark-stained oak hardwood floors.
A plush, off-white sectional sofa anchors the lounge area, styled comfortably with deep navy blue textured accent pillows and a cozy cream knit throw blanket. A minimalist black metal C-table rests at the end of the sofa for streamlined functionality. Tucked into the knee wall, a small access door maintains clean lines, while a rustic wood-framed map adds a personal touch to the wall, perfectly blending Nordic minimalism with cozy comfort.
 Kitchen Solvers of Spring Hill
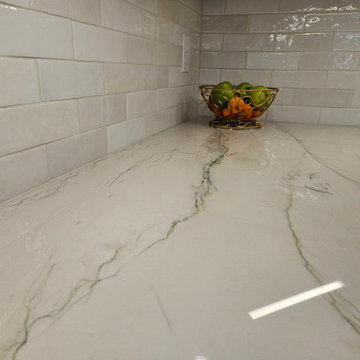
These homeowners didn’t feel the need for a whole remodel and liked the color of their cabinets but really wanted a few upgrades… and then ended up doing a little more once we showed them how we can improve efficiency and storage in their kitchen!
Their biggest issue is having a microwave over their stove since they tend to an elderly parent and that the exhaust is not vented outside. Andy figured out the perfect solution to vent out their new matching range hood and since they never liked their countertops or backsplash, they added that to the mix. With standard cabinet that have deep or half shelves it is hard to maximize storage and accessibility so Marty suggested roll-out trays in 3 cabinets, a pull-out trash so they don’t have to walk around the one at the end of their island, a blind corner pull-out so they don’t have to get down on their hands and knees to access things, and then their favorite… hinge out spice rack! Let’s be honest, it’s EVERYONE’s favorite!
Needless to say, we more than solved this kitchen for these homeowners. Where is the microwave now? Well, he is a handy guy so he decided to tackle a simple cabinet modification and is installing it himself in a base cabinet!
9