
Search results for "Official" in Home Design Ideas

 Envision Web
Twin magnificent and historic valleys – named according to lore and legend for two star crossed lovers of warring Native American tribes - make up the unincorporated area of White County that has become a pivot point for the arts, activism, community and preservation. The Sautee and Nacoochee Valleys – both listed on the National Register of Historic Places – are primarily the naturally occurring, lowland landscape punctuated by the sites and assets that give the area its vibrant character. Even the mapping department in White County asserts that Sautee Nacoochee defies definitive boundaries as pride of place has propelled innovative expansion.
Dedicated to Preserving and Protecting
Although Sautee Nacoochee lacks conventional city government, clearly the "mayor" of this hamlet is the Sautee Nacoochee Community Association, a non-profit organization dedicated to preserving and protecting the region and to nurturing the creativity that thrives here. The Association maintains the Sautee Nacoochee Center, a restored red brick schoolhouse, that is home to dual galleries, a history museum showcasing Cherokee heritage, gold strikes, timber and railroads, the Folk Pottery Museum of Northeast Georgia, art and dance studios, a heritage site and nature preserve, an intimate theater, an environmental studies room and a conference and special event facility. The Community Association was instrumental in establishing the official Historic Districts and brought acclaim to Sautee Nacoochee by securing its nomination as one of “The 100 Best Small Arts Towns in America.”
Arts programming, among other endeavors, remains one of the Center’s most valuable community resources. In addition to fostering children’s activities in music, dance, theatre and visual arts, the Center hosts the 50 member Sautee Nacoochee Community Chorale, art studio workshops, speaker luncheons for seniors, gallery exhibits, Contra dances, feature films, sustainable living forums and Open Stage nights. The Center’s six week long SummerFest is highlighted by the home grown folk life play, Headwaters, now in its fourth season, which serves as an unvarnished Valentine to and about the people, places and perceptions that shape the Valleys, and is consistently ranked as a Top 20 Event by the Southeastern Tourism Society.
 Windy City Painters
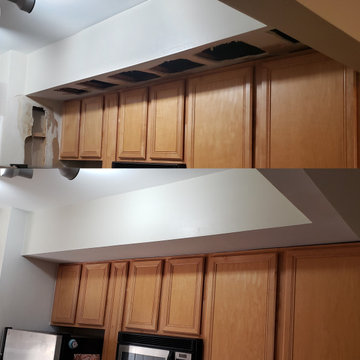
 response to water damage in a kitchen:
Assessment and Inspection:
Windy City Painters initiates the process by conducting a thorough assessment of the water damage in the kitchen. This involves inspecting the soffit above the kitchen cabinets and the side wall to identify the areas that require repair. The severity of the damage is carefully evaluated to determine the scope of the restoration.
Insulation Replacement:
In cases where water has damaged insulation, Windy City Painters removes and replaces the affected insulation to ensure proper restoration of the affected areas. This step is crucial for preventing future issues related to moisture and maintaining the integrity of the space.
Drywall Replacement:
Damaged drywall is carefully removed and replaced during the repair process. This includes removing sections of drywall that have been compromised by water, ensuring that the new drywall seamlessly integrates with the existing structure.
Sealing Water Spots with Oil-Based Primer:
To prevent any potential water stains from bleeding through the new paint, Windy City Painters applies an oil-based primer to seal water spots. This step not only ensures a smooth and uniform finish but also provides additional protection against future water damage.
Cleaning and Restoration:
After completing the repair work, Chicago painter takes the extra step of cleaning the entire area to ensure a neat and polished final result. This includes removing any debris or dust generated during the repair process, leaving the kitchen in a clean and presentable condition.
Efficient Completion by Skilled Painter:
Windy City Painters prides itself on efficiency, and the entire drywall repair job is completed within one day by a skilled painter. This quick turnaround minimizes disruptions to the homeowner's routine and allows for a prompt return to normalcy.
Scheduling and Estimates:
Customers looking to schedule an appointment or obtain an online estimate can easily do so by visiting the official website at www.windypainters.com. The user-friendly platform facilitates convenient scheduling and access to estimates.
Customer Assurance and Reviews:
Windy City Painters emphasizes customer satisfaction and provides the highest quality service. Potential customers are encouraged to check the company's 5-star reviews on Yelp ( https://www.yelp.com/biz/windy-city-painters-chicago-2) and Google, offering a glimpse into the positive experiences of previous clients.
Windy City Painters offers a comprehensive and efficient drywall repair service, addressing water damage in kitchens with expertise, professionalism, and a commitment to customer satisfaction.

 Shuler Architecture
Completed in 2019, this is a home we completed for client who initially engaged us to remodeled their 100 year old classic craftsman bungalow on Seattle’s Queen Anne Hill. During our initial conversation, it became readily apparent that their program was much larger than a remodel could accomplish and the conversation quickly turned toward the design of a new structure that could accommodate a growing family, a live-in Nanny, a variety of entertainment options and an enclosed garage – all squeezed onto a compact urban corner lot.
Project entitlement took almost a year as the house size dictated that we take advantage of several exceptions in Seattle’s complex zoning code. After several meetings with city planning officials, we finally prevailed in our arguments and ultimately designed a 4 story, 3800 sf house on a 2700 sf lot. The finished product is light and airy with a large, open plan and exposed beams on the main level, 5 bedrooms, 4 full bathrooms, 2 powder rooms, 2 fireplaces, 4 climate zones, a huge basement with a home theatre, guest suite, climbing gym, and an underground tavern/wine cellar/man cave. The kitchen has a large island, a walk-in pantry, a small breakfast area and access to a large deck. All of this program is capped by a rooftop deck with expansive views of Seattle’s urban landscape and Lake Union.
Unfortunately for our clients, a job relocation to Southern California forced a sale of their dream home a little more than a year after they settled in after a year project. The good news is that in Seattle’s tight housing market, in less than a week they received several full price offers with escalator clauses which allowed them to turn a nice profit on the deal.
Find the right local pro for your project

 Kathleen Jennison
An Arts & Crafts Bungalow is one of my favorite styles of homes. We have quite a few of them in our Stockton Mid-Town area. And when C&L called us to help them remodel their 1923 American Bungalow, I was beyond thrilled.
As per usual, when we get a new inquiry, we quickly Google the project location while we are talking to you on the phone. My excitement escalated when I saw the Google Earth Image of the sweet Sage Green bungalow in Mid-Town Stockton. "Yes, we would be interested in working with you," I said trying to keep my cool.
But what made it even better was meeting C&L and touring their home, because they are the nicest young couple, eager to make their home period perfect. Unfortunately, it had been slightly molested by some bad house-flippers, and we needed to bring the bathroom back to it "roots."
We knew we had to banish the hideous brown tile and cheap vanity quickly. But C&L complained about the condensation problems and the constant fight with mold. This immediately told me that improper remodeling had occurred and we needed to remedy that right away.
The Before: Frustrations with a Botched Remodel
The bathroom needed to be brought back to period appropriate design with all the functionality of a modern bathroom. We thought of things like marble countertop, white mosaic floor tiles, white subway tile, board and batten molding, and of course a fabulous wallpaper.
This small (and only) bathroom on a tight budget required a little bit of design sleuthing to figure out how we could get the proper look and feel. Our goal was to determine where to splurge and where to economize and how to complete the remodel as quickly as possible because C&L would have to move out while construction was going on.
The Process: Hard Work to Remedy Design and Function
During our initial design study, (which included 2 hours in the owners’ home), we noticed framed images of William Morris Arts and Crafts textile patterns and knew this would be our design inspiration. We presented C&L with three options and they quickly selected the Pimpernel Design Concept.
We had originally selected the Black and Olive colors with a black vanity, mirror, and black and white floor tile. C&L liked it but weren’t quite sure about the black, We went back to the drawing board and decided the William & Co Pimpernel Wallpaper in Bayleaf and Manilla color with a softer gray painted vanity and mirror and white floor tile was more to their liking.
After the Design Concept was approved, we went to work securing the building permit, procuring all the elements, and scheduling our trusted tradesmen to perform the work.
We did uncover some shoddy work by the flippers such as live electrical wires hidden behind the wall, plumbing venting cut-off and buried in the walls (hence the constant dampness), the tub barely balancing on two fence boards across the floor joist, and no insulation on the exterior wall.
All of the previous blunders were fixed and the bathroom put back to its previous glory. We could feel the house thanking us for making it pretty again.
The After Reveal: Cohesive Design Decisions
We selected a simple white subway tile for the tub/shower. This is always classic and in keeping with the style of the house.
We selected a pre-fab vanity and mirror, but they look rich with the quartz countertop. There is much more storage in this small vanity than you would think.
The Transformation: A Period Perfect Refresh
We began the remodel just as the pandemic reared and stay-in-place orders went into effect. As C&L were already moved out and living with relatives, we got the go-ahead from city officials to get the work done (after all, how can you shelter in place without a bathroom?).
All our tradesmen were scheduled to work so that only one crew was on the job site at a time. We stayed on the original schedule with only a one week delay.
The end result is the sweetest little bathroom I've ever seen (and I can't wait to start work on C&L's kitchen next).
Thank you for joining me in this project transformation. I hope this inspired you to think about being creative with your design projects, determining what works best in keeping with the architecture of your space, and carefully assessing how you can have the best life in your home.
 Shuler Architecture
Completed in 2019, this is a home we completed for client who initially engaged us to remodeled their 100 year old classic craftsman bungalow on Seattle’s Queen Anne Hill. During our initial conversation, it became readily apparent that their program was much larger than a remodel could accomplish and the conversation quickly turned toward the design of a new structure that could accommodate a growing family, a live-in Nanny, a variety of entertainment options and an enclosed garage – all squeezed onto a compact urban corner lot.
Project entitlement took almost a year as the house size dictated that we take advantage of several exceptions in Seattle’s complex zoning code. After several meetings with city planning officials, we finally prevailed in our arguments and ultimately designed a 4 story, 3800 sf house on a 2700 sf lot. The finished product is light and airy with a large, open plan and exposed beams on the main level, 5 bedrooms, 4 full bathrooms, 2 powder rooms, 2 fireplaces, 4 climate zones, a huge basement with a home theatre, guest suite, climbing gym, and an underground tavern/wine cellar/man cave. The kitchen has a large island, a walk-in pantry, a small breakfast area and access to a large deck. All of this program is capped by a rooftop deck with expansive views of Seattle’s urban landscape and Lake Union.
Unfortunately for our clients, a job relocation to Southern California forced a sale of their dream home a little more than a year after they settled in after a year project. The good news is that in Seattle’s tight housing market, in less than a week they received several full price offers with escalator clauses which allowed them to turn a nice profit on the deal.
 Kathleen Jennison
An Arts & Crafts Bungalow is one of my favorite styles of homes. We have quite a few of them in our Stockton Mid-Town area. And when C&L called us to help them remodel their 1923 American Bungalow, I was beyond thrilled.
As per usual, when we get a new inquiry, we quickly Google the project location while we are talking to you on the phone. My excitement escalated when I saw the Google Earth Image of the sweet Sage Green bungalow in Mid-Town Stockton. "Yes, we would be interested in working with you," I said trying to keep my cool.
But what made it even better was meeting C&L and touring their home, because they are the nicest young couple, eager to make their home period perfect. Unfortunately, it had been slightly molested by some bad house-flippers, and we needed to bring the bathroom back to it "roots."
We knew we had to banish the hideous brown tile and cheap vanity quickly. But C&L complained about the condensation problems and the constant fight with mold. This immediately told me that improper remodeling had occurred and we needed to remedy that right away.
The Before: Frustrations with a Botched Remodel
The bathroom needed to be brought back to period appropriate design with all the functionality of a modern bathroom. We thought of things like marble countertop, white mosaic floor tiles, white subway tile, board and batten molding, and of course a fabulous wallpaper.
This small (and only) bathroom on a tight budget required a little bit of design sleuthing to figure out how we could get the proper look and feel. Our goal was to determine where to splurge and where to economize and how to complete the remodel as quickly as possible because C&L would have to move out while construction was going on.
The Process: Hard Work to Remedy Design and Function
During our initial design study, (which included 2 hours in the owners’ home), we noticed framed images of William Morris Arts and Crafts textile patterns and knew this would be our design inspiration. We presented C&L with three options and they quickly selected the Pimpernel Design Concept.
We had originally selected the Black and Olive colors with a black vanity, mirror, and black and white floor tile. C&L liked it but weren’t quite sure about the black, We went back to the drawing board and decided the William & Co Pimpernel Wallpaper in Bayleaf and Manilla color with a softer gray painted vanity and mirror and white floor tile was more to their liking.
After the Design Concept was approved, we went to work securing the building permit, procuring all the elements, and scheduling our trusted tradesmen to perform the work.
We did uncover some shoddy work by the flippers such as live electrical wires hidden behind the wall, plumbing venting cut-off and buried in the walls (hence the constant dampness), the tub barely balancing on two fence boards across the floor joist, and no insulation on the exterior wall.
All of the previous blunders were fixed and the bathroom put back to its previous glory. We could feel the house thanking us for making it pretty again.
The After Reveal: Cohesive Design Decisions
We selected a simple white subway tile for the tub/shower. This is always classic and in keeping with the style of the house.
We selected a pre-fab vanity and mirror, but they look rich with the quartz countertop. There is much more storage in this small vanity than you would think.
The Transformation: A Period Perfect Refresh
We began the remodel just as the pandemic reared and stay-in-place orders went into effect. As C&L were already moved out and living with relatives, we got the go-ahead from city officials to get the work done (after all, how can you shelter in place without a bathroom?).
All our tradesmen were scheduled to work so that only one crew was on the job site at a time. We stayed on the original schedule with only a one week delay.
The end result is the sweetest little bathroom I've ever seen (and I can't wait to start work on C&L's kitchen next).
Thank you for joining me in this project transformation. I hope this inspired you to think about being creative with your design projects, determining what works best in keeping with the architecture of your space, and carefully assessing how you can have the best life in your home.

 Lee Kimball
Entertaining and relaxing in style
After helping our client on various projects throughout their home, they wanted to reconfigure their living room to serve as an area for family time and entertaining. By creating a space within a space we allowed function to meet fun! A space for their family to gather for movies and Sunday games to entertaining with ease for special occasions. Their newly designed living room includes a full working bar with a beer tap and refrigerated draws. The bar area was built in to a bay window leaving the transom windows to allow additional light from the outside in. Other unique and favorite features are the custom made curved cabinets, the LED lit Iridescent glass minbrick mosaic tile behind the TV and glass shelves, the 2 ½ inch thick Danby Montclair Marble and a mirror that turns into a TV.
GC: Lee Kimball - Designers: Lee Kimball- Photo Credit: Darren Pellegrino

 KINGDOM WOODWORKS
Collaboration with Canonbury Homes and Frank Neely Design Associates.
Inspiration for a timeless open concept kitchen remodel in Atlanta with beaded inset cabinets and two islands
Inspiration for a timeless open concept kitchen remodel in Atlanta with beaded inset cabinets and two islands

 RENESA ARCHITECTURE DESIGN INTERIORS
The PentHaus, Gurgaon.
(High-End Luxury Interiors- Residential Category)
2013-14
Built Up Area-
12,000 sq feet approx
Design Team:
RENESA ARCHITECTURE DESIGN INTERIORS,New Delhi
• Sanjay Arora - Founder| Principal Architect
• Sanchit Arora - Studio Head Architect
• Vandana Arora - Interior Designer| Decor Head
• Virender Singh- Studio Technical Head| Architectural Assistant
Photographer-
• Vibhor Yadav - RENESA's Official Photographer.
Social Media Connect:-
RENESA ARCHITECTURE DESIGN INTERIORS STUDIO, New Delhi
www.renesa.in
Contact: +91-9953542461
Tel : 011 455 11 211
Tel : 011 457 00 411
Email: renesa91@gmail.com | sanchit.renesa@gmail.com
Facebook: https://www.facebook.com/renesa.architecture
Instagram: https://www.instagram.com/renesa.architects/
Consultants | Contractors:
• Site Contractor - Mr. Umesh Mehta (Star Construction)
• Mechanical Consultants - TN Engg & Consultants.
• Electrial Consultants - Electro Consultants
"The PentHaus,Gurgaon" - Design Profile.
The Conceptual Design Development-
RENESA ARCHITECTURE DESIGN INTERIORS have recently completed an interiors project for a penthouse(The PentHaus) in Gurgaon.
The basic design requirement as per the client was to divide the floor plates in the penthouse on the basis of public and private relationship.(With the public interaction and services on the lower level with the private interface on the upper level).
The design philosophy as dictated and understood was on the lines of contrast in colors with the play of art and decorative pieces highlighting the depth in the detailing of the accessorization of the whole scale model.
The client's interest in art and design pieces worked in favor for RENESA DESIGN STUDIO as it was a value-addition to the whole interior decor design process.
Credits need to be given to the client for the right selection of art pieces in terms of the color pallet blending into the design philosophy set by RENESA STUDIO.
A mix of contemporary modern with classical essence here and there provides a smooth transition of amalgamation of different design philosophies in a given space model.
The play of solid volumes with double height spaces gives the apartment a very expansive and grand look at the entrance.
Thus a line of communication is created between the public and private zones via the massive chandelier mass structure in the middle of the entrance foyer.
RENESA ARCHITECTURE STUDIO carefully studied and analyzed the given area and the clients requirement for the look and feel for the space (internal decor) and planned the space accordingly. The positioning and placement of art pieces, furniture and furnishings once decided by RENESA was left to the client to decide and they did proper justification to the space with some amazing decor choice to value add to the existing space design by the architects. It is also great to have clients with good design taste as it is always a value addition to the architect's vision.
Each and every space has been demarcated with its own essence of design so that they stand out and give a new experience to the visitor while passing through.
Also, the toilets have been carefully crafted according to the ambience of the space. Different specialized Italian stones for each different toilets gives a new experience for the viewers.
Perhaps the contrasting color pallets of the activity zones change so massively that the eye catching experiential pathway is induced at the lower level of the apartment.
The kitchen area has been expansively designed to give a very airy feeling to the household activities. Huge windows with amazing views provide a perfect setup for a good-to-cook ambiance at any time of the day.
The deck area for the Penthouse has been carefully crafted in terms of keeping the pallet on the green side with a tinge of hardscaping with the lit backdrop of the penthouse adding character to this external space.
Hence, all in all the character of a bling-y yet subtle design space is created at this apartment with more importance given to the transparency of the space transitions with the careful play of the color shade card in the backdrop.
 Best Possible Removal Service In London
What You Should Know About Fuel Tanks
Home heating solutions can encompass electrical, gas, solar and oil based systems. When one talks about oil tanks that are used as home heating systems, there are a few important things to keep in mind.
Start with the installer
A high-quality, professional and expert installer of oil or fuel tanks can certainly help you make the decision on which type of tank is the best for your property. When you decide on underground fuel tanks, you should make sure that they are:
• Compliant with all statutory requirements.
• Made of steel and polyurethane.
• Covered by guarantee.
• Supported by backfill material, leak detection systems and tank supports.
Aboveground fuel tanks are easier to maintain simply because they are more accessible. Even the smallest of oil or fuel leaks can be detected almost immediately. But even here, an installer should give you premium quality tanks. These tanks:
• Should have secondary containment.
• Should be corrosion resistant.
• Should have proper support as well.
Installation
Installation for both – underground and above ground tanks is a technical and complex process. The installation process for both will start with a technician visiting your home and making an assessment of aspects such as:
• Measuring the space.
• Taking stock of the distance from your home to the tank, pipes and so on.
• The supports needed for the tank and so on.
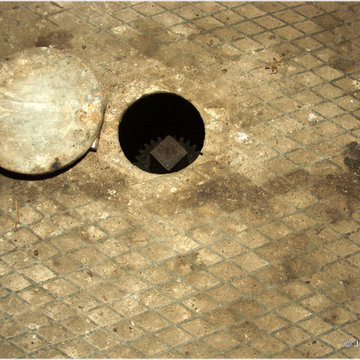
If it is an above ground tank, then it may also need bollards to protect it from vehicles. An underground tank will need containment sumps and drop tubes and so on.
The combination of components will be decided by the installer and you can certainly ask for a complete breakup of the same and get the costs for the same as well.
Remediation
Repair and remediation of above and underground tanks is a critical task. In fact, many problems associated with underground fuel storage tanks can be eliminated if the home owner invests time and resources into periodic analysis and examination of the same.
A fuel tank that has been installed above the ground will be easier to access but repair and remediation of both types of tanks will entail:
• Soil sampling.
• Extent of oil contamination.
• Assessment of leaks and the extent and number of the same.
• Drawing up a plan for dealing with all problem areas.
Removal
Every fuel tank has a shelf life. At some point of time or the other, the fuel tank will need to be removed. When it comes to above ground installations, the removal company will need to assess the type of fuel and the knowhow on emptying the tank completely.
The tank will also need to be cleaned completely before being loaded on to a vehicle that can take it away to a recycling unit or disposal unit. Underground tanks can be removed or closed or treated as abandoned depending on the condition of the tank and official licenses. For instance, a tank can be treated as closure in place if the removal of the same is going to compromise the safety of structures above the ground.
 Fresh Coat Painters of Monrovia
Want an HGTV Styled Room? Get an Accent Wall
If you’re moving into a new apartment/home or you’re finally getting to that laundry list of renovations;
here’s one statement piece that will set your place apart from the rest: an accent wall. An accent wall is
simply a wall that features a color that's different from the rest of the walls. It could be a green wall
along the sea of beige walls or a peach wall amongst a palette of white walls. It serves as an eye-opener
for guests entering the room, delivering an upbeat, fresh tone in your house.
Still need more convincing on why you need an accent wall? Here's a list of how accent walls are an
absolute game-changer for your place:
It gives your room personality. This rule is pretty straightforward. Add a bright or even neutral color to
just one wall, and it will make any room pop. The key is to select colors that play up a specific area in
your home. If you have a girl nursery room, you can paint one wall cotton candy pink to highlight the
plush toys and brightly colored crib. To make your office space look more "official," emphasize your
creative zone with a black, front-facing accent wall that shows off your flashy accessories and computers
while giving you the perfect color to concentrate in.
It modernizes your place without serious renovations. Since most homes typically have similarly
painted walls and tones, and accent wall gives off a modern, almost futuristic vibe. Accent walls
naturally draw in our eyes, and its color distinction causes objects in the room to take a unique form.
Instead of budgeting funds for new furniture, hone in a cool bohemian look with a cinnamon brown
accent wall. To play up the bohemian vibes, you can add wooden accessories like tables, picture frames,
vases, or compliment the brown with some colorful green houseplants!
Accent walls also work as an accessory. Living in a minimalist space? No problem! An accent wall with a
bright, unique hue will doll up your area without you having to add more objects. A burnt orange accent
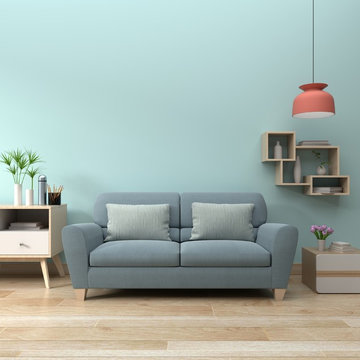
wall is the perfect look for a living room space accompanied by a tall plant, rug, sofa, and coffee table.
The burnt orange opens up the room, drawing all eyes to the playful contrast of the plant’s green
against the orange while balancing the place out with a neutral rug and a wooden coffee table to play up
earthy tones. People will think you spent all day decorating your room when in reality you only painted
one wall.
You can manipulate your room to look bigger or smaller. Accent walls have a science behind them
depending on what color palette you select. If you’re rooming in a small space, to make it look bigger
use bright colors like lemon yellow or French roses pink to make your room more reflective, maximizing
all the natural light coming in. This will leave your room feeling open and breezy. On the contrast, if you
are stuck with too much space, or want to minimize a corner as a small reading nook, use dark colors
like seaweed green to absorb light and tighten up the space.
Hopefully, this list was able to get you excited to kick-off your new (or next set) of accent walls. Feel free
to marathon HGTV while you paint or wait for the painters to arrive. Stay tuned for future pieces on how
to accentuate and best practices for painting!
 Tile Doctor Ltd
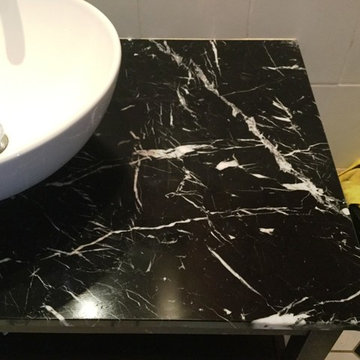
Marble is known for its premium quality, toughness and aesthetic, making it a very popular choice for bathroom countertops, such as this one at a house in Northampton. However just because it’s tough doesn’t mean that Marble can be cleaned with the usual household cleaners. Like all natural stone, Marble is acid sensitive and unsuitable products can have a very damaging effect on its appearance.
In this situation, the property owner had used a limescale remover to remove some unsightly marks from the countertop. Unfortunately, the product was acid-based and instead of making an improvement it just made it worse and caused severe etching.
The first photo above shows the limescale marks from where toiletries have been placed on the side whilst wet. Since Northampton is a hard water area, the limescale deposits over time caused these marks to appear.
The only way to effectively remove the Limestone deposits – while at the same time rectifying the damaged caused by the botched cleaning attempt – was to use a system of hand-held diamond encrusted pads and hand help blocks of various grits to cut back the stone and re-polish it, a process we call burnishing.
Before officially beginning the burnishing process, I ran a few tests to determine the type of pad I would need to use to achieve the best results. I found that, in most areas, I would need to use the Tile Doctor 400 Grit (Coarse) pad to resurface the tile and remove the damaged layer of stone, but in some areas where the etching was worse, I would need to use the 200 Grit (Very Coarse) pad.
After burnishing the affected areas with the Coarse and Very Coarse grit pads, I started to incrementally polish the stone to achieve a high-quality shine, working my up through the Medium, Fine and Very grit pads.
No chemicals were used during this process – only water for lubrication, combined with the six-inch diamond encrusted burnishing pads fitted to a hand-held buffing machine.
The final part of the restoration was to seal the stone to maintain a long-lasting, deep polished appearance. To do this, I used Tile Doctor Shine Powder, which is a crystallising sealer in powder form. The powder is applied directly and combined with water, before being worked into the stone to seal it.
The customer was very happy with the results and the level of shine achieved. I gave the customer a complimentary bottle of Tile Doctor Stone Soap, which is our aftercare cleaner for polished natural stone, along with instructions on periodic maintenance to help maintain the finish we had achieved for as long as possible.
Phil Vissian
Northamptonshire Tile Doctor

 CairnsCraft Design & Remodel
Great spacious bathroom with lot of amenities.
Photographer: Jon Upson
Large elegant master beige tile and porcelain tile drop-in bathtub photo in San Diego with an undermount sink, raised-panel cabinets, medium tone wood cabinets, granite countertops, beige walls and a two-piece toilet
Large elegant master beige tile and porcelain tile drop-in bathtub photo in San Diego with an undermount sink, raised-panel cabinets, medium tone wood cabinets, granite countertops, beige walls and a two-piece toilet
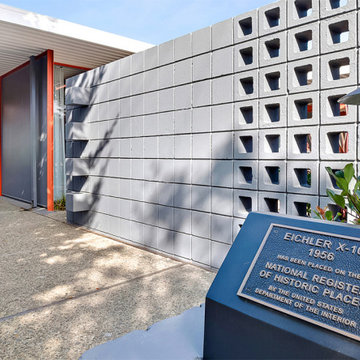
 Boyenga Team / Compass
Eichler X-100: A Nationally Recognized Architectural Landmark
The Eichler X-100 holds a rare distinction in residential real estate—it is listed on the National Register of Historic Places, recognizing it as a property of exceptional architectural and cultural significance in the United States.
This designation places the X-100 among a select group of homes that have not only endured over time, but have helped define the evolution of modern living.
What the National Register Means
The National Register of Historic Places is the official list of the nation’s most important historic resources—properties that embody significant contributions to architecture, history, and culture.
For the Eichler X-100, this recognition affirms:
Its role as a groundbreaking experimental prototype
Its importance within the broader movement of California Modernism
Its association with visionary figures like Joseph Eichler, A. Quincy Jones, and Frederick Emmons
It is not simply a well-designed home—it is a documented piece of architectural history.
A Rare Level of Integrity
One of the key factors in the X-100’s designation is its remarkable level of preservation. Over the decades, the home has been carefully maintained and thoughtfully updated to respect its original vision.
Important defining features remain intact, including:
The steel-frame structural system
The open, garden-centered floor plan
Skylights and natural light strategies
Signature material palette of steel, glass, and laminate
This continuity allows the home to be experienced today much as it was in 1956.
Preservation Without Limitation
A common misconception is that National Register status restricts ownership—but for private residences, this is not the case.
The designation:
Does not limit private ownership or resale
Does not impose federal restrictions on modifications (unless federal funding is involved)
May offer potential incentives or recognition for preservation efforts
Instead, it serves primarily as a recognition of significance, elevating the property’s status in both cultural and real estate contexts.
A Collector-Level Opportunity
For buyers, National Register status adds a layer of meaning that goes beyond square footage or location. It signals that the property is:
Architecturally important
Historically documented
Extremely rare within the marketplace
Homes like the Eichler X-100 are often viewed as “trophy properties”—assets that combine lifestyle, design, and long-term cultural value.
Stewardship of a Legacy
Owning a National Register home like the Eichler X-100 is not just about possession—it’s about participation in a larger story.
It means becoming part of a lineage of stewards who understand the importance of:
Preserving architectural intent
Respecting design integrity
Carrying forward a vision that helped shape modern living
The Significance Today
Nearly 70 years after its debut, the Eichler X-100 continues to stand as a symbol of innovation, optimism, and design excellence.
Its listing on the National Register of Historic Places ensures that its story is recognized—but its future will always depend on those who choose to own and care for it.
The Eichler X-100 is not just a home on a list.
It is a recognized landmark of modern architecture—now ready for its next chapter. Image Sabrina Huang
 Kathleen Jennison
An Arts & Crafts Bungalow is one of my favorite styles of homes. We have quite a few of them in our Stockton Mid-Town area. And when C&L called us to help them remodel their 1923 American Bungalow, I was beyond thrilled.
As per usual, when we get a new inquiry, we quickly Google the project location while we are talking to you on the phone. My excitement escalated when I saw the Google Earth Image of the sweet Sage Green bungalow in Mid-Town Stockton. "Yes, we would be interested in working with you," I said trying to keep my cool.
But what made it even better was meeting C&L and touring their home, because they are the nicest young couple, eager to make their home period perfect. Unfortunately, it had been slightly molested by some bad house-flippers, and we needed to bring the bathroom back to it "roots."
We knew we had to banish the hideous brown tile and cheap vanity quickly. But C&L complained about the condensation problems and the constant fight with mold. This immediately told me that improper remodeling had occurred and we needed to remedy that right away.
The Before: Frustrations with a Botched Remodel
The bathroom needed to be brought back to period appropriate design with all the functionality of a modern bathroom. We thought of things like marble countertop, white mosaic floor tiles, white subway tile, board and batten molding, and of course a fabulous wallpaper.
This small (and only) bathroom on a tight budget required a little bit of design sleuthing to figure out how we could get the proper look and feel. Our goal was to determine where to splurge and where to economize and how to complete the remodel as quickly as possible because C&L would have to move out while construction was going on.
The Process: Hard Work to Remedy Design and Function
During our initial design study, (which included 2 hours in the owners’ home), we noticed framed images of William Morris Arts and Crafts textile patterns and knew this would be our design inspiration. We presented C&L with three options and they quickly selected the Pimpernel Design Concept.
We had originally selected the Black and Olive colors with a black vanity, mirror, and black and white floor tile. C&L liked it but weren’t quite sure about the black, We went back to the drawing board and decided the William & Co Pimpernel Wallpaper in Bayleaf and Manilla color with a softer gray painted vanity and mirror and white floor tile was more to their liking.
After the Design Concept was approved, we went to work securing the building permit, procuring all the elements, and scheduling our trusted tradesmen to perform the work.
We did uncover some shoddy work by the flippers such as live electrical wires hidden behind the wall, plumbing venting cut-off and buried in the walls (hence the constant dampness), the tub barely balancing on two fence boards across the floor joist, and no insulation on the exterior wall.
All of the previous blunders were fixed and the bathroom put back to its previous glory. We could feel the house thanking us for making it pretty again.
The After Reveal: Cohesive Design Decisions
We selected a simple white subway tile for the tub/shower. This is always classic and in keeping with the style of the house.
We selected a pre-fab vanity and mirror, but they look rich with the quartz countertop. There is much more storage in this small vanity than you would think.
The Transformation: A Period Perfect Refresh
We began the remodel just as the pandemic reared and stay-in-place orders went into effect. As C&L were already moved out and living with relatives, we got the go-ahead from city officials to get the work done (after all, how can you shelter in place without a bathroom?).
All our tradesmen were scheduled to work so that only one crew was on the job site at a time. We stayed on the original schedule with only a one week delay.
The end result is the sweetest little bathroom I've ever seen (and I can't wait to start work on C&L's kitchen next).
Thank you for joining me in this project transformation. I hope this inspired you to think about being creative with your design projects, determining what works best in keeping with the architecture of your space, and carefully assessing how you can have the best life in your home.
 Kathleen Jennison
An Arts & Crafts Bungalow is one of my favorite styles of homes. We have quite a few of them in our Stockton Mid-Town area. And when C&L called us to help them remodel their 1923 American Bungalow, I was beyond thrilled.
As per usual, when we get a new inquiry, we quickly Google the project location while we are talking to you on the phone. My excitement escalated when I saw the Google Earth Image of the sweet Sage Green bungalow in Mid-Town Stockton. "Yes, we would be interested in working with you," I said trying to keep my cool.
But what made it even better was meeting C&L and touring their home, because they are the nicest young couple, eager to make their home period perfect. Unfortunately, it had been slightly molested by some bad house-flippers, and we needed to bring the bathroom back to it "roots."
We knew we had to banish the hideous brown tile and cheap vanity quickly. But C&L complained about the condensation problems and the constant fight with mold. This immediately told me that improper remodeling had occurred and we needed to remedy that right away.
The Before: Frustrations with a Botched Remodel
The bathroom needed to be brought back to period appropriate design with all the functionality of a modern bathroom. We thought of things like marble countertop, white mosaic floor tiles, white subway tile, board and batten molding, and of course a fabulous wallpaper.
This small (and only) bathroom on a tight budget required a little bit of design sleuthing to figure out how we could get the proper look and feel. Our goal was to determine where to splurge and where to economize and how to complete the remodel as quickly as possible because C&L would have to move out while construction was going on.
The Process: Hard Work to Remedy Design and Function
During our initial design study, (which included 2 hours in the owners’ home), we noticed framed images of William Morris Arts and Crafts textile patterns and knew this would be our design inspiration. We presented C&L with three options and they quickly selected the Pimpernel Design Concept.
We had originally selected the Black and Olive colors with a black vanity, mirror, and black and white floor tile. C&L liked it but weren’t quite sure about the black, We went back to the drawing board and decided the William & Co Pimpernel Wallpaper in Bayleaf and Manilla color with a softer gray painted vanity and mirror and white floor tile was more to their liking.
After the Design Concept was approved, we went to work securing the building permit, procuring all the elements, and scheduling our trusted tradesmen to perform the work.
We did uncover some shoddy work by the flippers such as live electrical wires hidden behind the wall, plumbing venting cut-off and buried in the walls (hence the constant dampness), the tub barely balancing on two fence boards across the floor joist, and no insulation on the exterior wall.
All of the previous blunders were fixed and the bathroom put back to its previous glory. We could feel the house thanking us for making it pretty again.
The After Reveal: Cohesive Design Decisions
We selected a simple white subway tile for the tub/shower. This is always classic and in keeping with the style of the house.
We selected a pre-fab vanity and mirror, but they look rich with the quartz countertop. There is much more storage in this small vanity than you would think.
The Transformation: A Period Perfect Refresh
We began the remodel just as the pandemic reared and stay-in-place orders went into effect. As C&L were already moved out and living with relatives, we got the go-ahead from city officials to get the work done (after all, how can you shelter in place without a bathroom?).
All our tradesmen were scheduled to work so that only one crew was on the job site at a time. We stayed on the original schedule with only a one week delay.
The end result is the sweetest little bathroom I've ever seen (and I can't wait to start work on C&L's kitchen next).
Thank you for joining me in this project transformation. I hope this inspired you to think about being creative with your design projects, determining what works best in keeping with the architecture of your space, and carefully assessing how you can have the best life in your home.
 Kathleen Jennison
An Arts & Crafts Bungalow is one of my favorite styles of homes. We have quite a few of them in our Stockton Mid-Town area. And when C&L called us to help them remodel their 1923 American Bungalow, I was beyond thrilled.
As per usual, when we get a new inquiry, we quickly Google the project location while we are talking to you on the phone. My excitement escalated when I saw the Google Earth Image of the sweet Sage Green bungalow in Mid-Town Stockton. "Yes, we would be interested in working with you," I said trying to keep my cool.
But what made it even better was meeting C&L and touring their home, because they are the nicest young couple, eager to make their home period perfect. Unfortunately, it had been slightly molested by some bad house-flippers, and we needed to bring the bathroom back to it "roots."
We knew we had to banish the hideous brown tile and cheap vanity quickly. But C&L complained about the condensation problems and the constant fight with mold. This immediately told me that improper remodeling had occurred and we needed to remedy that right away.
The Before: Frustrations with a Botched Remodel
The bathroom needed to be brought back to period appropriate design with all the functionality of a modern bathroom. We thought of things like marble countertop, white mosaic floor tiles, white subway tile, board and batten molding, and of course a fabulous wallpaper.
This small (and only) bathroom on a tight budget required a little bit of design sleuthing to figure out how we could get the proper look and feel. Our goal was to determine where to splurge and where to economize and how to complete the remodel as quickly as possible because C&L would have to move out while construction was going on.
The Process: Hard Work to Remedy Design and Function
During our initial design study, (which included 2 hours in the owners’ home), we noticed framed images of William Morris Arts and Crafts textile patterns and knew this would be our design inspiration. We presented C&L with three options and they quickly selected the Pimpernel Design Concept.
We had originally selected the Black and Olive colors with a black vanity, mirror, and black and white floor tile. C&L liked it but weren’t quite sure about the black, We went back to the drawing board and decided the William & Co Pimpernel Wallpaper in Bayleaf and Manilla color with a softer gray painted vanity and mirror and white floor tile was more to their liking.
After the Design Concept was approved, we went to work securing the building permit, procuring all the elements, and scheduling our trusted tradesmen to perform the work.
We did uncover some shoddy work by the flippers such as live electrical wires hidden behind the wall, plumbing venting cut-off and buried in the walls (hence the constant dampness), the tub barely balancing on two fence boards across the floor joist, and no insulation on the exterior wall.
All of the previous blunders were fixed and the bathroom put back to its previous glory. We could feel the house thanking us for making it pretty again.
The After Reveal: Cohesive Design Decisions
We selected a simple white subway tile for the tub/shower. This is always classic and in keeping with the style of the house.
We selected a pre-fab vanity and mirror, but they look rich with the quartz countertop. There is much more storage in this small vanity than you would think.
The Transformation: A Period Perfect Refresh
We began the remodel just as the pandemic reared and stay-in-place orders went into effect. As C&L were already moved out and living with relatives, we got the go-ahead from city officials to get the work done (after all, how can you shelter in place without a bathroom?).
All our tradesmen were scheduled to work so that only one crew was on the job site at a time. We stayed on the original schedule with only a one week delay.
The end result is the sweetest little bathroom I've ever seen (and I can't wait to start work on C&L's kitchen next).
Thank you for joining me in this project transformation. I hope this inspired you to think about being creative with your design projects, determining what works best in keeping with the architecture of your space, and carefully assessing how you can have the best life in your home.
 Kathleen Jennison
An Arts & Crafts Bungalow is one of my favorite styles of homes. We have quite a few of them in our Stockton Mid-Town area. And when C&L called us to help them remodel their 1923 American Bungalow, I was beyond thrilled.
As per usual, when we get a new inquiry, we quickly Google the project location while we are talking to you on the phone. My excitement escalated when I saw the Google Earth Image of the sweet Sage Green bungalow in Mid-Town Stockton. "Yes, we would be interested in working with you," I said trying to keep my cool.
But what made it even better was meeting C&L and touring their home, because they are the nicest young couple, eager to make their home period perfect. Unfortunately, it had been slightly molested by some bad house-flippers, and we needed to bring the bathroom back to it "roots."
We knew we had to banish the hideous brown tile and cheap vanity quickly. But C&L complained about the condensation problems and the constant fight with mold. This immediately told me that improper remodeling had occurred and we needed to remedy that right away.
The Before: Frustrations with a Botched Remodel
The bathroom needed to be brought back to period appropriate design with all the functionality of a modern bathroom. We thought of things like marble countertop, white mosaic floor tiles, white subway tile, board and batten molding, and of course a fabulous wallpaper.
This small (and only) bathroom on a tight budget required a little bit of design sleuthing to figure out how we could get the proper look and feel. Our goal was to determine where to splurge and where to economize and how to complete the remodel as quickly as possible because C&L would have to move out while construction was going on.
The Process: Hard Work to Remedy Design and Function
During our initial design study, (which included 2 hours in the owners’ home), we noticed framed images of William Morris Arts and Crafts textile patterns and knew this would be our design inspiration. We presented C&L with three options and they quickly selected the Pimpernel Design Concept.
We had originally selected the Black and Olive colors with a black vanity, mirror, and black and white floor tile. C&L liked it but weren’t quite sure about the black, We went back to the drawing board and decided the William & Co Pimpernel Wallpaper in Bayleaf and Manilla color with a softer gray painted vanity and mirror and white floor tile was more to their liking.
After the Design Concept was approved, we went to work securing the building permit, procuring all the elements, and scheduling our trusted tradesmen to perform the work.
We did uncover some shoddy work by the flippers such as live electrical wires hidden behind the wall, plumbing venting cut-off and buried in the walls (hence the constant dampness), the tub barely balancing on two fence boards across the floor joist, and no insulation on the exterior wall.
All of the previous blunders were fixed and the bathroom put back to its previous glory. We could feel the house thanking us for making it pretty again.
The After Reveal: Cohesive Design Decisions
We selected a simple white subway tile for the tub/shower. This is always classic and in keeping with the style of the house.
We selected a pre-fab vanity and mirror, but they look rich with the quartz countertop. There is much more storage in this small vanity than you would think.
The Transformation: A Period Perfect Refresh
We began the remodel just as the pandemic reared and stay-in-place orders went into effect. As C&L were already moved out and living with relatives, we got the go-ahead from city officials to get the work done (after all, how can you shelter in place without a bathroom?).
All our tradesmen were scheduled to work so that only one crew was on the job site at a time. We stayed on the original schedule with only a one week delay.
The end result is the sweetest little bathroom I've ever seen (and I can't wait to start work on C&L's kitchen next).
Thank you for joining me in this project transformation. I hope this inspired you to think about being creative with your design projects, determining what works best in keeping with the architecture of your space, and carefully assessing how you can have the best life in your home.

 GaliDerm Aesthetics
Enhance Your Natural Beauty with Confidence
Welcome to GaliDerm Aesthetics, your trusted med spa near Royal Palm Beach, FL. Conveniently located at 9100 Belvedere Rd, Suite 105, Royal Palm Beach, FL 33411, our clinic specializes in advanced aesthetic treatments designed to rejuvenate your skin, sculpt your features, and help you feel your absolute best.
? Call us today: (561) 336-0994
? Visit us online: www.galiderm.com
? Our Signature Treatments
? Botox Injections & Dermal Fillers
Smooth away fine lines and wrinkles with expertly administered Botox injections. Searching for Botox near me? Our team delivers natural-looking results that refresh your appearance.
We also offer dermal fillers and lip augmentation in West Palm Beach, perfect for restoring lost volume and enhancing facial contours.
Botox West Palm Beach
Dermal Fillers West Palm Beach
Lip Augmentation & Lip Fillers
Lip Injections Near Me
? Lip Enhancement Services
Achieve fuller, more defined lips with lip fillers and lip injections designed to enhance your natural beauty. Whether subtle or bold, our personalized approach ensures your results match your aesthetic goals.
✨ Skin Rejuvenation Treatments
Restore youthful, radiant skin with advanced rejuvenation techniques, including:
Microneedling Near Me
Morpheus8 West Palm Beach
Laser Hair Removal West Palm Beach
Palm Beach Laser Treatments
? Attiva RF Skin Tightening
Looking for Attiva RF near me? GaliDerm Aesthetics offers Attiva skin tightening—a groundbreaking treatment that lifts and firms the skin with minimal downtime, leaving you with a refreshed, youthful look.
⚖️ Palm Beach Weight Loss Solutions
Discover customized Palm Beach weight loss programs designed to help you shed pounds safely and effectively while supporting overall wellness.
? Why Choose GaliDerm Aesthetics?
✔ Board-certified providers specializing in aesthetics
✔ Safe, advanced treatments backed by science
✔ Personalized care tailored to your unique goals
✔ Convenient location in Royal Palm Beach, FL
We combine artistry with expertise to deliver results that highlight your natural beauty while maintaining a subtle, refreshed look.
? Business Information
Address:
9100 Belvedere Rd, Suite 105, Royal Palm Beach, FL 33411
Phone Number:
(561) 336-0994
Business Hours:
Tuesday – Friday: 9 AM – 6 PM
Saturday – Monday: Closed
Official Google Business Profile:
View on Google Maps
✨ Book Your Appointment Today
Whether you’re searching for Botox in West Palm Beach, lip fillers near me, or advanced skin rejuvenation treatments, GaliDerm Aesthetics is here to deliver transformative results.
? Call us today at (561) 336-0994 or schedule your consultation online at www.galiderm.com
.
✨ Your beauty, redefined—at GaliDerm Aesthetics.

 Housing & Building Association of Colorado Springs
The Home
The Sequoia is making its official debut! This beautiful two-story, main level master suite home offers luxurious and energy efficient living that appeals to all. The open floor plan is a perfect fit for those who love to entertain, enjoy having family and friends visit or stay, or are seeking multi-generational living.
This home exudes grandeur and elegance with its high ceilings, entry overlook, and two-story great room. The foyer beckons you to an expansive great room with an abundance of windows to view those beautiful Colorado sunsets. Adjoining is a spacious dining area and beautiful chef’s kitchen featuring designer cabinetry, wall ovens and gas range that are perfect for lovers of culinary – offering plenty of space to prepare all things food! Elegant arches, crisp colors in fixtures and finishes, granite and quartz, stunning wood floors and sophisticated design pull this masterpiece together. The finished basement welcomes many activities such as kids’ homework and play-time, family movie nights, watch parties for The Big Game and so much more! The Sequoia offers the ability to have two master suites for added space. The main-level location offers you a sanctuary of peace while adjoining to a luxurious bathroom area that includes two walk-in closets. The upper-level master retreat offers a spacious sitting area and five-piece bath, giving you that spa-like experience from your own home. The vibrant and unique architecture of this multigenerational home is composed of elegant touches and craftsmanship from the inside and out! With views of Pikes Peak, tree-lined sidewalks, and one of the best locations in eastern Colorado Springs, the premier neighborhood of Stonebridge at Meridian Ranch is the perfect frosting for this home. Don’t forget that all of our homes are HERS rated!
Our Meridian Ranch homesites located in Stonebridge have convenient access to the newest neighborhood parks and amenities. Running and walking trails, access to the private lodge, and plentiful open spaces make Stonebridge a premier community in the region! Covington Homes at Stonebridge in Meridian Ranch is a smart choice for anyone seeking to live the ‘Good Life.’
The Builder
Doing the right things, the right way - that is who we are. Creating a better way of living – that is what we do. Covington Homes is a local and family owned business committed to creating community. The Covington team continues to bring beautiful and exceptionally well-built homes and communities to eastern Colorado Springs and El Paso County with the hard work and dedication of our awardwinning team. As a result, our homes stand the test of time. At Covington Homes, we are focused on creating community. We are known as the builder with the highest level of customer care that can be found. Our homes are well thought out, fully planned and exceptionally executed. Covington Homes is currently building in District 20 at Wolf Ranch, in District 49 at Banning Lewis Ranch, in Stonebridge at Meridian Ranch and our newest community in North Carefree, the Gardens.
The Interior Design
The Sequoia is simple and understated luxury, topped off with modern farmhouse appeal. Designed with form, function and livability in mind, this amazing layout appeals to all. In a world that is ever-changing and hectic (social media, technology and increased demands), this home is designed to calm and sooth the soul once you step inside. Designer Grace Covington (GC Luxury Homes) brings eclectic farmhouse and modern design elements together to create a refined yet relaxed environment. The use of current colors, textiles, finishes and products blended with decor that reminds one of their favorite family memories, bring personality and warmth to this home. Meridian Ranch is a beautiful setting with amazing views of the mountains and Pikes Peak, so particular care was taken to select finishes and decor reminiscent of a peaceful country life. Muted tones of greige with surprising pops of color, creative use of woods, sleek lighting and bath fixtures, modern tile-work and the sprinkling of cottage textures throughout- this home is gorgeous! Tranquil luxury in a beautiful and vibrant community - the Sequoia is the perfect home!
103